
实战:基于深度学习的道路损坏检测
点击上方“小白学视觉”,选择加"星标"或“置顶”
重磅干货,第一时间送达

1.简介
道路基础设施是一项重要的公共资产,因为它有助于经济发展和增长,同时带来重要的社会效益。路面检查主要基于人类的视觉观察和使用昂贵机器的定量分析。这些方法的最佳替代方案是智能探测器,它使用记录的图像或视频来检测损坏情况。除了道路INFR一个结构,道路破损检测器也将在自主驾驶汽车,以检测他们的方式有些坑洼或其他干扰,尽量避免他们有用。
2.数据集
本项目中使用的数据集是从这里收集的。该数据集包含不同国家的道路图像,它们是日本、印度、捷克。对于图像,标签的注释是在 xml 文件中,即标签是 PASCAL VOC 格式。由于数据集包含来自日本的大部分图像(在以前的版本中,它仅包含来自日本的图像),因此根据数据来源,根据日本道路指南确定了标签。
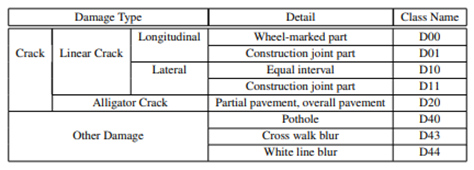
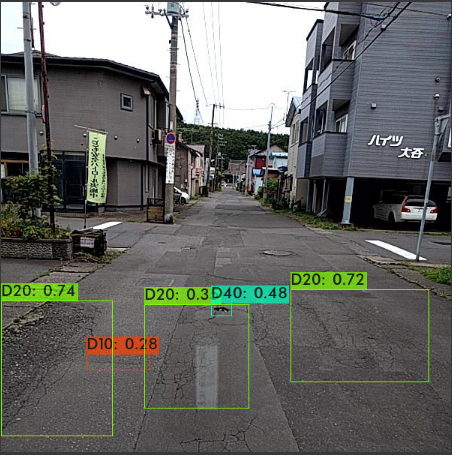
但是最新的数据集现在包含其他国家的图像,因此为了概括我们只考虑以下标签的损害。D00:垂直裂缝,D10:水平裂缝,D20:鳄鱼裂缝,D40:坑洼
3.基于深度学习得目标检测
CNN 或卷积神经网络是所有计算机视觉任务的基石。即使在物体检测的情况下,从图像中提取物体的模式到特征图(基本上是一个比图像尺寸小的矩阵)卷积操作也被使用。现在从过去几年开始,已经对对象检测任务进行了大量研究,我们得到了大量最先进的算法或方法,其中一些简而言之,我们在下面进行了解释。
4.EDA
数据集中的图像总数:26620
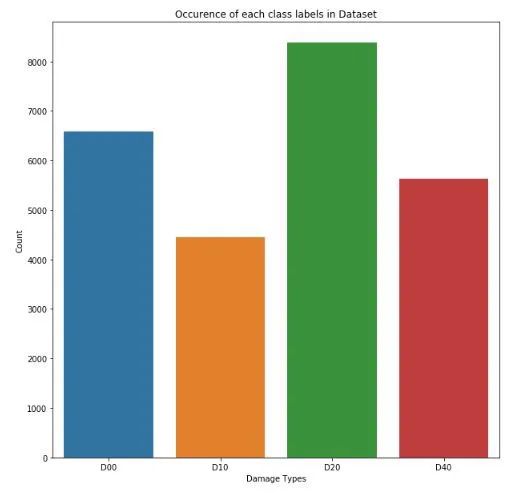
标签分布
每个班级的计数D00 : 6592D10 : 4446D20 : 8381: 5627
各国标签分布(全数据分析)
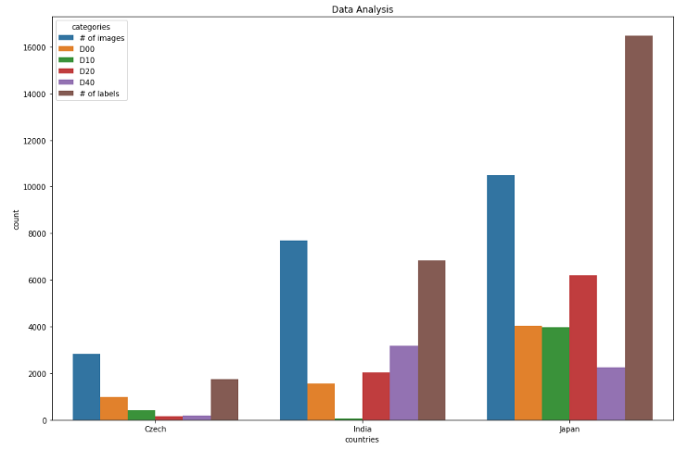
捷克数据分析0 图像数量 28291 D00 9882 D10 3993 D20 1614 D40 1975 标签数量 1745************************ **********************************************印度数据分析类别计数6 图像数量 77067 D00 15558 D10 689 D20 202110 D40 318711 标签数量 6831**************************** ******************************************日本数据分析12 图像数量 1050613 D00 404914 D10 397915 D20 619916 D40 224317 标签数量 16470************************************ ************************************
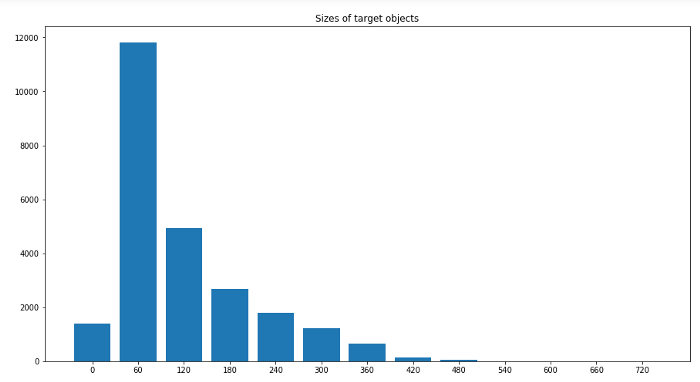
图像中标签大小的分布
标签最小尺寸:0x1 标签最大尺寸:704x492
5.关键技术
对象检测现在是一个庞大的主题,相当于一个学期的主题。它由许多算法组成。因此,为了使其简短,目标检测算法被分为各种类别,例如基于区域的算法(RCNN、Fast-RCNN、Faster-RCNN)、两级检测器、一级检测器,其中基于区域的算法本身是两级检测器的一部分,但我们将在下面简要地解释它们,因此我们明确地提到了它们。让我们从RCNN(基于区域的卷积神经网络)开始。
目标检测算法的基本架构由两部分组成。该部分由一个 CNN 组成,它将原始图像信息转换为特征图,在下一部分中,不同的算法有不同的技术。因此,在 RCNN 的情况下,它使用选择性搜索来获得 ROI(感兴趣区域),即在那个地方有可能有不同的对象。从每个图像中提取大约 2000 个区域。它使用这些 ROI 对标签进行分类并使用两种不同的模型预测对象位置。因此这些模型被称为两级检测器。
RCNN 有一些限制,为了克服这些限制,他们提出了 Fast RCNN。RCNN 具有很高的计算时间,因为每个区域都分别传递给 CNN,并且它使用三种不同的模型进行预测。因此,在 Fast RCNN 中,每个图像只传递一次到 CNN 并提取特征图。在这些地图上使用选择性搜索来生成预测。将 RCNN 中使用的所有三个模型组合在一起。
但是 Fast RCNN 仍然使用缓慢的选择性搜索,因此计算时间仍然很长。猜猜他们想出了另一个名字有意义的版本,即更快的 RCNN。Faster RCNN 用区域提议网络代替了选择性搜索方法,使算法更快。现在让我们转向一些一次性检测器。YOLO 和 SSD 是非常著名的物体检测模型,因为它们在速度和准确性之间提供了非常好的权衡
YOLO:单个神经网络在一次评估中直接从完整图像中预测边界框和类别概率。由于整个检测管道是一个单一的网络,因此可以直接在检测性能上进行端到端的优化
SSD(Single Shot Detector):SSD 方法将边界框的输出空间离散为一组不同纵横比的默认框。离散化后,该方法按特征图位置进行缩放。Single Shot Detector 网络结合了来自具有不同分辨率的多个特征图的预测,以自然地处理各种大小的对象。
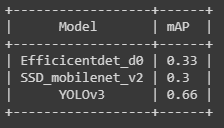
6.型号
作为深度学习的新手,或者准确地说是计算机视觉,为了学习基础知识,我们尝试了一些基本且快速的算法来实现如下数据集:
Efficientdet_d0SSD_mobilenet_v2YOLOv3
对于第一个和第二个模型,我们使用了tensorflow 模型 zoo并且为了训练 yolov3 引用了this。用于评估 mAP(平均平均精度),使用 Effectivedet_d0 和 ssd_mobilenet_v2 得到的 mAP 非常低,可能是因为没有更改学习率、优化器和数据增强的一些默认配置。
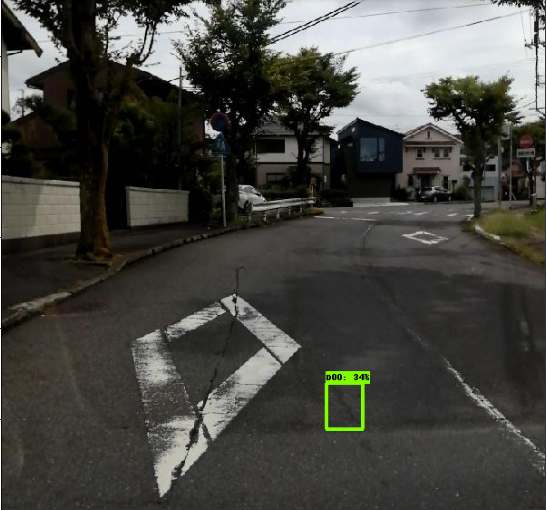
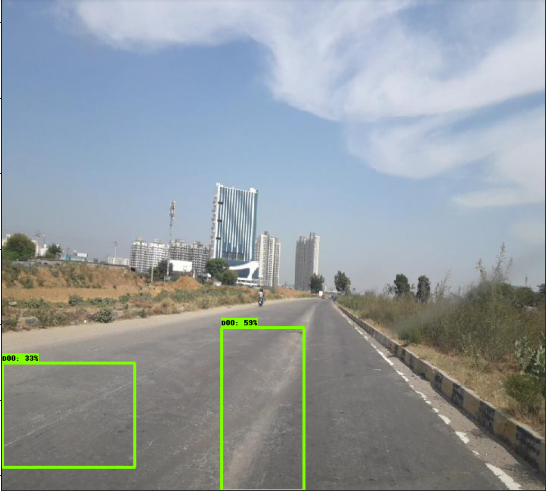
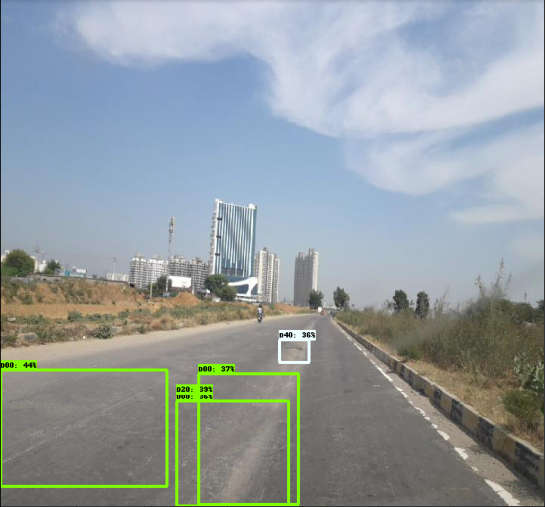
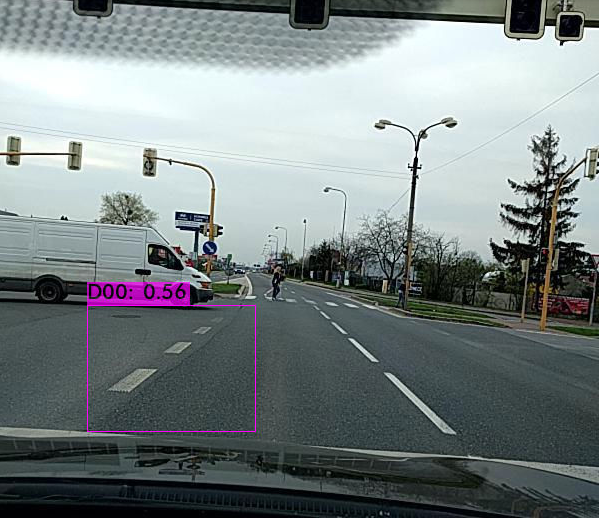
7.结果
使用 efficicentdet_d0 进行推导
import tensorflow as tffrom object_detection.utils import label_map_utilfrom object_detection.utils import config_utilfrom object_detection.utils import visualization_utils as viz_utilsfrom object_detection.builders import model_builder# Load pipeline config and build a detection modelconfigs = config_util.get_configs_from_pipeline_file('/content/efficientdet_d0_coco17_tpu-32/pipeline.config')model_config = configs['model']detection_model = model_builder.build(model_config=model_config, is_training=False)# Restore checkpointckpt = tf.compat.v2.train.Checkpoint(model=detection_model)ckpt.restore('/content/drive/MyDrive/efficientdet/checkpoints/ckpt-104').expect_partial()def detect_fn(image):"""Detect objects in image."""image, shapes = detection_model.preprocess(image)prediction_dict = detection_model.predict(image, shapes)detections = detection_model.postprocess(prediction_dict, shapes)return detectionscategory_index = label_map_util.create_category_index_from_labelmap('/content/data/label_map.pbtxt',use_display_name=True)for image_path in IMAGE_PATHS:print('Running inference for {}... '.format(image_path), end='')image_np = load_image_into_numpy_array(image_path)input_tensor = tf.convert_to_tensor(np.expand_dims(image_np, 0), dtype=tf.float32)detections = detect_fn(input_tensor)num_detections = int(detections.pop('num_detections'))detections = {key: value[0, :num_detections].numpy()for key, value in detections.items()}detections['num_detections'] = num_detections# detection_classes should be ints.detections['detection_classes'] = detections['detection_classes'].astype(np.int64)label_id_offset = 1image_np_with_detections = image_np.copy()viz_utils.visualize_boxes_and_labels_on_image_array(image_np_with_detections,detections['detection_boxes'],detections['detection_classes']+label_id_offset,detections['detection_scores'],category_index,use_normalized_coordinates=True,max_boxes_to_draw=200,min_score_thresh=.30,agnostic_mode=False)%matplotlib inlinefig = plt.figure(figsize = (10,10))plt.imshow(image_np_with_detections)print('Done')plt.show()
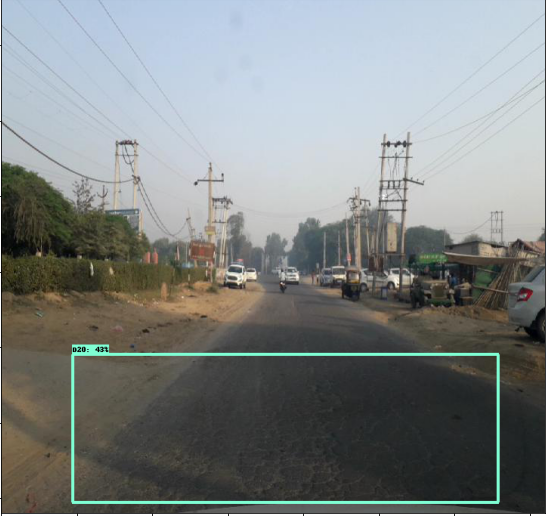
使用 SSD_mobilenet_v2 进行推导
(与efficientdet 相同的代码)
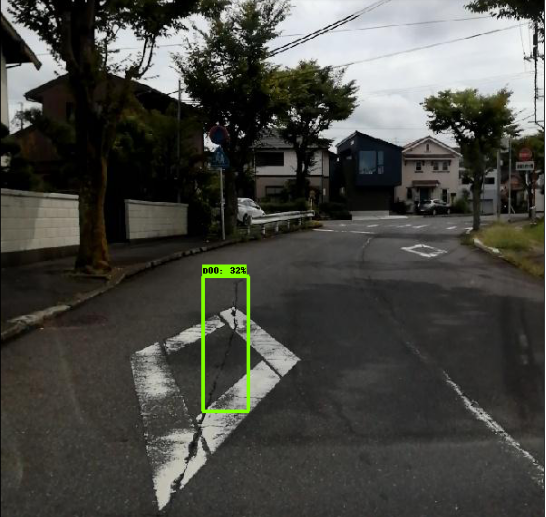
YOLOv3 的推导
def func(input_file):classes = ['D00', 'D10', 'D20', 'D40']alt_names = {'D00': 'lateral_crack', 'D10': 'linear_cracks', 'D20': 'aligator_crakcs', 'D40': 'potholes'}# initialize a list of colors to represent each possible class labelnp.random.seed(42)COLORS = np.random.randint(0, 255, size=(len(classes), 3),dtype="uint8")# derive the paths to the YOLO weights and model configurationweightsPath = "/content/drive/MyDrive/yolo/yolo-obj_final.weights"configPath = "/content/yolov3.cfg"# load our YOLO object detector trained on COCO dataset (80 classes)# and determine only the *output* layer names that we need from YOLO#print("[INFO] loading YOLO from disk...")net = cv2.dnn.readNetFromDarknet(configPath, weightsPath)ln = net.getLayerNames()ln = [ln[i[0] - 1] for i in net.getUnconnectedOutLayers()]# read the next frame from the fileframe = cv2.imread(input_file)W) = frame.shape[:2]# construct a blob from the input frame and then perform a forward# pass of the YOLO object detector, giving us our bounding boxes# and associated probabilitiesblob = cv2.dnn.blobFromImage(frame, 1 / 255.0, (416, 416),swapRB=True, crop=False)net.setInput(blob)start = time.time()layerOutputs = net.forward(ln)end = time.time()# initialize our lists of detected bounding boxes, confidences,# and class IDs, respectivelyboxes = []confidences = []classIDs = []# loop over each of the layer outputsfor output in layerOutputs:# loop over each of the detectionsfor detection in output:# extract the class ID and confidence (i.e., probability)# of the current object detectionscores = detection[5:]classID = np.argmax(scores)confidence = scores[classID]# filter out weak predictions by ensuring the detected# probability is greater than the minimum probabilityif confidence > 0.3:# scale the bounding box coordinates back relative to# the size of the image, keeping in mind that YOLO# actually returns the center (x, y)-coordinates of# the bounding box followed by the boxes' width and# heightbox = detection[0:4] * np.array([W, H, W, H])centerY, width, height) = box.astype("int")# use the center (x, y)-coordinates to derive the top# and and left corner of the bounding boxx = int(centerX - (width / 2))y = int(centerY - (height / 2))# update our list of bounding box coordinates,# confidences, and class IDsy, int(width), int(height)])confidences.append(float(confidence))classIDs.append(classID)# apply non-maxima suppression to suppress weak, overlapping# bounding boxesidxs = cv2.dnn.NMSBoxes(boxes, confidences, 0.3,0.25)# ensure at least one detection existsif len(idxs) > 0:# loop over the indexes we are keepingfor i in idxs.flatten():# extract the bounding box coordinatesy) = (boxes[i][0], boxes[i][1])h) = (boxes[i][2], boxes[i][3])# draw a bounding box rectangle and label on the framecolor = [int(c) for c in COLORS[classIDs[i]]](x, y), (x + w, y + h), color, 2)label = classes[classIDs[i]]text = "{}: {:.4f}".format(alt_names[label],confidences[i])text, (x, y - 5),0.5, color, 2)cv2_imshow(frame)

下载1:OpenCV-Contrib扩展模块中文版教程
在「小白学视觉」公众号后台回复:扩展模块中文教程,即可下载全网第一份OpenCV扩展模块教程中文版,涵盖扩展模块安装、SFM算法、立体视觉、目标跟踪、生物视觉、超分辨率处理等二十多章内容。
下载2:Python视觉实战项目52讲
在「小白学视觉」公众号后台回复:Python视觉实战项目,即可下载包括图像分割、口罩检测、车道线检测、车辆计数、添加眼线、车牌识别、字符识别、情绪检测、文本内容提取、面部识别等31个视觉实战项目,助力快速学校计算机视觉。
下载3:OpenCV实战项目20讲
在「小白学视觉」公众号后台回复:OpenCV实战项目20讲,即可下载含有20个基于OpenCV实现20个实战项目,实现OpenCV学习进阶。
交流群
欢迎加入公众号读者群一起和同行交流,目前有SLAM、三维视觉、传感器、自动驾驶、计算摄影、检测、分割、识别、医学影像、GAN、算法竞赛等微信群(以后会逐渐细分),请扫描下面微信号加群,备注:”昵称+学校/公司+研究方向“,例如:”张三 + 上海交大 + 视觉SLAM“。请按照格式备注,否则不予通过。添加成功后会根据研究方向邀请进入相关微信群。请勿在群内发送广告,否则会请出群,谢谢理解~