使用Keras和迁移学习从人脸图像中预测体重指数BMI
点击上方“小白学视觉”,选择加"星标"或“置顶”
重磅干货,第一时间送达
本文转自|AI公园
和人脸属性预测非常相似的一个应用。
这篇文章描述了一个神经网络,它可以通过人脸图像预测一个人的BMI([身体质量指数])。这个项目借鉴了另一个项目:https://github.com/yu4u/age-gender-estimation的方法,通过人脸来对一个人的年龄和性别进行分类,这个项目包括一个训练过的模型的权重和一个脚本,该脚本用摄像头动态检测用户的脸。这除了是一个有趣的机器学习问题外,以这种方式预测BMI可能是一个有用的医学诊断工具。
使用的训练数据是4000张图像,每张都是不同个体的图像,都是从受试者的正面拍摄的。每个训练样本的BMI由受试者的身高和体重计算(BMI是体重(kg)除以身高(米)的平方)。虽然训练图像不能在这里分享,因为它们被用于另一个私人项目,但这种类型的数据可以从网上的不同地方收集。
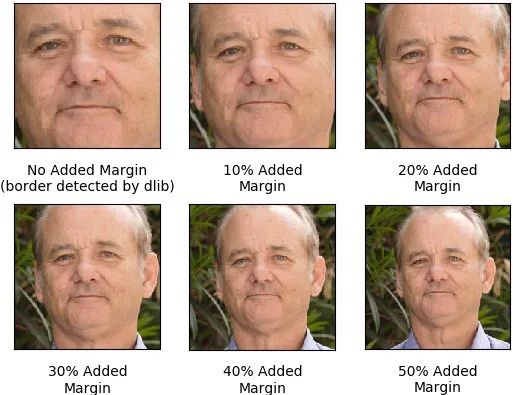
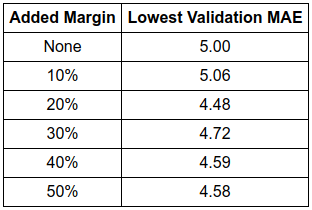
为了在训练前对图像进行归一化,将每张图像裁剪到受试者的面部,不包括面部周围的区域。使用Python库dlib检测每幅图像中的受试者的面部,并在dlib检测到的边界周围添加额外的边界,以生成用于实际训练图像。我们实验了几个边距,看看哪个能让网络表现得最好。我们选择了20%的边距,即图像的高度和宽度扩大40%(每边都是20%),因为它能产生最佳的验证性能。
下面显示了使用不同裁剪边缘添加到 Bill Murray 的图像中,还有一个表格,显示了添加了不同的边距在验证集上模型可以达到的最小的平均绝对误差(MAE)。


虽然在20%-50%的margin范围内的MAE值可能太过接近,不能说任何一个都比其他的好,但很明显,至少增加20%的margin 会比不增加margin 产生更好的MAE。这可能是因为增加的margin 捕获了前额上部、耳朵和颈部等特征,这些特征对模型预测BMI很有用,但大部分被原始的dlib裁剪掉了。
图像预处理代码:
import osimport cv2import dlibfrom matplotlib import pyplot as pltimport numpy as npimport configdetector = dlib.get_frontal_face_detector()def crop_faces():bad_crop_count = 0if not os.path.exists(config.CROPPED_IMGS_DIR):os.makedirs(config.CROPPED_IMGS_DIR)print 'Cropping faces and saving to %s' % config.CROPPED_IMGS_DIRgood_cropped_images = []good_cropped_img_file_names = []detected_cropped_images = []original_images_detected = []for file_name in sorted(os.listdir(config.ORIGINAL_IMGS_DIR)):np_img = cv2.imread(os.path.join(config.ORIGINAL_IMGS_DIR,file_name))detected = detector(np_img, 1)img_h, img_w, _ = np.shape(np_img)original_images_detected.append(np_img)if len(detected) != 1:bad_crop_count += 1continued = detected[0]x1, y1, x2, y2, w, h = d.left(), d.top(), d.right() + 1, d.bottom() + 1, d.width(), d.height()xw1 = int(x1 - config.MARGIN * w)yw1 = int(y1 - config.MARGIN * h)xw2 = int(x2 + config.MARGIN * w)yw2 = int(y2 + config.MARGIN * h)cropped_img = crop_image_to_dimensions(np_img, xw1, yw1, xw2, yw2)norm_file_path = '%s/%s' % (config.CROPPED_IMGS_DIR, file_name)cv2.imwrite(norm_file_path, cropped_img)good_cropped_img_file_names.append(file_name)# save info of good cropped imageswith open(config.ORIGINAL_IMGS_INFO_FILE, 'r') as f:column_headers = f.read().splitlines()[0]all_imgs_info = f.read().splitlines()[1:]cropped_imgs_info = [l for l in all_imgs_info if l.split(',')[-1] in good_cropped_img_file_names]with open(config.CROPPED_IMGS_INFO_FILE, 'w') as f:f.write('%s\n' % column_headers)for l in cropped_imgs_info:f.write('%s\n' % l)print 'Cropped %d images and saved in %s - info in %s' % (len(original_images_detected), config.CROPPED_IMGS_DIR, config.CROPPED_IMGS_INFO_FILE)print 'Error detecting face in %d images - info in Data/unnormalized.txt' % bad_crop_countreturn good_cropped_images# image cropping function taken from:# https://stackoverflow.com/questions/15589517/how-to-crop-an-image-in-opencv-using-pythondef crop_image_to_dimensions(img, x1, y1, x2, y2):if x1 < 0 or y1 < 0 or x2 > img.shape[1] or y2 > img.shape[0]:img, x1, x2, y1, y2 = pad_img_to_fit_bbox(img, x1, x2, y1, y2)return img[y1:y2, x1:x2, :]def pad_img_to_fit_bbox(img, x1, x2, y1, y2):img = cv2.copyMakeBorder(img, - min(0, y1), max(y2 - img.shape[0], 0),-min(0, x1), max(x2 - img.shape[1], 0), cv2.BORDER_REPLICATE)y2 += -min(0, y1)y1 += -min(0, y1)x2 += -min(0, x1)x1 += -min(0, x1)return img, x1, x2, y1, y2if __name__ == '__main__':crop_faces()
为了增加每个原始训练图像用于网络训练的次数,在每个训练epoch中对图像进行增强。图像增强库Augmentor用于动态旋转、翻转和扭曲图像不同部分的分辨率,并改变图像的对比度和亮度。


图像增强代码:
from keras.preprocessing.image import ImageDataGeneratorimport pandas as pdimport Augmentorfrom PIL import Imageimport randomimport numpy as npimport matplotlib.pyplot as pltimport mathimport configdef plot_imgs_from_generator(generator, number_imgs_to_show=9):print ('Plotting images...')n_rows_cols = int(math.ceil(math.sqrt(number_imgs_to_show)))plot_index = 1x_batch, _ = next(generator)while plot_index <= number_imgs_to_show:plt.subplot(n_rows_cols, n_rows_cols, plot_index)plt.imshow(x_batch[plot_index-1])plot_index += 1plt.show()def augment_image(np_img):p = Augmentor.Pipeline()p.rotate(probability=1, max_left_rotation=5, max_right_rotation=5)p.flip_left_right(probability=0.5)p.random_distortion(probability=0.25, grid_width=2, grid_height=2, magnitude=8)p.random_color(probability=1, min_factor=0.8, max_factor=1.2)p.random_contrast(probability=.5, min_factor=0.8, max_factor=1.2)p.random_brightness(probability=1, min_factor=0.5, max_factor=1.5)image = [Image.fromarray(np_img.astype('uint8'))]for operation in p.operations:r = round(random.uniform(0, 1), 1)if r <= operation.probability:image = operation.perform_operation(image)image = [np.array(i).astype('float64') for i in image]return image[0]image_processor = ImageDataGenerator(rescale=1./255,preprocessing_function=augment_image)# subtract validation size from training datawith open(config.CROPPED_IMGS_INFO_FILE) as f:for i, _ in enumerate(f):passtraining_n = i - config.VALIDATION_SIZEtrain_df=pd.read_csv(config.CROPPED_IMGS_INFO_FILE, nrows=training_n)train_generator=image_processor.flow_from_dataframe(dataframe=train_df,directory=config.CROPPED_IMGS_DIR,x_col='name',y_col='bmi',class_mode='other',color_mode='rgb',target_size=(config.RESNET50_DEFAULT_IMG_WIDTH,config.RESNET50_DEFAULT_IMG_WIDTH),batch_size=config.TRAIN_BATCH_SIZE)
其他网络架构在基于人脸的图像分类任务上也取得了令人印象深刻的结果,未来的工作可以探索其中的一些结构用于BMI 指数的预测。
实现模型架构代码:
from tensorflow.python.keras.models import Modelfrom tensorflow.python.keras.applications import ResNet50from tensorflow.python.keras.layers import Denseimport configdef get_age_model():# adapted from https://github.com/yu4u/age-gender-estimation/blob/master/age_estimation/model.pyage_model = ResNet50(include_top=False,weights='imagenet',input_shape=(config.RESNET50_DEFAULT_IMG_WIDTH, config.RESNET50_DEFAULT_IMG_WIDTH, 3),pooling='avg')prediction = Dense(units=101,kernel_initializer='he_normal',use_bias=False,activation='softmax',name='pred_age')(age_model.output)age_model = Model(inputs=age_model.input, outputs=prediction)age_model.load_weights(config.AGE_TRAINED_WEIGHTS_FILE)print 'Loaded weights from age classifier'return age_modeldef get_model():base_model = get_age_model()last_hidden_layer = base_model.get_layer(index=-2)base_model = Model(inputs=base_model.input,outputs=last_hidden_layer.output)prediction = Dense(1, kernel_initializer='normal')(base_model.output)model = Model(inputs=base_model.input, outputs=prediction)return model
迁移学习是为了利用年龄分类器网络中的权重,因为这些对于检测用于预测BMI的低级面部特征应该是有价值的。为年龄网络加一个新的线性回归输出层(输出一个代表BMI的数字),并使用MAE作为损失函数和Adam作为训练优化器进行训练。
首先对模型进行训练,使原始年龄分类器的每一层都被冻结,以允许新输出层的随机权值进行更新。第一次训练包含了10个epoch,因为在此之后,MAE没有明显的下降(使用early stop)。

在这个初始训练阶段之后,模型被训练了30个epoch,网络中的每一层都被解冻,以微调网络中的所有权重。Early stopping也决定了这里的epoch的数量,只有在观察到MAE没有减少的10个epoch后才停止训练(patience为10)。由于模型在epoch 20达到了最低的验证性MAE,训练在epoch 30停止。取模型在epoch 20的权重,并在下面的演示中使用。

平均绝对误差被选作为损失函数,和均方误差(MSE)或均方根误差(RMSE)不一样,BMI预测的误差的尺度是线性的(误差为10的惩罚应该是误差为5的惩罚的2倍)。
模型训练代码:
import cv2import numpy as npfrom tensorflow.python.keras.callbacks import EarlyStopping, ModelCheckpoint, TensorBoardfrom train_generator import train_generator, plot_imgs_from_generatorfrom mae_callback import MAECallbackimport configbatches_per_epoch=train_generator.n //train_generator.batch_sizedef train_top_layer(model):print 'Training top layer...'for l in model.layers[:-1]:l.trainable = Falsemodel.compile(loss='mean_absolute_error',optimizer='adam')mae_callback = MAECallback()early_stopping_callback = EarlyStopping(monitor='val_mae',mode='min',verbose=1,patience=1)model_checkpoint_callback = ModelCheckpoint('saved_models/top_layer_trained_weights.{epoch:02d}-{val_mae:.2f}.h5',monitor='val_mae',mode='min',verbose=1,save_best_only=True)tensorboard_callback = TensorBoard(log_dir=config.TOP_LAYER_LOG_DIR,batch_size=train_generator.batch_size)model.fit_generator(generator=train_generator,steps_per_epoch=batches_per_epoch,epochs=20,callbacks=[mae_callback,early_stopping_callback,model_checkpoint_callback,tensorboard_callback])def train_all_layers(model):print 'Training all layers...'for l in model.layers:l.trainable = Truemae_callback = MAECallback()early_stopping_callback = EarlyStopping(monitor='val_mae',mode='min',verbose=1,patience=10)model_checkpoint_callback = ModelCheckpoint('saved_models/all_layers_trained_weights.{epoch:02d}-{val_mae:.2f}.h5',monitor='val_mae',mode='min',verbose=1,save_best_only=True)tensorboard_callback = TensorBoard(log_dir=config.ALL_LAYERS_LOG_DIR,batch_size=train_generator.batch_size)model.compile(loss='mean_absolute_error',optimizer='adam')model.fit_generator(generator=train_generator,steps_per_epoch=batches_per_epoch,epochs=100,callbacks=[mae_callback,early_stopping_callback,model_checkpoint_callback,tensorboard_callback])
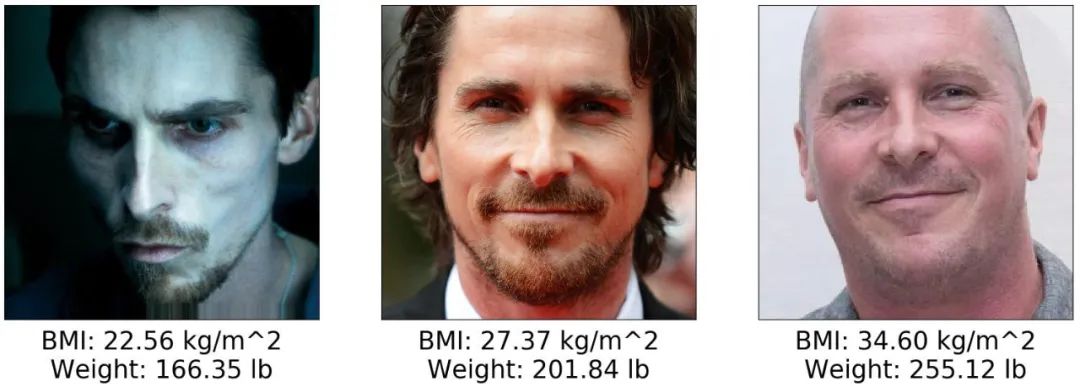
下面是模型通过Christian Bale的几张照片预测出的体重指数。之所以选择贝尔作为研究对象,是因为众所周知,他会在不同的角色中剧烈地改变自己的体重。知道了他的身高是6英尺0英寸,他的体重就可以从模型的BMI预测中得到。

左边的图片来自机械师,其中贝尔说他“大概135磅”。如果他的体重是135磅,那么他的BMI是18.3 kg/m (BMI的单位),而模型的预测相差约4 kg/m。中间的图片是我认为代表他的体重,当时他没有为一个角色彻底改变它。右边的图片是在拍摄Vice时拍摄的。在拍摄Vice的时候,我找不到他的体重数字,但我找到几个消息来源说他胖了45磅。如果我们假设他的平均体重是200磅,而在拍摄Vice时他体重是245磅,体重指数为33.2,那么模型对这张照片的体重指数预测将相差约1 kg/m²。
下面是我的BMI预测模型的记录。我的身体质量指数是23 kg/m²,当我直视相机时,模型偏差2~4 kg/m²,当我的头偏向一边或者朝下时,偏差高达8kg/m²。
该模型的验证MAE为4.48。给定一个人,5“9和195磅,美国男性的平均身高和体重,BMI 为27.35kg/m²,这4.48的错误将导致预测范围为22.87 kg/m² 到 31.83 kg/m²,对应163和227磅重量。显然,还有改进的余地,今后的工作将努力减少这种错误。
该模型的一个明显缺点是,当评估从不同角度而不是从被摄者的正面拍摄的图像时,性能很差。当我把头移到一边或往下时,模型的预测就变得不那么准确了。
这个模型的另一个可能的缺点可能有助于解释这个模型对 Christian Bale的第一张照片的不准确的预测,那就是当主体在黑暗的环境中被一个集中的光源照射时,表现不佳。强烈的光照造成的阴影改变了脸的两侧的曲率和皮肤的微妙的表现,造成了对BMI的影响。
也有可能这个模型只是简单地高估了总体BMI较低的受试者的BMI,这可以从它对我自己和克里斯蒂安·贝尔的第一张照片的评估中看出。
该模型的这些缺点可能可以用训练数据中奇怪的角度、集中的光线和较低的BMIs来解释。大多数训练图像是在良好的光照下,从受试者的前部拍摄的,并且是由BMI高于25 kg/m²的受试者拍摄的。因此,在这些不同的场景中,该模型可能无法充分了解面部特征与BMI的相关性。

好消息,小白学视觉团队的知识星球开通啦,为了感谢大家的支持与厚爱,团队决定将价值149元的知识星球现时免费加入。各位小伙伴们要抓住机会哦!

交流群
欢迎加入公众号读者群一起和同行交流,目前有SLAM、三维视觉、传感器、自动驾驶、计算摄影、检测、分割、识别、医学影像、GAN、算法竞赛等微信群(以后会逐渐细分),请扫描下面微信号加群,备注:”昵称+学校/公司+研究方向“,例如:”张三 + 上海交大 + 视觉SLAM“。请按照格式备注,否则不予通过。添加成功后会根据研究方向邀请进入相关微信群。请勿在群内发送广告,否则会请出群,谢谢理解~

