[深度文]YoloX部署、优化、训练相关
来自 叶润源
链接 https://www.yuque.com/yerunyuan/ar9831/tsm0id#Kfi4w
YOLOX的Anchor Free(Anchor Based针对数据集聚类分析得到Anchor Box的方式,怕对泛化会有影响,尤其前期缺乏现场数据时)以及更有效的Label Assignment(SimOTA),使我下决心将目前所用的FCOS+ATSS模型换成YOLOX模型。
这次改动将YOLOX添加到了Yolov5上,在Yolov5的框架下,训练150个epoch的yolox-s模型的mAP也达到了39.7(且未使用mixup数据增强和random resize)。
一、实验环境:
实验机器:
1台PC:CPU: AMD Ryzen 7 1700X Eight-Core Processor, 内存: 32G, 显卡: 2张GeForce GTX 1080 Ti 11G
1台PC:CPU: AMD Ryzen 5 2600 Six-Core Processor, 内存: 32G, 显卡: 2张GeForce GTX 1080 Ti 11G
目标部署硬件:
A311D开发板(带8位整型5TOPS算力的NPU)
软件版本:
Python版本为3.7.7,Pytorch版本为1.7.1,Cuda版本为10.1
官方YoloX版本:
https://github.com/Megvii-BaseDetection/YOLOX.git
Commits:29df1fb9bc456fcd5c35653312d7c22c9f66b9f8 (Aug 2, 2021)
官方Yolov5版本:
- https://github.com/ultralytics/yolov5.git
Commits: f409d8e54f9391ce21436d33334beff3a2fd4042 (Aug 4, 2021)
二、选择适合NPU的架构试验:
1、速度实验:
注:
a、模型在NPU上的速度实验,并不需要把模型完整地训练一遍,那样太耗时,只需要将模型导出(初始化后导出或者少量图片train一个epoch),再量化转换为NPU的模型即可。
b、另一方面,NPU对有些层不支持、层与层之间的搭配、或层的实现完整性差异(参见:【原创】A311D模型转换问题),会导致模型转换成NPU模型时失败,这样花大力气训练出来模型用不上,白白浪费时间,尤其对于小公司,训练机器资源有限,训练一个模型一两天时间就过去了,因为模型转换失败或者模型性能不达标,又要重来一遍,会推迟项目进度。
c、对于面向产品快速部署落地而言,在开始训练模型之前,需要先确保模型能成功转换成目标硬件上,以及能在目标硬件上达到所需的性能要求。
1)、YOLOX_S模型在NPU上640x640分辨率下纯推理速度(不包括前处理和后处理)每帧需要62.3ms;
2)、原来部署在NPU上的FCOS ATSS模型在同等分辨率下NPU纯推理速度每帧只需要45.58ms;
我们的FCOS对解耦头做过简化设计,但为了融合多数据集以及自有数据集训练(如,coco,wider face等),进行多种不同任务检测(如,人体检测,人脸检测等),采用更多的解耦头分支来规避数据集之间相互缺少的类别标签问题。最终更换成YOLOX_S模型,也是需要实现同时检测多个任务的功能,如果原始的YOLOX_S模型在NPU上就比FCOS在速度上差这么多,较难应用;
3)、将YOLOX_S模型的SiLU激活函数替换成ReLU激活函数在同等分辨率下NPU纯推理速度每帧只需要42.61ms;
我们所用的NPU可以将Conv+ReLU融合成一个层(注意多看NPU手册,了解哪些层的组合以及什么样的层的参数配置对性能优化更友好),而SiLU激活函数是不会做融合的,这意味着更多的运算量以及内存访问(在32位DDR4甚至DDR3的内存的NPU开发板上,内存访问对性能的影响是不容忽视的),因此,只是更换了一下激活函数推理速度便提升为原来的1.46倍了;
我很想知道SiLU比ReLU到底能提升多少的AP值(但没找到,唯一能找到的是对ImageNet数据集的分类模型来说的),如果AP提升不多,1.46倍的性能差别,觉得不值,从其他地方补回来可能更划算;
4)、将YOLOX_S模型的SiLU激活函数替换成LeakyReLU激活函数在同等分辨率下NPU纯推理速度每帧需要54.36ms;
Conv+LeakyReLU不会融合成一个层,LeakyReLU也多一点运算,性能相比ReLU也慢不少;
5)、YOLOX_S模型使用ReLU+SiLU激活函数,即大部分使用ReLU激活函数小部分使用SiLU激活函数(所有stride为2的Conv、SPP、所有C3中的最后一个Conv都使用SiLU)在同等分辨率下NPU纯推理速度每帧需要44.22ms;
SiLU激活函数可以增加非线性,ReLU激活函数的非线性感觉还是比较有限:

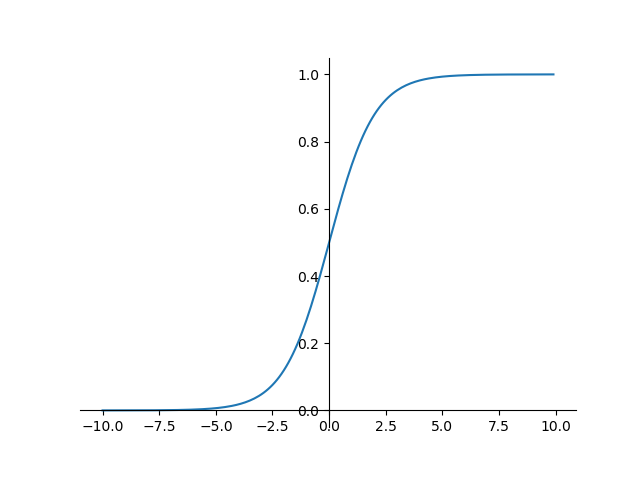

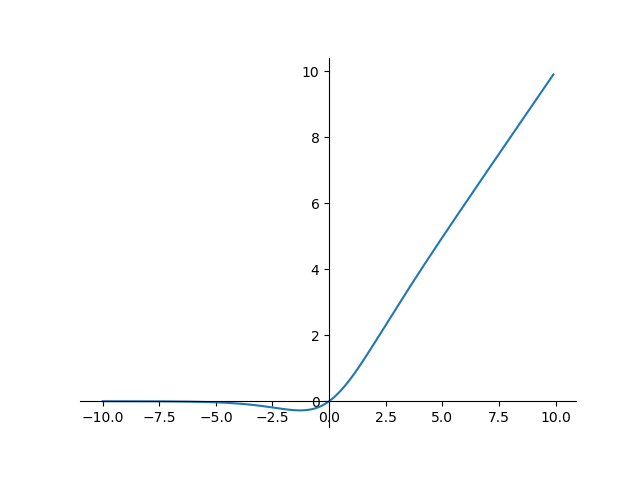

而ReLU激活函数大于0部分是一条直线,只靠小于0时截断为0实现非线性,其对非线性的表达能力相对于SiLU激活函数感觉是不如的。非线性表达能力的欠缺,感觉会让模型收敛更慢,更难以训练。
全部使用SiLU激活函数推理速度较低,因此,打算使用ReLU激活函数+SiLU激活函数的方式。
注:由于YOLOX代码的模型训练速度太慢(补充:Aug 19, 2021后的版本对训练速度做了优化),下面使用YOLOv5的YOLOv5-s模型做实验。
下面是不同激活函数的YOLOX_S模型的前5个epoch的mAP值,其中ReLU+Kaiming初始化,表示卷积层的初始化使用的是针对ReLU的Kaiming初始化;
表格中的每个单元第一个数值为mAP@.5:.95,第二个的数值为mAP@.5
| SiLU | ReLU+Kaiming初始化 | ReLU | ReLU+SiLU | |
| 第1个epoch | 0.00229, 0.00691 | 0.0000431, 0.000232 | 0.000995, 0.00352 | 0.00173, 0.00528 |
| 第2个epoch | 0.02040, 0.05240 | 0.00248, 0.00764 | 0.013300, 0.03470 | 0.01720, 0.04310 |
| 第3个epoch | 0.05130, 0.11800 | 0.01240, 0.03330 | 0.037500, 0.09110 | 0.04460, 0.10300 |
| 第4个epoch | 0.09560, 0.19900 | 0.03430, 0.08330 | 0.072300, 0.15600 | 0.08530, 0.17900 |
| 第5个epoch | 0.12700, 0.25200 | 0.05530, 0.18100 | 0.106000, 0.21400 | 0.11600, 0.23100 |
选择ReLU与SiLU的组合时,只使用了第一个epoch的mAP作为参考,一般第一个epoch的mAP越高,后面的收敛速度也越快,最终的mAP一般也会更高一些。像ReLU+Kaiming初始化与ReLU两个网络一样,只是Conv参数的初始化方法不同,ReLU+Kaiming初始化开始的收敛要慢些(从mAP值的角度来看),但最终训练完150个epoch其mAP@.5:.95相差不大(一个为0.339,一个为0.338),训练迭代次数多了之后参数初始化的影响变得很小。
训练完150epoch,各模型的mAP对比(移植了YOLOX的评估方法):
| SiLU | ReLU+Kaiming初始化 | ReLU | ReLU+SiLU | |
| mAP@.5:.95 | 0.359 | 0.339 | 0.338 | 0.348 |
可以看到,ReLU+SiLU相比SiLU低1.1个点左右,比ReLU高1个点,ReLU+SiLU是推理速度与mAP值较好的折中方案。注:虽然Yolov5中没有使用解耦头和SimOTA,但测试模型速度时是带了解耦头的,这里也大概反映出了SiLU和ReLU对mAP值的影响。

其中,fan_in和fan_out在pytorch中计算如下:
fan_in = num_input_fmaps * receptive_field_size
fan_out = num_output_fmaps * receptive_field_size
其中,num_input_fmaps为输入通道数,num_output_fmaps为输出通道数,receptive_field_size感受野大小=卷积核宽x卷积核高
输入通道数与输出通道数一般相等,或者输出通道数是输入通道数2倍,即fan_out要么等于fan_in,要么等于2*fan_in;
通过参数的绝对值之和的均值表示两种初始化方法的参数大小,如果只比较默认的卷积初始化参数与kaiming的Relu卷积初始化参数的数量级的大小,可约去

,即,默认的卷积初始化可统计(-1, 1)的均匀分布,kaiming的Relu卷积初始化可统计均值为0,标准差为 或1的正态分布;
发现kaiming的Relu卷积初始化的两种标准差生成的参数的绝对值之和的均值,都是比默认的卷积初始化要大,分别是默认初始化的2.247倍和1.587倍(统计随机生成的100000个参数,受随机数影响,每次运行这个倍率会有少量变化,差别不大);
总得来说,kaiming的Relu卷积初始化比默认的卷积初始化的参数要大,如果最优化参数偏小,初始化为较大参数,在模型训练前期收敛确实也会慢些。
2、一个想法:
统计训练好的模型的参数,对均匀分布或正态分布做参数估计,看模型以什么方式初始化参数更合适?能否从统计角度得到更好的参数初始化方法?这对于从0开始训练模型也许会有帮助,也许对提升AP影响不大,不过可能可以减少收敛所用的epoch数,相当于提升训练速度。
三、合并YoloX到Yolov5中:
由于YoloX训练速度相比Yolov5慢很多 ,而我手上只有2张1080ti显卡的机器,YoloX训练yolox-s配置且只训练150epoch也要5天17小时(54.98分钟/epoch),而Yolov5训练yolov5-s配置且只训练150epoch只要1天19小时(17.48分钟/epoch),虽然yolox-s加了解耦头和SimOTA,也不至于差那么多。因此,打算将YoloX合并到Yolov5中。注:YoloX后来Aug 19, 2021的版本对训练速度做了优化,据说速度提升2倍。
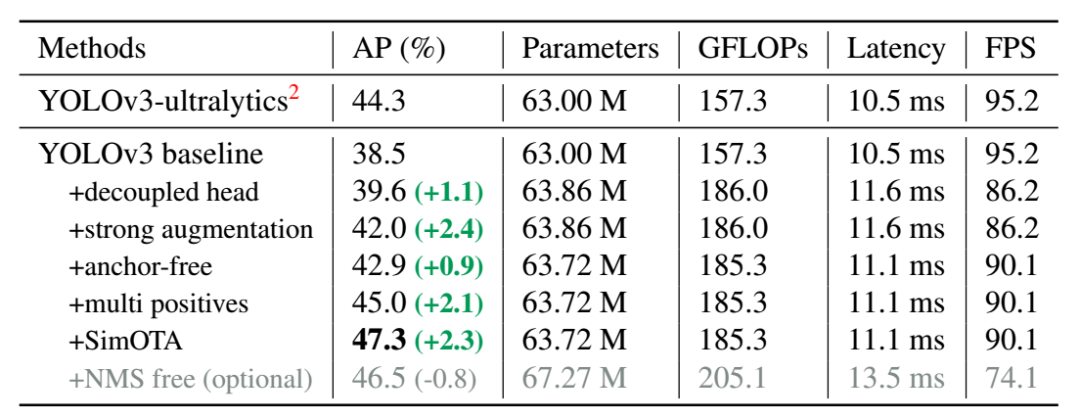
另外,将YoloX合并到Yolov5后,也好对比YoloX相对于Yolov5哪些改进比较有效。解耦头可能有效,但也增加了不少计算量,Yolov5总结的计算量来看,Yolov5-s是17.1 GFLOPs,而YoloX-s是26.8 GFLOPs。实际在NPU上测试的推理速度,在640x640分辨率下,YoloX-s需要62.3ms,而Yolov5-s只需要52.00ms,慢了1.198倍,10.3ms差别还是不小的。如果像YoloX论文所说(下表)只相差1.1个AP也许并不值得,或者将解耦头从2层减少到1层。
1、问题解决:
Yolov5的混合精度训练使用的是torch自带的torch.cuda.amp,而YoloX使用的是apex的apex.amp,使用binary_cross_entropy会引起报错:
pair_wise_cls_loss = F.binary_cross_entropy(cls_preds_, gt_cls_per_image, reduction="none").sum(-1) # [num_gt, fg_count]报错如下:
Traceback (most recent call last):File "/rootfs/media/kasim/DataSet/git/yolov5/models/yolo.py", line 425, in get_lossesobj_preds,File "/media/kasim/Data1/pytorch1.7_python3.7_venv/lib/python3.7/site-packages/torch/autograd/grad_mode.py", line 26, in decorate_contextreturn func(*args, **kwargs)File "/rootfs/media/kasim/DataSet/git/yolov5/models/yolo.py", line 624, in get_assignmentspair_wise_cls_loss = F.binary_cross_entropy(cls_preds_, gt_cls_per_image, reduction="none").sum(-1) # [num_gt, fg_count]File "/media/kasim/Data1/pytorch1.7_python3.7_venv/lib/python3.7/site-packages/torch/nn/functional.py", line 2526, in binary_cross_entropyinput, target, weight, reduction_enum)RuntimeError: torch.nn.functional.binary_cross_entropy and torch.nn.BCELoss are unsafe to autocast.Many models use a sigmoid layer right before the binary cross entropy layer.In this case, combine the two layers using torch.nn.functional.binary_cross_entropy_with_logitsor torch.nn.BCEWithLogitsLoss. binary_cross_entropy_with_logits and BCEWithLogits aresafe to autocast.During handling of the above exception, another exception occurred:Traceback (most recent call last):File "/media/kasim/DataSet/git/yolov5/train.py", line 642, in <module>main(opt)File "/media/kasim/DataSet/git/yolov5/train.py", line 540, in maintrain(opt.hyp, opt, device)File "/media/kasim/DataSet/git/yolov5/train.py", line 341, in trainloss, loss_items = compute_loss(pred, targets.to(device)) # loss scaled by batch_sizeFile "/rootfs/media/kasim/DataSet/git/yolov5/utils/loss.py", line 322, in __call__dtype=bbox_preds[0].dtype,File "/rootfs/media/kasim/DataSet/git/yolov5/models/yolo.py", line 465, in get_losses"cpu",File "/media/kasim/Data1/pytorch1.7_python3.7_venv/lib/python3.7/site-packages/torch/autograd/grad_mode.py", line 26, in decorate_contextreturn func(*args, **kwargs)File "/rootfs/media/kasim/DataSet/git/yolov5/models/yolo.py", line 624, in get_assignmentspair_wise_cls_loss = F.binary_cross_entropy(cls_preds_, gt_cls_per_image, reduction="none").sum(-1) # [num_gt, fg_count]File "/media/kasim/Data1/pytorch1.7_python3.7_venv/lib/python3.7/site-packages/torch/nn/functional.py", line 2526, in binary_cross_entropyinput, target, weight, reduction_enum)RuntimeError: torch.nn.functional.binary_cross_entropy and torch.nn.BCELoss are unsafe to autocast.Many models use a sigmoid layer right before the binary cross entropy layer.In this case, combine the two layers using torch.nn.functional.binary_cross_entropy_with_logitsor torch.nn.BCEWithLogitsLoss. binary_cross_entropy_with_logits and BCEWithLogits aresafe to autocast.
大意是torch.nn.functional.binary_cross_entropy和torch.nn.BCELoss不能进行安全的自动转换(16位浮点与32浮点之间的互转),让你使用torch.nn.functional.binary_cross_entropy_with_logits或torch.nn.BCEWithLogitsLoss 。不过,YoloX标签分配(label assign)函数get_assignments,使用的分类loss所输入的预测类别置信度(概率)是预测类别置信度(概率)乘上预测目标置信度(概率)再开根号,伪码如下:
cls_preds_ = (cls_preds_.sigmoid_() * obj_preds_.sigmoid_()).sqrt_()这不是标准的logits函数,无法使用binary_cross_entropy_with_logits或BCEWithLogitsLoss来代替。其实传递给F.binary_cross_entropy的cls_preds_和gt_cls_per_image已经是32位浮点了(从代码易知),因此,不需要自动转换,通过torch.cuda.amp.autocast关闭F.binary_cross_entropy的自动转换即可,伪码如下:
from torch.cuda.amp import autocastwith autocast(enabled=False):pair_wise_cls_loss = F.binary_cross_entropy(cls_preds_, gt_cls_per_image, reduction="none").sum(-1) # [num_gt, fg_count]
2、两个想法:
A、如果NMS也使用的置信度在预测类别置信度与预测目标置信度相乘后再开根号对AP值会有什么影响?可能也没什么影响,毕竟NMS比的只是置信度大小,开根号后并不影响单调性(大的还是大,小的还是小),不过对置信度阈值的选择可能会有影响,置信度阈值的选择可能变得更为平滑?毕竟原来的置信度有点二次关系的意味;
B、如果训练的总loss也加上这个loss进行辅助训练能否提升AP值?毕竟模型推理时NMS所用的置信度便是预测类别置信度与预测目标置信度乘积;
3、优化,再快一点:
将YoloX移植到Yolov5上后,训练1个epoch的时间从54.979分钟降低到了27.766分钟,训练速度提升了1.98倍,从原来训练150个epoch要5天17小时,降低到了2天21小时。不过,YoloX实现代码还有优化空间,尤其是标签分配(label assign)函数get_assignments,除了解耦头,YoloX与Yolov5的训练速度差距主要就在于SimOTA标签分配函数get_assignments,对其进行优化后(在将YoloX移植到Yolov5后,在Yolov5框架上测试),get_assignments的速度从原来的4852524ns(纳秒一帧,单GPU上测试,4.852ms)下降到2658222ns(2.658ms),forward+get_losses的速度从11661420ns(11.661ms)下降到9198305ns(9.198ms),训练1个epoch的时间降低到了23.533分钟,训练速度再提升1.1798倍,总共提升到原始YoloX的2.336倍。
注:这里的测试数据只针对我使用的机器,不同机器差别也许不一样。
SimOTA标签分配函数get_assignments各主要优化速度对比:
| 优化前 | 优化后 | 提升比率 | |
| get_in_boxes_info | 1614612ns | 880761ns | 1.833 |
| bboxes_iou | 390084ns | 237384ns | 1.643 |
| dynamic_k_matching | 2002892ns | 830621ns | 2.411 |
1)一些小修改:
A、注意顺序:
cls_preds_.float().unsqueeze(0).repeat(num_gt, 1, 1).sigmoid_()repeat之后数量就增多了,sigmoid_放后面无疑也增加了运算量,
修改如下:
cls_preds_.float().sigmoid_().unsqueeze(0).repeat(num_gt, 1, 1)B、不要频繁地在gpu和cpu之间切换数据:
for gt_idx in range(num_gt):_, pos_idx = torch.topk(cost[gt_idx], k=dynamic_ks[gt_idx].item(), largest=False)
item()函数会将gpu的数据转换为python的数据,但不要每个数据都去调用一次,如果每个数据都要转,调用tolist()函数对整个tensor做转换即可。
ks = dynamic_ks.tolist()for gt_idx in range(num_gt):_, pos_idx = torch.topk(cost[gt_idx], k=ks[gt_idx], largest=False)
C、注意Tensor的创建:
expanded_strides.append(torch.zeros(1, grid.shape[1]).fill_(stride_this_level).type_as(xin[0]))
这个Tensor的创建会先对创建的Tensor清0,再填充为stride_this_level,然后做类型转换,其实这个可以一步做完:
expanded_strides.append(torch.full((1, grid.shape[1]), stride_this_level, dtype=xin[0].dtype, device=xin[0].device))
D、等等,每一小点修改不一定能带来多少性能提升,不过积少成多、养成良好的编码习惯。
2)理解pytorch的几个函数及差别:
A、expand和repeat:它们可以完成类似的功能,但repeat会分配内存和拷贝数据,而expand不会,它只是创建新视图,因此,如果要节省内存使用量,可以使用expand;
B、view和permute:它们使用的还是原来的内存,修改这两个操作返回的数据,也会修改到这两个操作输入的数据,即它们不会分配新的内存,只是改变视图;permute会让tensor的内存变得不连续(is_contiguous函数返回False),我的理解是,对permute转置后的维度,按0,1,2,3顺序索引来读写转置后tensor,其访问到的内存不是连续的。不过,如果转置的两个维度其中一个维度为1,那么转置后还是连续的。permute转置后接view,view也不会让tensor变得连续,可以使用contiguous函数使得tensor内存变得连续,不过它会分配新的内存并拷贝数据(如果这个tensor的内存是不连续时)。reshape可以完成view相似的功能,区别是reshape相当于在view后再调用了contiguous,即reshape可能会重新分配内存和拷贝数据。
C、cat:会分配新的内存和拷贝数据,非必要不去cat,尤其是那种为了方便参数传递,cat在一起,后面又要去拆cat来处理的情况;
D、通过切片方式获取子tensor不会分配内存,通过list或tensor作为索引获取子tensor会分配内存,切片方式可以节省内存但获取的子tensor的内存是不连续的,连续的内存有时可以加速运算:
cc0 = cost[:, :2, :] # 不会分配新内存cc1 = cost[:, 0::2, :] # 不会分配新内存idx = torch.tensor([0, 1], dtype=torch.long)cc2 = cost[:, idx, :] # 会分配新内存cc3 = cost[:, [0, 1], :] # 会分配新内存print(cc1.is_contiguous(), cc2.is_contiguous(), cc3.is_contiguous())
3)get_in_boxes_info优化:
原代码:
def get_in_boxes_info(self,gt_bboxes_per_image,expanded_strides,x_shifts,y_shifts,total_num_anchors,num_gt,:expanded_strides_per_image = expanded_strides[0]x_shifts_per_image = x_shifts[0] * expanded_strides_per_imagey_shifts_per_image = y_shifts[0] * expanded_strides_per_imagex_centers_per_image = (+ 0.5 * expanded_strides_per_image).unsqueeze(0)1)# [n_anchor] -> [n_gt, n_anchor]y_centers_per_image = (+ 0.5 * expanded_strides_per_image).unsqueeze(0)1))gt_bboxes_per_image_l = (:, 0] - 0.5 * gt_bboxes_per_image[:, 2]).unsqueeze(1)total_num_anchors))gt_bboxes_per_image_r = (:, 0] + 0.5 * gt_bboxes_per_image[:, 2]).unsqueeze(1)total_num_anchors))gt_bboxes_per_image_t = (:, 1] - 0.5 * gt_bboxes_per_image[:, 3]).unsqueeze(1)total_num_anchors))gt_bboxes_per_image_b = (:, 1] + 0.5 * gt_bboxes_per_image[:, 3]).unsqueeze(1)total_num_anchors))b_l = x_centers_per_image - gt_bboxes_per_image_lb_r = gt_bboxes_per_image_r - x_centers_per_imageb_t = y_centers_per_image - gt_bboxes_per_image_tb_b = gt_bboxes_per_image_b - y_centers_per_imagebbox_deltas = torch.stack([b_l, b_t, b_r, b_b], 2)is_in_boxes = bbox_deltas.min(dim=-1).values > 0.0is_in_boxes_all = is_in_boxes.sum(dim=0) > 0# in fixed centercenter_radius = 2.5gt_bboxes_per_image_l = (gt_bboxes_per_image[:, 0]).unsqueeze(1).repeat(total_num_anchors- center_radius * expanded_strides_per_image.unsqueeze(0)gt_bboxes_per_image_r = (gt_bboxes_per_image[:, 0]).unsqueeze(1).repeat(total_num_anchors+ center_radius * expanded_strides_per_image.unsqueeze(0)gt_bboxes_per_image_t = (gt_bboxes_per_image[:, 1]).unsqueeze(1).repeat(total_num_anchors- center_radius * expanded_strides_per_image.unsqueeze(0)gt_bboxes_per_image_b = (gt_bboxes_per_image[:, 1]).unsqueeze(1).repeat(total_num_anchors+ center_radius * expanded_strides_per_image.unsqueeze(0)c_l = x_centers_per_image - gt_bboxes_per_image_lc_r = gt_bboxes_per_image_r - x_centers_per_imagec_t = y_centers_per_image - gt_bboxes_per_image_tc_b = gt_bboxes_per_image_b - y_centers_per_imagecenter_deltas = torch.stack([c_l, c_t, c_r, c_b], 2)is_in_centers = center_deltas.min(dim=-1).values > 0.0is_in_centers_all = is_in_centers.sum(dim=0) > 0# in boxes and in centersis_in_boxes_anchor = is_in_boxes_all | is_in_centers_allis_in_boxes_and_center = (:, is_in_boxes_anchor] & is_in_centers[:, is_in_boxes_anchor])return is_in_boxes_anchor, is_in_boxes_and_center
其主要计算网格中心是否在gt bboxes框中,以及网格中心是否在以gt bboxes框的中心为中心,2.5为半径(需乘上网格的stride,相当于5个网格大小的矩形框)的矩形框(中心框)中,只要满足其中一个即为前景anchor(fg_mask)记为is_in_boxes_anchor,两个都满足的anchor记为is_in_boxes_and_center(既在gt bboxes框中又在中心框中,这种框的cost要比其他前景anchor的cost要低很多,其他前景anchor的cost要加上10000)。优化做法:
A、gt bboxes框的计算要将xywh模式(中心坐标+宽高)的框转换为xyxy
的模式(左上角坐标+右下角坐标),xyxy的模式框在IOUloss和
bboxes_iou里也都会再计算一遍,觉得没有必要,因此,
把它统一到get_output_and_grid函数中算一遍就好了;
B、x_centers_per_image和y_centers_per_image在输入图像分辨率
不变的情况下,并不需要每处理一张图片都去计算,在一个batch里输入图像
的分辨率都一样的,而yolov5训练默认是没有带--multi-scale选项
(多尺寸图像缩放,如,对输入的图像尺寸进行0.5到1.5倍的随机缩放),
即输入图像的分辨率都是统一为640x640(默认没带--multi-scale选项,可能yolov5考虑到random_perspective中也有进行图片随机缩放?
),而yolox官方代码是每10个迭代随机改变一次图像的输入尺寸
(random_resize),即使64的batch size,两个GPU,
相当于1个GPU的batch size为32,10个迭代相当于每处理320张图片才
需要计算一次;
另外,x_centers_per_image和y_centers_per_image可以合并为
xy_centers_per_image,b_l、b_t、b_r、b_b可以合并为
b_lt、b_rb;
C、判断是否在以gt bboxes框的中心为中心,2.5为半径的中心框内时,
计算c_l、c_t、c_r、c_b可以用下面的伪码表示:
gt_bboxes_per_image_l = gt_bboxes_per_image_x - center_radius * expanded_strides_per_imagegt_bboxes_per_image_t = gt_bboxes_per_image_y - center_radius * expanded_strides_per_imagegt_bboxes_per_image_r = gt_bboxes_per_image_x + center_radius * expanded_strides_per_imagegt_bboxes_per_image_b = gt_bboxes_per_image_y + center_radius * expanded_strides_per_imagec_l = x_centers_per_image - gt_bboxes_per_image_lc_t = y_centers_per_image - gt_bboxes_per_image_tc_r = gt_bboxes_per_image_r - x_centers_per_imagec_b = gt_bboxes_per_image_b - y_centers_per_imagecenter_deltas = cat(c_l, c_t, c_r, c_b)
center_radius * expanded_strides_per_image的计算是固定的,可以通过将gt_bboxes_per_image_l、gt_bboxes_per_image_t、gt_bboxes_per_image_r、gt_bboxes_per_image_b代入c_l、c_t、c_r、c_b公式将center_radius * expanded_strides_per_image的计算与x_centers_per_image、y_centers_per_image合并成固定项,在分辨率不变的情况下只需计算一遍:
c_l = x_centers_per_image - (gt_bboxes_per_image_x - center_radius * expanded_strides_per_image)c_t = y_centers_per_image - (gt_bboxes_per_image_y - center_radius * expanded_strides_per_image)c_r = (gt_bboxes_per_image_x + center_radius * expanded_strides_per_image) - x_centers_per_imagec_b = (gt_bboxes_per_image_y + center_radius * expanded_strides_per_image) - y_centers_per_imagecenter_deltas = cat(c_l, c_t, c_r, c_b)
交换整理:
c_l = -gt_bboxes_per_image_x + (x_centers_per_image + center_radius * expanded_strides_per_image)c_t = -gt_bboxes_per_image_y + (y_centers_per_image + center_radius * expanded_strides_per_image)c_r = gt_bboxes_per_image_x + (center_radius * expanded_strides_per_image - x_centers_per_image)c_b = gt_bboxes_per_image_y + (center_radius * expanded_strides_per_image - y_centers_per_image)center_deltas = cat(c_l, c_t, c_r, c_b)
c_l、c_t、c_r、c_b公式的括号项为固定值(分辨率不变情况下)可提取在get_output_and_grid函数中计算好,另外将x、y合并为1项计算,即:
center_lt = xy_centers_per_image + center_radius * expanded_strides_per_image # 固定项center_rb = center_radius * expanded_strides_per_image - xy_centers_per_image # 固定项center_ltrb = cat(center_lt, center_rb) # 固定项gt_xy_center = cat(-gt_bboxes_per_image_xy,gt_bboxes_per_image_xy)center_deltas = gt_xy_center + center_ltrb
D、最终get_in_boxes_info函数优化为:
def get_in_boxes_info(org_gt_bboxes_per_image,gt_bboxes_per_image,center_ltrbes,xy_shifts,total_num_anchors,num_gt,:xy_centers_per_image = xy_shifts.expand(num_gt, total_num_anchors, 2)gt_bboxes_per_image = gt_bboxes_per_image[:, None, :].expand(num_gt, total_num_anchors, 4)b_lt = xy_centers_per_image - gt_bboxes_per_image[..., :2]b_rb = gt_bboxes_per_image[..., 2:] - xy_centers_per_imagebbox_deltas = torch.cat([b_lt, b_rb], 2) # [n_gt, n_anchor, 4]is_in_boxes = bbox_deltas.min(dim=-1).values > 0.0 # [_n_gt, _n_anchor]is_in_boxes_all = is_in_boxes.sum(dim=0) > 0center_ltrbes = center_ltrbes.expand(num_gt, total_num_anchors, 4)org_gt_xy_center = org_gt_bboxes_per_image[:, 0:2]org_gt_xy_center = torch.cat([-org_gt_xy_center, org_gt_xy_center], dim=-1)org_gt_xy_center = org_gt_xy_center[:, None, :].expand(num_gt, total_num_anchors, 4)center_deltas = org_gt_xy_center + center_ltrbesis_in_centers = center_deltas.min(dim=-1).values > 0.0 # [_n_gt, _n_anchor]is_in_centers_all = is_in_centers.sum(dim=0) > 0# in boxes and in centersis_in_boxes_anchor = is_in_boxes_all | is_in_centers_all # fg_maskis_in_boxes_and_center = (:, is_in_boxes_anchor] & is_in_centers[:, is_in_boxes_anchor])return is_in_boxes_anchor, is_in_boxes_and_center4)bboxes_iou优化:如上所说,已经在get_output_and_grid函数中将xywh模式(中心坐标+宽高)的框转换为xyxy的模式(左上角坐标+右下角坐标)的框,原来代码如下,可以看到xyxy为True时要比xyxy为False时计算量要少,因此,使用时可将xyxy设为True:def bboxes_iou(bboxes_a, bboxes_b, xyxy=True):if bboxes_a.shape[1] != 4 or bboxes_b.shape[1] != 4:raise IndexErrorif xyxy:tl = torch.max(bboxes_a[:, None, :2], bboxes_b[:, :2])br = torch.min(bboxes_a[:, None, 2:], bboxes_b[:, 2:])area_a = torch.prod(bboxes_a[:, 2:] - bboxes_a[:, :2], 1)area_b = torch.prod(bboxes_b[:, 2:] - bboxes_b[:, :2], 1)else:tl = torch.max(:, None, :2] - bboxes_a[:, None, 2:] / 2),:, :2] - bboxes_b[:, 2:] / 2),)br = torch.min(:, None, :2] + bboxes_a[:, None, 2:] / 2),:, :2] + bboxes_b[:, 2:] / 2),)area_a = torch.prod(bboxes_a[:, 2:], 1)area_b = torch.prod(bboxes_b[:, 2:], 1)en = (tl < br).type(tl.type()).prod(dim=2)area_i = torch.prod(br - tl, 2) * en # * ((tl < br).all())return area_i / (area_a[:, None] + area_b - area_i)
另外,再化简一下计算,并增加inplace模式减少内存使用,修改如下:
def bboxes_iou(bboxes_a, bboxes_b, xyxy=True, inplace=False):if bboxes_a.shape[1] != 4 or bboxes_b.shape[1] != 4:raise IndexErrorif inplace:if xyxy:tl = torch.max(bboxes_a[:, None, :2], bboxes_b[:, :2])br_hw = torch.min(bboxes_a[:, None, 2:], bboxes_b[:, 2:])br_hw.sub_(tl) # hwbr_hw.clamp_min_(0) # [rows, 2]del tlarea_ious = torch.prod(br_hw, 2) # areadel br_hwarea_a = torch.prod(bboxes_a[:, 2:] - bboxes_a[:, :2], 1)area_b = torch.prod(bboxes_b[:, 2:] - bboxes_b[:, :2], 1)else:tl = torch.max((bboxes_a[:, None, :2] - bboxes_a[:, None, 2:] / 2),(bboxes_b[:, :2] - bboxes_b[:, 2:] / 2),)br_hw = torch.min((bboxes_a[:, None, :2] + bboxes_a[:, None, 2:] / 2),(bboxes_b[:, :2] + bboxes_b[:, 2:] / 2),)br_hw.sub_(tl) # hwbr_hw.clamp_min_(0) # [rows, 2]del tlarea_ious = torch.prod(br_hw, 2) # areadel br_hwarea_a = torch.prod(bboxes_a[:, 2:], 1)area_b = torch.prod(bboxes_b[:, 2:], 1)union = (area_a[:, None] + area_b - area_ious)area_ious.div_(union) # iousreturn area_iouselse:if xyxy:tl = torch.max(bboxes_a[:, None, :2], bboxes_b[:, :2])br = torch.min(bboxes_a[:, None, 2:], bboxes_b[:, 2:])area_a = torch.prod(bboxes_a[:, 2:] - bboxes_a[:, :2], 1)area_b = torch.prod(bboxes_b[:, 2:] - bboxes_b[:, :2], 1)else:tl = torch.max((bboxes_a[:, None, :2] - bboxes_a[:, None, 2:] / 2),(bboxes_b[:, :2] - bboxes_b[:, 2:] / 2),)br = torch.min((bboxes_a[:, None, :2] + bboxes_a[:, None, 2:] / 2),(bboxes_b[:, :2] + bboxes_b[:, 2:] / 2),)area_a = torch.prod(bboxes_a[:, 2:], 1)area_b = torch.prod(bboxes_b[:, 2:], 1)hw = (br - tl).clamp(min=0) # [rows, 2]area_i = torch.prod(hw, 2)ious = area_i / (area_a[:, None] + area_b - area_i)return ious
5)dynamic_k_matching优化:
原来代码:
def dynamic_k_matching(self, cost, pair_wise_ious, gt_classes, num_gt, fg_mask):# Dynamic K# ---------------------------------------------------------------# gt box与前景anchor的匹配矩阵,维度为[num_gt, fg_count]matching_matrix = torch.zeros_like(cost)# gt_bboxes与前景anchor(fg_mask)的预测框通过bboxes_iou函数计算的两两之间的IOU,维度为[num_gt, fg_count]ious_in_boxes_matrix = pair_wise_ious# 每个gt bbox的候选前景anchor预测框数量,ious_in_boxes_matrix.size(1)为fg_count所有前景anchor预测框数量n_candidate_k = min(10, ious_in_boxes_matrix.size(1))# 计算每个gt bbox前k个最大的前景anchor预测框的IOU(gt bbox与预测框的IOU)_ = torch.topk(ious_in_boxes_matrix, n_candidate_k, dim=1)# 每个gt bbox以它的前k个最大前景anchor预测框的IOU之和作为动态候选数dynamic_k(至少为1)dynamic_ks = torch.clamp(topk_ious.sum(1).int(), min=1)# 为每个gt bbox选出dynamic_k个cost最小的前景anchor预测(正例索引pos_idx),# 并将匹配矩阵matching_matrix对应位置设为1,表示为此gt bbox匹配到的候选前景anchor,# 也可知道前景anchor匹配给了哪些gt bboxfor gt_idx in range(num_gt):pos_idx = torch.topk(k=dynamic_ks[gt_idx].item(), largest=False# dynamic_ks[gt_idx].item()多次在gpu和cpu中转化数值= 1.0del topk_ious, dynamic_ks, pos_idx# 计算每个前景anchor匹配到的gt bbox的数量anchor_matching_gt = matching_matrix.sum(0)# 每个前景anchor只能匹配一个gt bbox,如果前景anchor匹配到的gt bbox的数量多于1个,# 只保留cost最小的那个gt bbox作为此前景anchor匹配的gtif (anchor_matching_gt > 1).sum() > 0: # anchor_matching_gt > 1算了4次,可以给它定义一个变量cost_argmin = torch.min(cost[:, anchor_matching_gt > 1], dim=0):, anchor_matching_gt > 1] *= 0.0 # 乘以0,可以直接赋值为0anchor_matching_gt > 1] = 1.0# 计算前景anchor匹配到的gt bbox的数量,若此数量大于0,则表示此前景anchor有匹配到gt bbox,# 从而得到匹配到gt box的前景anchor的mask(fg_mask_inboxes)fg_mask_inboxes = matching_matrix.sum(0) > 0.0# 计算有匹配到gt box的前景anchor的数量num_fg = fg_mask_inboxes.sum().item()# 前景anchor(fg_mask)更新为有匹配到gt box的哪些前景anchor,没匹配到gt box的哪些前景anchor不再作为前景anchor= fg_mask_inboxes# 求出有配对到gt box的前景anchor所匹配到的gt box的索引(前景anchor所匹配到的gt box索引)# 由于每个前景anchor只能匹配一个gt,因此只有此gt位置为1(最大值),其他位置0,因此可以使用argmax得到此最大值的位置matched_gt_inds = matching_matrix[:, fg_mask_inboxes].argmax(0)# 获取每个前景anchor所匹配到的gt的类别gt_matched_classes = gt_classes[matched_gt_inds]# 求出每个前景Anchor的预测框与所匹配到的gt box的IOUpred_ious_this_matching = (matching_matrix * pair_wise_ious).sum(0)[fg_mask_inboxes]return num_fg, gt_matched_classes, pred_ious_this_matching, matched_gt_inds
函数的功能从上面的注释应该也清楚了,为每个gt选择Dynamic k个前景anchor(正样本),k的估计为prediction aware ,先计算与每个gt最接近的10个预测(不大于前景anchor数,可能实际小于10个),再将这10个预测与gt的IOU之和作为这个gt最终的k(小于1时设为1),然后求出每个gt前k个最小cost的前景anchor预测,可以认为得到了每个gt的k个候选的前景anchor(正样本),这样一个前景anchor(正样本)可能会被分配给了多个gt做候选,但实际上一个前景anchor(正样本)只能匹配一个gt(如果一个预测框要预测两个gt框,到底要预测成哪个?因此,只能预测1个),因此,需要选出与此前景anchor(正样本)cost最小的gt,作为它最终匹配(分配)到的gt。
优化方法:
A、matching_matrix在代码中只有0和1两种值,其实并不需要分配成cost的类型(32位浮点),定义为torch.bool或torch.uint8。cost的维度[num_gt, fg_count],num_gt为一张图片的gt bboxes的数量,fg_count为前景anchor的数量(fg_mask为True时的总项数);
B、fg_mask在代码的很多地方都使用到,其维度为[n_anchors_all],n_anchors_all表示所有的anchor数量,对于640x640分辨率为8400,通过它来取值,显然要对8400个fg_mask值都要做判断。可通过torch.nonzero函数将mask转换为索引(fg_mask_inds = torch.nonzero(fg_mask)[..., 0]),那么就可以通过索引直接访存,且只需访问作为前景的anchor;
C、对求每个gt最小cost的前k个前景anchor(正样本)的优化,原始代码:
for gt_idx in range(num_gt):_, pos_idx = torch.topk(cost[gt_idx], k=dynamic_ks[gt_idx].item(), largest=False)matching_matrix[gt_idx][pos_idx] = 1.0
dynamic_ks[gt_idx].item()多次在gpu和cpu中转化数值会降低速度,可以在循环外统一通过tolist()转换,如:
ks = dynamic_ks.tolist()for gt_idx in range(num_gt):_, pos_idx = torch.topk(cost[gt_idx], k=ks[gt_idx], largest=False)matching_matrix[gt_idx][pos_idx] = 1
GPU有众多的cuda核,每次循环执行一次torch.topk,可能很多cuda核都处于空闲状态,没有利用起来。这里不能并行使用torch.topk的原因是每个gt的k值可能不一样,为此,可以用它们中最大的k值作为k。这样,有些gt的topk会多计算,但也没关系,由于cuda核很多反而更快:
max_k = dynamic_ks.max().item()_, pos_idxes = torch.topk(cost, k=max_k, dim=1, largest=False)
注:当前k个最小的cost中有两个及以上相同的cost时,torch.topk返
回的索引,大的索引会排在前面,小的索引会排在后面。
不过,如果第k个只能包含到多个相同cost中的一个时,torch.topk返回
的索引却又是最小的那个,如,k=1,索引100和索引200处的cost同时为
最小,那么此时torch.topk返回的是100,而k=2时,torch.topk返回
的是200,100的顺序。
不知pytorch为何如此实现,没有去深究。
所以,在前max_k有相同的cost时,原来循环方式的代码与修改后的并行代码
产生的topk结果可会有一点差别。不过都是相同cost,选哪个索引可能影响也
没那么大。
现在问题是怎么给matching_matrix赋值。pos_idxes得到的是前max_k个索引,而不是每个gt各自的k个索引,因此,
需要通过下面第3、4行代码,选出每个gt各自的k个索引组成的pos_idxes,
不过torch.masked_select会将其转换为1维的tensor
(因为k值不一样也无法作为通常的2维tensor,每行的长度不一)。
但原来的pos_idxes的每一行索引都是从0开始计数的,因此,需要在之前
加上每一行的偏移offsets,最后将matching_matrix转为1维视图,
直接通过index_fill_函数将索引为pos_idxes的matching_matrix赋
值为1:
offsets = torch.arange(0, matching_matrix.shape[0]*matching_matrix.shape[1], step=matching_matrix.shape[1])[:, None]pos_idxes.add_(offsets)masks = (torch.arange(0, max_k)[None, :].expand(num_gt, max_k) < dynamic_ks[:, None])pos_idxes = torch.masked_select(pos_idxes, masks)matching_matrix.view(-1).index_fill_(0, pos_idxes, 1)
由于给赋值多个几行代码,当num_gt不多于3个时,速度是没有循环的方法快,当num_gt多于3个时,会更快,且执行速度和num_gt没有太大关系(只测到num_gt=13)。另外,如果每个gt的k值都一样(min_k==max_k时,有不少这种情况),可以更优化,最终代码改为:
if num_gt > 3:min_k, max_k = torch._aminmax(dynamic_ks)min_k, max_k = min_k.item(), max_k.item()if min_k != max_k:offsets = torch.arange(0, matching_matrix.shape[0] * matching_matrix.shape[1], step=matching_matrix.shape[1], dtype=torch.int, device=device)[:, None]masks = (torch.arange(0, max_k, dtype=dynamic_ks.dtype, device=device)[None, :].expand(num_gt, max_k) < dynamic_ks[:, None])_, pos_idxes = torch.topk(cost, k=max_k, dim=1, largest=False)pos_idxes.add_(offsets)pos_idxes = torch.masked_select(pos_idxes, masks)matching_matrix.view(-1).index_fill_(0, pos_idxes, 1)else:_, pos_idxes = torch.topk(cost, k=max_k, dim=1, largest=False)matching_matrix.scatter_(1, pos_idxes, 1)else:ks = dynamic_ks.tolist()for gt_idx in range(num_gt):_, pos_idx = torch.topk(cost[gt_idx], k=ks[gt_idx], largest=False)matching_matrix[gt_idx][pos_idx] = 1
D、求出每个前景Anchor的预测框与所匹配到的gt box的IOU,原代码:
pred_ious_this_matching = (matching_matrix * pair_wise_ious).sum(0)[fg_mask_inboxes]
matching_matrix由于只有0和1两个值,且每个前景Anchor只匹配一个
gt,因此,无需相乘求和的计算,可以直接索引,如下:
# pred_ious_this_matching = pair_wise_ious[:, fg_mask_inboxes_inds][matched_gt_inds, torch.arange(0, matched_gt_inds.shape[0])] # [matched_gt_inds_count]pred_ious_this_matching = pair_wise_ious.index_select(1, fg_mask_inboxes_inds).gather(dim=0, index=matched_gt_inds[None, :]) # [1, matched_gt_inds_count]
E、由于每个前景anchor只对应一个gt,不需要求和来判断这个前景anchor
有没有匹配gt(matching_matrix.sum(0) > 0),只需要判断其中是否
有任何一项为1(matching_matrix.any(dim=0))。
另外,index_select、index_fill_等函数调用会比直接使用中括号带
索引的速度快1.x~2倍,不过中括号带索引的执行速度也都很快,为了代码
可读性也可以保持使用中括号带索引的方式。下面也不再一一说了,
最终修改代码:
def dynamic_k_matching(cost, pair_wise_ious, gt_classes, num_gt, fg_mask_inds):# Dynamic K# ---------------------------------------------------------------device = cost.devicematching_matrix = torch.zeros(cost.shape, dtype=torch.uint8, device=device) # [num_gt, fg_count]ious_in_boxes_matrix = pair_wise_ious # [num_gt, fg_count]n_candidate_k = min(10, ious_in_boxes_matrix.size(1))_ = torch.topk(ious_in_boxes_matrix, n_candidate_k, dim=1)dynamic_ks = topk_ious.sum(1).int().clamp_min_(1)if num_gt > 3:max_k = torch._aminmax(dynamic_ks)max_k = min_k.item(), max_k.item()if min_k != max_k:offsets = torch.arange(0, matching_matrix.shape[0] * matching_matrix.shape[1], step=matching_matrix.shape[1], dtype=torch.int, device=device)[:, None]masks = (torch.arange(0, max_k, dtype=dynamic_ks.dtype, device=device)[None, :].expand(num_gt, max_k) < dynamic_ks[:, None])pos_idxes = torch.topk(cost, k=max_k, dim=1, largest=False)pos_idxes.add_(offsets)pos_idxes = torch.masked_select(pos_idxes, masks)pos_idxes, 1)del topk_ious, dynamic_ks, pos_idxes, offsets, maskselse:pos_idxes = torch.topk(cost, k=max_k, dim=1, largest=False)pos_idxes, 1)del topk_ious, dynamic_kselse:ks = dynamic_ks.tolist()for gt_idx in range(num_gt):pos_idx = torch.topk(cost[gt_idx], k=ks[gt_idx], largest=False)= 1del topk_ious, dynamic_ks, pos_idxanchor_matching_gt = matching_matrix.sum(0)anchor_matching_one_more_gt_mask = anchor_matching_gt > 1anchor_matching_one_more_gt_inds = torch.nonzero(anchor_matching_one_more_gt_mask)if anchor_matching_one_more_gt_inds.shape[0] > 0:anchor_matching_one_more_gt_inds = anchor_matching_one_more_gt_inds[..., 0]# _, cost_argmin = torch.min(cost[:, anchor_matching_one_more_gt_inds], dim=0)cost_argmin = torch.min(cost.index_select(1, anchor_matching_one_more_gt_inds), dim=0)# matching_matrix[:, anchor_matching_one_more_gt_inds] = 0anchor_matching_one_more_gt_inds, 0)anchor_matching_one_more_gt_inds] = 1# fg_mask_inboxes = matching_matrix.sum(0) > 0fg_mask_inboxes = matching_matrix.any(dim=0)fg_mask_inboxes_inds = torch.nonzero(fg_mask_inboxes)[..., 0]else:fg_mask_inboxes_inds = torch.nonzero(anchor_matching_gt)[..., 0]num_fg = fg_mask_inboxes_inds.shape[0]matched_gt_inds = matching_matrix.index_select(1, fg_mask_inboxes_inds).argmax(0)fg_mask_inds = fg_mask_inds[fg_mask_inboxes_inds]gt_matched_classes = gt_classes[matched_gt_inds]# pred_ious_this_matching = pair_wise_ious[:, fg_mask_inboxes_inds][matched_gt_inds, torch.arange(0, matched_gt_inds.shape[0])] # [matched_gt_inds_count]pred_ious_this_matching = pair_wise_ious.index_select(1, fg_mask_inboxes_inds).gather(dim=0, index=matched_gt_inds[None, :]) # [1, matched_gt_inds_count]return num_fg, gt_matched_classes, pred_ious_this_matching, matched_gt_inds, fg_mask_inds
四、Yolov5下的YoloX训练结果:
这里为两个配置的训练结果,每种配置都只训练150个epoch,在最后15个epoch停止数据增强。
1、配置一:
YoloX模型,但使用Yolov5的训练超参配置(数据增强,学习率控制等)
1)训练命令:
python -m torch.distributed.launch --nproc_per_node 2 train.py --noautoanchor --img-size 640 --data coco.yaml --cfg models/yoloxs.yaml --hyp data/hyps/hyp.scratch.yolox.yaml --weights '' --batch-size 64 --epochs 150 --device 0,12)超参配置:
data/hyps/hyp.scratch.yolox.yaml,可以看到在数据增强方面相对于官方的yolox没有使用mixup,也没有使用旋转和shear,另外,也没有使用random resize:
lr0: 0.01lrf: 0.2momentum: 0.937weight_decay: 0.0005warmup_epochs: 3.0warmup_momentum: 0.8warmup_bias_lr: 0.1box: 0.05cls: 0.5cls_pw: 1.0obj: 1.0obj_pw: 1.0hsv_h: 0.015hsv_s: 0.7hsv_v: 0.4degrees: 0.0translate: 0.1scale: 0.5shear: 0.0perspective: 0.0flipud: 0.0fliplr: 0.5mosaic: 1.0mixup: 0.0mixup_mode: "yolov5"mixup_scale: [0.5, 1.5]mixup_ratio: 0.5copy_paste: 0.0no_aug_epochs: 15
3)模型配置:
models/yoloxs.yaml,使用yolox-s配置:
nc: 80depth_multiple: 0.33width_multiple: 0.50anchors: 1loss: ComputeXLossbackbone:[]],[]],[]],[]],[]],[]],[]],[]],[]]],[]],]head:[]],[]],[], 1, Concat, [1]],[]],[]],[]],[], 1, Concat, [1]],[]],[]],[], 1, Concat, [1]],[]],[]],[], 1, Concat, [1]],[]],[]],[]],[]],[]],[]],[]],[]],[]],[]],[], 1, DetectX, [nc, anchors]],]
4)COCO验证集的结果:
对last.pt的验证结果,150个epoch达到了39.7,比官方yolox的300个epoch的yolox-s的39.6差不多(注:官方yolox目前最新版本yolox-s的提升到了40.5,有机器资源的同学也可以train够300个epoch看与最新官方yolox-s的mAP值差多少,后面会放增加yolox的yolov5代码的git)。验证命令:
python val.py --data data/coco.yaml --weights runs/train/exp/weights/last.pt --batch-size 64 --device 0,1 --save-json --classwiseAverage Precision (AP) @[ IoU=0.50:0.95 | area= all | maxDets=100 ] = 0.397Average Precision (AP) @[ IoU=0.50 | area= all | maxDets=100 ] = 0.589Average Precision (AP) @[ IoU=0.75 | area= all | maxDets=100 ] = 0.427Average Precision (AP) @[ IoU=0.50:0.95 | area= small | maxDets=100 ] = 0.223Average Precision (AP) @[ IoU=0.50:0.95 | area=medium | maxDets=100 ] = 0.443Average Precision (AP) @[ IoU=0.50:0.95 | area= large | maxDets=100 ] = 0.516Average Recall (AR) @[ IoU=0.50:0.95 | area= all | maxDets= 1 ] = 0.324Average Recall (AR) @[ IoU=0.50:0.95 | area= all | maxDets= 10 ] = 0.541Average Recall (AR) @[ IoU=0.50:0.95 | area= all | maxDets=100 ] = 0.585Average Recall (AR) @[ IoU=0.50:0.95 | area= small | maxDets=100 ] = 0.409Average Recall (AR) @[ IoU=0.50:0.95 | area=medium | maxDets=100 ] = 0.642Average Recall (AR) @[ IoU=0.50:0.95 | area= large | maxDets=100 ] = 0.728+---------------+-------+--------------+-------+----------------+-------+| category | AP | category | AP | category | AP |+---------------+-------+--------------+-------+----------------+-------+| person | 0.535 | bicycle | 0.280 | car | 0.399 || motorcycle | 0.435 | airplane | 0.649 | bus | 0.633 || train | 0.637 | truck | 0.350 | boat | 0.249 || traffic light | 0.261 | fire hydrant | 0.647 | stop sign | 0.647 || parking meter | 0.468 | bench | 0.228 | bird | 0.328 || cat | 0.625 | dog | 0.583 | horse | 0.579 || sheep | 0.488 | cow | 0.532 | elephant | 0.639 || bear | 0.663 | zebra | 0.658 | giraffe | 0.668 || backpack | 0.125 | umbrella | 0.395 | handbag | 0.131 || tie | 0.292 | suitcase | 0.370 | frisbee | 0.645 || skis | 0.202 | snowboard | 0.279 | sports ball | 0.416 || kite | 0.433 | baseball bat | 0.270 | baseball glove | 0.349 || skateboard | 0.484 | surfboard | 0.359 | tennis racket | 0.441 || bottle | 0.357 | wine glass | 0.315 | cup | 0.387 || fork | 0.294 | knife | 0.160 | spoon | 0.158 || bowl | 0.422 | banana | 0.261 | apple | 0.165 || sandwich | 0.322 | orange | 0.281 | broccoli | 0.236 || carrot | 0.223 | hot dog | 0.349 | pizza | 0.508 || donut | 0.462 | cake | 0.362 | chair | 0.288 || couch | 0.436 | potted plant | 0.248 | bed | 0.423 || dining table | 0.293 | toilet | 0.622 | tv | 0.572 || laptop | 0.599 | mouse | 0.574 | remote | 0.246 || keyboard | 0.474 | cell phone | 0.326 | microwave | 0.560 || oven | 0.365 | toaster | 0.334 | sink | 0.384 || refrigerator | 0.549 | book | 0.140 | clock | 0.480 || vase | 0.350 | scissors | 0.231 | teddy bear | 0.451 || hair drier | 0.014 | toothbrush | 0.189 | None | None |+---------------+-------+--------------+-------+----------------+-------+
2、配置二:
YoloX模型(激活函数使用relu+silu),但使用Yolov5的训练超参配置(数据增强,学习率控制等)
1)训练命令:
python -m torch.distributed.launch --nproc_per_node 2 train.py --noautoanchor --img-size 640 --data coco.yaml --cfg models/yoloxs_rslu.yaml --hyp data/hyps/hyp.scratch.yolox.yaml --weights '' --batch-size 64 --epochs 150 --device 0,12)超参配置:
data/hyps/hyp.scratch.yolox.yaml,使用“配置一”相同的超参配置;
3)模型配置:
models/yoloxs_rslu.yaml:
# Parametersnc: 80 # number of classesdepth_multiple: 0.33 # model depth multiplewidth_multiple: 0.50 # layer channel multipleanchors: 1 # number of anchorsloss: ComputeXLoss# YOLOv5 backbonebackbone:# [from, number, module, args][[-1, 1, Focus, [64, 3, 1, None, 1, 'relu']], # 0-P1/2[-1, 1, Conv, [128, 3, 2, None, 1, 'silu']], # 1-P2/4[-1, 3, C3, [128, True, 1, 0.5, 'relu']],[-1, 1, Conv, [256, 3, 2, None, 1, 'silu']], # 3-P3/8[-1, 9, C3, [256, True, 1, 0.5, 'relu_silu']],[-1, 1, Conv, [512, 3, 2, None, 1, 'silu']], # 5-P4/16[-1, 9, C3, [512, True, 1, 0.5, 'relu_silu']],[-1, 1, Conv, [1024, 3, 2, None, 1, 'silu']], # 7-P5/32[-1, 1, SPP, [1024, [5, 9, 13], 'silu']],[-1, 3, C3, [1024, False, 1, 0.5, 'relu_silu']], # 9]# YOLOv5 headhead:[[-1, 1, Conv, [512, 1, 1, None, 1, 'silu']],[-1, 1, nn.Upsample, [None, 2, 'nearest']],[[-1, 6], 1, Concat, [1]], # cat backbone P4[-1, 3, C3, [512, False, 1, 0.5, 'relu_silu']], # 13[-1, 1, Conv, [256, 1, 1, None, 1, 'silu']],[-1, 1, nn.Upsample, [None, 2, 'nearest']],[[-1, 4], 1, Concat, [1]], # cat backbone P3[-1, 3, C3, [256, False, 1, 0.5, 'relu_silu']], # 17 (P3/8-small)[-1, 1, Conv, [256, 3, 2, None, 1, 'silu']],[[-1, 14], 1, Concat, [1]], # cat head P4[-1, 3, C3, [512, False, 1, 0.5, 'relu_silu']], # 20 (P4/16-medium)[-1, 1, Conv, [512, 3, 2, None, 1, 'silu']],[[-1, 10], 1, Concat, [1]], # cat head P5[-1, 3, C3, [1024, False, 1, 0.5, 'relu_silu']], # 23 (P5/32-large)# yolox head[17, 1, Conv, [256, 1, 1, None, 1, 'silu']], # 24 lateral0 (P3/8-small)[20, 1, Conv, [256, 1, 1, None, 1, 'silu']], # 25 lateral1 (P4/16-medium)[23, 1, Conv, [256, 1, 1, None, 1, 'silu']], # 26 lateral2 (P5/32-large)[24, 2, Conv, [256, 3, 1]], # 27 cls0 (P3/8-small)[24, 2, Conv, [256, 3, 1]], # 28 reg0 (P3/8-small)[25, 2, Conv, [256, 3, 1]], # 29 cls1 (P4/16-medium)[25, 2, Conv, [256, 3, 1]], # 30 reg1 (P4/16-medium)[26, 2, Conv, [256, 3, 1]], # 31 cls2 (P5/32-large)[26, 2, Conv, [256, 3, 1]], # 32 reg2 (P5/32-large)[[27, 28, 29, 30, 31, 32], 1, DetectX, [nc, anchors]], # Detect(P3, P4, P5)]
4)COCO验证集的结果:
对last.pt的验证结果,150个epoch达到了38.9,比"配置一"的39.7低0.8个点,不过在NPU上的推理速度可提升1.4倍。验证命令:
python val.py --data data/coco.yaml --weights runs/train/exp/weights/last.pt --batch-size 64 --device 0,1 --save-json --classwiseAverage Precision (AP) @[ IoU=0.50:0.95 | area= all | maxDets=100 ] = 0.389Average Precision (AP) @[ IoU=0.50 | area= all | maxDets=100 ] = 0.581Average Precision (AP) @[ IoU=0.75 | area= all | maxDets=100 ] = 0.419Average Precision (AP) @[ IoU=0.50:0.95 | area= small | maxDets=100 ] = 0.223Average Precision (AP) @[ IoU=0.50:0.95 | area=medium | maxDets=100 ] = 0.434Average Precision (AP) @[ IoU=0.50:0.95 | area= large | maxDets=100 ] = 0.503Average Recall (AR) @[ IoU=0.50:0.95 | area= all | maxDets= 1 ] = 0.322Average Recall (AR) @[ IoU=0.50:0.95 | area= all | maxDets= 10 ] = 0.533Average Recall (AR) @[ IoU=0.50:0.95 | area= all | maxDets=100 ] = 0.577Average Recall (AR) @[ IoU=0.50:0.95 | area= small | maxDets=100 ] = 0.391Average Recall (AR) @[ IoU=0.50:0.95 | area=medium | maxDets=100 ] = 0.633Average Recall (AR) @[ IoU=0.50:0.95 | area= large | maxDets=100 ] = 0.715+---------------+-------+--------------+-------+----------------+-------+| category | AP | category | AP | category | AP |+---------------+-------+--------------+-------+----------------+-------+| person | 0.529 | bicycle | 0.279 | car | 0.395 || motorcycle | 0.417 | airplane | 0.629 | bus | 0.624 || train | 0.627 | truck | 0.319 | boat | 0.253 || traffic light | 0.254 | fire hydrant | 0.621 | stop sign | 0.651 || parking meter | 0.477 | bench | 0.219 | bird | 0.310 || cat | 0.612 | dog | 0.570 | horse | 0.565 || sheep | 0.465 | cow | 0.523 | elephant | 0.621 || bear | 0.643 | zebra | 0.644 | giraffe | 0.666 || backpack | 0.141 | umbrella | 0.376 | handbag | 0.118 || tie | 0.282 | suitcase | 0.383 | frisbee | 0.618 || skis | 0.212 | snowboard | 0.306 | sports ball | 0.416 || kite | 0.441 | baseball bat | 0.255 | baseball glove | 0.342 || skateboard | 0.462 | surfboard | 0.354 | tennis racket | 0.425 || bottle | 0.351 | wine glass | 0.297 | cup | 0.370 || fork | 0.277 | knife | 0.143 | spoon | 0.144 || bowl | 0.423 | banana | 0.242 | apple | 0.171 || sandwich | 0.307 | orange | 0.280 | broccoli | 0.210 || carrot | 0.208 | hot dog | 0.339 | pizza | 0.498 || donut | 0.447 | cake | 0.352 | chair | 0.283 || couch | 0.427 | potted plant | 0.243 | bed | 0.401 || dining table | 0.298 | toilet | 0.598 | tv | 0.570 || laptop | 0.581 | mouse | 0.574 | remote | 0.230 || keyboard | 0.469 | cell phone | 0.304 | microwave | 0.568 || oven | 0.344 | toaster | 0.342 | sink | 0.372 || refrigerator | 0.520 | book | 0.140 | clock | 0.474 || vase | 0.344 | scissors | 0.280 | teddy bear | 0.437 || hair drier | 0.001 | toothbrush | 0.207 | None | None |+---------------+-------+--------------+-------+-----------
3、增加Yolox的Yolov5代码与模型:
1)代码:
基于2021年8月31日的Commits:
de534e922120b2da876e8214b976af1f82019e28的yolov5修改的代码(保持写文档时与最新的yolov5版本同步,与实验时所用版本有所不同)已提交,通过下面命令下载:
git clone https://gitee.com/SearchSource/yolov5_yolox.git环境安装:
除了yolov5原来的环境安装之外,还需安装从yolox移植过来的评估工具:yoloxtools,进入yolov5_yolox目录执行下面命令:
2)模型:
A、yolox-s:百度网盘: https://pan.baidu.com/s/1i7Si3oCv3QMGYBngJUEkvg 提取码: j4co
验证命令:
python val.py --data data/coco.yaml --weights yolox-s.pt
--batch-size 64 --device 0,1 --save-json --classwise
B、yolox-s(relu+silu):百度网盘: https://pan.baidu.com/s/1oCHzeO6w4G9PXXLtKkVhbA 提取码: spcp
验证命令:
python val.py --data data/coco.yaml --weights yolox-s_rslu.pt
--batch-size 64 --device 0,1 --save-json --classwise
五、关于旋转的数据增强:
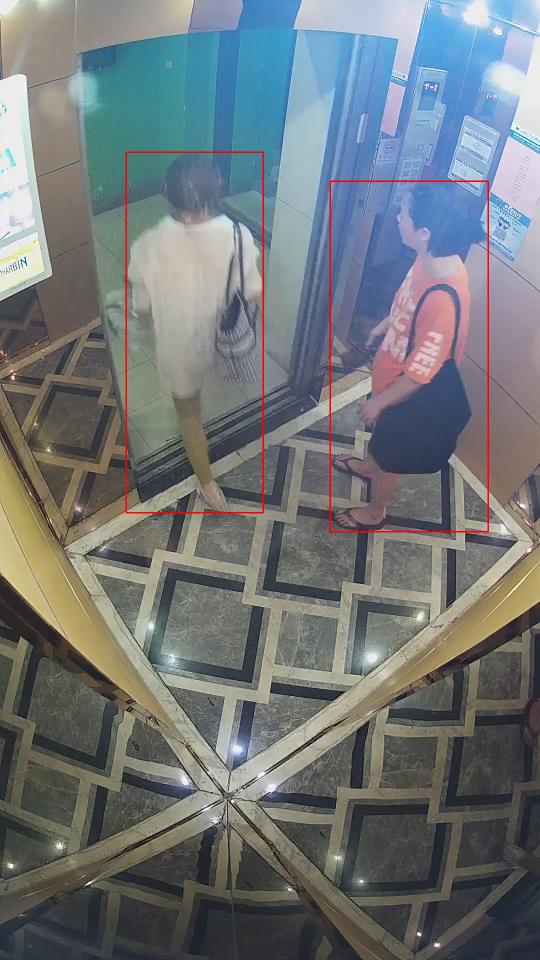
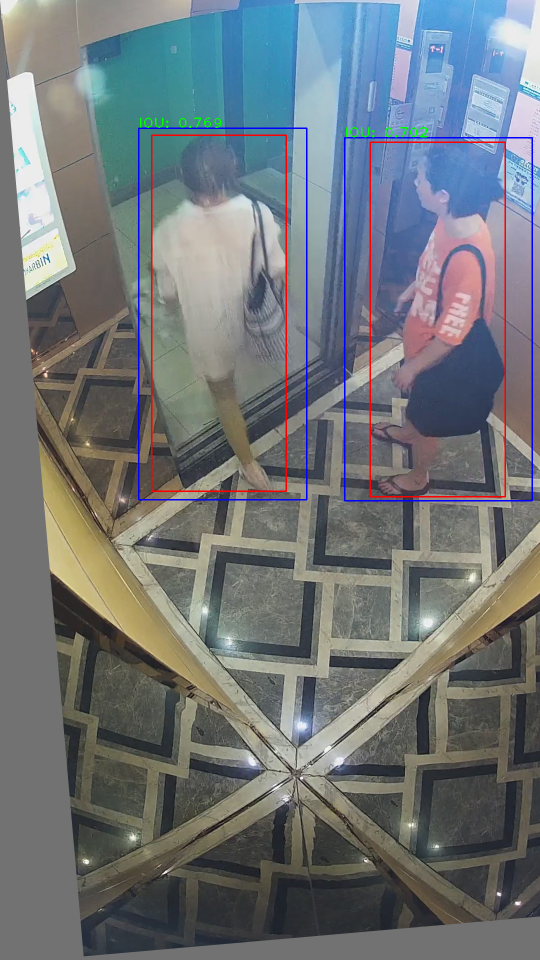
官方的YoloX代码使用了-10度到10度之间的随机角度旋转的数据增强,对于检测模型里使用随机旋转的数据增强,个人是持保留意见的,因为旋转之后的gt bbox是不准的。下面为旋转数据增强实验的代码(扣取YoloX的random_perspective函数的旋转部分的代码):
def rotation(img, targets, degree=5):# Rotation and ScaleM = np.eye(3):2] = cv2.getRotationMatrix2D(angle=degree, center=(0, 0), scale=1.0)width = img.shape[:2]new_img = cv2.warpAffine(img, M[:2], dsize=(width, height), borderValue=(114, 114, 114))# Transform label coordinatesn = len(targets)# warp pointsxy = np.ones((n * 4, 3)):, :2] = targets[:, [0, 1, 2, 3, 0, 3, 2, 1]].reshape(n * 4, 2# x1y1, x2y2, x1y2, x2y1xy = xy @ M.T # transformxy = xy[:, :2].reshape(n, 8)# create new boxesx = xy[:, [0, 2, 4, 6]]y = xy[:, [1, 3, 5, 7]]xy = np.concatenate((x.min(1), y.min(1), x.max(1), y.max(1))).reshape(4, n).T# clip boxes:, [0, 2]] = xy[:, [0, 2]].clip(0, width):, [1, 3]] = xy[:, [1, 3]].clip(0, height)new_targets = xyreturn new_img, new_targets
原图(红框为gt bbox):
旋转5度(蓝框为gt框旋转后的框,红框为手工重画的gt框,其上的绿色数值为蓝框与红框的IOU):
旋转10度(蓝框为gt框旋转后的框,红框为手工重画的gt框,其上的绿色数值为蓝框与红框的IOU):
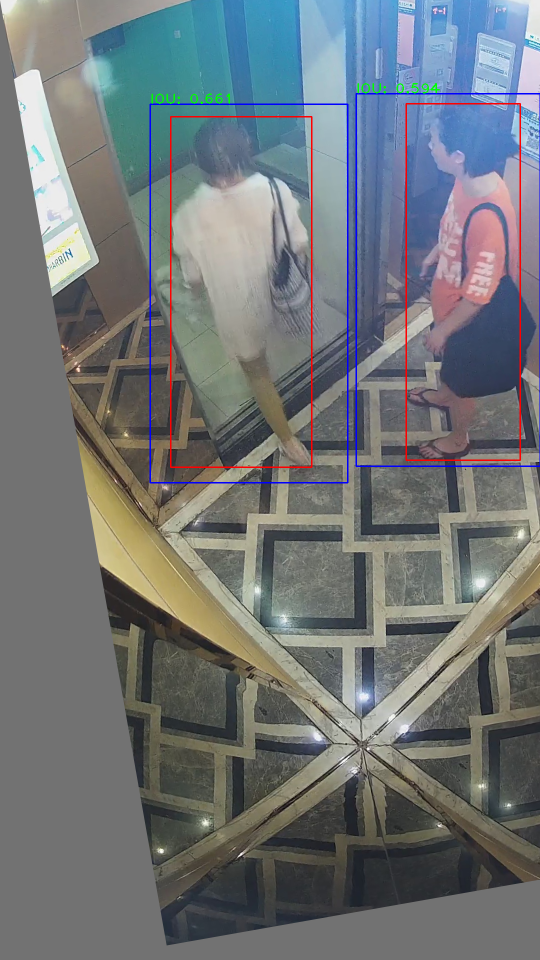
可以看到旋转后的物体框(蓝框)与真实的物体框(红框)差别还是很大的(这个也取决于旋转的角度与旋转的中心点、以及物体在图像中的位置等)。这可能可以提高低IOU的AP值,不过可能也会降低高IOU的AP值,降低预测的检测框框住物体的精准度。如果希望检测框框的很准,可能不该使用旋转的数据增强。如果对检测框框的准度要求不高,能框出来就好的话,也许旋转的数据增强可以使原来无法框出来的物体变得可以框出来。
yolov5默认的hyp.scratch.yaml配置没有使用旋转的数据增强(degrees为0),唯一使用了旋转的数据增强的yolov5配置hyp.finetune.yaml,也只用了-0.373度到0.373度(degrees为0.373)的旋转数据增强,相当于只有一个微小扰动。不知yolov5作者是否也出于相同的考虑?另外,也不知yolox作者实验将degrees设为10对AP值是否有提升?
不过如果有物体的mask标注,旋转后再计算mask标注的外接矩形作为gt bbox,觉得可以使用这种增强。
六、部署:
通过下面的命令将模型转换为onnx格式的模型:
python export.py --weights ./yolox_rslu.pt --include onnx --opset 10 --simplify --deploy将转换为onnx格式的模型再使用NPU的工具链转换格式量化等操作,从而得到能在NPU上跑的模型,不同的NPU及其工具链做法会有所不同,这里就不详述NPU相关部分的转换了。
——The End——
推荐阅读


