
轻松学Pytorch-使用卷积神经网络实现图像分类
点击上方“小白学视觉”,选择加"星标"或“置顶”
重磅干货,第一时间送达
本文转自|人工智能与算法学习

大家好,本篇教程的贡献者来自社区投稿作者【陨星落云】,使用CIFAR-10数据集进行图像分类。该数据集中的图像是彩色小图像,其中被分为了十类。一些示例图像,如下图所示:

测试GPU是否可以使用
数据集中的图像大小为32x32x3 。在训练的过程中最好使用GPU来加速。
 1import torch
 2import numpy as np
 3
 4# 检查是否可以利用GPU
 5train_on_gpu = torch.cuda.is_available()
 6
 7if not train_on_gpu:
 8    print('CUDA is not available.')
 9else:
10    print('CUDA is available!')
结果:
CUDA is available!
加载数据
数据下载可能会比较慢。请耐心等待。加载训练和测试数据,将训练数据分为训练集和验证集,然后为每个数据集创建DataLoader。
 1from torchvision import datasets
 2import torchvision.transforms as transforms
 3from torch.utils.data.sampler import SubsetRandomSampler
 4
 5# number of subprocesses to use for data loading
 6num_workers = 0
 7# 每批加载16张图片
 8batch_size = 16
 9# percentage of training set to use as validation
10valid_size = 0.2
11
12# 将数据转换为torch.FloatTensor,并标准化。
13transform = transforms.Compose([
14    transforms.ToTensor(),
15    transforms.Normalize((0.5, 0.5, 0.5), (0.5, 0.5, 0.5))
16    ])
17
18# 选择训练集与测试集的数据
19train_data = datasets.CIFAR10('data', train=True,
20                              download=True, transform=transform)
21test_data = datasets.CIFAR10('data', train=False,
22                             download=True, transform=transform)
23
24# obtain training indices that will be used for validation
25num_train = len(train_data)
26indices = list(range(num_train))
27np.random.shuffle(indices)
28split = int(np.floor(valid_size * num_train))
29train_idx, valid_idx = indices[split:], indices[:split]
30
31# define samplers for obtaining training and validation batches
32train_sampler = SubsetRandomSampler(train_idx)
33valid_sampler = SubsetRandomSampler(valid_idx)
34
35# prepare data loaders (combine dataset and sampler)
36train_loader = torch.utils.data.DataLoader(train_data, batch_size=batch_size,
37    sampler=train_sampler, num_workers=num_workers)
38valid_loader = torch.utils.data.DataLoader(train_data, batch_size=batch_size,
39    sampler=valid_sampler, num_workers=num_workers)
40test_loader = torch.utils.data.DataLoader(test_data, batch_size=batch_size,
41    num_workers=num_workers)
42
43# 图像分类中10类别
44classes = ['airplane', 'automobile', 'bird', 'cat', 'deer',
45           'dog', 'frog', 'horse', 'ship', 'truck']
查看训练集中的一批样本
 1import matplotlib.pyplot as plt
 2%matplotlib inline
 3
 4# helper function to un-normalize and display an image
 5def imshow(img):
 6    img = img / 2 + 0.5  # unnormalize
 7    plt.imshow(np.transpose(img, (1, 2, 0)))  # convert from Tensor image
 8
 9# 获取一批样本
10dataiter = iter(train_loader)
11images, labels = dataiter.next()
12images = images.numpy() # convert images to numpy for display
13
14# 显示图像,标题为类名
15fig = plt.figure(figsize=(25, 4))
16# 显示16张图片
17for idx in np.arange(16):
18    ax = fig.add_subplot(2, 16/2, idx+1, xticks=[], yticks=[])
19    imshow(images[idx])
20    ax.set_title(classes[labels[idx]])
结果:

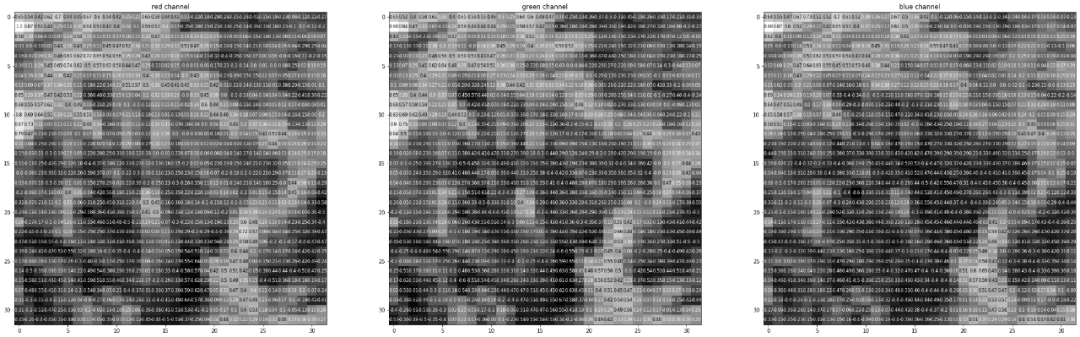
查看一张图像中的更多细节
在这里,进行了归一化处理。红色、绿色和蓝色(RGB)颜色通道可以被看作三个单独的灰度图像。
 1rgb_img = np.squeeze(images[3])
 2channels = ['red channel', 'green channel', 'blue channel']
 3
 4fig = plt.figure(figsize = (36, 36))
 5for idx in np.arange(rgb_img.shape[0]):
 6    ax = fig.add_subplot(1, 3, idx + 1)
 7    img = rgb_img[idx]
 8    ax.imshow(img, cmap='gray')
 9    ax.set_title(channels[idx])
10    width, height = img.shape
11    thresh = img.max()/2.5
12    for x in range(width):
13        for y in range(height):
14            val = round(img[x][y],2) if img[x][y] !=0 else 0
15            ax.annotate(str(val), xy=(y,x),
16                    horizontalalignment='center',
17                    verticalalignment='center', size=8,
18                    color='white' if img[x][y]<thresh else 'black')
结果:
定义卷积神经网络的结构
这里,将定义一个CNN的结构。将包括以下内容:
卷积层:可以认为是利用图像的多个滤波器(经常被称为卷积操作)进行滤波,得到图像的特征。
通常,我们在 PyTorch 中使用
nn.Conv2d定义卷积层,并指定以下参数:1nn.Conv2d(in_channels, out_channels, kernel_size, stride=1, padding=0)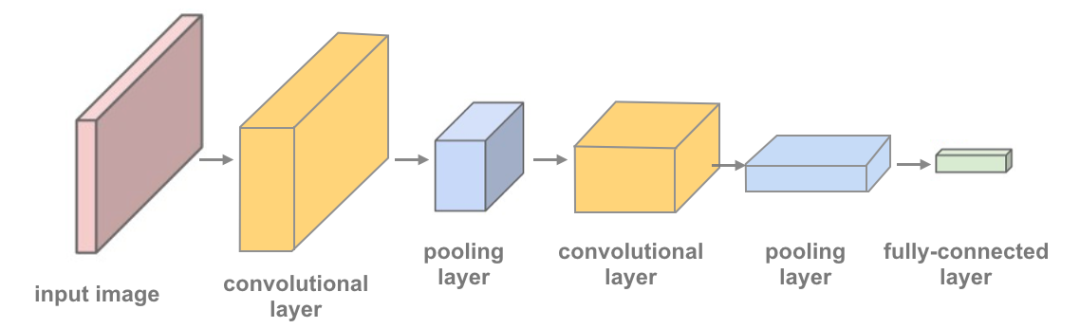
用 3x3 窗口和步长 1 进行卷积运算 in_channels是指输入深度。对于灰阶图像来说,深度 = 1out_channels是指输出深度,或你希望获得的过滤图像数量kernel_size是卷积核的大小(通常为 3,表示 3x3 核)stride和padding具有默认值,但是应该根据你希望输出在空间维度 x, y 里具有的大小设置它们的值。池化层:这里采用的最大池化:对指定大小的窗口里的像素值最大值。
在 2x2 窗口里,取这四个值的最大值。
由于最大池化更适合发现图像边缘等重要特征,适合图像分类任务。
最大池化层通常位于卷积层之后,用于缩小输入的 x-y 维度 。
通常的“线性+dropout”层可避免过拟合,并产生输出10类别。
下图中,可以看到这是一个具有2个卷积层的神经网络。
卷积层的输出大小
要计算给定卷积层的输出大小,我们可以执行以下计算:
这里,假设输入大小为(H,W),滤波器大小为(FH,FW),输出大小为 (OH,OW),填充为P,步幅为S。此时,输出大小可通过下面公式进行计算。

例: 输入大小为(H=7,W=7),滤波器大小为(FH=3,FW=3),填充为P=0,步幅为S=1, 输出大小为 (OH=5,OW=5)。如果用 S=2,将得输出大小为 (OH=3,OW=3)。
 1import torch.nn as nn
 2import torch.nn.functional as F
 3
 4# 定义卷积神经网络结构
 5class Net(nn.Module):
 6    def __init__(self):
 7        super(Net, self).__init__()
 8        # 卷积层 (32x32x3的图像)
 9        self.conv1 = nn.Conv2d(3, 16, 3, padding=1)
10        # 卷积层(16x16x16)
11        self.conv2 = nn.Conv2d(16, 32, 3, padding=1)
12        # 卷积层(8x8x32)
13        self.conv3 = nn.Conv2d(32, 64, 3, padding=1)
14        # 最大池化层
15        self.pool = nn.MaxPool2d(2, 2)
16        # linear layer (64 * 4 * 4 -> 500)
17        self.fc1 = nn.Linear(64 * 4 * 4, 500)
18        # linear layer (500 -> 10)
19        self.fc2 = nn.Linear(500, 10)
20        # dropout层 (p=0.3)
21        self.dropout = nn.Dropout(0.3)
22
23    def forward(self, x):
24        # add sequence of convolutional and max pooling layers
25        x = self.pool(F.relu(self.conv1(x)))
26        x = self.pool(F.relu(self.conv2(x)))
27        x = self.pool(F.relu(self.conv3(x)))
28        # flatten image input
29        x = x.view(-1, 64 * 4 * 4)
30        # add dropout layer
31        x = self.dropout(x)
32        # add 1st hidden layer, with relu activation function
33        x = F.relu(self.fc1(x))
34        # add dropout layer
35        x = self.dropout(x)
36        # add 2nd hidden layer, with relu activation function
37        x = self.fc2(x)
38        return x
39
40# create a complete CNN
41model = Net()
42print(model)
43
44# 使用GPU
45if train_on_gpu:
46    model.cuda()
结果:
1Net(
2  (conv1): Conv2d(3, 16, kernel_size=(3, 3), stride=(1, 1), padding=(1, 1))
3  (conv2): Conv2d(16, 32, kernel_size=(3, 3), stride=(1, 1), padding=(1, 1))
4  (conv3): Conv2d(32, 64, kernel_size=(3, 3), stride=(1, 1), padding=(1, 1))
5  (pool): MaxPool2d(kernel_size=2, stride=2, padding=0, dilation=1, ceil_mode=False)
6  (fc1): Linear(in_features=1024, out_features=500, bias=True)
7  (fc2): Linear(in_features=500, out_features=10, bias=True)
8  (dropout): Dropout(p=0.3, inplace=False)
9)
选择损失函数与优化函数
1import torch.optim as optim
2# 使用交叉熵损失函数
3criterion = nn.CrossEntropyLoss()
4# 使用随机梯度下降,学习率lr=0.01
5optimizer = optim.SGD(model.parameters(), lr=0.01)
训练卷积神经网络模型
注意:训练集和验证集的损失是如何随着时间的推移而减少的;如果验证损失不断增加,则表明可能过拟合现象。(实际上,在下面的例子中,如果n_epochs设置为40,可以发现存在过拟合现象!)
 1# 训练模型的次数
 2n_epochs = 30
 3
 4valid_loss_min = np.Inf # track change in validation loss
 5
 6for epoch in range(1, n_epochs+1):
 7
 8    # keep track of training and validation loss
 9    train_loss = 0.0
10    valid_loss = 0.0
11
12    ###################
13    # 训练集的模型 #
14    ###################
15    model.train()
16    for data, target in train_loader:
17        # move tensors to GPU if CUDA is available
18        if train_on_gpu:
19            data, target = data.cuda(), target.cuda()
20        # clear the gradients of all optimized variables
21        optimizer.zero_grad()
22        # forward pass: compute predicted outputs by passing inputs to the model
23        output = model(data)
24        # calculate the batch loss
25        loss = criterion(output, target)
26        # backward pass: compute gradient of the loss with respect to model parameters
27        loss.backward()
28        # perform a single optimization step (parameter update)
29        optimizer.step()
30        # update training loss
31        train_loss += loss.item()*data.size(0)
32
33    ######################
34    # 验证集的模型#
35    ######################
36    model.eval()
37    for data, target in valid_loader:
38        # move tensors to GPU if CUDA is available
39        if train_on_gpu:
40            data, target = data.cuda(), target.cuda()
41        # forward pass: compute predicted outputs by passing inputs to the model
42        output = model(data)
43        # calculate the batch loss
44        loss = criterion(output, target)
45        # update average validation loss
46        valid_loss += loss.item()*data.size(0)
47
48    # 计算平均损失
49    train_loss = train_loss/len(train_loader.sampler)
50    valid_loss = valid_loss/len(valid_loader.sampler)
51
52    # 显示训练集与验证集的损失函数
53    print('Epoch: {} \tTraining Loss: {:.6f} \tValidation Loss: {:.6f}'.format(
54        epoch, train_loss, valid_loss))
55
56    # 如果验证集损失函数减少,就保存模型。
57    if valid_loss <= valid_loss_min:
58        print('Validation loss decreased ({:.6f} --> {:.6f}).  Saving model ...'.format(
59        valid_loss_min,
60        valid_loss))
61        torch.save(model.state_dict(), 'model_cifar.pt')
62        valid_loss_min = valid_loss
结果:
 1Epoch: 1     Training Loss: 2.065666     Validation Loss: 1.706993
 2Validation loss decreased (inf --> 1.706993).  Saving model ...
 3Epoch: 2     Training Loss: 1.609919     Validation Loss: 1.451288
 4Validation loss decreased (1.706993 --> 1.451288).  Saving model ...
 5Epoch: 3     Training Loss: 1.426175     Validation Loss: 1.294594
 6Validation loss decreased (1.451288 --> 1.294594).  Saving model ...
 7Epoch: 4     Training Loss: 1.307891     Validation Loss: 1.182497
 8Validation loss decreased (1.294594 --> 1.182497).  Saving model ...
 9Epoch: 5     Training Loss: 1.200655     Validation Loss: 1.118825
10Validation loss decreased (1.182497 --> 1.118825).  Saving model ...
11Epoch: 6     Training Loss: 1.115498     Validation Loss: 1.041203
12Validation loss decreased (1.118825 --> 1.041203).  Saving model ...
13Epoch: 7     Training Loss: 1.047874     Validation Loss: 1.020686
14Validation loss decreased (1.041203 --> 1.020686).  Saving model ...
15Epoch: 8     Training Loss: 0.991542     Validation Loss: 0.936289
16Validation loss decreased (1.020686 --> 0.936289).  Saving model ...
17Epoch: 9     Training Loss: 0.942437     Validation Loss: 0.892730
18Validation loss decreased (0.936289 --> 0.892730).  Saving model ...
19Epoch: 10     Training Loss: 0.894279     Validation Loss: 0.875833
20Validation loss decreased (0.892730 --> 0.875833).  Saving model ...
21Epoch: 11     Training Loss: 0.859178     Validation Loss: 0.838847
22Validation loss decreased (0.875833 --> 0.838847).  Saving model ...
23Epoch: 12     Training Loss: 0.822664     Validation Loss: 0.823634
24Validation loss decreased (0.838847 --> 0.823634).  Saving model ...
25Epoch: 13     Training Loss: 0.787049     Validation Loss: 0.802566
26Validation loss decreased (0.823634 --> 0.802566).  Saving model ...
27Epoch: 14     Training Loss: 0.749585     Validation Loss: 0.785852
28Validation loss decreased (0.802566 --> 0.785852).  Saving model ...
29Epoch: 15     Training Loss: 0.721540     Validation Loss: 0.772729
30Validation loss decreased (0.785852 --> 0.772729).  Saving model ...
31Epoch: 16     Training Loss: 0.689508     Validation Loss: 0.768470
32Validation loss decreased (0.772729 --> 0.768470).  Saving model ...
33Epoch: 17     Training Loss: 0.662432     Validation Loss: 0.758518
34Validation loss decreased (0.768470 --> 0.758518).  Saving model ...
35Epoch: 18     Training Loss: 0.632324     Validation Loss: 0.750859
36Validation loss decreased (0.758518 --> 0.750859).  Saving model ...
37Epoch: 19     Training Loss: 0.616094     Validation Loss: 0.729692
38Validation loss decreased (0.750859 --> 0.729692).  Saving model ...
39Epoch: 20     Training Loss: 0.588593     Validation Loss: 0.729085
40Validation loss decreased (0.729692 --> 0.729085).  Saving model ...
41Epoch: 21     Training Loss: 0.571516     Validation Loss: 0.734009
42Epoch: 22     Training Loss: 0.545541     Validation Loss: 0.721433
43Validation loss decreased (0.729085 --> 0.721433).  Saving model ...
44Epoch: 23     Training Loss: 0.523696     Validation Loss: 0.720512
45Validation loss decreased (0.721433 --> 0.720512).  Saving model ...
46Epoch: 24     Training Loss: 0.508577     Validation Loss: 0.728457
47Epoch: 25     Training Loss: 0.483033     Validation Loss: 0.722556
48Epoch: 26     Training Loss: 0.469563     Validation Loss: 0.742352
49Epoch: 27     Training Loss: 0.449316     Validation Loss: 0.726019
50Epoch: 28     Training Loss: 0.442354     Validation Loss: 0.713364
51Validation loss decreased (0.720512 --> 0.713364).  Saving model ...
52Epoch: 29     Training Loss: 0.421807     Validation Loss: 0.718615
53Epoch: 30     Training Loss: 0.404595     Validation Loss: 0.729914
加载模型
1model.load_state_dict(torch.load('model_cifar.pt'))
结果:
1<All keys matched successfully>
测试训练好的网络
在测试数据上测试你的训练模型!一个“好”的结果将是CNN得到大约70%,这些测试图像的准确性。
 1# track test loss
 2test_loss = 0.0
 3class_correct = list(0. for i in range(10))
 4class_total = list(0. for i in range(10))
 5
 6model.eval()
 7# iterate over test data
 8for data, target in test_loader:
 9    # move tensors to GPU if CUDA is available
10    if train_on_gpu:
11        data, target = data.cuda(), target.cuda()
12    # forward pass: compute predicted outputs by passing inputs to the model
13    output = model(data)
14    # calculate the batch loss
15    loss = criterion(output, target)
16    # update test loss
17    test_loss += loss.item()*data.size(0)
18    # convert output probabilities to predicted class
19    _, pred = torch.max(output, 1)
20    # compare predictions to true label
21    correct_tensor = pred.eq(target.data.view_as(pred))
22    correct = np.squeeze(correct_tensor.numpy()) if not train_on_gpu else np.squeeze(correct_tensor.cpu().numpy())
23    # calculate test accuracy for each object class
24    for i in range(batch_size):
25        label = target.data[i]
26        class_correct[label] += correct[i].item()
27        class_total[label] += 1
28
29# average test loss
30test_loss = test_loss/len(test_loader.dataset)
31print('Test Loss: {:.6f}\n'.format(test_loss))
32
33for i in range(10):
34    if class_total[i] > 0:
35        print('Test Accuracy of %5s: %2d%% (%2d/%2d)' % (
36            classes[i], 100 * class_correct[i] / class_total[i],
37            np.sum(class_correct[i]), np.sum(class_total[i])))
38    else:
39        print('Test Accuracy of %5s: N/A (no training examples)' % (classes[i]))
40
41print('\nTest Accuracy (Overall): %2d%% (%2d/%2d)' % (
42    100. * np.sum(class_correct) / np.sum(class_total),
43    np.sum(class_correct), np.sum(class_total)))
结果:
 1Test Loss: 0.708721
 2
 3Test Accuracy of airplane: 82% (826/1000)
 4Test Accuracy of automobile: 81% (818/1000)
 5Test Accuracy of  bird: 65% (659/1000)
 6Test Accuracy of   cat: 59% (590/1000)
 7Test Accuracy of  deer: 75% (757/1000)
 8Test Accuracy of   dog: 56% (565/1000)
 9Test Accuracy of  frog: 81% (812/1000)
10Test Accuracy of horse: 82% (823/1000)
11Test Accuracy of  ship: 86% (866/1000)
12Test Accuracy of truck: 84% (848/1000)
13
14Test Accuracy (Overall): 75% (7564/10000)
显示测试样本的结果
 1# obtain one batch of test images
 2dataiter = iter(test_loader)
 3images, labels = dataiter.next()
 4images.numpy()
 5
 6# move model inputs to cuda, if GPU available
 7if train_on_gpu:
 8    images = images.cuda()
 9
10# get sample outputs
11output = model(images)
12# convert output probabilities to predicted class
13_, preds_tensor = torch.max(output, 1)
14preds = np.squeeze(preds_tensor.numpy()) if not train_on_gpu else np.squeeze(preds_tensor.cpu().numpy())
15
16# plot the images in the batch, along with predicted and true labels
17fig = plt.figure(figsize=(25, 4))
18for idx in np.arange(16):
19    ax = fig.add_subplot(2, 16/2, idx+1, xticks=[], yticks=[])
20    imshow(images.cpu()[idx])
21    ax.set_title("{} ({})".format(classes[preds[idx]], classes[labels[idx]]),
22                 color=("green" if preds[idx]==labels[idx].item() else "red"))
结果:

交流群
欢迎加入公众号读者群一起和同行交流,目前有SLAM、三维视觉、传感器、自动驾驶、计算摄影、检测、分割、识别、医学影像、GAN、算法竞赛等微信群(以后会逐渐细分),请扫描下面微信号加群,备注:”昵称+学校/公司+研究方向“,例如:”张三 + 上海交大 + 视觉SLAM“。请按照格式备注,否则不予通过。添加成功后会根据研究方向邀请进入相关微信群。请勿在群内发送广告,否则会请出群,谢谢理解~