视觉进阶 | 用于图像降噪的卷积自编码器
点击上方“小白学视觉”,选择加"星标"或“置顶”
重磅干货,第一时间送达
本文转自:磐创AI
作者|Dataman
编译|Arno
来源|Analytics Vidhya
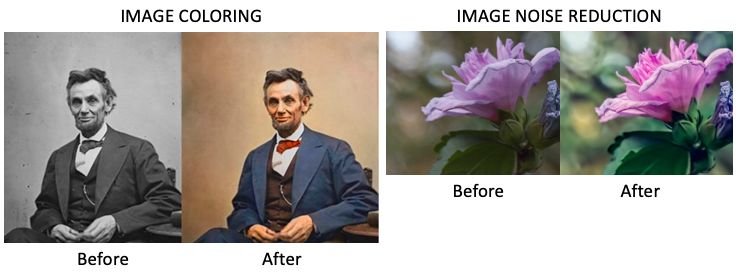
这篇文章的目的是介绍关于利用自动编码器实现图像降噪的内容。
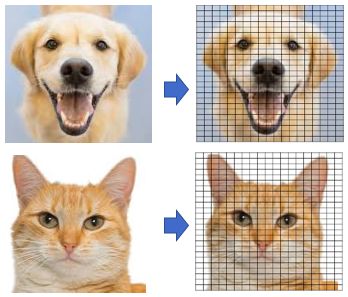
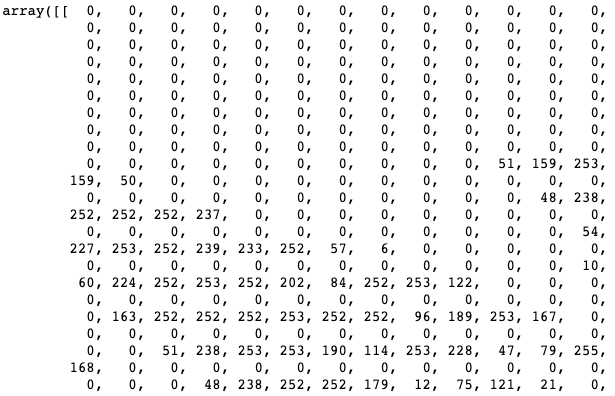
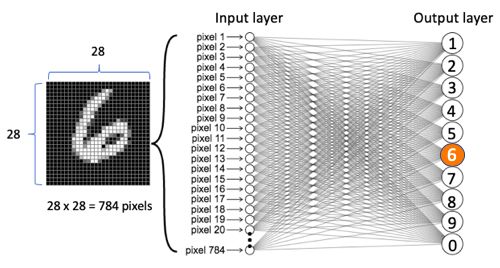
在神经网络世界中,对图像数据进行建模需要特殊的方法。其中最著名的是卷积神经网络(CNN或ConvNet)或称为卷积自编码器。并非所有的读者都了解图像数据,那么我先简要介绍图像数据(如果你对这方面已经很清楚了,可以跳过)。然后,我会介绍标准神经网络。这个标准神经网络用于图像数据,比较简单。这解释了处理图像数据时为什么首选的是卷积自编码器。最重要的是,我将演示卷积自编码器如何减少图像噪声。这篇文章将用上Keras模块和MNIST数据。Keras用Python编写,并且能够在TensorFlow上运行,是高级的神经网络API。
from keras.layers import Input, Dense
from keras.models import Model
from keras.datasets import mnist
import numpy as np
(x_train, _), (x_test, _) = mnist.load_data()
它们看起来怎么样?我们用绘图库及其图像功能imshow()展示前十条记录。
import matplotlib.pyplot as plt

n = 10  # 显示的记录数
plt.figure(figsize=(20, 4))
for i in range(n):
    # 显示原始图片
    ax = plt.subplot(2, n, i + 1)
    plt.imshow(x_test[i].reshape(28, 28))
    plt.gray()
    ax.get_xaxis().set_visible(False)
    ax.get_yaxis().set_visible(False)

plt.show()

图像数据的堆叠,用于训练
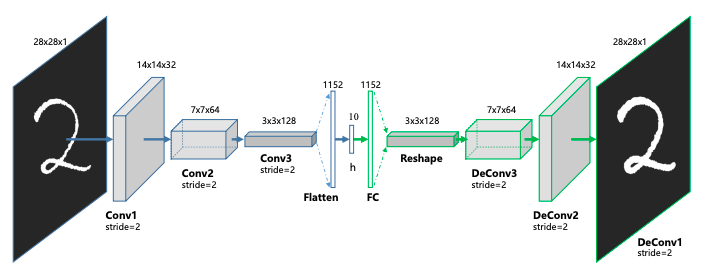
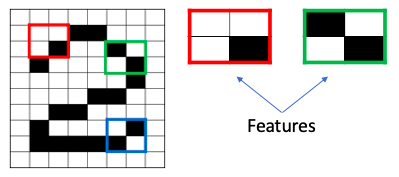
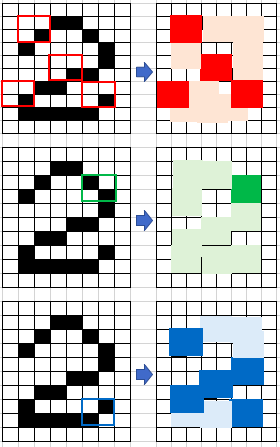
1. 卷积层
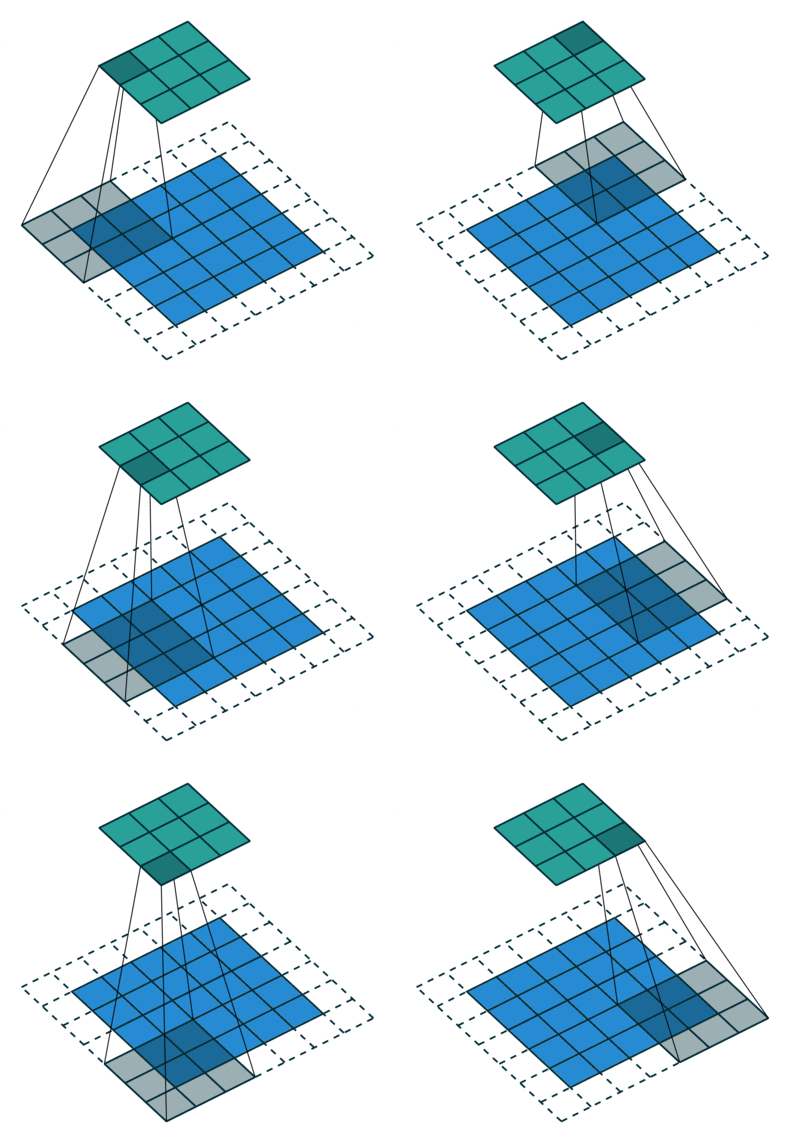
1.1填充
1.2步长
2.线性整流步骤
3.最大池化层
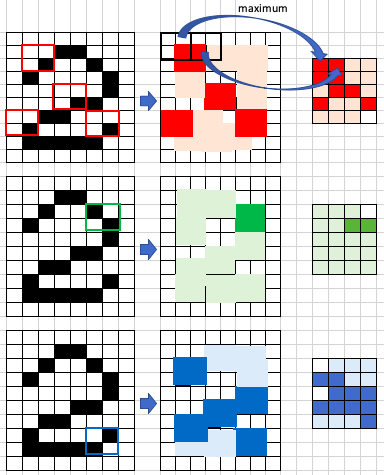

from keras.layers import Input, Dense, Conv2D, MaxPooling2D, UpSampling2D
from keras.models import Model

# 编码过程
input_img = Input(shape=(28, 28, 1))

############
# 编码 #
############

# Conv1 #
x = Conv2D(filters = 16, kernel_size = (3, 3), activation='relu', padding='same')(input_img)
x = MaxPooling2D(pool_size = (2, 2), padding='same')(x)

# Conv2 #
x = Conv2D(filters = 8, kernel_size = (3, 3), activation='relu', padding='same')(x)
x = MaxPooling2D(pool_size = (2, 2), padding='same')(x)

# Conv 3 #
x = Conv2D(filters = 8, (3, 3), activation='relu', padding='same')(x)
encoded = MaxPooling2D(pool_size = (2, 2), padding='same')(x)

# 注意:
# padding 是一个超参数,值'valid' or 'same'.
# "valid" 意味不需要填充
# "same" 填充输入,使输出具有与原始输入相同的长度。
然后,解码过程继续。因此,下面解码部分已全部完成编码和解码过程。
############
# 解码 #
############

# DeConv1
x = Conv2D(8, (3, 3), activation='relu', padding='same')(encoded)
x = UpSampling2D((2, 2))(x)

# DeConv2
x = Conv2D(8, (3, 3), activation='relu', padding='same')(x)
x = UpSampling2D((2, 2))(x)

# Deconv3
x = Conv2D(16, (3, 3), activation='relu')(x)
x = UpSampling2D((2, 2))(x)
decoded = Conv2D(1, (3, 3), activation='sigmoid', padding='same')(x)
该Keras API需要模型和优化方法的声明:
# 声明模型
autoencoder = Model(input_img, decoded)
autoencoder.compile(optimizer='adadelta', loss='binary_crossentropy')
# 训练模型
autoencoder.fit(x_train, x_train,
                epochs=100,
                batch_size=128,
                shuffle=True,
                validation_data=(x_test, x_test)
               )
decoded_imgs = autoencoder.predict(x_test)

n = 10

plt.figure(figsize=(20, 4))
for i in range(n):
    # 显示原始图像
    ax = plt.subplot(2, n, i + 1)
    plt.imshow(x_test[i].reshape(28, 28))
    plt.gray()
    ax.get_xaxis().set_visible(False)
    ax.get_yaxis().set_visible(False)

    # 显示重构后的图像
    ax = plt.subplot(2, n, i+1+n)
    plt.imshow(decoded_imgs[i].reshape(28, 28))
    plt.gray()
    ax.get_xaxis().set_visible(False)
    ax.get_yaxis().set_visible(False)
plt.show()

noise_factor = 0.4
x_train_noisy = x_train + noise_factor * np.random.normal(loc=0.0, scale=1.0, size=x_train.shape)
x_test_noisy = x_test + noise_factor * np.random.normal(loc=0.0, scale=1.0, size=x_test.shape)

x_train_noisy = np.clip(x_train_noisy, 0., 1.)
x_test_noisy = np.clip(x_test_noisy, 0., 1.)
前十张噪声图像如下所示:
n = 10
plt.figure(figsize=(20, 2))
for i in range(n):
    ax = plt.subplot(1, n, i+1)
    plt.imshow(x_test_noisy[i].reshape(28, 28))
    plt.gray()
    ax.get_xaxis().set_visible(False)
    ax.get_yaxis().set_visible(False)
plt.show()

然后,我们训练模型时将输入噪声数据,输出干净的数据。
autoencoder.fit(x_train_noisy, x_train,
                epochs=100,
                batch_size=128,
                shuffle=True,
                validation_data=(x_test_noisy, x_test)
               )
最后,我们打印出前十个噪点图像以及相应的降噪图像。
decoded_imgs = autoencoder.predict(x_test)

n = 10

plt.figure(figsize=(20, 4))
for i in range(n):
    # 显示原始图像
    ax = plt.subplot(2, n, i + 1)
    plt.imshow(x_test_noisy[i].reshape(28, 28))
    plt.gray()
    ax.get_xaxis().set_visible(False)
    ax.get_yaxis().set_visible(False)

    # 显示重构后的图像
    ax = plt.subplot(2, n, i+1+n)
    plt.imshow(decoded_imgs[i].reshape(28, 28))
    plt.gray()
    ax.get_xaxis().set_visible(False)
    ax.get_yaxis().set_visible(False)
plt.show()

交流群
欢迎加入公众号读者群一起和同行交流,目前有SLAM、三维视觉、传感器、自动驾驶、计算摄影、检测、分割、识别、医学影像、GAN、算法竞赛等微信群(以后会逐渐细分),请扫描下面微信号加群,备注:”昵称+学校/公司+研究方向“,例如:”张三 + 上海交大 + 视觉SLAM“。请按照格式备注,否则不予通过。添加成功后会根据研究方向邀请进入相关微信群。请勿在群内发送广告,否则会请出群,谢谢理解~
评论

