【CV】目标检测入门和实现思路!
一、目标检测基本概念
1. 什么是目标检测
目标检测是计算机视觉中的一个重要任务,近年来传统目标检测方法已经难以满足人们对目标检测效果的要求,随着深度学习在计算机视觉任务上取得的巨大进展,目前基于深度学习的目标检测算法已经成为主流。
相比较于基于深度学习的图像分类任务,目标检测任务更具难度,具体区别如下图所示。
图像分类:只需要判断输入的图像中是否包含感兴趣物体。
目标检测:需要在识别出图片中目标类别的基础上,还要精确定位到目标的具体位置,并用外接矩形框标出。
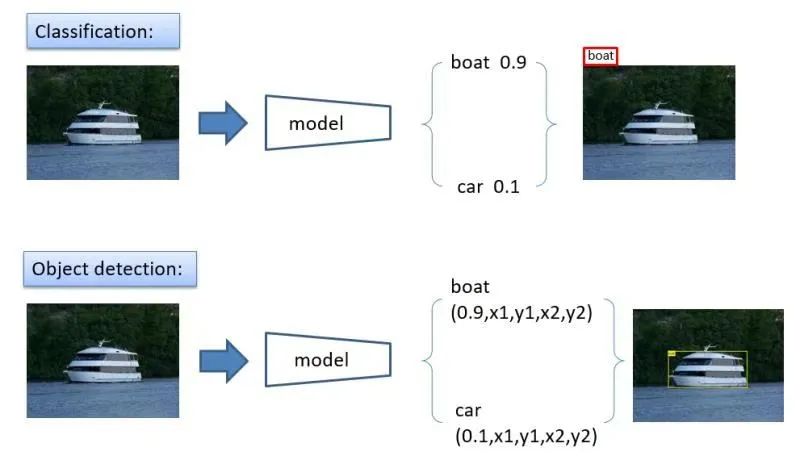 分类和目标检测任务示意图
2. 目标检测常用思路
自2012年Alex Krizhevsky凭借Alex在ImageNet图像分类挑战赛中拿下冠军之后,深度学习在图像识别尤其是图像分类领域开始大放异彩,大众的视野也重新回到深度神经网络中。紧接着,不断有更深更复杂的网络出现,一再刷新ImageNet图像分类比赛的记录。
大家发现,通过合理的构造,神经网络可以用来预测各种各样的实际问题。于是人们开始了基于CNN的目标检测研究, 但是随着进一步的探索大家发现,似乎CNN并不善于直接预测坐标信息。并且一幅图像中可能出现的物体个数也是不定的,模型如何构建也比较棘手。
因此,人们就想,如果知道了图中某个位置存在物体,再将对应的局部区域送入到分类网络中去进行判别,那我不就可以知道图像中每个物体的位置和类别了吗?
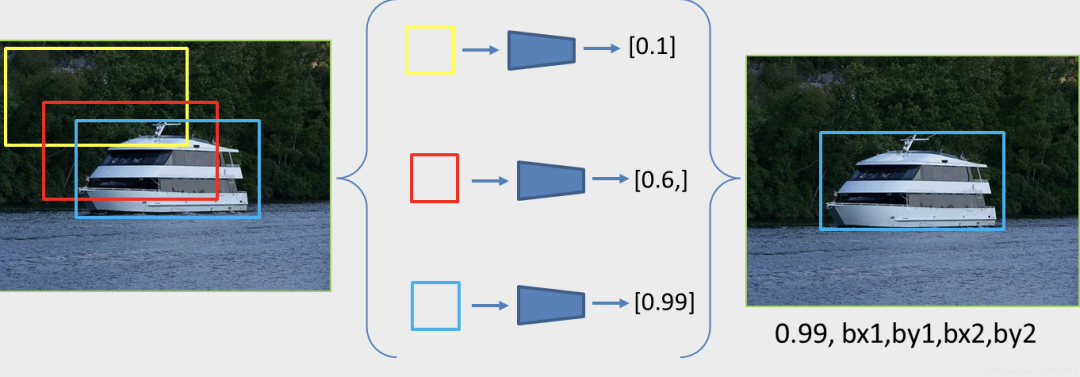
但是,怎么样才能知道每个物体的位置呢?显然我们是没办法知道的,但是我们可以去猜啊!所谓猜,其实就是通过滑窗的方式,罗列图中各种可能的区域,一个个去试,分别送入到分类网络进行分类得到其类别,同时我们会对当前的边界框进行微调,这样对于图像中每个区域都能得到(class,x1,y1,x2,y2)五个属性,汇总后最终就得到了图中物体的类别和坐标信息。
总结一下我们的这种方案思路:先确立众多候选框,再对候选框进行分类和微调。
观察下图,更形象的理解下这种思想:
3. 目标框定义方式
任何图像任务的训练数据都要包括两项,图片和真实标签信息,通常叫做GT。
图像分类中,标签信息是类别。目标检测的标签信息除了类别label以外,需要同时包含目标的位置信息,也就是目标的外接矩形框bounding box。
用来表达bbox的格式通常有两种,(x1, y1, x2, y2) 和 (c_x, c_y, w, h) ,如图所示:
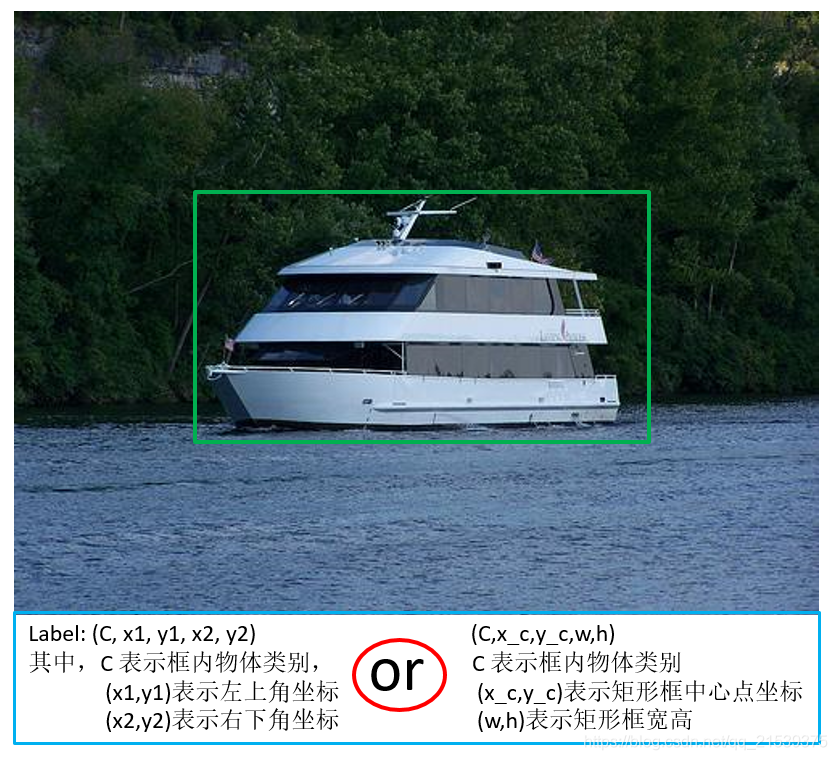
之所以使用两种不同的目标框信息表达格式,是因为两种格式会分别在后续不同场景下更加便于计算。
两种格式互相转换的实现在utils.py中,代码也非常简单:
def xy_to_cxcy(xy):
    """
    Convert bounding boxes from boundary coordinates (x_min, y_min, x_max, y_max) to center-size coordinates (c_x, c_y, w, h).

    :param xy: bounding boxes in boundary coordinates, a tensor of size (n_boxes, 4)
    :return: bounding boxes in center-size coordinates, a tensor of size (n_boxes, 4)
    """
    return torch.cat([(xy[:, 2:] + xy[:, :2]) / 2,  # c_x, c_y
                      xy[:, 2:] - xy[:, :2]], 1)  # w, h


def cxcy_to_xy(cxcy):
    """
    Convert bounding boxes from center-size coordinates (c_x, c_y, w, h) to boundary coordinates (x_min, y_min, x_max, y_max).

    :param cxcy: bounding boxes in center-size coordinates, a tensor of size (n_boxes, 4)
    :return: bounding boxes in boundary coordinates, a tensor of size (n_boxes, 4)
    """
    return torch.cat([cxcy[:, :2] - (cxcy[:, 2:] / 2),  # x_min, y_min
                      cxcy[:, :2] + (cxcy[:, 2:] / 2)], 1)  # x_max, y_max
用torch.cat()将两个形状为(n,2)的tensor在第一维度拼接成(n,4)。
4. 交并比(IoU)
在目标检测任务中,关于IOU的计算贯穿整个模型的训练测试和评价过程,是非常非常重要的一个概念,其目的是用来衡量两个目标框的重叠程度。
IoU的全称是交并比(Intersection over Union),表示两个目标框的交集占其并集的比例。下图为IOU计算示意图:
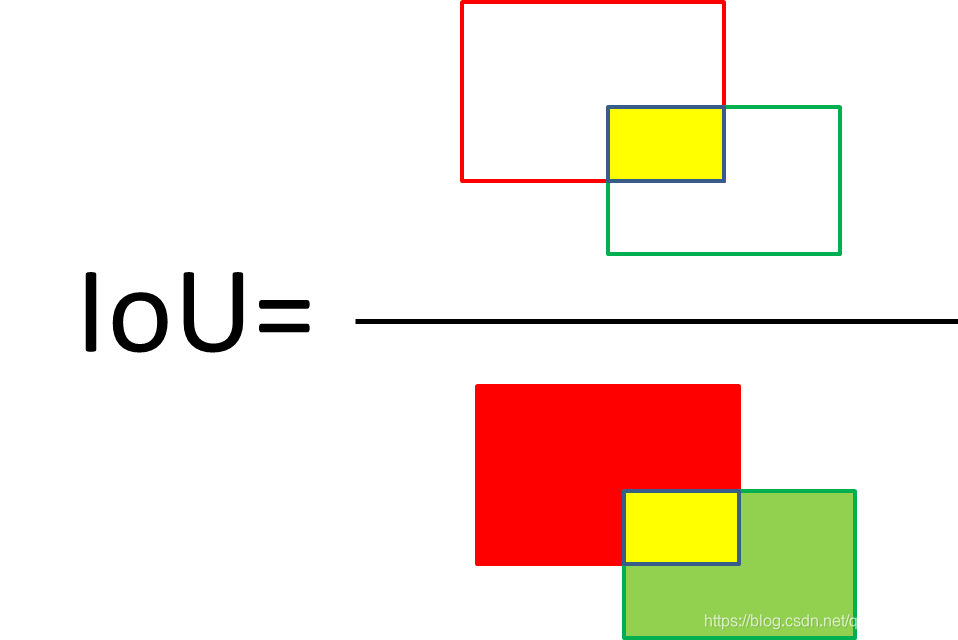
图中可以看到,分子中黄色区域为红bbox和绿bbox的交集,分母中黄+红+绿区域为红bbox和绿bbox的并集,两者之比即为iou。
那么具体怎么去计算呢?这里给出计算流程的简述:
首先获取两个框的坐标,红框坐标: 左上(red_x1, red_y1), 右下(red_x2, red_y2),绿框坐标: 左上(green_x1, green_y1),右下(green_x2, green_y2) 计算两个框左上点的坐标最大值:(max(red_x1, green_x1), max(red_y1, green_y1)), 和右下点坐标最小值:(min(red_x2, green_x2), min(red_y2, green_y2)) 利用2算出的信息计算黄框面积:yellow_area 计算红绿框的面积:red_area 和 green_area iou = yellow_area / (red_area + green_area - yellow_area)
如果文字表述的不够清晰,就再看下代码:
def find_intersection(set_1, set_2):
    """
    Find the intersection of every box combination between two sets of boxes that are in boundary coordinates.

    :param set_1: set 1, a tensor of dimensions (n1, 4)
    :param set_2: set 2, a tensor of dimensions (n2, 4)
    :return: intersection of each of the boxes in set 1 with respect to each of the boxes in set 2, a tensor of dimensions (n1, n2)
    """

    # PyTorch auto-broadcasts singleton dimensions
    lower_bounds = torch.max(set_1[:, :2].unsqueeze(1), set_2[:, :2].unsqueeze(0))  # (n1, n2, 2)
    upper_bounds = torch.min(set_1[:, 2:].unsqueeze(1), set_2[:, 2:].unsqueeze(0))  # (n1, n2, 2)
    intersection_dims = torch.clamp(upper_bounds - lower_bounds, min=0)  # (n1, n2, 2)
    return intersection_dims[:, :, 0] * intersection_dims[:, :, 1]  # (n1, n2)


def find_jaccard_overlap(set_1, set_2):
    """
    Find the Jaccard Overlap (IoU) of every box combination between two sets of boxes that are in boundary coordinates.

    :param set_1: set 1, a tensor of dimensions (n1, 4)
    :param set_2: set 2, a tensor of dimensions (n2, 4)
    :return: Jaccard Overlap of each of the boxes in set 1 with respect to each of the boxes in set 2, a tensor of dimensions (n1, n2)
    """

    # Find intersections
    intersection = find_intersection(set_1, set_2)  # (n1, n2)

    # Find areas of each box in both sets
    areas_set_1 = (set_1[:, 2] - set_1[:, 0]) * (set_1[:, 3] - set_1[:, 1])  # (n1)
    areas_set_2 = (set_2[:, 2] - set_2[:, 0]) * (set_2[:, 3] - set_2[:, 1])  # (n2)

    # Find the union
    # PyTorch auto-broadcasts singleton dimensions
    union = areas_set_1.unsqueeze(1) + areas_set_2.unsqueeze(0) - intersection  # (n1, n2)

    return intersection / union  # (n1, n2)
以上代码位于utils.py脚本的find_intersection和find_jaccard_overlap。
函数
find_intersectionfind_intersection(set_1, set_2)是求形状为 (n1,4) 和 (n2,4) 的boxes的交集的面积。set_1[:, :2]的形状为(n1,2),后面加上.unsqueeze(1),形状变为(n1,1,2)。同理set_2[:, :2].unsqueeze(0),形状为(1,n2,2)。(n1,1,2)和(1,n2,2),作了torch.max,有广播存在,(n1,1,2)变成(n1,n2,2) ,(1,n2,2)也变成(n1,n2,2)。因此得到了形状为(n1,n2,2)的框的左上角坐标 那个2 就是储存了x1,y1。
torch.clamp()是将函数限制在最大值和最小值范围内,如果超过就变成那个最大值或者最小值。这里min=0,意思是如果面积小于0,那么面积取0(排除异常)。函数
find_jaccard_overlap计算iou,交集/并集,最后union计算, 升维 (n1)->(n1,1) 、 (n2)->(1,n2) 、 接下去相加,广播成(n1,n2),减去一个(n1,n2)的交集面积,得到并集面积。
5. 小结
本小节首先介绍了目标检测的问题背景,随后分析了一个实现目标检测的解决思路,这也是众多经典检测网络所采用的思路(即先确立众多候选框,再对候选框进行分类和微调)。最后介绍了bbox和IoU这两个目标检测相关的基本概念。
下一篇将会从数据入手,介绍下目标检测领域最常见的一个数据集VOC,以及数据读取相关的代码。
往期精彩回顾
获取本站知识星球优惠券,复制链接直接打开:
https://t.zsxq.com/qFiUFMV
本站qq群704220115。
加入微信群请扫码:
