如何计算深度学习模型参数量和推理速度
大家好,我是DASOU;
1.FLOPs和Params计算
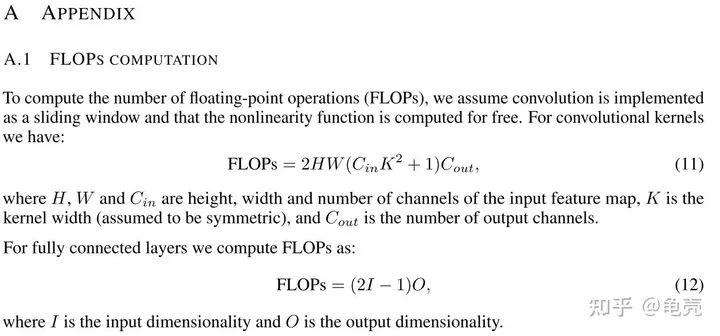
1.1概念理解
计算公式:
对卷积层:(K_h * K_w * C_in * C_out) * (H_out * W_out)
对全连接层:C_in * C_out

模型参数量计算公式为:
对卷积层:(K_h * K_w * C_in)* C_out
对全连接层:C_in * C_out

注意:
1.params只与你定义的网络结构有关,和forward的任何操作无关。即定义好了网络结构,参数就已经决定了。FLOPs和不同的层运算结构有关。如果forward时在同一层(同一名字命名的层)多次运算,FLOPs不会增加
2.Model_size = 4*params  模型大小约为参数量的4倍
补充:

1.2计算方法
'''
code by zzg-2020-05-19
pip install thop
'''
import torch
from thop import profile
from models.yolo_nano import YOLONano

device = torch.device("cpu")
#input_shape of model,batch_size=1
net = YOLONano(num_classes=20, image_size=416) ##定义好的网络模型

input = torch.randn(1, 3, 416, 416)
flops, params = profile(net, inputs=(input, ))

print("FLOPs=", str(flops/1e9) +'{}'.format("G"))
print("params=", str(params/1e6)+'{}'.format("M")
'''
在PyTorch中,可以使用torchstat这个库来查看网络模型的一些信息,包括总的参数量params、MAdd、显卡内存占用量和FLOPs等
pip install torchstat
'''
from torchstat import stat
from torchvision.models import resnet50
model = resnet50()
stat(model, (3, 224, 224))
#pip install ptflops
from ptflops import get_model_complexity_info
from torchvision.models import resnet50
model = resnet50()
flops, params = get_model_complexity_info(model, (3, 224, 224), as_strings=True, print_per_layer_stat=True)
print('Flops:  ' + flops)
print('Params: ' + params)
2.模型推理速度计算
2.1 模型推理速度正确计算
model = EfficientNet.from_pretrained(‘efficientnet-b0’)
device = torch.device(“cuda”)
model.to(device)
dummy_input = torch.randn(1, 3, 224, 224,dtype=torch.float).to(device)
starter, ender = torch.cuda.Event(enable_timing=True), torch.cuda.Event(enable_timing=True)
repetitions = 300
timings=np.zeros((repetitions,1))
#GPU-WARM-UP
for _ in range(10):
   _ = model(dummy_input)
# MEASURE PERFORMANCE
with torch.no_grad():
  for rep in range(repetitions):
     starter.record()
     _ = model(dummy_input)
     ender.record()
     # WAIT FOR GPU SYNC
     torch.cuda.synchronize()
     curr_time = starter.elapsed_time(ender)
     timings[rep] = curr_time
mean_syn = np.sum(timings) / repetitions
std_syn = np.std(timings)
mean_fps = 1000. / mean_syn
print(' * Mean@1 {mean_syn:.3f}ms Std@5 {std_syn:.3f}ms FPS@1 {mean_fps:.2f}'.format(mean_syn=mean_syn, std_syn=std_syn, mean_fps=mean_fps))
print(mean_syn)
2.2 模型吞吐量计算
(批次数 X 批次大小)/(以秒为单位的总时间)
model = EfficientNet.from_pretrained(‘efficientnet-b0’)
device = torch.device(“cuda”)
model.to(device)
dummy_input = torch.randn(optimal_batch_size, 3,224,224, dtype=torch.float).to(device)
repetitions=100
total_time = 0
with torch.no_grad():
  for rep in range(repetitions):
     starter, ender = torch.cuda.Event(enable_timing=True),torch.cuda.Event(enable_timing=True)
     starter.record()
     _ = model(dummy_input)
     ender.record()
     torch.cuda.synchronize()
     curr_time = starter.elapsed_time(ender)/1000
     total_time += curr_time
Throughput = (repetitions*optimal_batch_size)/total_time
print(‘Final Throughput:’,Throughput)
评论
