
用 XGBoost 开发随机森林集成

XGBoost提供了梯度增强的有效实现,可以将其配置为训练随机森林集成。 如何使用XGBoost API训练和评估随机森林集成模型以进行分类和回归。 如何调整XGBoost随机森林集成模型的超参数。
XGBoost的随机森林 随机森林的XGBoost API XGBoost分类随机森林 XGBoost回归随机森林 XGBoost随机森林超参数
XGBoost的实用机器学习简介
https://machinelearningmastery.com/gentle-introduction-xgboost-applied-machine-learning/
如何使用Python开发随机森林集成体
https://machinelearningmastery.com/random-forest-ensemble-in-python/
sudo pip install xgboost
# check xgboost version
import xgboost
# display version
print(xgboost.__version__)
1.0.2
# define the model
model = XGBRFClassifier()
# define the model
model = XGBRFClassifier(n_estimators=100)
# define the model
model = XGBRFClassifier(n_estimators=100, subsample=0.9)
# define the model
model = XGBRFClassifier(n_estimators=100, subsample=0.9, colsample_bynode=0.2)
XGBoost中的随机森林
https://xgboost.readthedocs.io/en/latest/tutorials/rf.html
make_classification()函数创建具有1,000个示例和20个输入特征的综合二进制分类问题。# test classification dataset
from sklearn.datasets import make_classification
# define dataset
X, y = make_classification(n_samples=1000, n_features=20, n_informative=15, n_redundant=5, random_state=7)
# summarize the dataset
print(X.shape, y.shape)
(1000, 20) (1000,)
# evaluate xgboost random forest algorithm for classification
from numpy import mean
from numpy import std
from sklearn.datasets import make_classification
from sklearn.model_selection import cross_val_score
from sklearn.model_selection import RepeatedStratifiedKFold
from xgboost import XGBRFClassifier
# define dataset
X, y = make_classification(n_samples=1000, n_features=20, n_informative=15, n_redundant=5, random_state=7)
# define the model
model = XGBRFClassifier(n_estimators=100, subsample=0.9, colsample_bynode=0.2)
# define the model evaluation procedure
cv = RepeatedStratifiedKFold(n_splits=10, n_repeats=3, random_state=1)
# evaluate the model and collect the scores
n_scores = cross_val_score(model, X, y, scoring='accuracy', cv=cv, n_jobs=-1)
# report performance
print('Mean Accuracy: %.3f (%.3f)' % (mean(n_scores), std(n_scores)))
Mean Accuracy: 0.891 (0.036)
prepare()函数对新数据进行预测。# make predictions using xgboost random forest for classification
from numpy import asarray
from sklearn.datasets import make_classification
from xgboost import XGBRFClassifier
# define dataset
X, y = make_classification(n_samples=1000, n_features=20, n_informative=15, n_redundant=5, random_state=7)
# define the model
model = XGBRFClassifier(n_estimators=100, subsample=0.9, colsample_bynode=0.2)
# fit the model on the whole dataset
model.fit(X, y)
# define a row of data
row = [0.2929949,-4.21223056,-1.288332,-2.17849815,-0.64527665,2.58097719,0.28422388,-7.1827928,-1.91211104,2.73729512,0.81395695,3.96973717,-2.66939799,3.34692332,4.19791821,0.99990998,-0.30201875,-4.43170633,-2.82646737,0.44916808]
row = asarray([row])
# make a prediction
yhat = model.predict(row)
# summarize the prediction
print('Predicted Class: %d' % yhat[0])
Predicted Class: 1
make_regression()函数创建具有1000个示例和20个输入要素的综合回归问题。下面列出了完整的示例。# test regression dataset
from sklearn.datasets import make_regression
# define dataset
X, y = make_regression(n_samples=1000, n_features=20, n_informative=15, noise=0.1, random_state=7)
# summarize the dataset
print(X.shape, y.shape)
(1000, 20) (1000,)
# evaluate xgboost random forest ensemble for regression
from numpy import mean
from numpy import std
from sklearn.datasets import make_regression
from sklearn.model_selection import cross_val_score
from sklearn.model_selection import RepeatedKFold
from xgboost import XGBRFRegressor
# define dataset
X, y = make_regression(n_samples=1000, n_features=20, n_informative=15, noise=0.1, random_state=7)
# define the model
model = XGBRFRegressor(n_estimators=100, subsample=0.9, colsample_bynode=0.2)
# define the model evaluation procedure
cv = RepeatedKFold(n_splits=10, n_repeats=3, random_state=1)
# evaluate the model and collect the scores
n_scores = cross_val_score(model, X, y, scoring='neg_mean_absolute_error', cv=cv, n_jobs=-1)
# report performance
print('MAE: %.3f (%.3f)' % (mean(n_scores), std(n_scores)))
MAE: -108.290 (5.647)
predict()函数对新数据进行预测。# gradient xgboost random forest for making predictions for regression
from numpy import asarray
from sklearn.datasets import make_regression
from xgboost import XGBRFRegressor
# define dataset
X, y = make_regression(n_samples=1000, n_features=20, n_informative=15, noise=0.1, random_state=7)
# define the model
model = XGBRFRegressor(n_estimators=100, subsample=0.9, colsample_bynode=0.2)
# fit the model on the whole dataset
model.fit(X, y)
# define a single row of data
row = [0.20543991,-0.97049844,-0.81403429,-0.23842689,-0.60704084,-0.48541492,0.53113006,2.01834338,-0.90745243,-1.85859731,-1.02334791,-0.6877744,0.60984819,-0.70630121,-1.29161497,1.32385441,1.42150747,1.26567231,2.56569098,-0.11154792]
row = asarray([row])
# make a prediction
yhat = model.predict(row)
# summarize the prediction
print('Prediction: %d' % yhat[0])
Prediction: 17
# explore xgboost random forest number of trees effect on performance
from numpy import mean
from numpy import std
from sklearn.datasets import make_classification
from sklearn.model_selection import cross_val_score
from sklearn.model_selection import RepeatedStratifiedKFold
from xgboost import XGBRFClassifier
from matplotlib import pyplot
# get the dataset
def get_dataset():
X, y = make_classification(n_samples=1000, n_features=20, n_informative=15, n_redundant=5, random_state=7)
return X, y
# get a list of models to evaluate
def get_models():
models = dict()
# define the number of trees to consider
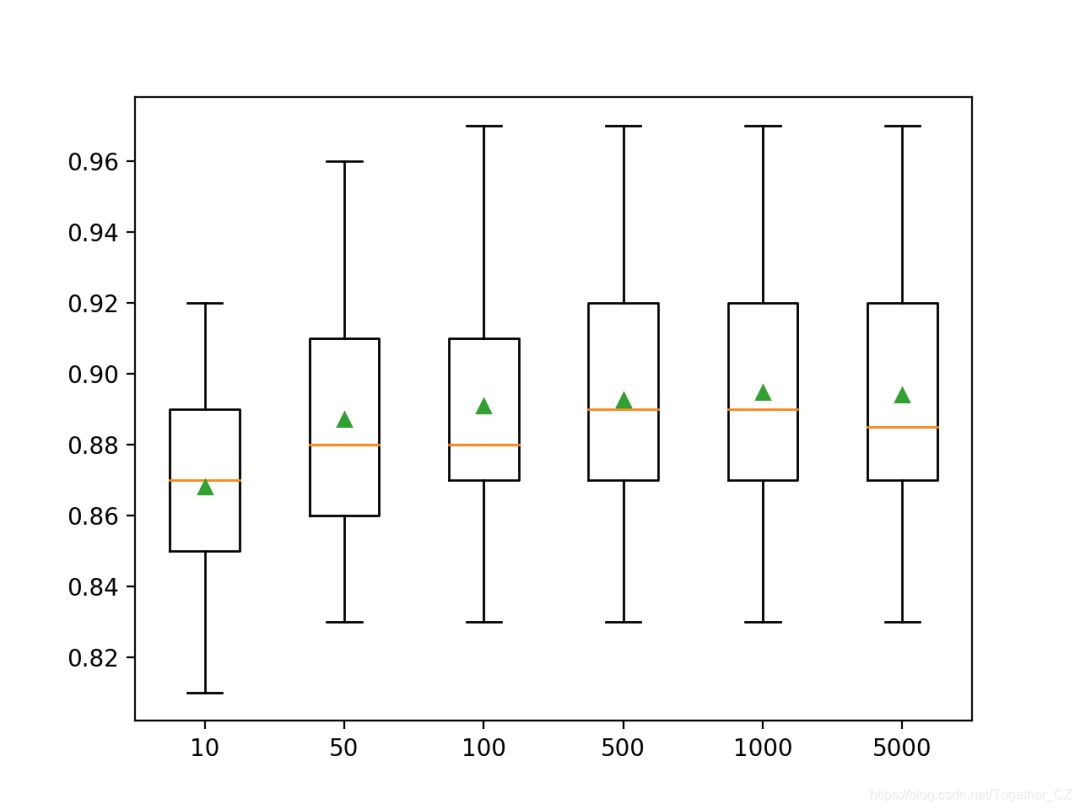
n_trees = [10, 50, 100, 500, 1000, 5000]
for v in n_trees:
models[str(v)] = XGBRFClassifier(n_estimators=v, subsample=0.9, colsample_bynode=0.2)
return models
# evaluate a give model using cross-validation
def evaluate_model(model, X, y):
# define the model evaluation procedure
cv = RepeatedStratifiedKFold(n_splits=10, n_repeats=3, random_state=1)
# evaluate the model
scores = cross_val_score(model, X, y, scoring='accuracy', cv=cv, n_jobs=-1)
return scores
# define dataset
X, y = get_dataset()
# get the models to evaluate
models = get_models()
# evaluate the models and store results
results, names = list(), list()
for name, model in models.items():
# evaluate the model and collect the results
scores = evaluate_model(model, X, y)
# store the results
results.append(scores)
names.append(name)
# summarize performance along the way
print('>%s %.3f (%.3f)' % (name, mean(scores), std(scores)))
# plot model performance for comparison
pyplot.boxplot(results, labels=names, showmeans=True)
pyplot.show()
>10 0.868 (0.030)
>50 0.887 (0.034)
>100 0.891 (0.036)
>500 0.893 (0.033)
>1000 0.895 (0.035)
>5000 0.894 (0.036)
# explore xgboost random forest number of features effect on performance
from numpy import mean
from numpy import std
from numpy import arange
from sklearn.datasets import make_classification
from sklearn.model_selection import cross_val_score
from sklearn.model_selection import RepeatedStratifiedKFold
from xgboost import XGBRFClassifier
from matplotlib import pyplot
# get the dataset
def get_dataset():
X, y = make_classification(n_samples=1000, n_features=20, n_informative=15, n_redundant=5, random_state=7)
return X, y
# get a list of models to evaluate
def get_models():
models = dict()
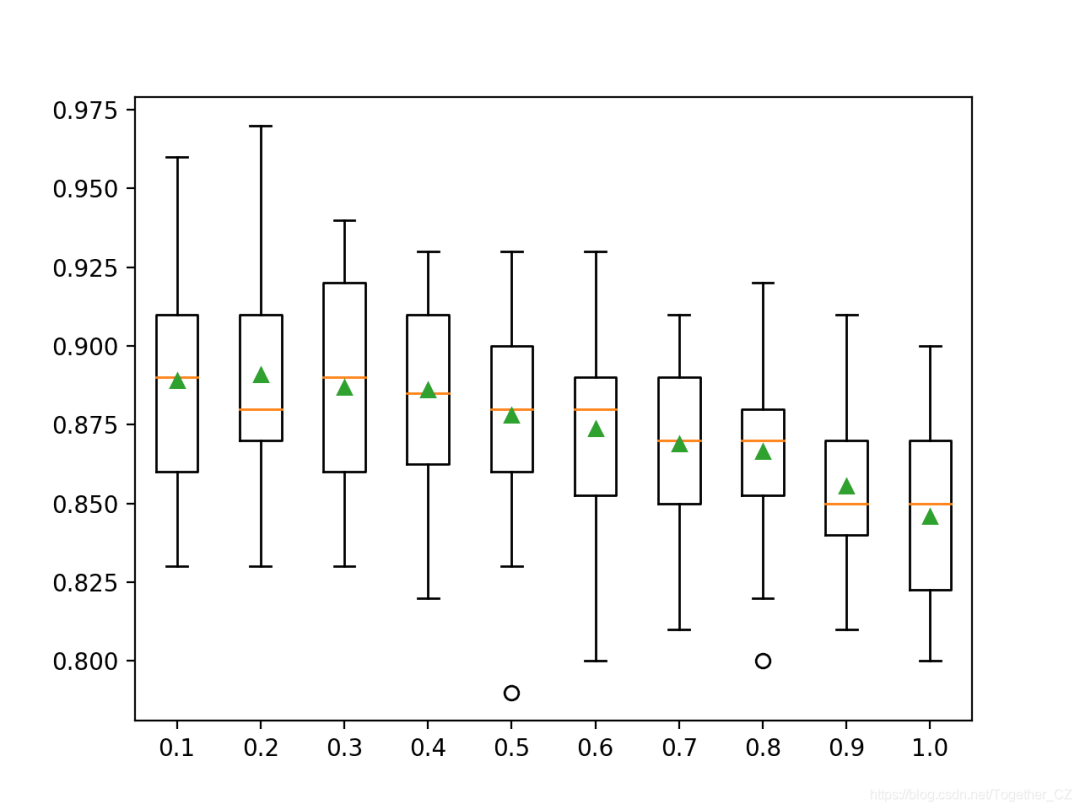
for v in arange(0.1, 1.1, 0.1):
key = '%.1f' % v
models[key] = XGBRFClassifier(n_estimators=100, subsample=0.9, colsample_bynode=v)
return models
# evaluate a give model using cross-validation
def evaluate_model(model, X, y):
# define the model evaluation procedure
cv = RepeatedStratifiedKFold(n_splits=10, n_repeats=3, random_state=1)
# evaluate the model
scores = cross_val_score(model, X, y, scoring='accuracy', cv=cv, n_jobs=-1)
return scores
# define dataset
X, y = get_dataset()
# get the models to evaluate
models = get_models()
# evaluate the models and store results
results, names = list(), list()
for name, model in models.items():
# evaluate the model and collect the results
scores = evaluate_model(model, X, y)
# store the results
results.append(scores)
names.append(name)
# summarize performance along the way
print('>%s %.3f (%.3f)' % (name, mean(scores), std(scores)))
# plot model performance for comparison
pyplot.boxplot(results, labels=names, showmeans=True)
pyplot.show()
>0.1 0.889 (0.032)
>0.2 0.891 (0.036)
>0.3 0.887 (0.032)
>0.4 0.886 (0.030)
>0.5 0.878 (0.033)
>0.6 0.874 (0.031)
>0.7 0.869 (0.027)
>0.8 0.867 (0.027)
>0.9 0.856 (0.023)
>1.0 0.846 (0.027)
作者:沂水寒城,CSDN博客专家,个人研究方向:机器学习、深度学习、NLP、CV
Blog: http://yishuihancheng.blog.csdn.net
赞 赏 作 者

更多阅读
特别推荐

点击下方阅读原文加入社区会员
评论