U-Net模型PyTorch实现【含代码+视频】
来源:投稿 作者:卷舒 编辑:学姐
模型总览
编码器结构 解码器结构 输入与输出 代码复现
Conv Block DownSample UpSample U-Net模型 Reference
前面说了过多的理论知识,可能有些乏味。现在我们来通过PyTorch来复现U-Net
模型总览

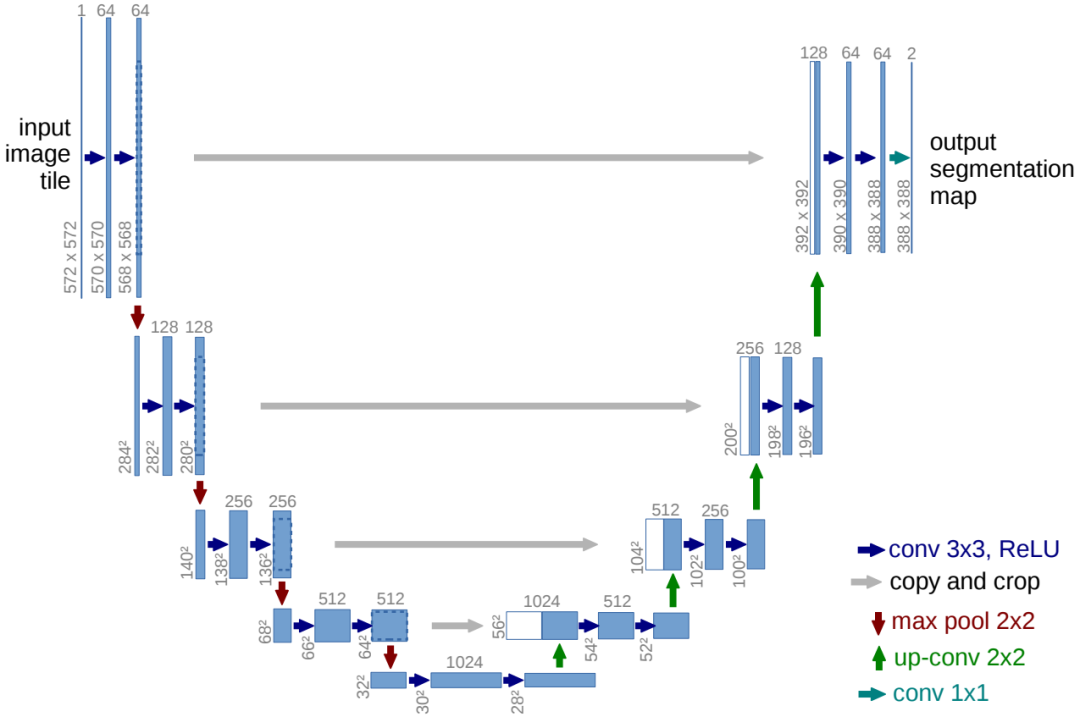
如上图(蓝色方块上方显示的是通道数,左下角显示的是数据的高宽)所示,U-Net的模型结构符合我们前面说的编码器/解码器结构 (Encoder/Decoder structure)
左边的contracting path就是编码器,从图片提取出特征;右边的expansive path就是解码器。
编码器结构
左边的编码器和典型的卷积网络结构相似,它由两个3×3没有填充的卷积操作和2×2步长为2的max pooling不断重复组成。并且每个卷积操作后面都有一个ReLU激活函数。
由于3×3卷积操作没有进行padding,所以每次卷积操作之后数据的宽高都会减少(k-1),k是卷积核的大小。如图,最初是的输入数据的宽高为572×572,经过一次3×3没有填充的卷积之后变成了570×570。
在每次max pooling的下采样中,数据的通道数会翻倍,但是宽高变为 表示输入形状,k是卷积核大小,s是步长。将k与s带入,可以知道,每次下采样数据的高宽都会减半。
解码器结构
右边的解码器与编码器相比有两点差异。
其一,编码器中max pooling的下采样改成了步长为2的 2×2 的转置卷积来进行上采样。这里数据的通道数会减半,同时数据的宽高都会变为。这里s步长,表示输入形状,k是卷积核大小。将k与 s 带入,可以得知,每次上采样数据的高宽都会翻倍 。
其二,在每次上采样之后有一个名为skip connection的操作,即图中的copy and crop。即将左侧对应的特征图与上采样的输出进行concatenation。
注意:
这里由于padding、stride与kernel size的选择,每次卷积操作,边界像素都会有损失。所以左侧的特征图高宽是大于右侧对应特征图的,所以这里论文中对左侧特征图先进行了crop,然后再与右侧特征图进行连接。而最后输出结果的形状远小于输入数据形状的原因也是因为卷积操作中边界像素的损失。
[同时,你也可以考虑对解码器的特征图做线性插值或者padding操作后再进行concatenation。或者在每次卷积操作中加入为1的padding,即可使卷积操作不损失边界且左右编码器解码器对应的特征图高宽一致(但是由于四次下采样每次数据高宽都减半,所以使用这种方法需要确保模型输入数据高宽是$2^4$的倍数)]
输入与输出
U-Net论文中的数据是单通道的灰度图,所以输入数据的通道数为1(如果是RGB图像即为3)输入后经过第一个卷积操作直接转换成了64通道的特征图,与后面的通道数翻倍增加不同。
最后得到的输出会经过1×1的卷积操作将64通道的特征图映射成所需的类别数。
代码复现
如图所示,U-Net主要由连续的两个conv 3×3 + ReLu,copy and crop,max pool下采样,up-conv转置卷积上采样和conv 1×1组成。
下面我们将分别实现连续的两个conv3×3+ReLu,下采样和上采样。
首先,我们导入必要的库
import torch
import torch.nn as nn
import torch.nn.functional as F
import torchvision
Conv Block
这里实现连续的两个conv3×3+ReLu
class conv_block(nn.Module):
    def __init__(self, in_channels, out_channels, padding=0):
        super().__init__()
        self.conv = nn.Sequential(
            nn.Conv2d(in_channels, out_channels, kernel_size=3,stride=1,padding=padding),
            nn.BatchNorm2d(out_channels),
            nn.ReLU(inplace=True),
            nn.Conv2d(out_channels, out_channels, kernel_size=3,stride=1,padding=padding),
            nn.BatchNorm2d(out_channels),
            nn.ReLU(inplace=True)
        )

    def forward(self,x):
        x = self.conv(x)
        return x
DownSample
这里的下采样包括max pool下采样和连续的两个conv3×3+ReLu。
class DownSample(nn.Module):
    def __init__(self, in_channels, out_channels, padding=0):
        super().__init__()
        self.maxpool_conv = nn.Sequential(
            nn.MaxPool2d(kernel_size=2, stride=2),
            conv_block(in_channels, out_channels, padding=padding)
        )

    def forward(self, x):
        return self.maxpool_conv(x)
UpSample
这里的上采样包括转置卷积上采样,并与左侧对应编码器的特征图concatenation。之后进行连续的两个conv3×3+ReLu。
class UpSample(nn.Module):
    def __init__(self, in_channels, out_channels, concat=0):
        super().__init__()
        """
        concat=0 -> do center crop
        concat=1 -> padding decoder feature map
        concat=2 -> padding=1 in conv_block
        """
        self.concat = concat
        if self.concat not in [0, 1, 2]:
            raise Exception('concat not in list of [0, 1, 2]')
        if self.concat == 2:
            padding = 1

        self.up = nn.ConvTranspose2d(in_channels, in_channels // 2, kernel_size=2, stride=2)
        self.conv = conv_block(in_channels, out_channels, padding=padding)

    def forward(self, x, x_copy):
        x = self.up(x)

        if self.concat == 0:
            B, C, H, W = x.shape
            x_copy = torchvision.transforms.CenterCrop([H, W])(x_copy)

        elif self.concat == 1:
            diffY = x_copy.size()[2] - x.size()[2]
            diffX = x_copy.size()[3] - x.size()[3]
            x = F.pad(x, [
                diffX // 2, diffX - diffX // 2,
                diffY // 2, diffY - diffY // 2
                ])

        x = torch.cat([x_copy, x], dim=1)
        return self.conv(x)
U-Net模型
前面通过PyTorch构造了U-Net模型编码器与解码器的各个模块,现在只需要将其拼接在一起就可以组成U-Net模型了。
class UNet(nn.Module):
    def __init__(self, n_channels, n_classes, concat=0):
        super().__init__()
        self.n_channels = n_channels
        self.n_classes = n_classes
        self.concat = concat

        if concat == 2:
            padding = 1
        else:
            padding = 0

        expansion = 2
        inplanes = 64
        chns = [inplanes, inplanes*expansion, inplanes*expansion**2, inplanes*expansion**3, inplanes*expansion**4]

        self.inc = conv_block(n_channels, chns[0], padding)
        self.down1 = DownSample(chns[0], chns[1], padding)
        self.down2 = DownSample(chns[1], chns[2], padding)
        self.down3 = DownSample(chns[2], chns[3], padding)
        self.down4 = DownSample(chns[3], chns[4], padding)

        self.up1 = UpSample(chns[-1], chns[-2], concat)
        self.up2 = UpSample(chns[-2], chns[-3], concat)
        self.up3 = UpSample(chns[-3], chns[-4], concat)
        self.up4 = UpSample(chns[-4], chns[-5], concat)
        self.outc = nn.Conv2d(chns[-5], n_classes, kernel_size=1)

    def forward(self, x):
        e1 = self.inc(x)
        e2 = self.down1(e1)
        e3 = self.down2(e2)
        e4 = self.down3(e3)
        e5 = self.down4(e4)

        x = self.up1(e5, e4)
        x = self.up2(x, e3)
        x = self.up3(x, e2)
        x = self.up4(x, e1)
        logits = self.outc(x)

        return logits
以上就是U-Net模型PyTorch的实现。
Reference
Ronneberger, Olaf, Philipp Fischer, and Thomas Brox. "U-net: Convolutional networks for biomedical image segmentation." International Conference on Medical image computing and computer-assisted intervention. Springer, Cham, 2015.APA
Milesial. “U-Net: Semantic segmentation with PyTorch” https://github.com/milesial/Pytorch-UNet
推荐阅读
全网最全速查表:Python 机器学习 搭建完美的Python 机器学习开发环境 训练集,验证集,测试集,交叉验证
