【深度学习】深度学习之Pytorch基础教程!

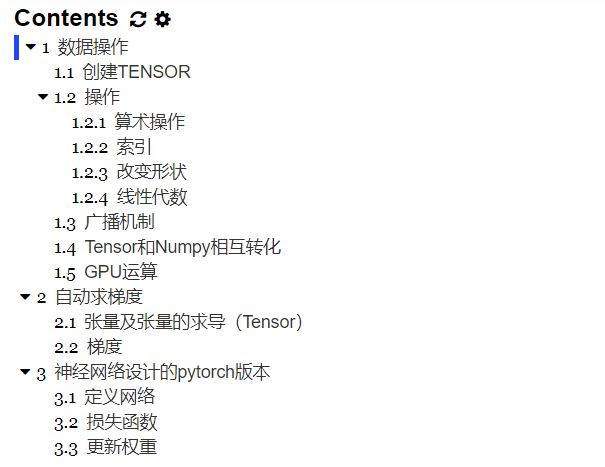
一、数据操作
import torch# 创建未初始化的Tensorx = torch.empty(5,3)print(x)

# 创建随机初始化的Tensorx = torch.rand(5,3)print(x)

# 创建全为0的Tensorx = torch.zeros(5,3,dtype=torch.long)print(x)

# 根据数据创建Tensorx = torch.tensor([5.5,3])print(x)

# 修改原Tensor为全1的Tensorx = x.new_ones(5,3,dtype=torch.float64)print(x)# 修改数据类型x = torch.rand_like(x,dtype=torch.float64)print(x)

# 获取Tensor的形状print(x.size())print(x.shape)# 注意:返回的torch.Size其实就是⼀一个tuple, ⽀支持所有tuple的操作。

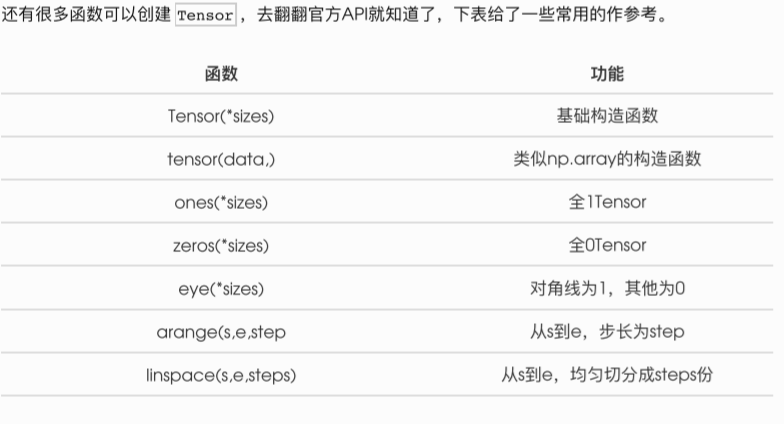
这些创建方法都可以在创建的时候指定数据类型dtype和存放device(cpu/gpu)。
1.2.1 算术操作
在PyTorch中,同⼀种操作可能有很多种形式,下⾯面⽤用加法作为例子。
# 形式1:y = torch.rand(5,3)print(x+y)

# 形式2print(torch.add(x,y))# 还可以指定输出result = torch.empty(5, 3)torch.add(x, y, out=result)print(result)

# 形式3y.add_(x)print(y)

我们还可以使⽤类似NumPy的索引操作来访问 Tensor 的一部分,需要注意的是:索引出来的结果与原数据共享内存,也即修改⼀个,另⼀个会跟着修改。
y = x[0,:]y += 1print(y)print(x[0,:]) # 观察x是否改变了

1.2.3 改变形状
注意 view() 返回的新tensor与源tensor共享内存(其实是同⼀个tensor),也即更改其中的⼀个,另 外⼀个也会跟着改变。(顾名思义,view仅是改变了对这个张量的观察角度)
y = x.view(15)z = x.view(-1,5) # -1所指的维度可以根据其他维度的值推出来print(x.size(),y.size(),z.size())

x += 1print(x)print(y)

所以如果我们想返回⼀个真正新的副本(即不共享内存)该怎么办呢?Pytorch还提供了⼀ 个 reshape() 可以改变形状,但是此函数并不能保证返回的是其拷贝,所以不推荐使用。推荐先 ⽤ clone 创造一个副本然后再使⽤ view 。
x_cp = x.clone().view(15)x -= 1print(x)print(x_cp)

另外⼀个常用的函数就是 item() , 它可以将⼀个标量 Tensor 转换成⼀个Python
number:x = torch.randn(1)print(x)print(x.item())

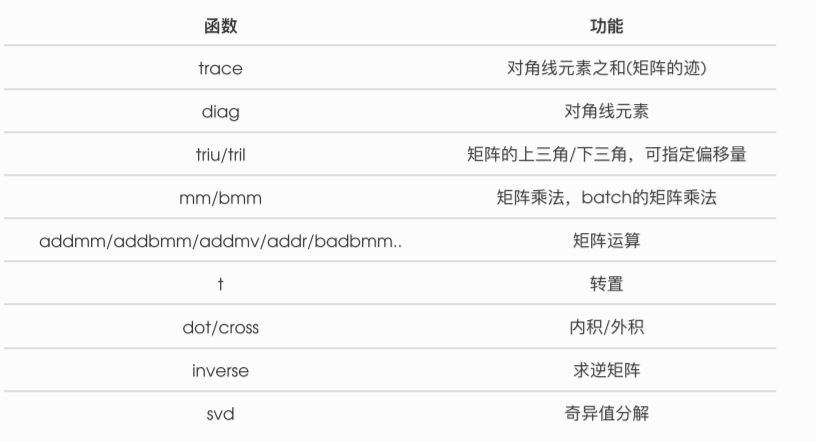
1.2.4 线性代数
1.3 广播机制
前⾯我们看到如何对两个形状相同的 Tensor 做按元素运算。当对两个形状不同的 Tensor 按元素运算时,可能会触发广播(broadcasting)机制:先适当复制元素使这两个 Tensor 形状相同后再按元素运算。例如:
x = torch.arange(1,3).view(1,2)print(x)y = torch.arange(1,4).view(3,1)print(y)print(x+y)

1.4 Tensor和Numpy相互转化
我们很容易⽤ numpy() 和 from_numpy() 将 Tensor 和NumPy中的数组相互转换。但是需要注意的⼀点是:这两个函数所产生的的 Tensor 和NumPy中的数组共享相同的内存(所以他们之间的转换很快),改变其中⼀个时另⼀个也会改变!!!
a = torch.ones(5)b = a.numpy()print(a,b)

a += 1print(a,b)

b += 1print(a,b)

使⽤ from_numpy() 将NumPy数组转换成 Tensor :
import numpy as npa = np.ones(5)b = torch.from_numpy(a)print(a,b)

a += 1print(a,b)b += 1print(a,b)

1.5 GPU运算
# let us run this cell only if CUDA is available# We will use ``torch.device`` objects to move tensors in and out of GPUif torch.cuda.is_available():device = torch.device("cuda") # a CUDA device objecty = torch.ones_like(x, device=device) # directly create a tensor on GPUx = x.to(device) # or just use strings ``.to("cuda")``z = x + yprint(z)print(z.to("cpu", torch.double)) # ``.to`` can also change dtype together!

二、自动求梯度(非常重要)

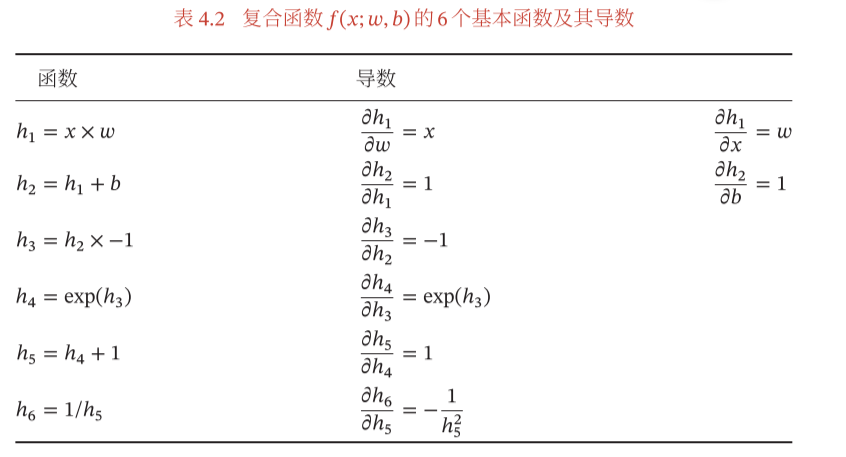
 处的导数。我们的做法是利用链式法则分解为一系列的操作:
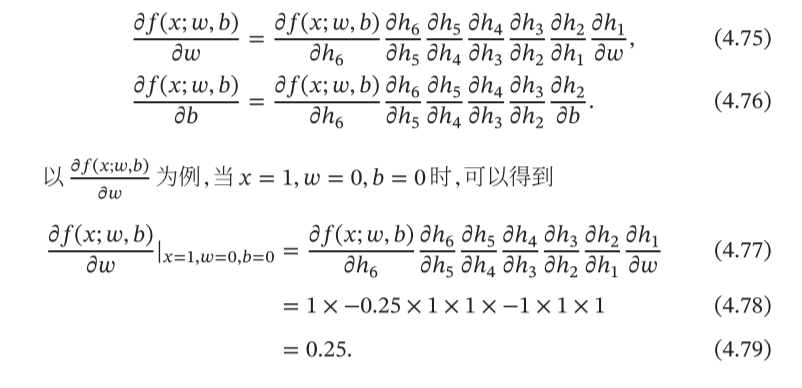
2.1 张量及张量的求导(Tensor)
# 加入requires_grad=True参数可追踪函数求导x = torch.ones(2,2,requires_grad=True)print(x)print(x.grad_fn)

# 进行运算y = x + 2print(y)print(y.grad_fn) # 创建了一个加法操作

像x这种直接创建的称为叶子节点,叶子节点对应的 grad_fn 是 None 。
print(x.is_leaf,y.is_leaf)
# 整点复杂的操作z = y * y * 3out = z.mean()print(z,out)

a = torch.randn(2,2) # 缺失情况下默认 requires_grad = Falsea = ((a*3)/(a-1))print(a.requires_grad) # Falsea.requires_grad_(True)print(a.requires_grad)b = (a*a).sum()print(b.grad_fn)

现在让我们反向传播:因为out包含单个标量,out.backward()所以等效于out.backward(torch.tensor(1.))。
out.backward()print(x.grad)

# 再来反向传播⼀次,注意grad是累加的out2 = x.sum()out2.backward()print(x.grad)out3 = x.sum()x.grad.data.zero_()out3.backward()print(x.grad)

定义具有一些可学习参数(或权重)的神经网络
遍历输入数据集
通过网络处理输入
计算损失(输出正确的距离有多远)
将梯度传播回网络参数
通常使用简单的更新规则来更新网络的权重:weight = weight - learning_rate * gradient

import torchimport torch.nn as nnimport torch.nn.functional as Fclass Net(nn.Module):def __init__(self):super(Net,self).__init__()# 1 input image channel, 6 output channels, 3x3 square convolution# kernelself.conv1 = nn.Conv2d(1,6,3)self.conv2 = nn.Conv2d(6,16,3)# an affine operation: y = Wx + bself.fc1 = nn.Linear(16*6*6,120) # 6*6 from image dimensionself.fc2 = nn.Linear(120,84)self.fc3 = nn.Linear(84,10)def forward(self,x):# Max pooling over a (2, 2) windowx = F.max_pool2d(F.relu(self.conv1(x)),(2,2)) # CLASStorch.nn.MaxPool2d(kernel_size, stride=None, padding=0, dilation=1, return_indices=False, ceil_mode=False)x = F.max_pool2d(F.relu(self.conv2(x)),2)x = x.view(-1,self.num_flat_features(x))x = F.relu(self.fc1(x))x = F.relu(self.fc2(x))x = self.fc3(x)return xdef num_flat_features(self,x):size = x.size()[1:] # all dimensions except the batch dimensionnum_features = 1for s in size:num_features *= sprint(num_features)return num_featuresnet = Net()print(net)

# 模型的可学习参数由返回 net.parameters()params = list(net.parameters())print(len(params))print(params[0].size()) # conv1's .weight

# 尝试一个32x32随机输入input = torch.randn(1,1,32,32)out = net(input)print(out)

# 用随机梯度将所有参数和反向传播器的梯度缓冲区归零:net.zero_grad()out.backward(torch.randn(1,10))
output = net(input)target = torch.randn(10) # a dummy target, for exampletarget = target.view(-1,1) # # make it the same shape as outputcriterion = nn.MSELoss()loss = criterion(output,target)print(loss)


# 如果loss使用.grad_fn属性的属性向后移动,可查看网络结构print(loss.grad_fn) # MSELossprint(loss.grad_fn.next_functions[0][0]) # Linearprint(loss.grad_fn.next_functions[0][0].next_functions[0][0]) # ReLU

weight = weight - learning_rate * gradient
import torch.optim as optim# create your optimizeroptimizer = optim.SGD(net.parameters(),lr = 0.01)# in your training loop:optimizer.zero_grad() # zero the gradient buffersoutput = net(input)loss = criterion(output,target)loss.backward()optimizer.step()
576
四、写到最后
关于Pytorch的项目实践,阿里天池「零基础入门NLP」学习赛中提供了Pytorch版实践教程,供学习参考(阅读原文直接跳转):
往期精彩回顾
获取一折本站知识星球优惠券,复制链接直接打开:
https://t.zsxq.com/yFQV7am
本站qq群1003271085。
加入微信群请扫码进群:
