30分钟 Keras 创建一个图像分类器
深度学习是使用人工神经网络进行机器学习的一个子集,目前已经被证明在图像分类方面非常强大。尽管这些算法的内部工作在数学上是严格的,但 Python 库(比如 keras)使这些问题对我们所有人都可以接近。在本文中,我将介绍一个简单的图像分类器的设计,它使用人工神经网络将食物图像分为两类:披萨或意大利面。
下载图片
为了训练我们的模型,我们将需要下载大量比萨饼和意大利面的图像,这是一个可能非常繁琐的任务,通过 bing-image-downloader Python 库可以非常容易地完成。
# Install Bing image downloaderpip install bing-image-downloader
现在,我们已经安装了 bing-image-downloader,我们可以很容易地抓取500张比萨饼和意大利面的照片用于训练和测试我们的模型!
# Import bing-image-downloaderfrom bing_image_downloader import downloader# Download imagesdownloader.download("pizza", limit=500, output_dir="photos")downloader.download("pasta", limit=500, output_dir="photos")
这应该需要几分钟,之后你将有两个子目录下的照片称为比萨饼和面食,每个包含500张照片。这很简单!
数据整理
为了将我们的数据转换成对我们的模型有利的格式,我们需要使用 glob、 pandas、 numpy 和 PIL 库。
# Import packagesimport globimport numpy as npimport pandas as pdfrom PIL import Image
我们将使用 glob 来收集我们下载的所有图像的文件路径。为此,我们使用 * 通配符分配变量,以对应目录中的所有文件。
# Filepaths for the pizza and pasta imagesfilepath_pizza = "./photos/pizza/*"filepath_pasta = "./photos/pasta/*"
现在,我们可以使用 glob 创建列表,其中每个元素都包含文件夹中单个图像的文件路径:
# Collect all the image filepaths into listspizza_files = [file for file in glob.iglob(filepath_pizza)]pasta_files = [file for file in glob.iglob(filepath_pasta)]
使用所有的文件路径,我们现在可以构建一个 pandas 数据框架,我们可以在其中跟踪文件路径及其相关标签(比萨或意大利面)。在这种情况下,我们将给披萨图像一个0的标签,给意大利面图像一个1的标签。为了方便地为这些标签创建数组,我们可以使用 np.zeros()和 np.ones():
# Construct pandas dataframe with all the image filenames and labelsdf_photos = (pd.DataFrame({"filepath": pizza_files, "label": np.zeros(len(pizza_files))}).append(pd.DataFrame({"filepath": pasta_files, "label": np.ones(len(pasta_files))})))
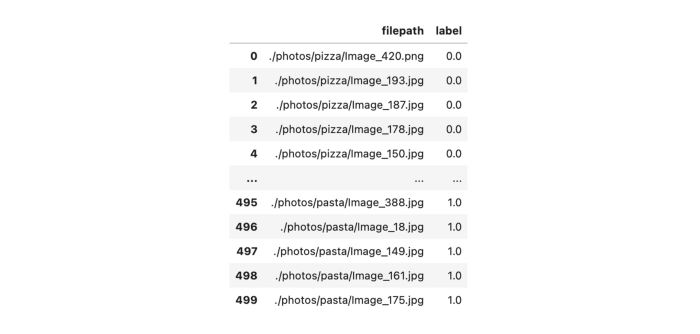
现在,我们希望将数据集拆分为训练数据和测试数据。幸运的是,scikit-learn 有一个非常简单的功能,可以直接在我们的 pandas 数据库上为我们实现这个功能。我们需要设置 test_size ,它是我们用于测试集数据的一个百分比,并且,通过指定 random_state,我们可以使拆分的结果可重复进行以进行后续测试。最后,我们将重新设置并删除新数据流的索引,因为 train_test_split 会自动为我们分配数据,所以旧的索引值现在没有意义了。
# Import train_test_splitfrom sklearn.model_selection import train_test_split# Split our datasetdf_train, df_test = train_test_split(df_photos, test_size=0.2, random_state=1)df_train.reset_index(drop=True, inplace=True)df_test.reset_index(drop=True, inplace=True)
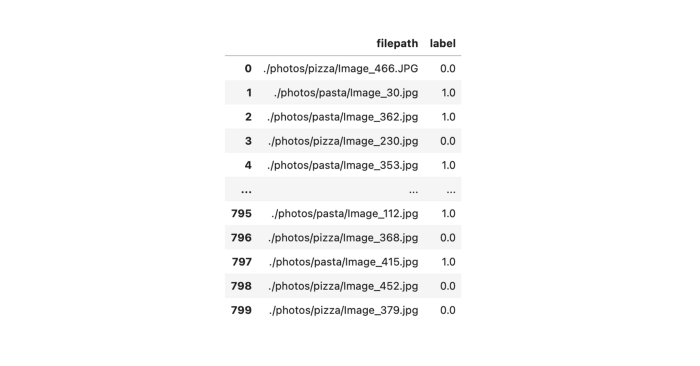
我们的训练数据集已经将数据与其相关的标签混合在一起
我们有我们的图像和标签到一个可接受的形式,现在我们必须从文件路径加载我们的图像。我们将 PIL.Image 封装到一个函数中,该函数将加载图像,将其调整为128 x 128像素,将其转换为灰度图像,并将亮度正常化为0到1之间的值。
# Wrapper function to load and process imagesdef process_image(filepath):return np.asarray(Image.open(filepath).resize((128, 128)).convert("L")) / 255.0
让我们来测试一下我们的封装函数,我们可以从 pizza_files 文件中加载第一张图片,然后绘制出来看:
# Load imageimg = process_images(pizza_files[0])# Plot imagefig = plt.figure(figsize=(5, 5))ax = fig.add_subplot(111)ax.imshow(img, cmap="gray")ax.set_xticks([])ax.set_yticks([])plt.show()
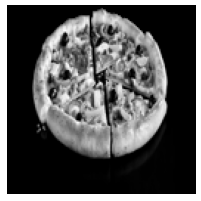
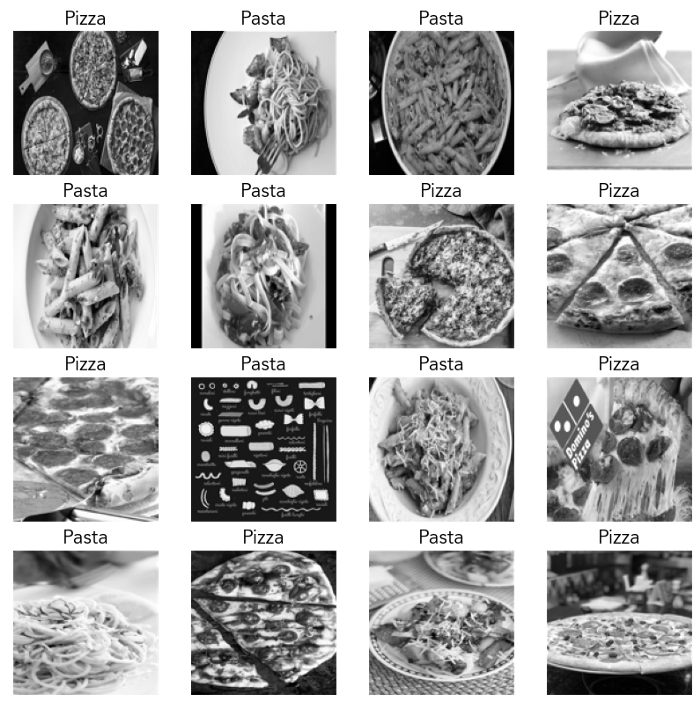
酷!现在让我们继续从我们的训练集中绘制16张图片,连同它们的相关标签,来了解我们的数据是什么样的:
# Plot 16 images from our training set with labelsfig = plt.figure(figsize=(10, 10))for i in range(16):plt.subplot(4, 4, i+1)img = process_image(df_train["filepath"].iloc[i])plt.imshow(img, cmap="gray")plt.grid(False)plt.xticks([])plt.yticks([])if df_train["label"].iloc[i] == 0:plt.title("Pizza", size=16)else:plt.title("Pasta", size=16)plt.show()
在构建分类器之前,我们需要做的最后一件事是将所有的图像和标签加载到数组中,以便加载到模型中。对于我们的图像,我们首先创建一个空的 numpy 数组,其长度等于训练集中图像的数量。这个数组的每个元素都是一个128 x 128的矩阵,代表一幅图像。我们也可以对我们的测试集图像做同样的事情。
# Create array of training imagestrain_images = np.empty([df_train.shape[0], 128, 128])for index, row in df_train.iterrows():img = process_image(row.filepath)train_images[index] = img# Create array of test imagestest_images = np.empty([df_test.shape[0], 128, 128])for index, row in df_test.iterrows():img = process_image(row.filepath)test_images[index] = img
我们可以看到一个示例图像看起来像一个 numpy 数组:
>>> train_images[0]array([[0.12941176, 0.12156863, 0.12941176, ..., 0.10588235, 0.10588235,0.09803922],[0.09803922],[0.09803922],...,[0.0745098 ],[0.0745098 ],[0.0745098 ]])
制作训练标签和测试标签的数组更加简单 —— 我们已经在数据框的一列中有了值,所以我们只需将这列转换为 numpy 数组:
# Create array of training labelstrain_labels = df_train["label"].to_numpy()# Create array of test labelstest_labels = df_test["label"].to_numpy()
我们现在准备构建和训练我们的模型!
模型构建与训练
我们将使用 keras 创建我们的模型,keras 是一个用于创建人工神经网络的高级 API。我们首先导入所需的软件包:
# Import kerasimport tensorflow.keras as keras
我们的模型将由一系列层组成,我们将它们封装在 keras.Sequential() 中。神经网络通常包括:
一个输入层ーー将数据输入其中
一个或多个隐藏层ーー数据流经这些层,这些层具有激活函数,以确定节点的输入如何影响输出
输出层ーー读取最终的输出神经元以确定分类
在我们的示例中,我们将有一个输入层、一个隐藏层和一个输出层。我们的模型将构建如下:
输入层将图像压平为一维(128 x 128 = 16384个输入节点)
隐藏层有256个节点——我们将使用的激活函数是一个rectified linear unit,但你可以使用其他方法,例如sigmoid function
输出层有2个节点(分别对应于比萨和意大利面)ー我们将添加一个softmax function 。因此,每个节点上的值代表了我们的分类器认为图像是披萨或意大利面的概率
# Create our modelmodel = keras.Sequential([keras.layers.Flatten(input_shape=(128, 128)),keras.layers.Dense(256, activation="relu"),keras.layers.Dense(2, activation="softmax")])
我们可以查看我们的模型:
model.summary()Model: "sequential"_________________________________________________________________Layer (type) Output Shape Param #=================================================================flatten (Flatten) (None, 16384) 0_________________________________________________________________dense (Dense) (None, 256) 4194560_________________________________________________________________dense_1 (Dense) (None, 2) 514=================================================================Total params: 4,195,074Trainable params: 4,195,074Non-trainable params: 0_________________________________________________________________
现在我们已经有了网络层,为了构建我们的模型,我们还需要3样东西:1)优化函数,2)损失函数,3)性能指标。
对于优化函数,我们将使用自适应矩估计(ADAM) ,它在较大数据集上往往比梯度下降法更好。我们还将设置我们的优化器的学习速率,以便在更新权重时不会出现大的跳跃。
对于我们的损失函数,我们将使用稀疏绝对交叉熵。
我们的性能指标是准确性,即正确分类照片的比例。
# Set the learning rateopt = keras.optimizers.Adam(learning_rate=0.000005)# Compile our modelmodel.compile(optimizer=opt, loss=keras.losses.SparseCategoricalCrossentropy(from_logits=True), metrics=['accuracy'])
现在我们可以训练我们的模型了!我们需要决定我们的数据集中有多少比例将用于未来的交叉验证,以及有多少 epoch 将用于我们的训练。在这种情况下,我将使用20% 的验证和运行我们的50个 epoch 的训练。
# Train our modelhistory = model.fit(train_images, train_labels, epochs=50, validation_split=0.2)
在我们的训练结束时,我们应该看到这样的东西:
Epoch 48/5020/20 [==============================] - 0s 10ms/step - loss: 0.4522 - accuracy: 0.9453 - val_loss: 0.4958 - val_accuracy: 0.8875Epoch 49/5020/20 [==============================] - 0s 9ms/step - loss: 0.4505 - accuracy: 0.9500 - val_loss: 0.4943 - val_accuracy: 0.8750Epoch 50/5020/20 [==============================] - 0s 9ms/step - loss: 0.4493 - accuracy: 0.9438 - val_loss: 0.4981 - val_accuracy: 0.8625
酷!我们训练的神经网络在我们的训练数据上达到了94% 的准确率,在交叉验证上达到了86% 。通过将我们的适应输出设置为一个名为 history 的变量,我们可以将性能作为训练 epoch 的函数来绘制:
# Plot accuracyfig = plt.figure(figsize=(15,5))ax1 = fig.add_subplot(121)ax2 = fig.add_subplot(122)ax1.plot(history.history['accuracy'])ax1.plot(history.history['val_accuracy'])ax1.set_title('Model Accuracy')ax1.set_ylabel('Accuracy')ax1.set_xlabel('Epoch')ax1.legend(['train', 'val'], loc='upper left')ax2.plot(history.history['loss'])ax2.plot(history.history['val_loss'])ax2.set_title('Model Loss')ax2.set_ylabel('Loss')ax2.set_xlabel('Epoch')ax2.legend(['train', 'val'], loc='upper left')plt.show()
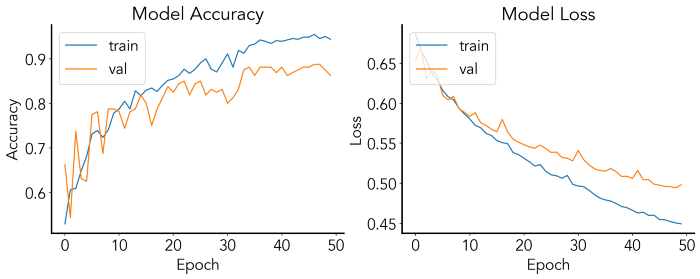
这样的图可以用来检验我们是否过度拟合(即训练和交叉验证准确性和损失之间的巨大差异,在这里训练集是合适的)。
让我们看看我们的模型在我们之前分割出的测试数据上的准确性:
# Evaluate training accuracymodel.evaluate(test_images, test_labels, verbose=2)7/7 - 0s - loss: 0.5233 - accuracy: 0.8250
我们的分类器在训练数据上有82.5% 的准确率ー现在让我们在一些新的照片上尝试我们的训练模型。
模型预测
现在让我们用一些新的看不见的数据来测试我们的模型。首先,我们可以编写一个封装函数,它接受模型和图像作为 numpy 数组,并返回一个字符串,其中包含预测的类和根据模型该类的概率。
# Function to return prediction and probabilitydef model_prediction(model, img):predictions = model.predict(np.array([img]))if predictions[0][0] > predictions[0][1]:return f"Pizza: {round(100*predictions[0][0], 2)}%"else:return f"Pasta: {round(100*predictions[0][1], 2)}%"
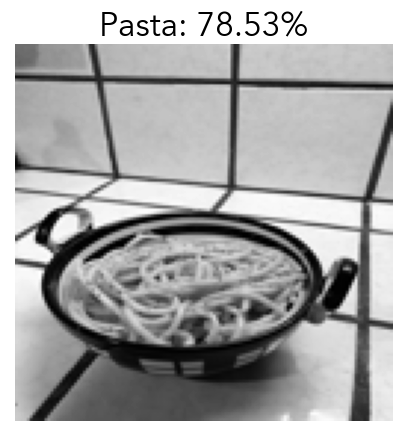
现在,我们可以用我自己做饭的两张图片来测试这一点:一碗意大利面和一个比萨饼。
意大利面
# Load image of cacio e pepecacio_e_pepe = process_image("./cacioepepe.jpg")# Plot image along with predictionfig = plt.figure(figsize=(5, 5))ax = fig.add_subplot(111)ax.imshow(cacio_e_pepe, cmap="gray")ax.set_xticks([])ax.set_yticks([])ax.set_title(model_prediction(model, cacio_e_pepe))plt.show()
披萨
# Load image of pizzahome_pizza = process_image("./pizza.jpg")# Plot image along with predictionfig = plt.figure(figsize=(5, 5))ax = fig.add_subplot(111)ax.imshow(home_pizza, cmap="gray")ax.set_xticks([])ax.set_yticks([])ax.set_title(model_prediction(model, home_pizza))plt.show()
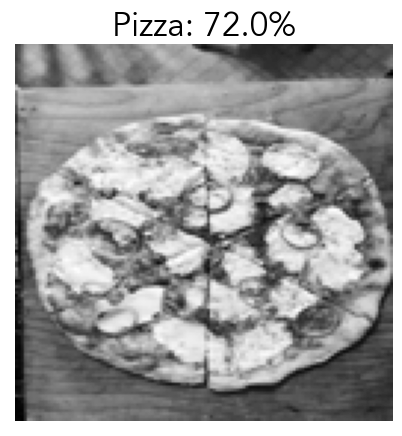
哇!都是正确的分类!我们现在有一个图像分类器比可以区分比萨饼和面食。从这里,我们可以调整神经网络的一些层,优化器,损失函数,甚至考虑使用卷积,以提高我们模型的准确性。
交流群
欢迎加入公众号读者群一起和同行交流,目前有SLAM、三维视觉、传感器、自动驾驶、计算摄影、检测、分割、识别、医学影像、GAN、算法竞赛等微信群(以后会逐渐细分),请扫描下面微信号加群,备注:”昵称+学校/公司+研究方向“,例如:”张三 + 上海交大 + 视觉SLAM“。请按照格式备注,否则不予通过。添加成功后会根据研究方向邀请进入相关微信群。请勿在群内发送广告,否则会请出群,谢谢理解~
