【时间序列】使用 Auto-TS 自动化时间序列预测
Auto-TS 是 AutoML 的一部分,它将自动化机器学习管道的一些组件。这自动化库有助于非专家训练基本的机器学习模型,而无需在该领域有太多知识。在本文中,小编和你一起学习如何使用 Auto-TS 库自动执行时间序列预测模型。
什么是自动 TS?
它是一个开源 Python 库,主要用于自动化时间序列预测。它将使用一行代码自动训练多个时间序列模型,这将帮助我们为我们的问题陈述选择最好的模型。
在 python 开源库 Auto-TS 中,auto-ts.Auto_TimeSeries() 使用训练数据调用的主要函数。然后我们可以选择想要的模型类型,例如 stats、ml 或FB prophet-based models (基于 FB 先知的模型)。我们还可以调整参数,这些参数将根据我们希望它基于的评分参数自动选择最佳模型。它将返回最佳模型和一个字典,其中包含提到的预测周期数的预测(默认值 = 2)。
Auto_timeseries 是用于时间序列数据的复杂模型构建实用程序。由于它自动化了复杂工作中涉及的许多任务,因此它假定了许多智能默认值。5.但是我们可以改变它们。Auto_Timeseries 将基于 Statsmodels ARIMA、Seasonal ARIMA 和 Scikit-Learn ML 快速构建预测模型。它将自动选择给出指定最佳分数的最佳模型。
Auto_TimeSeries 能够帮助我们使用 ARIMA、SARIMAX、VAR、可分解(趋势+季节性+残差)模型和集成机器学习模型等技术构建和选择多个时间序列模型。
Auto-TS 库的特点
它使用遗传规划优化找到最佳时间序列预测模型。 它训练普通模型、统计模型、机器学习模型和深度学习模型,具有所有可能的超参数配置和交叉验证。 它通过学习最佳 NaN 插补和异常值去除来执行数据转换以处理杂乱的数据。 选择用于模型选择的指标组合。
安装
pip install auto-ts  # 或
pip install git+git://github.com/AutoViML/Auto_TS
依赖包,如下依赖包需要提前安装
dask
scikit-learn
FB Prophet
statsmodels
pmdarima
XGBoost
导入库
from auto_ts import auto_timeseries
巨坑警告
根据上述安装步骤安装成功后,很大概率会出现这样的错误:
Running setup.py clean for fbprophet
Failed to build fbprophet
Installing collected packages: fbprophet
  Running setup.py install for fbprophet ... error
 ......
  from pystan import StanModel
ModuleNotFoundError: No module named 'pystan'
这个时候你会装pystan:pip install pystan 。安装完成后,还是会出现上述报错。如果你也出现了如上情况,不要慌,云朵君已经帮你踩过坑了。
参考解决方案:(Mac/anaconda)
1. 安装 Ephem:
conda install -c anaconda ephem

2. 安装 Pystan:
conda install -c conda-forge pystan
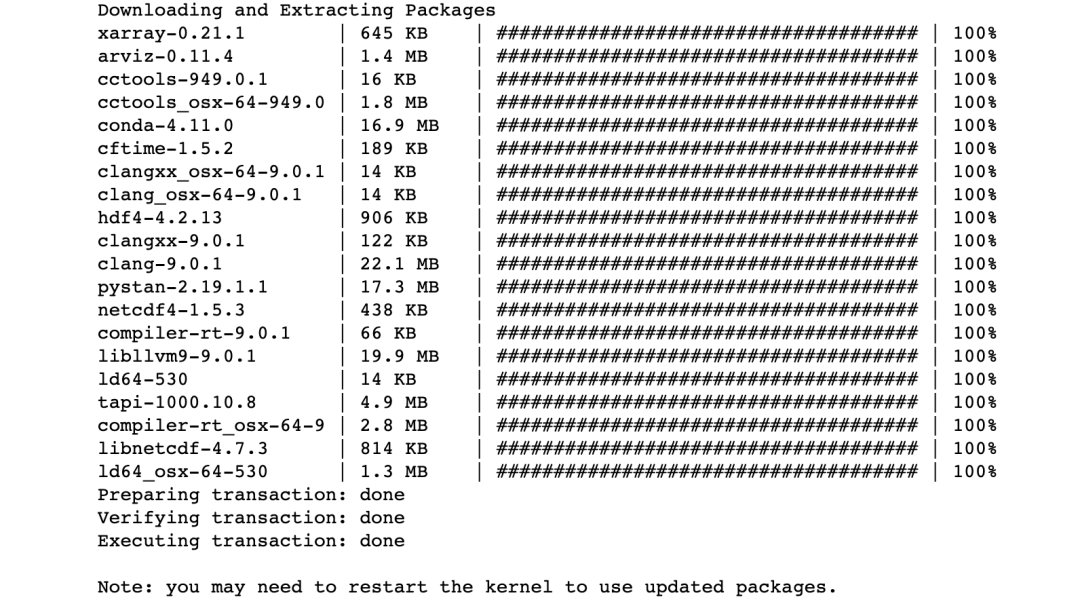
3. 安装 Fbprophet:
(这个会花费4小时+)
conda install -c conda-forge fbprophet
4. 最后安装:
pip install prophet
pip install fbprophet
5. 最后直到出现:
Successfully installed cmdstanpy-0.9.5 fbprophet-0.7.1 holidays-0.13
如果上述还不行,你先尝试重启anaconda,如果还不行,则需要先安装:
conda install gcc
再上述步骤走一遍。
上述过程可能要花费1天时间!!
最后尝试导入,成功!
from auto_ts import auto_timeseries
Imported auto_timeseries version:0.0.65. Call by using:
model = auto_timeseries(score_type='rmse',
time_interval='M',
non_seasonal_pdq=None,
seasonality=False,
seasonal_period=12,
model_type=['best'],
verbose=2,
dask_xgboost_flag=0)
model.fit(traindata,
ts_column,target)
model.predict(testdata, model='best')
auto_timeseries 中可用的参数
model = auto_timeseries(
score_type='rmse',
time_interval='Month',
non_seasonal_pdq=None,
seasonity=False,
season_period=12,
model_type=['Prophet'],verbose=2)
可以调整参数并分析模型性能的变化。有关参数的更多详细信息参考auto-ts文档[1]。
使用的数据集
本文使用了从 Kaggle 下载的 2006 年 1 月至 2018 年 1 月的亚马逊股票价格[2]数据集。该库仅提供训练时间序列预测模型。数据集应该有一个时间或日期格式列。
最初,使用时间/日期列加载时间序列数据集:
df = pd.read_csv(
    "Amazon_Stock_Price.csv",
    usecols=['Date', 'Close'])
df['Date'] = pd.to_datetime(df['Date'])
df = df.sort_values('Date')
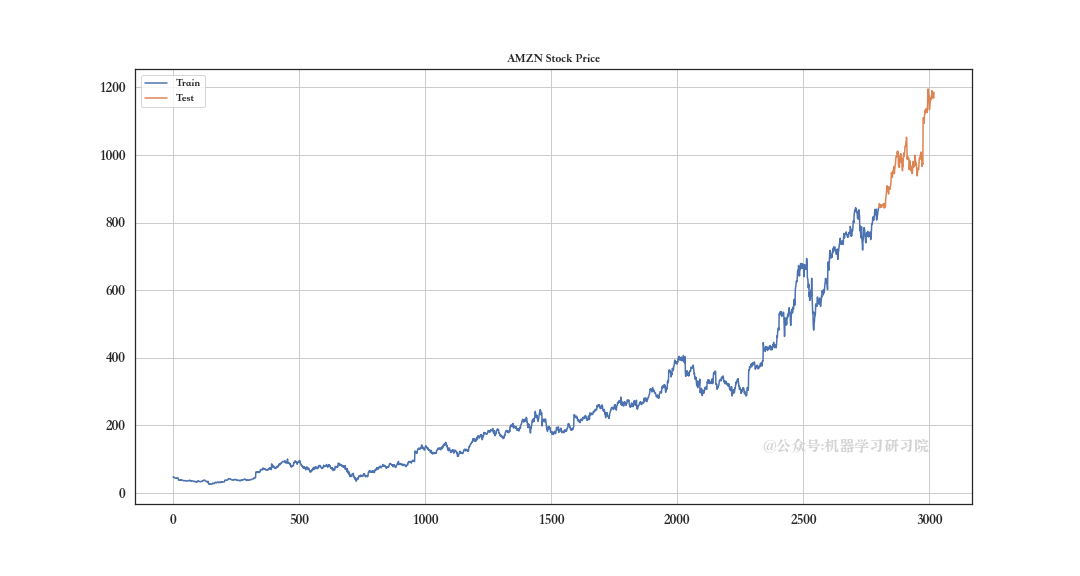
现在,将整个数据拆分为训练数据和测试数据:
train_df = df.iloc[:2800]
test_df = df.iloc[2800:]
现在,我们将可视化拆分训练测试:
train_df.Close.plot(
      figsize=(15,8),
      title= 'AMZN Stock Price', fontsize=14,
      label='Train')
test_df.Close.plot(
      figsize=(15,8),
      title= 'AMZN Stock Price', fontsize=14,
      label='Test')
现在,让我们初始化 Auto-TS 模型对象,并拟合训练数据:
model = auto_timeseries(
  forecast_period=219,
  score_type='rmse',
  time_interval='D',
  model_type='best')
model.fit(traindata= train_df,
    ts_column="Date",
    target="Close")
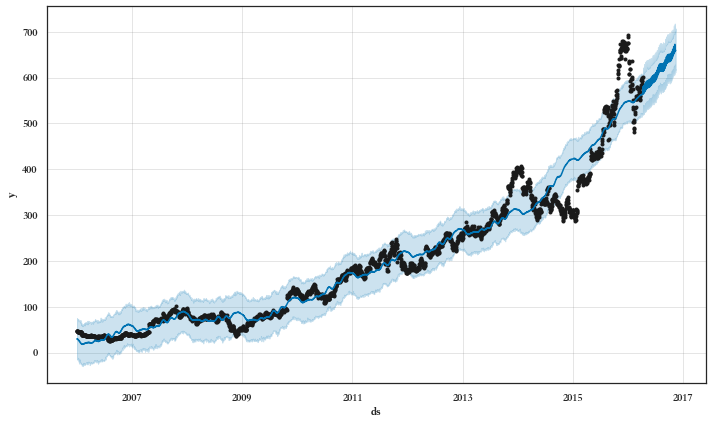
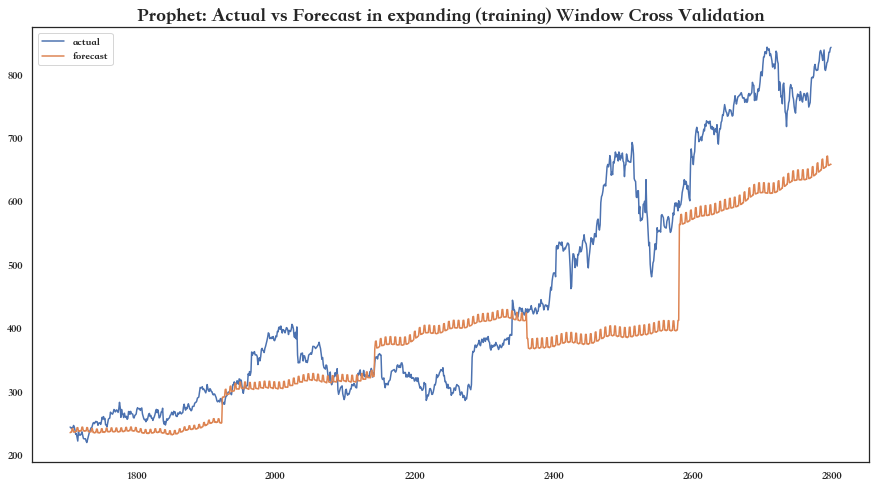
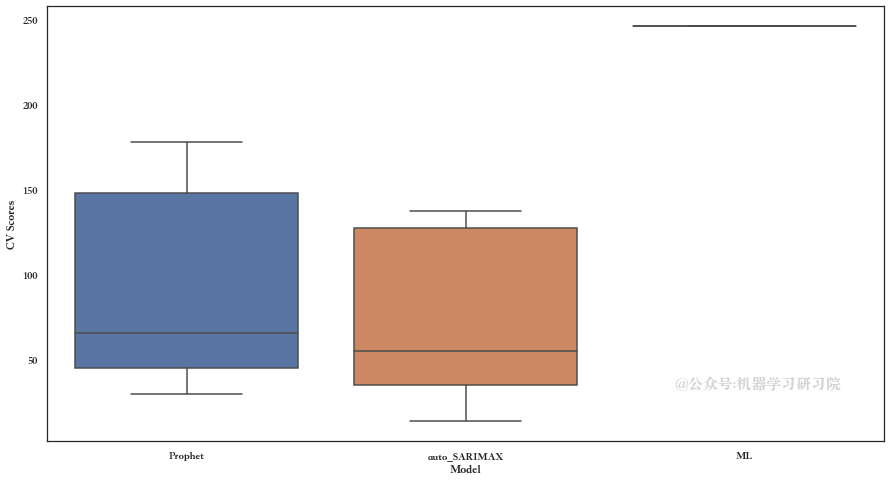
现在让我们比较不同模型的准确率:
model.get_leaderboard()
model.plot_cv_scores()
得到如下结果:
Start of Fit.....
Target variable given as = Close
Start of loading of data.....
Inputs: ts_column = Date, sep = ,, target = ['Close']
Using given input: pandas dataframe...
Date column exists in given train data...
train data shape = (2800, 1)
Alert: Could not detect strf_time_format of Date. Provide strf_time format during "setup" for better results.
Running Augmented Dickey-Fuller test with paramters:
maxlag: 31 regression: c autolag: BIC
Data is stationary after one differencing
There is 1 differencing needed in this datasets for VAR model
No time series plot since verbose = 0. Continuing
Time Interval is given as D
Correct Time interval given as a valid Pandas date-range frequency...
WARNING: Running best models will take time... Be Patient...
==================================================
Building Prophet Model
==================================================
Running Facebook Prophet Model...
Starting Prophet Fit
No seasonality assumed since seasonality flag is set to False
Starting Prophet Cross Validation
Max. iterations using expanding window cross validation = 5
Fold Number: 1 --> Train Shape: 1705 Test Shape: 219
RMSE = 30.01
Std Deviation of actuals = 19.52
Normalized RMSE (as pct of std dev) = 154%
Cross Validation window: 1 completed
Fold Number: 2 --> Train Shape: 1924 Test Shape: 219
RMSE = 45.33
Std Deviation of actuals = 34.21
Normalized RMSE (as pct of std dev) = 132%
Cross Validation window: 2 completed
Fold Number: 3 --> Train Shape: 2143 Test Shape: 219
RMSE = 65.61
Std Deviation of actuals = 39.85
Normalized RMSE (as pct of std dev) = 165%
Cross Validation window: 3 completed
Fold Number: 4 --> Train Shape: 2362 Test Shape: 219
RMSE = 178.53
Std Deviation of actuals = 75.28
Normalized RMSE (as pct of std dev) = 237%
Cross Validation window: 4 completed
Fold Number: 5 --> Train Shape: 2581 Test Shape: 219
RMSE = 148.18
Std Deviation of actuals = 57.62
Normalized RMSE (as pct of std dev) = 257%
Cross Validation window: 5 completed
-------------------------------------------
Model Cross Validation Results:
-------------------------------------------
MAE (Mean Absolute Error = 85.20
MSE (Mean Squared Error = 12218.34
MAPE (Mean Absolute Percent Error) = 17%
RMSE (Root Mean Squared Error) = 110.5366
Normalized RMSE (MinMax) = 18%
Normalized RMSE (as Std Dev of Actuals)= 60%
Time Taken = 13 seconds
End of Prophet Fit
==================================================
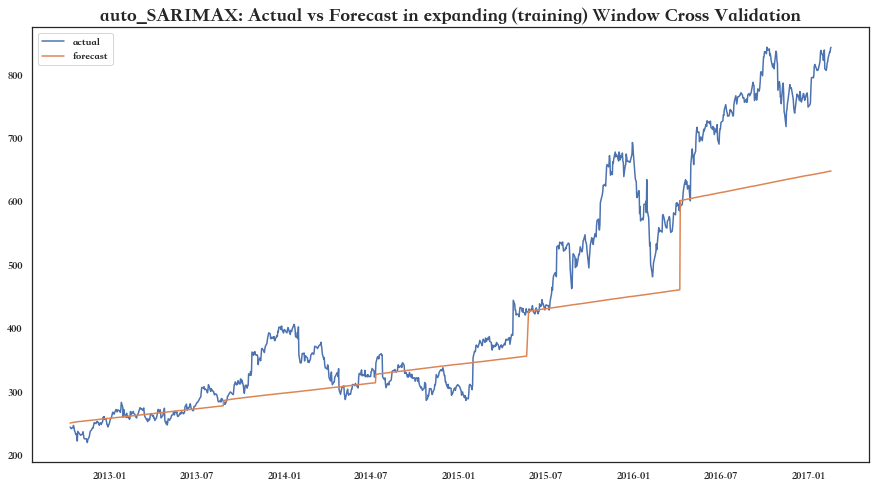
Building Auto SARIMAX Model
==================================================
Running Auto SARIMAX Model...
Using smaller parameters for larger dataset with greater than 1000 samples
Using smaller parameters for larger dataset with greater than 1000 samples
Using smaller parameters for larger dataset with greater than 1000 samples
Using smaller parameters for larger dataset with greater than 1000 samples
Using smaller parameters for larger dataset with greater than 1000 samples
SARIMAX RMSE (all folds): 73.9230
SARIMAX Norm RMSE (all folds): 35%
-------------------------------------------
Model Cross Validation Results:
-------------------------------------------
MAE (Mean Absolute Error = 64.24
MSE (Mean Squared Error = 7962.95
MAPE (Mean Absolute Percent Error) = 12%
RMSE (Root Mean Squared Error) = 89.2354
Normalized RMSE (MinMax) = 14%
Normalized RMSE (as Std Dev of Actuals)= 48%
Using smaller parameters for larger dataset with greater than 1000 samples
Refitting data with previously found best parameters
Best aic metric = 18805.2
SARIMAX Results
==============================================================================
Dep. Variable: Close No. Observations: 2800
Model: SARIMAX(2, 2, 0) Log Likelihood -9397.587
Date: Mon, 28 Feb 2022 AIC 18805.174
Time: 19:45:31 BIC 18834.854
Sample: 0 HQIC 18815.888
- 2800
Covariance Type: opg
==============================================================================
coef std err z P>|z| [0.025 0.975]
------------------------------------------------------------------------------
intercept -0.0033 0.557 -0.006 0.995 -1.094 1.088
drift 3.618e-06 0.000 0.015 0.988 -0.000 0.000
ar.L1 -0.6405 0.008 -79.601 0.000 -0.656 -0.625
ar.L2 -0.2996 0.009 -32.618 0.000 -0.318 -0.282
sigma2 48.6323 0.456 106.589 0.000 47.738 49.527
===================================================================================
Ljung-Box (L1) (Q): 14.84 Jarque-Bera (JB): 28231.48
Prob(Q): 0.00 Prob(JB): 0.00
Heteroskedasticity (H): 19.43 Skew: 0.56
Prob(H) (two-sided): 0.00 Kurtosis: 18.53
===================================================================================
Warnings:
[1] Covariance matrix calculated using the outer product of gradients (complex-step).
===============================================
Skipping VAR Model since dataset is > 1000 rows and it will take too long
===============================================
==================================================
Building ML Model
==================================================
Creating 2 lagged variables for Machine Learning model...
You have set lag = 3 in auto_timeseries setup to feed prior targets. You cannot set lags > 10 ...
### Be careful setting dask_xgboost_flag to True since dask is unstable and doesn't work sometime's ###
########### Single-Label Regression Model Tuning and Training Started ####
Fitting ML model
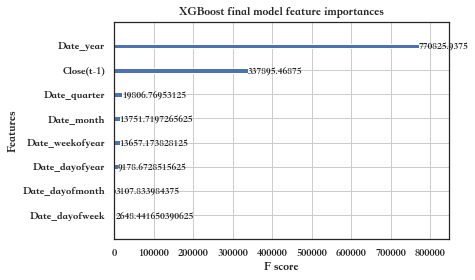
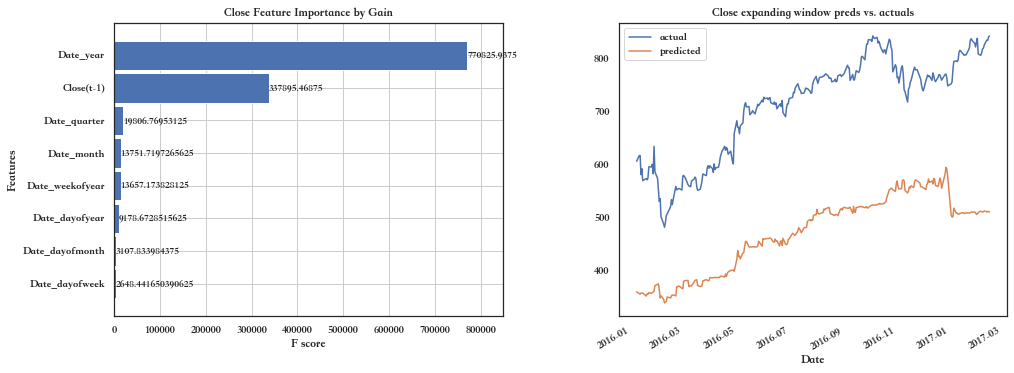
11 variables used in training ML model = ['Close(t-1)', 'Date_hour', 'Date_minute', 'Date_dayofweek', 'Date_quarter', 'Date_month', 'Date_year', 'Date_dayofyear', 'Date_dayofmonth', 'Date_weekofyear', 'Date_weekend']
Running Cross Validation using XGBoost model..
Max. iterations using expanding window cross validation = 2
train fold shape (2519, 11), test fold shape = (280, 11)
### Number of booster rounds = 250 for XGBoost which can be set during setup ####
Hyper Param Tuning XGBoost with CPU parameters. This will take time. Please be patient...
Cross-validated Score = 31.896 in num rounds = 249
Time taken for Hyper Param tuning of XGBoost (in minutes) = 0.0
Top 10 features:
['Date_year', 'Close(t-1)', 'Date_quarter', 'Date_month', 'Date_weekofyear', 'Date_dayofyear', 'Date_dayofmonth', 'Date_dayofweek']
Time taken for training XGBoost on entire train data (in minutes) = 0.0
Returning the following:
Model =
Scaler = Pipeline(steps=[('columntransformer',
ColumnTransformer(transformers=[('simpleimputer',
SimpleImputer(),
['Close(t-1)', 'Date_hour',
'Date_minute',
'Date_dayofweek',
'Date_quarter', 'Date_month',
'Date_year',
'Date_dayofyear',
'Date_dayofmonth',
'Date_weekofyear',
'Date_weekend'])])),
('maxabsscaler', MaxAbsScaler())])
(3) sample predictions:[359.8374 356.59747 355.447 ]
XGBoost model tuning completed
Target = Close...CV results:
RMSE = 246.63
Std Deviation of actuals = 94.60
Normalized RMSE (as pct of std dev) = 261%
Fitting model on entire train set. Please be patient...
Time taken to train model (in seconds) = 0
Best Model is: auto_SARIMAX
Best Model (Mean CV) Score: 73.92
--------------------------------------------------
Total time taken: 52 seconds.
--------------------------------------------------
Leaderboard with best model on top of list:
name rmse
1 auto_SARIMAX 73.922971
0 Prophet 93.532440
2 ML 246.630613
现在我们在测试数据上测试我们的模型:
future_predictions = model.predict(testdata=219)
# 或
model.predict(
    testdata=test_df.Close)
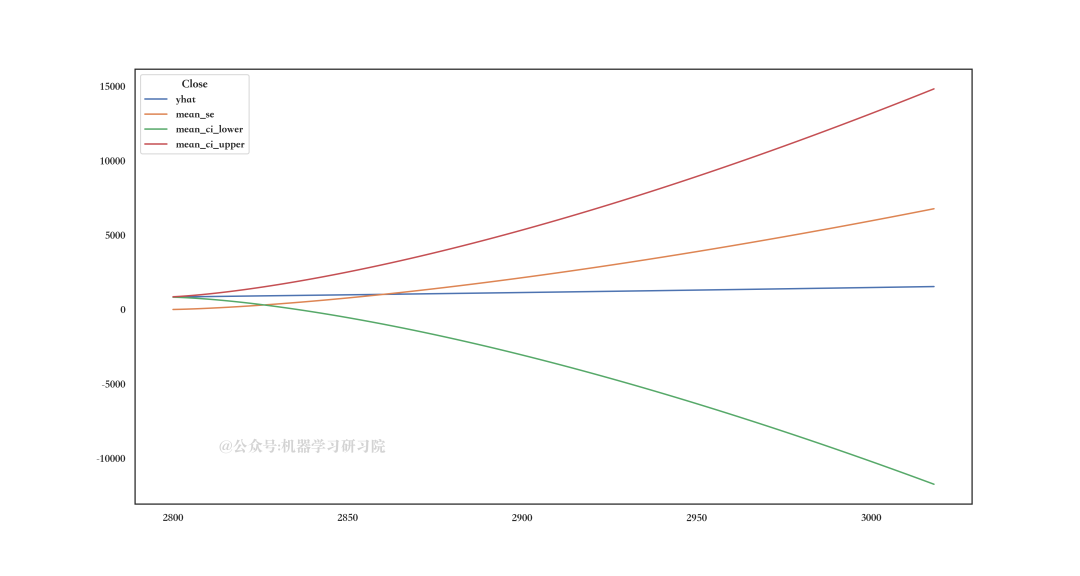
使用预测周期=219作为auto_SARIMAX模型的输入进行预测:
future_predictions

可视化看下future_predictions是什么样子:
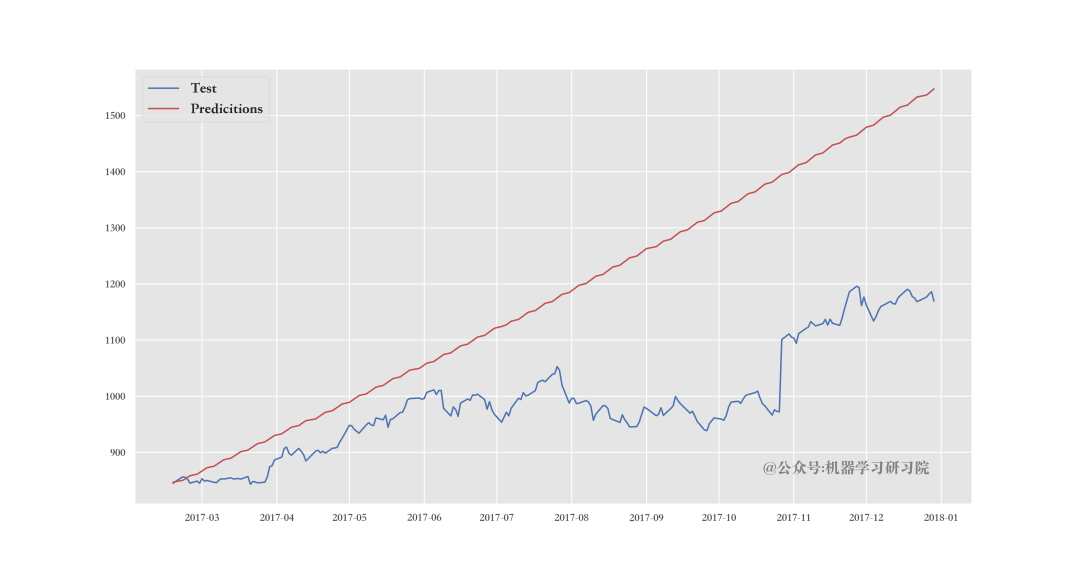
最后,可视化测试数据值和预测:
pred_df = pd.concat(
    [test_df,future_predictions],
    axis=1)
ax.plot('Date','Close','b',
         data=pred_df,
         label='Test')
ax.plot('Date','yhat','r',
         data=pred_df,
         label='Predicitions')
auto_timeseries 中可用的参数:
model = auto_timeseries(
    score_type='rmse',
    time_interval='Month',
    non_seasonal_pdq=None,
    seasonity=False,
    season_period=12,
    model_type=['Prophet'],
    verbose=2)
model.fit() 中可用的参数:
model.fit(traindata=train_data,
    ts_column=ts_column,
    target=target,
    cv=5, sep="," )
model.predict() 中可用的参数:
model = model.predict(testdata = '可以是数据框或代表预测周期的整数';
                      model = 'best', '或代表训练模型的任何其他字符串')
可以使用所有这些参数并分析我们模型的性能,然后可以为我们的问题陈述选择最合适的模型。可以查看auto-ts文档[3]详细检查所有这些参数。
写在最后
在本文中,讨论了如何在一行 Python 代码中自动化时间序列模型。Auto-TS 对数据进行预处理,因为它从数据中删除异常值并通过学习最佳 NaN 插补来处理混乱的数据。
通过初始化 Auto-TS 对象并拟合训练数据,它将自动训练多个时间序列模型,例如 ARIMA、SARIMAX、FB Prophet、VAR,并得出性能最佳的模型。模型的结果跟数据集的大小有一定的关系。如果我们尝试增加数据集的大小,结果应该会有所改善。
参考资料
auto-ts文档: https://pypi.org/project/auto-ts/
[2]亚马逊股票价格: https://www.kaggle.com/szrlee/stock-time-series-20050101-to-20171231?select=AMZN_2006-01-01_to_2018-01-01.csv
[3]auto-ts文档: https://pypi.org/project/auto-ts/
往期精彩回顾
适合初学者入门人工智能的路线及资料下载 (图文+视频)机器学习入门系列下载 中国大学慕课《机器学习》(黄海广主讲) 机器学习及深度学习笔记等资料打印 《统计学习方法》的代码复现专辑 AI基础下载 机器学习交流qq群955171419,加入微信群请扫码:
