用OpenCV和深度学习进行年龄识别
点击下方卡片,关注“新机器视觉”公众号
视觉/图像重磅干货,第一时间送达
极市导读
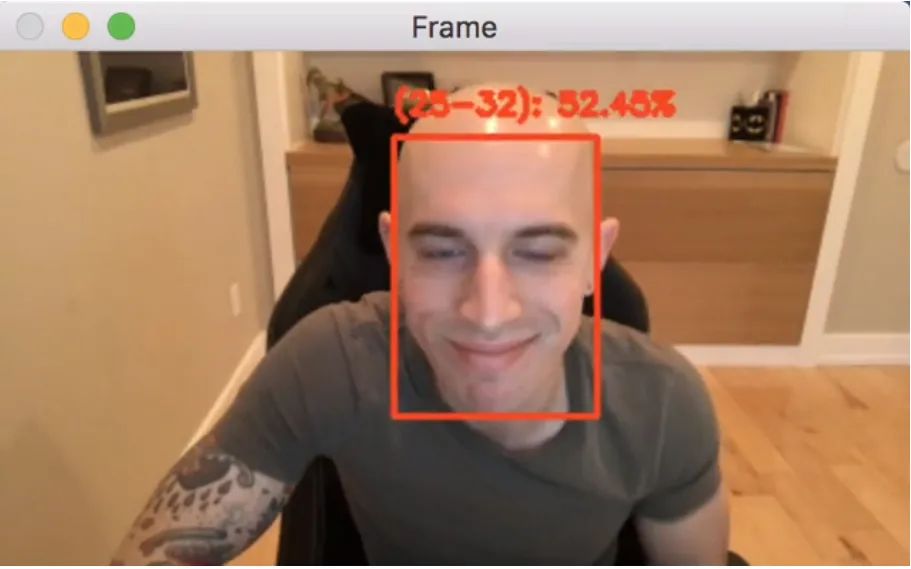
通过本文可Get如何使用OpenCV,深度学习和Python执行年龄的自动识别/预测。撸完本教程您将能以相当高的精确度,预测静态图像文件、实时视频中人的年龄。
用OpenCV和深度学习进行年龄识别
在本文的第一部分关于年龄识别,包括从图片或视频中自动预测人的年龄所需要的步骤(以及为何将年龄识别当做分类问题而不是回归问题来处理)。
下面我们将介绍这个基于深度学习的年龄识别模型,然后学习如何将该模型应用在两个方面:
-
静态图像中的年龄识别 -
实时视频中的年龄识别
什么是年龄识别?
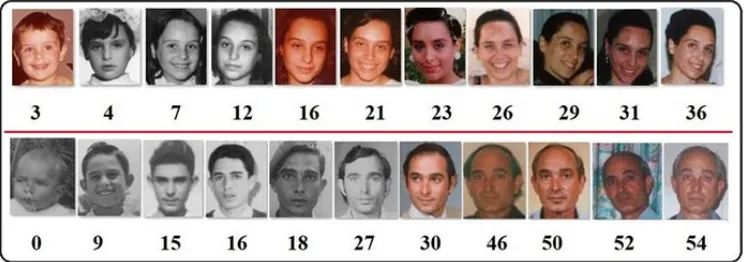
年龄识别是仅用人脸的照片去自动识别其年龄的过程,通常,年龄识别可分为两个阶段进行实现:
-
阶段1. :检测输入图像/视频中的人脸; -
阶段2:提取人的面部区域(ROI),并通过年龄检测算法预测人的年龄。
对于第一阶段,可以使用任何能够为图片中的人脸生成边框的人脸检测器。这些检测器包括但不限于Haar cascades,HOG+线性SVM,单镜头检测器(SSD)等。
具体使用哪种人脸检测器取决于您的项目:
-
Haar cascades速度很快,并且能够在嵌入式设备上实时运行。缺点是准确度较低,并且极易出现假阳性检测。 -
HOG+线性SVM模型比Haar cascades更精确,但速度较慢。它们对遮挡(即部分面部可见)或视角变化(即面部的不同视图)的容错性也较低。 -
基于深度学习的人脸检测器功能最为强大,它提供了最高的准确度,但比Haar cascades和HOG+线性SVM需要更多的计算资源。
当选择人脸检测器时,需要花点时间考虑您的项目需求——速度或准确性,哪个对您更加重要?除此之外,还建议您对每个人脸检测器进行试验,以便从实验结果中择优而从。
一旦您的人脸检测器在图像/视频中生成了人脸的边界框坐标,就可以进入第二阶段——确定人的年龄。
确定了脸部的边界框坐标(x,y)后,首先提取面部ROI,而忽略图像/帧的其余部分。以便将年龄检测器的注意力放在人脸上,而非图像中其他不相关的“噪点”。然后将面部ROI传递给模型,从而得到实际的年龄预测。
年龄检测器的算法有很多,但是最受欢迎的是基于深度学习的年龄检测器——在本教程中,将使用这种基于深度学习的年龄检测器。
基于深度学习的年龄检测器模型

本文中使用的深度学习年龄检测器模型是Levi和Hassner发表的《使用卷积神经网络进行年龄和性别分类》中构建和训练的。该文作者提出了一个类似AlexNet的简单体系,该体系总共学习了8个年龄段:
0-2 4-6 8-12 15-20 25-32 38-43 48-53 60-100
您可能会注意到这些年龄段是不连续的,这是有意而为。因为用于训练模型的Adience数据集定义了年龄段(下一节中将介绍为什么这样做)。
在这篇文章中,我们将使用预先训练的年龄检测器模型。如果您有兴趣学习如何从头开始训练它,请务必阅读《用Python进行计算机视觉深度学习》,在那里我将向您展示如何训练。
我们为什么不将年龄预测看做回归问题?
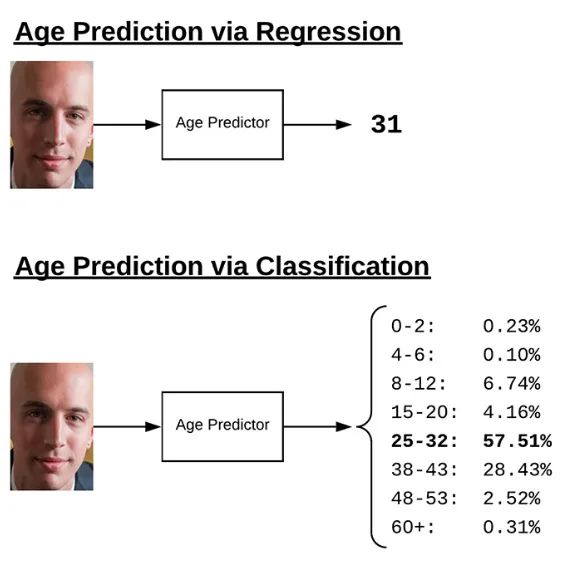
您会在上面注意到,我们将年龄离散化为"不同的区间”,从而将年龄预测作为分类问题——为什么不将它看做回归问题?
从技术上讲,没有理由不能将年龄预测看做回归任务。甚至有一些模型可以通过回归来实现。问题在于年龄预测本质上是主观的,并且仅基于容貌。
一个五十多岁的人,从未吸过烟、出门总是擦防晒霜、每天都要护理皮肤,相比一个三十多岁的人一天要抽很多烟、不擦防晒霜、从事体力劳动,且没有适当的皮肤护理的人,五十岁的人很可能看起来比三十岁的人年轻。
而且,基因是衰老最重要的驱动因素。有些人就是比其他人衰老得慢。
例如,看看下面的 Matthew Perry(在电视情景喜剧Friends中扮演Chandler Bing)的图片,并将它与Jennifer Aniston(扮演Rachel Green)的图片进行比较:

您能猜出 Matthew Perry(50岁)实际上比 Jennifer Aniston(51岁)小一岁吗?若非您事先了解了关于这些演员的情况,否则我不会相信。
但另一方面,您能猜到这些演员在48-53岁吗?这个准确率恐怕高一些。
虽然人类天生不擅长预测年龄的准确值,但我们实际上在预测年龄段方面还是不错的。当然上面只是一个示例,Jennifer Aniston的基因近乎完美,再加上有非常优秀的整形外科医生,她似乎青春不老。
但这印证了我的观点——如果人类准确地预测一个人的年龄很困难的话,那么机器肯定也会同样困难。
一旦将年龄预测看做回归问题,那么对于一个模型,要准确预测人的图像中的年龄值是极困难的。但如果您将其视为分类问题,为模型定义了年龄段,那么我们的年龄预测模型将更容易训练,通常会比基于回归的预测提供更高的准确性。
简而言之:将年龄预测看做分类问题可以极大地"缓解”准确程度——通常我们不需要一个人的确切年龄,粗略的估计就足够了。
项目结构
您可从本文相关链接中获取代码,模型和图片,提取文件后,您的项目将如下所示:
$ tree --dirsfirst
.
├── age_detector
│   ├── age_deploy.prototxt
│   └── age_net.caffemodel
├── face_detector
│   ├── deploy.prototxt
│   └── res10_300x300_ssd_iter_140000.caffemodel
├── images
│   ├── adrian.png
│   ├── neil_patrick_harris.png
│   └── samuel_l_jackson.png
├── detect_age.py
└── detect_age_video.py
3 directories, 9 files
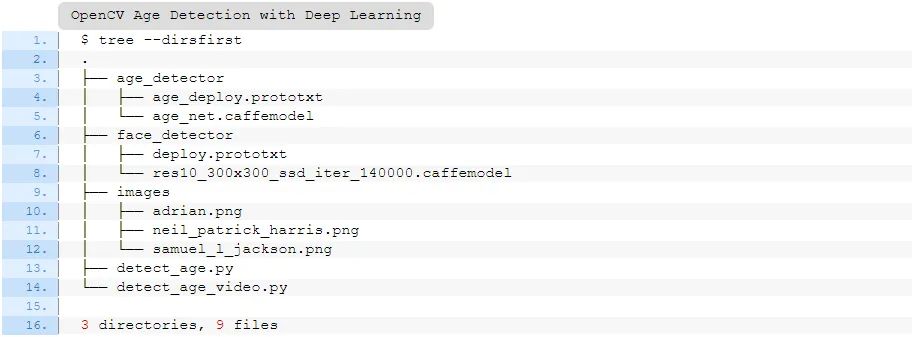
前两个目录由年龄预测器和面部检测器组成。这两个深度学习模型都基于Caffe。
这里提供了三张用于年龄预测的测试图片,您也可以添加自己的图片。
在本教程的其余部分,我们将讨论这两个Python脚本:
-
detect\_age.py:图片年龄预测 -
detect\_age\_video.py:视频年龄预测
这些脚本都会检测图片/帧中的人脸,然后使用OpenCV对它们进行年龄预测。
运行该 OpenCV 图像年龄检测器
首先,开始在静态图像中使用OpenCV进行年龄检测。在目录中打开detect\_age.py文件,运行工作:
# import the necessary packages
import numpy as np
import argparse
import cv2
import os
# construct the argument parse and parse the arguments
ap = argparse.ArgumentParser()
ap.add_argument("-i", "--image", required=True,
	help="path to input image")
ap.add_argument("-f", "--face", required=True,
	help="path to face detector model directory")
ap.add_argument("-a", "--age", required=True,
	help="path to age detector model directory")
ap.add_argument("-c", "--confidence", type=float, default=0.5,
	help="minimum probability to filter weak detections")
args = vars(ap.parse_args())
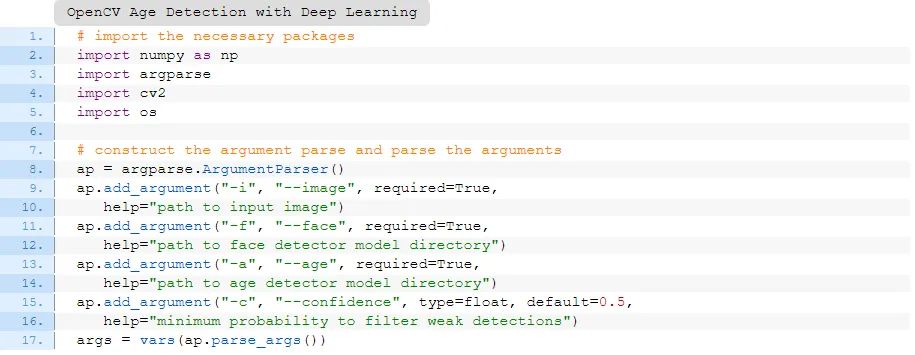
为了启动我们的年龄检测器脚本,我们先导入NumPy和OpenCV。我建议查看我的pip install opencv教程来配置您的系统。
此外,需要导入Python内置的os模块,它可以添加模型所需的路径。
最后,导入argparse来解析命令行参数。
此处的脚本需要四个命令行参数:
-
image:提供为年龄检测输入图像的路径 -
face:为预先训练的面部检测器模型提供路径 -
age:预先训练的年龄探测器模型 -
confidence:最小概率阈值,以便筛除低置信检测
如上所述,本文的年龄检测器是一种分类器,可以根据预定义的年龄分段,通过人的面部 ROI 预测这个人的年龄——我们不会将其视为回归问题。现在让我们定义这些年龄段的bucket:
# define the list of age buckets our age detector will predict
AGE_BUCKETS = ["(0-2)", "(4-6)", "(8-12)", "(15-20)", "(25-32)",
	"(38-43)", "(48-53)", "(60-100)"]

我们的年龄是在预先训练好的年龄检测器的bucket(即类别标签)中定义的。我们将使用此列表和相关的索引来获取年龄段,从而在输出的图像上进行注释。
完成了导入,命令行参数和年龄段的设置,我们现在就可以加载两个预先训练的模型:
# load our serialized face detector model from disk
print("[INFO] loading face detector model...")
prototxtPath = os.path.sep.join([args["face"], "deploy.prototxt"])
weightsPath = os.path.sep.join([args["face"],
	"res10_300x300_ssd_iter_140000.caffemodel"])
faceNet = cv2.dnn.readNet(prototxtPath, weightsPath)
# load our serialized age detector model from disk
print("[INFO] loading age detector model...")
prototxtPath = os.path.sep.join([args["age"], "age_deploy.prototxt"])
weightsPath = os.path.sep.join([args["age"], "age_net.caffemodel"])
ageNet = cv2.dnn.readNet(prototxtPath, weightsPath)

在这里,我们加载两个模型:
-
我们的人脸检测器可以找到并定位图片中的人脸(第25-28行) -
年龄分类器确定特定面孔所属的年龄范围(第32-34行)
这些模型均使用Caffe框架进行了训练。在PyImageSearch Gurus课程中介绍了如何训练Caffe分类器。
现在我们已经完成了所有初始化,从磁盘加载图像并检测面部ROI:
# load the input image and construct an input blob for the image
image = cv2.imread(args["image"])
(h, w) = image.shape[:2]
blob = cv2.dnn.blobFromImage(image, 1.0, (300, 300),
	(104.0, 177.0, 123.0))
# pass the blob through the network and obtain the face detections
print("[INFO] computing face detections...")
faceNet.setInput(blob)
detections = faceNet.forward()

我们使用OpenCV的blobFromImage方法——请在我的教程中阅读有关blobFromImage的更多信息。
为了检测图片中的人脸,我们通过CNN传送blob,得到了detections的列表。现在让我们循环面部ROI的检测:
# loop over the detections
for i in range(0, detections.shape[2]):
	# extract the confidence (i.e., probability) associated with the
	# prediction
	confidence = detections[0, 0, i, 2]
	# filter out weak detections by ensuring the confidence is
	# greater than the minimum confidence
	if confidence > args["confidence"]:
		# compute the (x, y)-coordinates of the bounding box for the
		# object
		box = detections[0, 0, i, 3:7] * np.array([w, h, w, h])
		(startX, startY, endX, endY) = box.astype("int")
		# extract the ROI of the face and then construct a blob from
		# *only* the face ROI
		face = image[startY:endY, startX:endX]
		faceBlob = cv2.dnn.blobFromImage(face, 1.0, (227, 227),
			(78.4263377603, 87.7689143744, 114.895847746),
			swapRB=False)
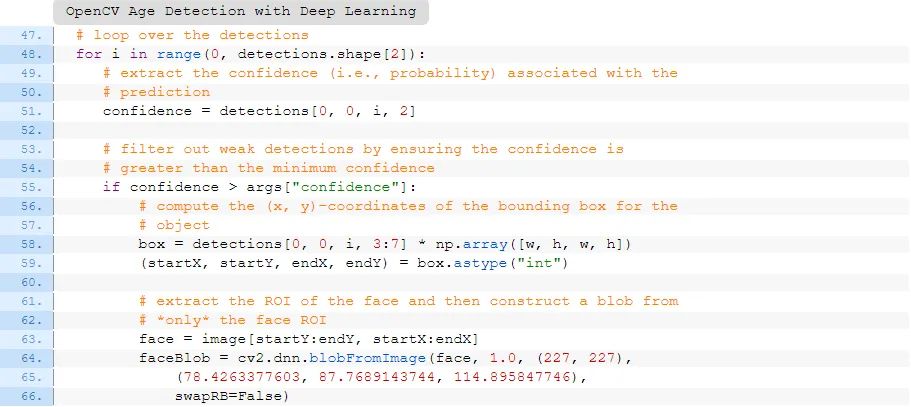
当我们循环detections时,我们清除了低置信度的面部(第51-55行)。
对于满足了最低置信度标准的面部,我们提取它们的ROI坐标(第58-63行)。现在,我们在仅包含单个面部的图像中有了小小收获。我们在第64-66行根据此ROI创建一个blob(即faceBlob)。
现在,我们将进行年龄识别:
		# make predictions on the age and find the age bucket with
		# the largest corresponding probability
		ageNet.setInput(faceBlob)
		preds = ageNet.forward()
		i = preds[0].argmax()
		age = AGE_BUCKETS[i]
		ageConfidence = preds[0][i]
		# display the predicted age to our terminal
		text = "{}: {:.2f}%".format(age, ageConfidence * 100)
		print("[INFO] {}".format(text))
		# draw the bounding box of the face along with the associated
		# predicted age
		y = startY - 10 if startY - 10 > 10 else startY + 10
		cv2.rectangle(image, (startX, startY), (endX, endY),
			(0, 0, 255), 2)
		cv2.putText(image, text, (startX, y),
			cv2.FONT_HERSHEY_SIMPLEX, 0.45, (0, 0, 255), 2)
# display the output image
cv2.imshow("Image", image)
cv2.waitKey(0)
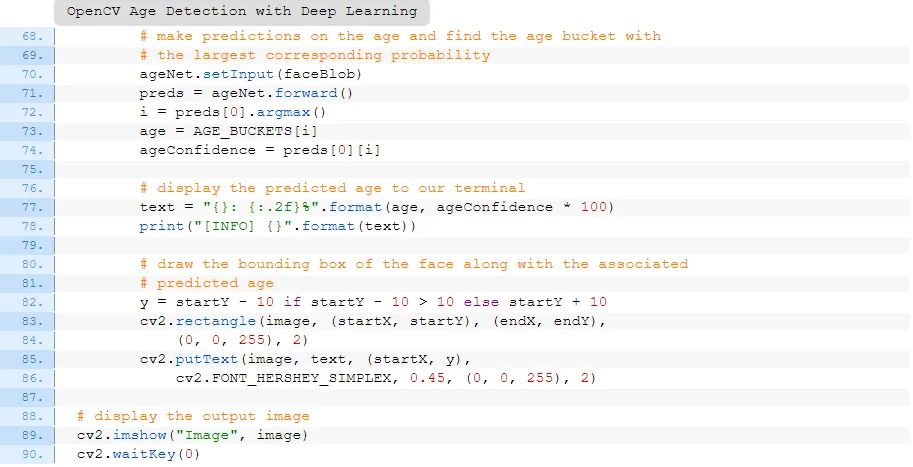
我们使用face blob进行年龄预测(第70-74行),从而得出年龄段和年龄的置信度。我们使用这些数据点以及面部ROI的坐标来注释最初输入的图片(第77-86行)并显示结果(第89和90行)。
在下一部分中,我们将分析结果。
OpenCV的年龄识别结果
让我们运行OpenCV年龄检测器。
首先,从本教程的"下载"部分下载源代码,预先训练的年龄检测器模型及示例图像。
从那里打开一个终端,然后执行以下命令:
$ python detect_age.py --image images/adrian.png --face face_detector --age age_detector
[INFO] loading face detector model...
[INFO] loading age detector model...
[INFO] computing face detections...
[INFO] (25-32): 57.51%

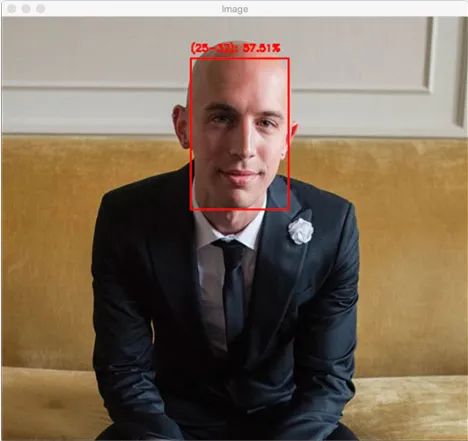
在这里,您可以看到我们的OpenCV年龄检测器以57.51%的置信度预测了我的年龄为25-32岁——实际上,该年龄检测器是正确的(我拍摄这张照片时是30岁)。
让我们再举一个例子,这是著名演员Neil Patrick Harris小时候的照片:
$ python detect_age.py --image images/neil_patrick_harris.png --face face_detector --age age_detector
[INFO] loading face detector model...
[INFO] loading age detector model...
[INFO] computing face detections...
[INFO] (8-12): 85.72%

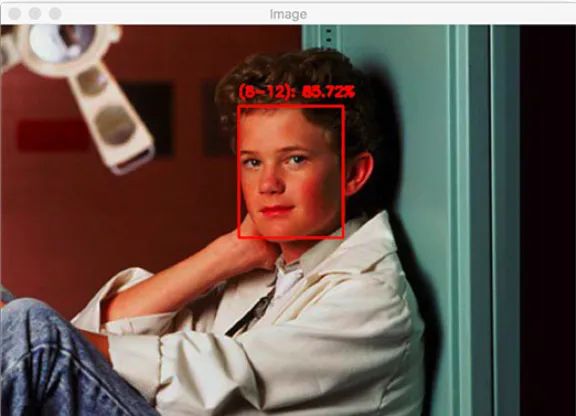
我们的年龄预测是正确的,拍摄这张照片时,Nat Patrick Harris看起来的确在8-12岁年龄段中的某个年龄。
尝试另一张图片:Samuel L. Jackson,他是我最喜欢的演员之一:
$ python detect_age.py --image images/samuel_l_jackson.png --face face_detector --age age_detector
[INFO] loading face detector model...
[INFO] loading age detector model...
[INFO] computing face detections...
[INFO] (48-53): 69.38%

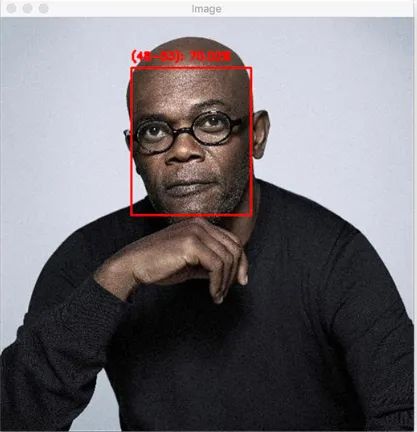
OpenCV年龄检测器针对Samuel L. Jackson的结果出错了——Jackson大约71岁,年龄预测大约有18岁的偏差。
仅仅看照片Jackson先生看上去像71岁吗?我猜测应该是50到60岁左右,他不像70岁多一点的男人。但这恰恰印证了我在前文提出的观点:
用视觉进行年龄预测的过程很困难,当计算机或人试图猜测某人的年龄时,我认为这是主观的。
为了评估年龄检测器,不能依赖人的实际年龄去评价。相反,需要衡量预测年龄和感知年龄之间的准确度。
为实时视频运行我们的OpenCV年龄检测器
现在我们可以在静态图像中实现年龄检测,但实时视频可以吗?
您应该猜我们可以。我们的视频脚本与图像脚本非常相似。不同之处在于,我们需要设置视频流并在每个帧上循环进行年龄检测。本文将重点介绍视频功能,可根据需要参考上面的流程。
要了解如何在视频中进行年龄识别,那就来看看detect\_age\_video.py。
# import the necessary packages
from imutils.video import VideoStream
import numpy as np
import argparse
import imutils
import time
import cv2
import os

我们需要导入三个新的模块:
-
VideoStream -
imutils -
time
这些导入允许我们对视频进行设置和使用webcam功能。
我决定定义一个快捷函数来获取帧,定位面部并预测年龄。函数通过进行检测和逻辑预测,使我们的帧处理循环不会那么庞大(您也可以将此函数放到单独的文件中)。现在让我们进入这个程序:
def detect_and_predict_age(frame, faceNet, ageNet, minConf=0.5):
	# define the list of age buckets our age detector will predict
	AGE_BUCKETS = ["(0-2)", "(4-6)", "(8-12)", "(15-20)", "(25-32)",
		"(38-43)", "(48-53)", "(60-100)"]
	# initialize our results list
	results = []
	# grab the dimensions of the frame and then construct a blob
	# from it
	(h, w) = frame.shape[:2]
	blob = cv2.dnn.blobFromImage(frame, 1.0, (300, 300),
		(104.0, 177.0, 123.0))
	# pass the blob through the network and obtain the face detections
	faceNet.setInput(blob)
	detections = faceNet.forward()
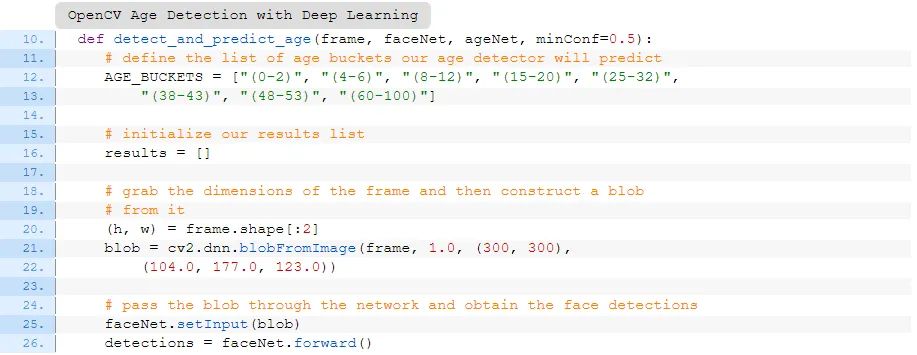
我们的 detect\_and\_predict\_age 辅助函数接受以下参数:
-
frame:视频通过webcam获取的单个帧 -
faceNet:初始化的深度学习人脸检测器 -
ageNet:初始化的深度学习年龄分类器 -
minConf:筛去较差人脸识别的置信度阈值
这里的参数和我们的图片年龄检测器脚本的命令行参数是相似的。
我们的AGE\_BUCKETS再次被定义(第12和13行)。然后我们定义一个空列表来保存面部定位和年龄检测的results。(第20-26行进行面部检测。)
接下来,我们将处理每个detections:
	# loop over the detections
	for i in range(0, detections.shape[2]):
		# extract the confidence (i.e., probability) associated with
		# the prediction
		confidence = detections[0, 0, i, 2]
		# filter out weak detections by ensuring the confidence is
		# greater than the minimum confidence
		if confidence > minConf:
			# compute the (x, y)-coordinates of the bounding box for
			# the object
			box = detections[0, 0, i, 3:7] * np.array([w, h, w, h])
			(startX, startY, endX, endY) = box.astype("int")
			# extract the ROI of the face
			face = frame[startY:endY, startX:endX]
			# ensure the face ROI is sufficiently large
			if face.shape[0] < 20 or face.shape[1] < 20:
				continue
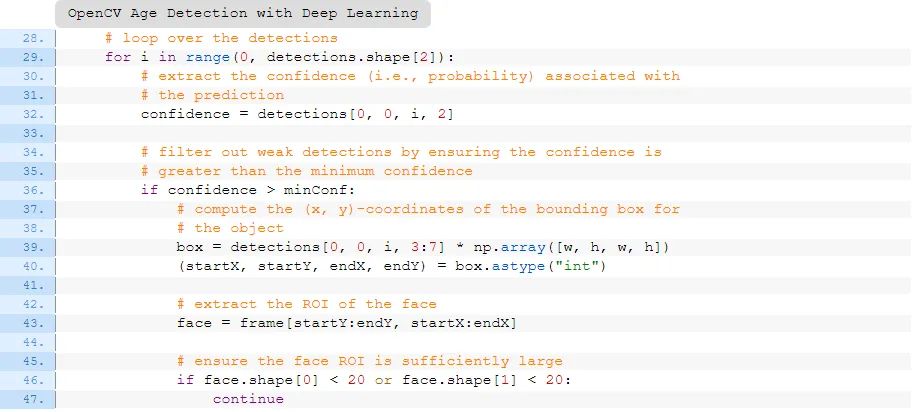
请看29-43行——它们循环检测,以确保较高的置信度,然后提取出面部ROI。
第46-47行是新的——由于以下两个原因,我们要确保视频中的面部ROI足够大:
-
首先,我们要筛掉帧中检测到的假阳性面部。 -
其次,年龄分类结果对于远离相机的脸(即脸部很小)来说并不准确。
为了完成我们的辅助功能,我们将进行年龄识别并返回结果:
			# construct a blob from *just* the face ROI
			faceBlob = cv2.dnn.blobFromImage(face, 1.0, (227, 227),
				(78.4263377603, 87.7689143744, 114.895847746),
				swapRB=False)
			# make predictions on the age and find the age bucket with
			# the largest corresponding probability
			ageNet.setInput(faceBlob)
			preds = ageNet.forward()
			i = preds[0].argmax()
			age = AGE_BUCKETS[i]
			ageConfidence = preds[0][i]
			# construct a dictionary consisting of both the face
			# bounding box location along with the age prediction,
			# then update our results list
			d = {
				"loc": (startX, startY, endX, endY),
				"age": (age, ageConfidence)
			}
			results.append(d)
	# return our results to the calling function
	return results
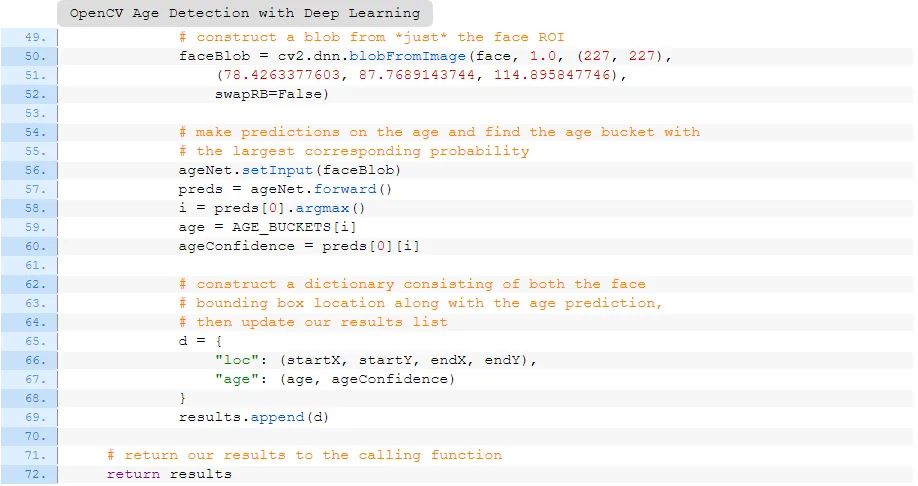
在这里预测人脸的年龄并提取出年龄段和年龄置信度(第56-60行)。第65-68行在一个字典中存储面部定位和年龄预测。循环检测的最后一步是将该字典放到结果列表中(第69行)。
如果所有检测都已经完成,并且结果都得到了,那我们将结果返回给调用者。
定义好辅助函数后,现在我们可以继续处理视频了。但我们需要先定义命令行参数:
# construct the argument parse and parse the arguments
ap = argparse.ArgumentParser()
ap.add_argument("-f", "--face", required=True,
	help="path to face detector model directory")
ap.add_argument("-a", "--age", required=True,
	help="path to age detector model directory")
ap.add_argument("-c", "--confidence", type=float, default=0.5,
	help="minimum probability to filter weak detections")
args = vars(ap.parse_args())

我们的脚本需要三个命令行参数:
-
face:预先训练的面部检测器模型的目录的路径 -
age:预先训练的年龄检测器模型的目录 -
confidence:最小概率阈值,以便筛除低置信检测
在这里,我们将加载模型并初始化视频:
# load our serialized face detector model from disk
print("[INFO] loading face detector model...")
prototxtPath = os.path.sep.join([args["face"], "deploy.prototxt"])
weightsPath = os.path.sep.join([args["face"],
	"res10_300x300_ssd_iter_140000.caffemodel"])
faceNet = cv2.dnn.readNet(prototxtPath, weightsPath)
# load our serialized age detector model from disk
print("[INFO] loading age detector model...")
prototxtPath = os.path.sep.join([args["age"], "age_deploy.prototxt"])
weightsPath = os.path.sep.join([args["age"], "age_net.caffemodel"])
ageNet = cv2.dnn.readNet(prototxtPath, weightsPath)
# initialize the video stream and allow the camera sensor to warm up
print("[INFO] starting video stream...")
vs = VideoStream(src=0).start()
time.sleep(2.0)
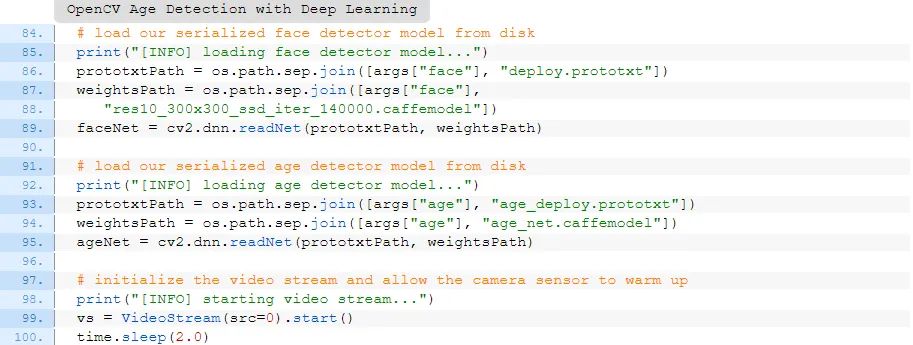
第86-89行加载并初始化了我们的面部检测器,而第93-95行加载了年龄检测器。
然后,我们使用VideoStream类来初始化webcam(第99和100行)。webcam准备好后,我们将开始处理帧:
# loop over the frames from the video stream
while True:
	# grab the frame from the threaded video stream and resize it
	# to have a maximum width of 400 pixels
	frame = vs.read()
	frame = imutils.resize(frame, width=400)
	# detect faces in the frame, and for each face in the frame,
	# predict the age
	results = detect_and_predict_age(frame, faceNet, ageNet,
		minConf=args["confidence"])
	# loop over the results
	for r in results:
		# draw the bounding box of the face along with the associated
		# predicted age
		text = "{}: {:.2f}%".format(r["age"][0], r["age"][1] * 100)
		(startX, startY, endX, endY) = r["loc"]
		y = startY - 10 if startY - 10 > 10 else startY + 10
		cv2.rectangle(frame, (startX, startY), (endX, endY),
			(0, 0, 255), 2)
		cv2.putText(frame, text, (startX, y),
			cv2.FONT_HERSHEY_SIMPLEX, 0.45, (0, 0, 255), 2)
	# show the output frame
	cv2.imshow("Frame", frame)
	key = cv2.waitKey(1) & 0xFF
	# if the `q` key was pressed, break from the loop
	if key == ord("q"):
		break
# do a bit of cleanup
cv2.destroyAllWindows()
vs.stop()
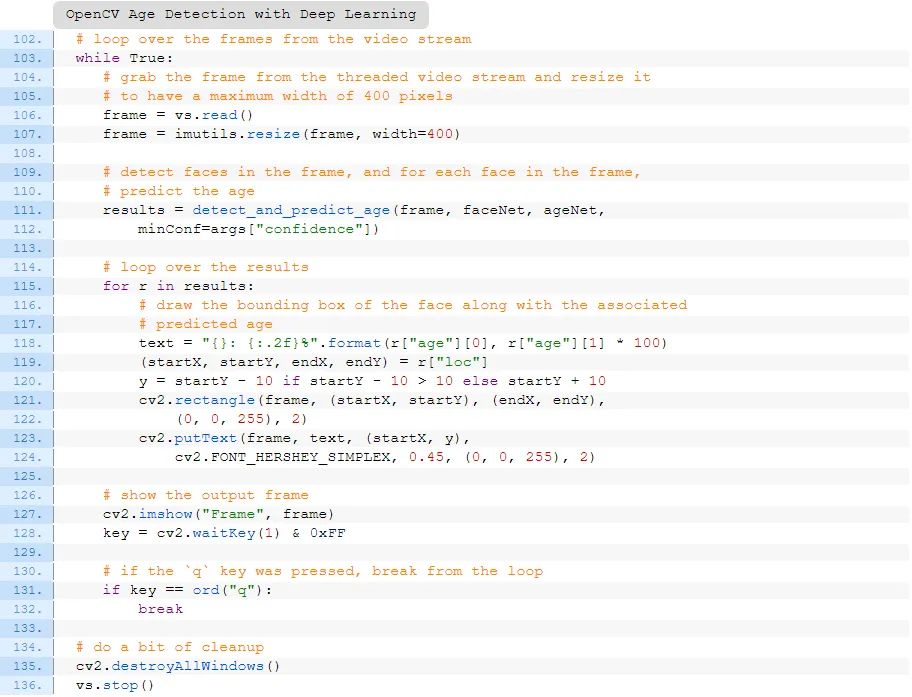
在上面的循环中,我们:
-
获取帧,并将其调整为已知宽度(第106和107行) -
通过我们的 detect_and_predict_age便捷函数传递帧,以便(1)检测面部(2)确定年龄(第111和112行) -
在帧上注释结果(第115-124行) -
显示和捕获键盘输入(第127和128行) -
如果键入 q,那么退出并清空(第131-136行)
在下一节中,我们将启动年龄检测器,看看它是否有效!
使用OpenCV进行实时年龄检测的结果
现在,让我们将OpenCV年龄检测器应用于实时视频。
确保您已从本教程的"下载"部分下载源代码和预先训练的年龄检测器。
从那里打开一个终端,然后输入以下命令:
$ python detect_age_video.py --face face_detector --age age_detector
[INFO] loading face detector model...
[INFO] loading age detector model...
[INFO] starting video stream...

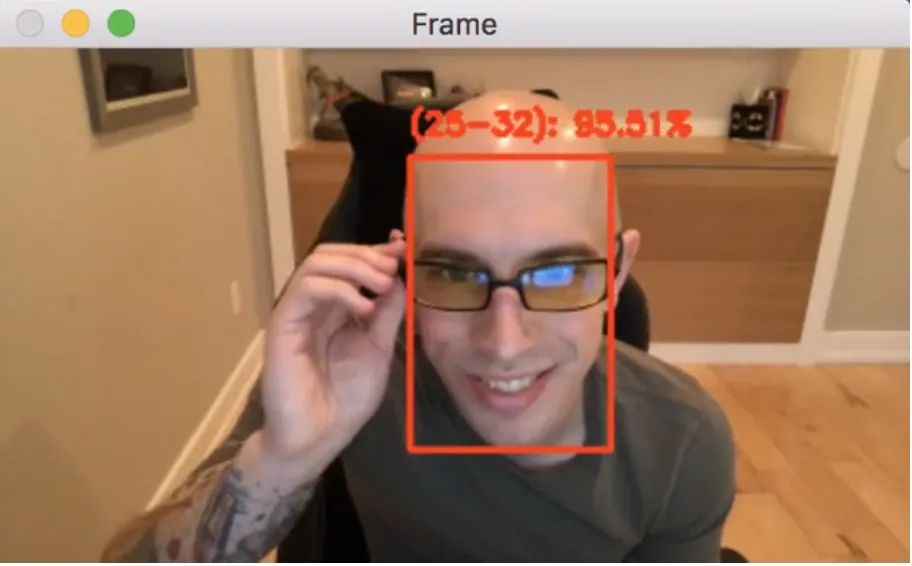
在这里,您可以看到OpenCV年龄检测器将我的年龄范围准确地预测为25-32岁(在写本文时,我还是31岁)。
如何改善年龄预测结果?
由Levi和Hassner训练的年龄预测模型的问题之一是,它严重偏向25-32岁年龄组,如他们原始版本中的这个混淆矩阵表所示:
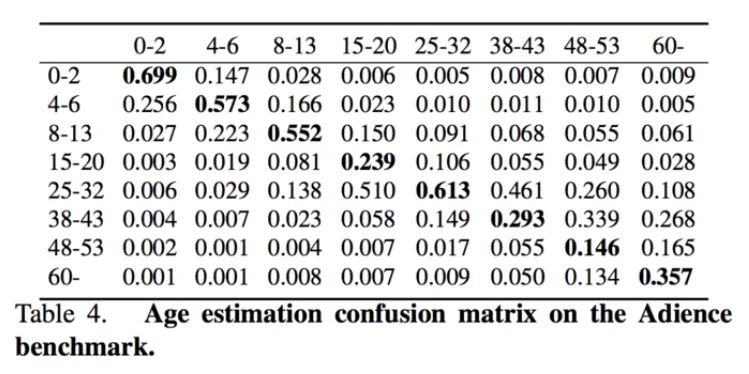
为了在您的模型中解决此问题,请考虑收集更多的训练数据,使用类权重、数据扩充和正则化技术。
不幸的是,这意味着我们的模型预测的25-32岁结果可能实际上属于其他的年龄段——在分析本教程的结果以及我自己的年龄预测中也遇到了几次这样的情况。
您可以通过以下方法消除这种偏差:
-
收集其他年龄段的额外训练数据以帮助平衡数据集; -
使用类权重来处理类失衡的问题; -
注意数据扩充; -
训练模型时使用正则化。
其次,年龄预测结果可以通过使用人脸对齐来改善。
人脸对齐功能会识别人脸的几何结构,然后尝试使用平移,缩放和旋转获得人脸的规范化。
在许多情况下(但并非总是如此),人脸对齐可以改善面部应用的效果,包括面部识别,年龄预测等。
为简单起见,我们在本教程中没有使用人脸对齐功能,但您可以按照这个教程学习有关人脸对齐的更多信息,然后将其应用于自己的年龄预测程序中。
性别预测呢?
我特意选择不在本教程中介绍性别预测。
使用计算机视觉和深度学习来识别一个人的性别似乎是一个有趣的分类问题,但实际上这是一个道德问题。
某人在视觉上看上去怎样,穿着什么或如何表现,这些都并不意味着他们可能是某种(或其他)性别。
试图将性别划分为两类的软件只会把我们束缚在对于性别的过时观念里。因此,我鼓励您尽可能不要在自己的程序中使用性别识别。
如果必须进行性别识别,请确保对自己负责,并确保您不去创建使他人遵循性别偏见的应用程序(例如根据感知到的性别去定义用户体验)。
性别识别几乎没有价值,而且它引起的问题比它解决的问题还要多。请尽可能避免它。
总结
在本教程中,您学习了如何使用OpenCV通过深度学习进行年龄识别。
为此,我们利用了Levi和Hassner在2015年出版的《使用卷积神经网络进行年龄和性别分类》中的预训练模型。该模型使我们能够以相当高的准确度去预测八个不同的年龄段;但是,我们必须认识到年龄预测是一个很有挑战性的问题。
有很多因素可以决定一个人的视觉年龄,包括他们的生活方式,工作,吸烟习惯,最重要的是基因。其次,请记住,人们试图掩饰自己的年龄——如果人类准确地预测某人的年龄有困难的话,那么机器学习模型同样会有困难。
因此,您需要根据感知年龄(而非实际年龄)去评估所有的年龄预测结果。在您自己的计算机视觉项目中进行年龄识别时,请记住这一点。
希望您喜欢本教程!
原文链接:https://www.pyimagesearch.com/2020/04/13/opencv-age-detection-with-deep-learning
—版权声明—
仅用于学术分享,版权属于原作者。
若有侵权,请联系微信号:yiyang-sy 删除或修改!
