【小白学习PyTorch教程】六、基于CIFAR-10 数据集,使用PyTorch 从头开始构建图像分类模型
「@Author:Runsen」
图像识别本质上是一种计算机视觉技术,它赋予计算机“眼睛”,让计算机通过图像和视频“看”和理解世界。
在开始阅读本文之前,建议先了解一下什么是tensor、什么是torch.autograd以及如何在 PyTorch 中构建神经网络模型。
CIFAR-10 数据集
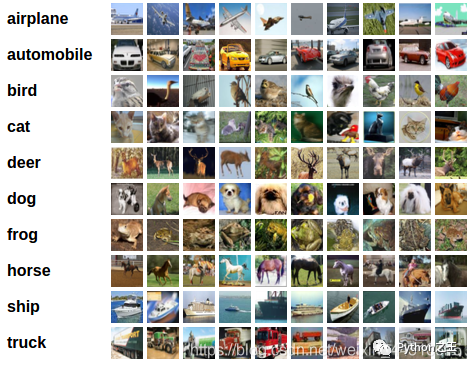
本教程使用具有 10 个类的CIFAR10 数据集:‘airplane’, ‘automobile’, ‘bird’, ‘cat’, ‘deer’, ‘dog’, ‘frog’, ‘horse’, ‘ship’, 和‘truck’.
构建图像分类模型的 5 个步骤
加载并标准化训练和测试数据 定义卷积神经网络 (CNN) 定义损失函数和优化器 在训练数据上训练模型 在测试数据上测试模型
首先,我们导入库matplotlib和numpy. 这些分别是绘图和数据转换的基本库。
import matplotlib.pyplot as plt # for plotting
import numpy as np # for transformation

import torch # PyTorch package
import torchvision # load datasets
import torchvision.transforms as transforms # transform data
import torch.nn as nn # basic building block for neural neteorks
import torch.nn.functional as F # import convolution functions like Relu
import torch.optim as optim # optimzer
torchvision 用于加载流行的数据集 torchvision.transforms 用于对图像数据进行变换 torch.nn 用于定义神经网络 torch.nn.functional 用于导入 Relu 等函数 torch.optim 用于实现优化算法,例如随机梯度下降 (SGD)
在加载数据之前,首先定义一个应用于 CIFAR10 数据集中的图像数据的转换器transform。
#将多个变换组合在一起
transform = transforms.Compose(
 # to tensor object
    [transforms.ToTensor(),
    #  mean = 0.5, std = 0.5
    transforms.Normalize((0.5, 0.5, 0.5), (0.5, 0.5, 0.5))])

# 设置 batch_size
batch_size = 4

# 设置 num_workers
num_workers = 2

# 加载train数据
trainset = torchvision.datasets.CIFAR10(root='./data', train=True, download=True, transform=transform)

trainloader = torch.utils.data.DataLoader(trainset, batch_size=batch_size, shuffle=True, num_workers=num_workers)

# 加载test数据
testset = torchvision.datasets.CIFAR10(root='./data', train=False,
                                       download=True, transform=transform)
testloader = torch.utils.data.DataLoader(testset, batch_size=batch_size,shuffle=False, num_workers=num_workers)

# 10个label
classes = ('plane', 'car', 'bird', 'cat',
           'deer', 'dog', 'frog', 'horse', 'ship', 'truck')
在上面代码,首先将想要的转换并将其放入括号列表中[]并将其传递给transforms.Compose()函数。这里有这两个转换:
ToTensor()
将 CIFAR10 数据集中的类型图像转换为由 Python 图像库 ( PIL ) 图像组成的张量,缩放到[0,1]。
Normalize(mean, std)
mean 和 std 参数的参数数量取决于 PIL 图像的模式,由于PIL 图像是 RGB,这意味着它们具有三个通道——红色、绿色和蓝色,其范围是[0,1]。设置mean = 0.5, std = 0.5,基于归一化公式 : (x — mean) /std,最终得到[-1, 1] 的范围。
接下来,我们将一些训练图像可视化。
def imshow(img):
  img = img / 2 + 0.5 # unnormalize
  npimg = img.numpy() # numpy objects
  plt.imshow(np.transpose(npimg, (1, 2, 0)))
  plt.show()

# 利用ITER函数获取随机训练图像
dataiter = iter(trainloader)
images, labels = dataiter.next()

imshow(torchvision.utils.make_grid(images))

# print the class of the image
print(' '.join('%s' % classes[labels[j]] for j in range(batch_size)))
 「定义CNN模型」
class Net(nn.Module):
    def __init__(self):
        super(Net, self).__init__()
 # 3 input image channel, 6 output channels,
 # 5x5平方卷积核
 # in_channels = 3 因为我们的图像是 RGB
        self.conv1 = nn.Conv2d(3, 6, 5)
 # Max pooling over a (2, 2) window
        self.pool = nn.MaxPool2d(2, 2)
        self.conv2 = nn.Conv2d(6, 16, 5)
        self.fc1 = nn.Linear(16 * 5 * 5, 120)# 5x5 from image dimension
        self.fc2 = nn.Linear(120, 84)
        self.fc3 = nn.Linear(84, 10)

    def forward(self, x):
        x = self.pool(F.relu(self.conv1(x)))
        x = self.pool(F.relu(self.conv2(x)))
        # 展平 conv 层的输出并将其提供给我们的全连接层
        x = x.flatten(1)
        # x = x.view(-1, 16 * 5 * 5)
        x = F.relu(self.fc1(x))
        x = F.relu(self.fc2(x))
        x = self.fc3(x)
        return x

net = Net()
print(net)

定义一个损失函数和优化器
criterion = nn.CrossEntropyLoss()
optimizer = optim.SGD(net.parameters(), lr=0.001, momentum=0.9)
训练模型
start = torch.cuda.Event(enable_timing=True)
end = torch.cuda.Event(enable_timing=True)

start.record()

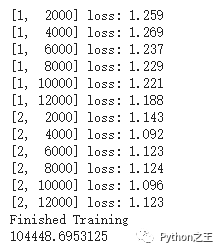
for epoch in range(2):  # loop over the dataset multiple times

    running_loss = 0.0
    for i, data in enumerate(trainloader, 0):
        # get the inputs; data is a list of [inputs, labels]
        inputs, labels = data

        # zero the parameter gradients
        optimizer.zero_grad()

        # forward + backward + optimize
        outputs = net(inputs)
        loss = criterion(outputs, labels)
        loss.backward()
        optimizer.step()

        # print statistics
        running_loss += loss.item()
        if i % 2000 == 1999:    # print every 2000 mini-batches
            print('[%d, %5d] loss: %.3f' %
                  (epoch + 1, i + 1, running_loss / 2000))
            running_loss = 0.0

# whatever you are timing goes here
end.record()

# Waits for everything to finish running
torch.cuda.synchronize()

print('Finished Training')
print(start.elapsed_time(end))  # milliseconds

保存神经网络
# save
PATH = './cifar_net.pth'
torch.save(net.state_dict(), PATH)
# reload
net = Net()
net.load_state_dict(torch.load(PATH))
「在测试数据上测试模型」
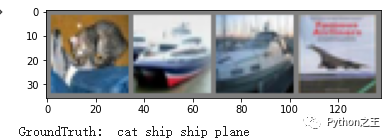
dataiter = iter(testloader)
images, labels = dataiter.next()

# print images
imshow(torchvision.utils.make_grid(images))
print('GroundTruth: ', ' '.join('%s' % classes[labels[j]] for j in range(4)))
 下面Testing on 10,000 images
correct = 0
total = 0
with torch.no_grad():
    for data in testloader:
        images, labels = data
        outputs = net(images)
        _, predicted = torch.max(outputs.data, 1)
        total += labels.size(0)
        correct += (predicted == labels).sum().item()

print('Accuracy of the network on the 10000 test images: %d %%' % (
    100 * correct / total))

写在后面
我们的模型准确度得分很低,那么有什么方法可以提高它呢?
调超参数 使用不同的优化器 图像数据增强 尝试更复杂的架构,例如ImageNet 模型 处理过拟合
往期精彩回顾 本站qq群851320808,加入微信群请扫码:
