轻松学Pytorch-迁移学习实现表面缺陷检查
点击上方“小白学视觉”,选择加"星标"或“置顶”
重磅干货,第一时间送达
本文转载自:OpenCV学堂
引言 ·
大家好,今天给大家更新的是如何基于torchvision自带的模型完成图像分类任务的迁移学习,前面我们已经完成了对对象检测任务的迁移学习,这里补上针对图像分类任务的迁移学习,官方的文档比较啰嗦,看了之后其实可操作性很低,特别是对于初学者,估计看了之后就发懵的那种。本人重新改写了一波,代码简洁易懂,然后把训练结果导出ONNX,使用OpenCV DNN调用部署,非常实用!
数据集
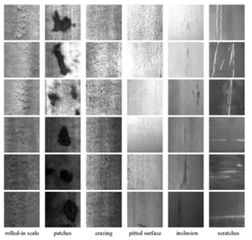
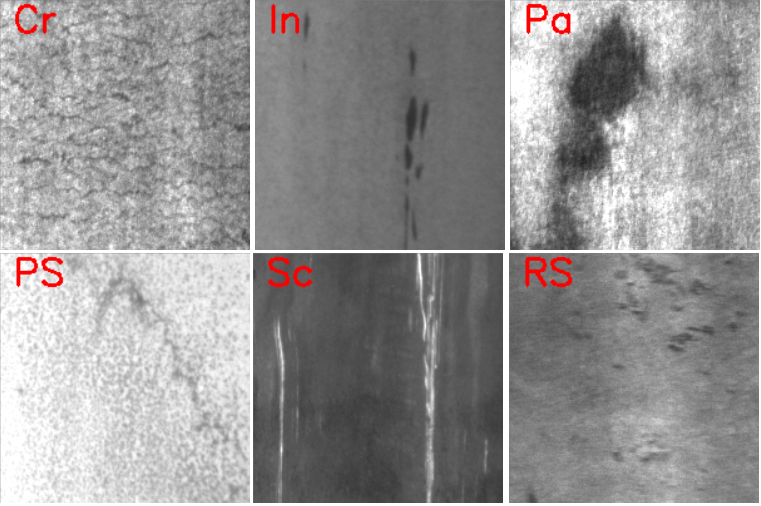
东北大学热轧带钢表面缺陷数据集,该数据集是东北大学的宋克臣等几位老师收集的,一共包含了三类数据。这里使用(NEU surface defect database),数据集收集了夹杂、划痕、压入氧化皮、裂纹、麻点和斑块总计6种缺陷,每种缺陷300张,图像尺寸为200×200。部分示例如下:

基于该数据集,实现pytorch数据类,完成数据集的加载与预处理的代码如下:
class SurfaceDefectDataset(Dataset):
    def __init__(self, root_dir):
        self.transform = transforms.Compose([transforms.ToTensor()])
        img_files = os.listdir(root_dir)
        self.defect_types = []
        self.images = []
        index = 0
        for file_name in img_files:
            defect_attrs = file_name.split("_")
            d_index = defect_labels.index(defect_attrs[0])
            self.images.append(os.path.join(root_dir, file_name))
            self.defect_types.append(d_index)
            index += 1

    def __len__(self):
        return len(self.images)

    def num_of_samples(self):
        return len(self.images)

    def __getitem__(self, idx):
        if torch.is_tensor(idx):
            idx = idx.tolist()
            image_path = self.images[idx]
        else:
            image_path = self.images[idx]
        img = cv.imread(image_path)  # BGR order
        h, w, c = img.shape
        # rescale
        img = cv.resize(img, (200, 200))
        img = (np.float32(img) /255.0 - 0.5) / 0.5
        # H, W C to C, H, W
        img = img.transpose((2, 0, 1))
        sample = {'image': torch.from_numpy(img), 'defect': self.defect_types[idx]}
return sample怎么下载该数据集,后台回复"NEU"关键字即可获取下载地址
模型使用
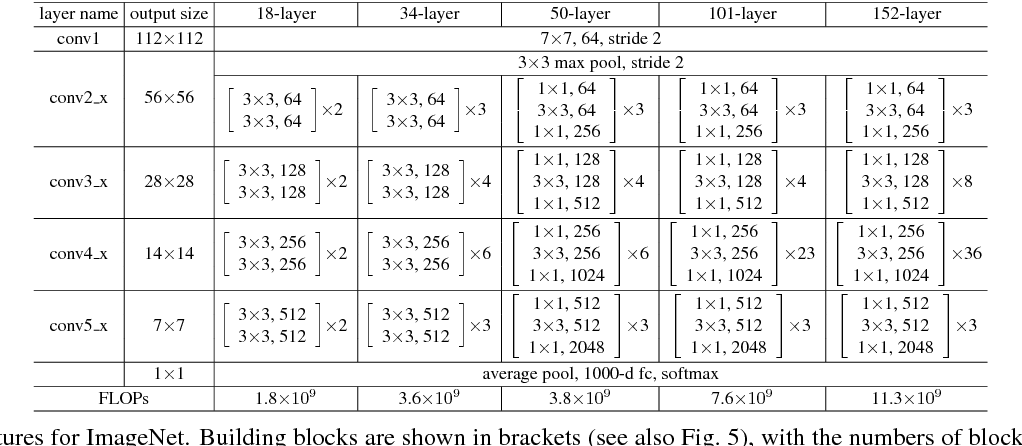
Pytorchvison支持多种图像分类模型,这里我们选择残差网络模型作为迁移学习的基础模型,对输出层(最后一层)改为六个类别,其它特征层选择在训练时候微调参数。常见的ResNet网络模型如下:

基于ResNet18完成网络模型修改,最终的模型实现代码如下:
class SurfaceDefectResNet(torch.nn.Module):

    def __init__(self):
        super(SurfaceDefectResNet, self).__init__()
        self.cnn_layers = torchvision.models.resnet18(pretrained=True)
        num_ftrs = self.cnn_layers.fc.in_features
        self.cnn_layers.fc = torch.nn.Linear(num_ftrs, 6)

    def forward(self, x):
        # stack convolution layers
        out = self.cnn_layers(x)
        return out
模型训练与测试
模型训练跟前面讲的一些图像分类模型训练方式并无不同,基于交叉熵损失,完成训练,每个批次4张图像或者8张图,训练15个epoch之后,保存模型。然后使用模型测试35张测试图像,发现有两张预测错误,其余均正确。训练模型的代码如下:
# 训练模型的次数
num_epochs = 15
# optimizer = torch.optim.SGD(model.parameters(), lr=0.001)
optimizer = torch.optim.Adam(model.parameters(), lr=1e-2)
model.train()

# 损失函数
cross_loss = torch.nn.CrossEntropyLoss()
index = 0
for epoch in  range(num_epochs):
    train_loss = 0.0
    for i_batch, sample_batched in enumerate(dataloader):
        images_batch, label_batch = \
            sample_batched['image'], sample_batched['defect']
        if train_on_gpu:
            images_batch, label_batch= images_batch.cuda(), label_batch.cuda()
        optimizer.zero_grad()

        # forward pass: compute predicted outputs by passing inputs to the model
        m_label_out_ = model(images_batch)
        label_batch = label_batch.long()

        # calculate the batch loss
        loss = cross_loss(m_label_out_, label_batch)

        # backward pass: compute gradient of the loss with respect to model parameters
        loss.backward()

        # perform a single optimization step (parameter update)
        optimizer.step()

        # update training loss
        train_loss += loss.item()
        if index % 100 == 0:
            print('step: {} \tTraining Loss: {:.6f} '.format(index, loss.item()))
        index += 1

        # 计算平均损失
    train_loss = train_loss / num_train_samples

    # 显示训练集与验证集的损失函数
    print('Epoch: {} \tTraining Loss: {:.6f} '.format(epoch, train_loss))

# save model
model.eval()
torch.save(model, 'surface_defect_model.pt')
转为为ONNX模式,OpenCV DNN部署调用,代码如下:
defect_net = cv.dnn.readNetFromONNX("surface_defect_resnet18.onnx")
root_dir = "D:/pytorch/enu_surface_defect/test"
fileNames = os.listdir(root_dir)
for f in fileNames:
    image = cv.imread(os.path.join(root_dir, f))
    blob = cv.dnn.blobFromImage(image, 0.00392, (200, 200), (127, 127, 127)) / 0.5
    defect_net.setInput(blob)
    res = defect_net.forward()
    idx = np.argmax(np.reshape(res, (6)))
    defect_txt = defect_labels[idx]
    cv.putText(image, defect_txt, (10, 25), cv.FONT_HERSHEY_SIMPLEX, 1, (255, 0, 0), 2)
    cv.imshow("input", image)
    print(f, defect_txt)
    cv.waitKey(0)
cv.destroyAllWindows()
预测运行结果如下:

运行结果与pytorch调用模型运行结果保持一致。由于这个是一个专栏,很多代码在以前的文章中已经给出了,这里就没有重复贴代码!
好消息!
小白学视觉知识星球
开始面向外开放啦👇👇👇
下载1:OpenCV-Contrib扩展模块中文版教程 在「小白学视觉」公众号后台回复:扩展模块中文教程,即可下载全网第一份OpenCV扩展模块教程中文版,涵盖扩展模块安装、SFM算法、立体视觉、目标跟踪、生物视觉、超分辨率处理等二十多章内容。 下载2:Python视觉实战项目52讲 在「小白学视觉」公众号后台回复:Python视觉实战项目,即可下载包括图像分割、口罩检测、车道线检测、车辆计数、添加眼线、车牌识别、字符识别、情绪检测、文本内容提取、面部识别等31个视觉实战项目,助力快速学校计算机视觉。 下载3:OpenCV实战项目20讲 在「小白学视觉」公众号后台回复:OpenCV实战项目20讲,即可下载含有20个基于OpenCV实现20个实战项目,实现OpenCV学习进阶。 交流群
欢迎加入公众号读者群一起和同行交流,目前有SLAM、三维视觉、传感器、自动驾驶、计算摄影、检测、分割、识别、医学影像、GAN、算法竞赛等微信群(以后会逐渐细分),请扫描下面微信号加群,备注:”昵称+学校/公司+研究方向“,例如:”张三 + 上海交大 + 视觉SLAM“。请按照格式备注,否则不予通过。添加成功后会根据研究方向邀请进入相关微信群。请勿在群内发送广告,否则会请出群,谢谢理解~

