高性能模糊算法 Dual Blur 在 2D Sprite 上的实现与应用丨Cocos Creator
引言:在游戏开发中,很多效果的实现都离不开图像模糊算法的运用。今天,一起来看看社区开发者「詠恆の承諾」是如何基于 RenderTexture 实现多 Pass Kawase Blur。
屏幕后处理效果(Screen Post Processing Effects)是游戏中实现屏幕特效的方法,有助于提升画面效果。图像模糊算法在后处理渲染领域占据着重要地位,泛光(Bloom)、镜头眩光光晕(Glare Lens Flare)、景深(Depth of Field)、体积光(Volume Ray)等许多效果都用到了图像模糊算法。所以说,后处理中所采用模糊算法的优劣,决定了后处理管线最终的渲染品质和消耗性能的多少。
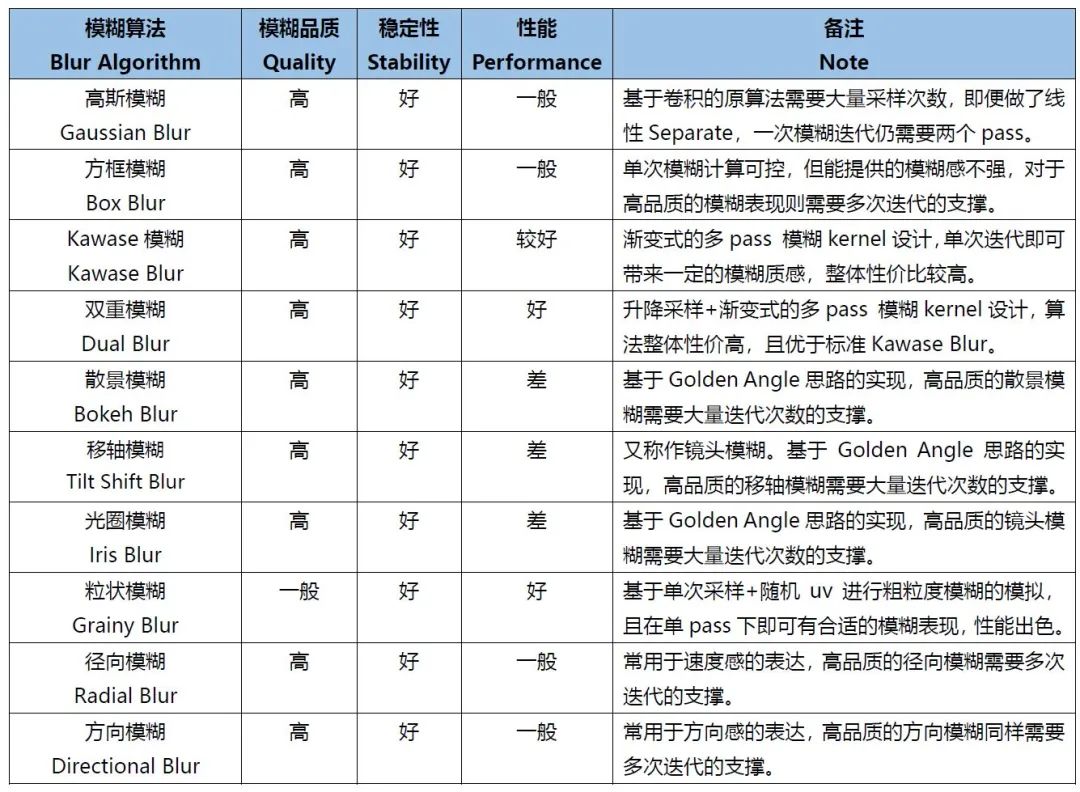
后处理管线中会使用到十种模糊算法总结
前段时间,由于项目需要做一个背景模糊的功能,正巧之前看到了大城小胖在《如何重绘<江南百景图>》中对比了几种模糊算法,本着学习的态度,我决定尝试在 Cocos Creator 2.4.x 中实现 Dual Blur(双重模糊)。
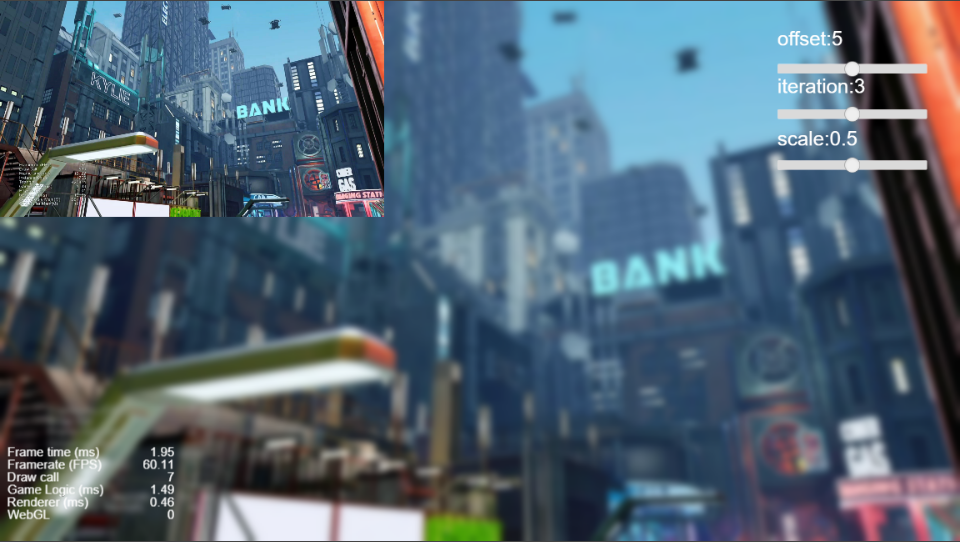
最终效果
实现多 Pass
首先要解决的问题是:如何在 v2.4.x 中实现多 pass?
参考陈皮皮大佬的实现方案[2],基于 RenderTexture 实现多 Pass Kawase Blur。先将纹理渲染到 RenderTexture(下文简称 RT)上,再对得到的 RT 做单次模糊处理并得到新的 RT,重复此操作,将最后一个 RT 渲染到需要的 Sprite 中即可。
注意:每次渲染得到的 RT 是倒置的,渲染前的纹理 Y 轴相反。
protected renderWithMaterial(srcRT: cc.RenderTexture, dstRT: cc.RenderTexture | cc.Material, material?: cc.Material, size?: cc.Size) {
    // 检查参数
    if (dstRT instanceof cc.Material) {
        material = dstRT;
        dstRT = new cc.RenderTexture();
    }
    // 创建临时节点(用于渲染 RenderTexture)
    const tempNode = new cc.Node();
    tempNode.setParent(cc.Canvas.instance.node);
    const tempSprite = tempNode.addComponent(cc.Sprite);
    tempSprite.sizeMode = cc.Sprite.SizeMode.RAW;
    tempSprite.trim = false;
    tempSprite.spriteFrame = new cc.SpriteFrame(srcRT);
    // 获取图像宽高
    const { width, height } = size ?? { width: srcRT.width, height: srcRT.height };
    // 初始化 RenderTexture
    // 如果截图内容中不包含 Mask 组件,可以不用传递第三个参数
    dstRT.initWithSize(width, height, cc.gfx.RB_FMT_S8);
    // 更新材质
    if (material instanceof cc.Material) {
        tempSprite.setMaterial(0, material);
    }
    // 创建临时摄像机(用于渲染临时节点)
    const cameraNode = new cc.Node();
    cameraNode.setParent(tempNode);
    const camera = cameraNode.addComponent(cc.Camera);
    camera.clearFlags |= cc.Camera.ClearFlags.COLOR;
    camera.backgroundColor = cc.color(0, 0, 0, 0);
    // 根据屏幕适配方案,决定摄像机缩放比
    // 还原sizeScale,zoomRatio取屏幕与RT宽高比
    camera.zoomRatio = cc.winSize.height / srcRT.height;
    // 将临时节点渲染到 RenderTexture 中
    camera.targetTexture = dstRT;
    camera.render(tempNode);
    // 销毁临时对象
    cameraNode.destroy();
    tempNode.destroy();
    // 返回 RenderTexture
    return dstRT;
}
提示!需要留意 cc.RenderTexture.initWithSize(width, height, depthStencilFormat) 中的第3个参数,之前使用时我忽略了第3个参数,加上场景比较复杂,需要截图的结点中带有 Mask 组件,导致截图丢失了 Mask 组件所在结点之前的所有图片。
查看源码可知道,initWithSize 默认会清除深度缓冲区、模版缓冲区,depthStencilFormat 传入 gfx.RB_FMT_D16、gfx.RB_FMT_S8、gfx.RB_FMT_D24S8 时,则可以保留对应缓冲区。感谢鸦哥(渡鸦)的文章《实现单个 Node 截图的两种方式》[3],代码+注释太香了!
/**
* !#en
* Init the render texture with size.
* !#zh
* 初始化 render texture
* @param {Number} [width]
* @param {Number} [height]
* @param {Number} [depthStencilFormat]
* @method initWithSize
*/
initWithSize (width, height, depthStencilFormat) {
    this.width = Math.floor(width || cc.visibleRect.width);
    this.height = Math.floor(height || cc.visibleRect.height);
    this._resetUnderlyingMipmaps();

    let opts = {
    colors: [ this._texture ],
    };

    if (this._depthStencilBuffer) this._depthStencilBuffer.destroy();
    let depthStencilBuffer;
    if (depthStencilFormat) {
    depthStencilBuffer = new gfx.RenderBuffer(renderer.device, depthStencilFormat, width, height);
    if (depthStencilFormat === gfx.RB_FMT_D24S8) {
    opts.depthStencil = depthStencilBuffer;
    }
    else if (depthStencilFormat === gfx.RB_FMT_S8) {
    opts.stencil = depthStencilBuffer;
    }
    else if (depthStencilFormat === gfx.RB_FMT_D16) {
    opts.depth = depthStencilBuffer;
    }
    }
    this._depthStencilBuffer = depthStencilBuffer;
    if (this._framebuffer) this._framebuffer.destroy();
    this._framebuffer = new gfx.FrameBuffer(renderer.device, width, height, opts);

    this._packable = false;

    this.loaded = true;
    this.emit("load");
},
Dual Blur(双重模糊)
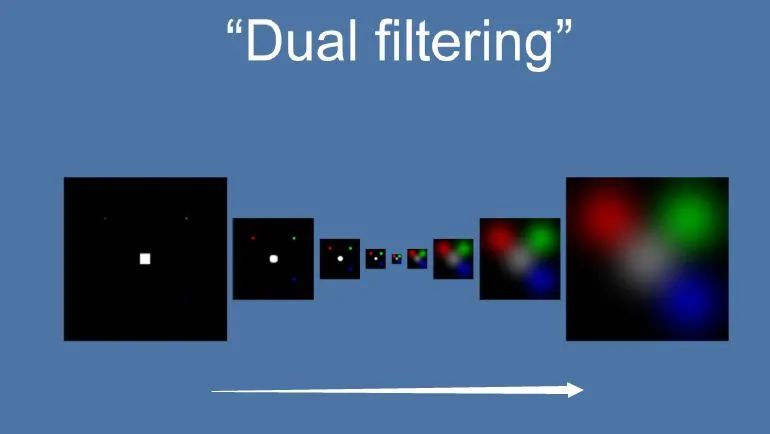
接下来只需实现 Dual Blur 算法即可。首先简单了解一下 Dual Blur,此处引用《高品质后处理:十种图像模糊算法的总结与实现》[4]一文。
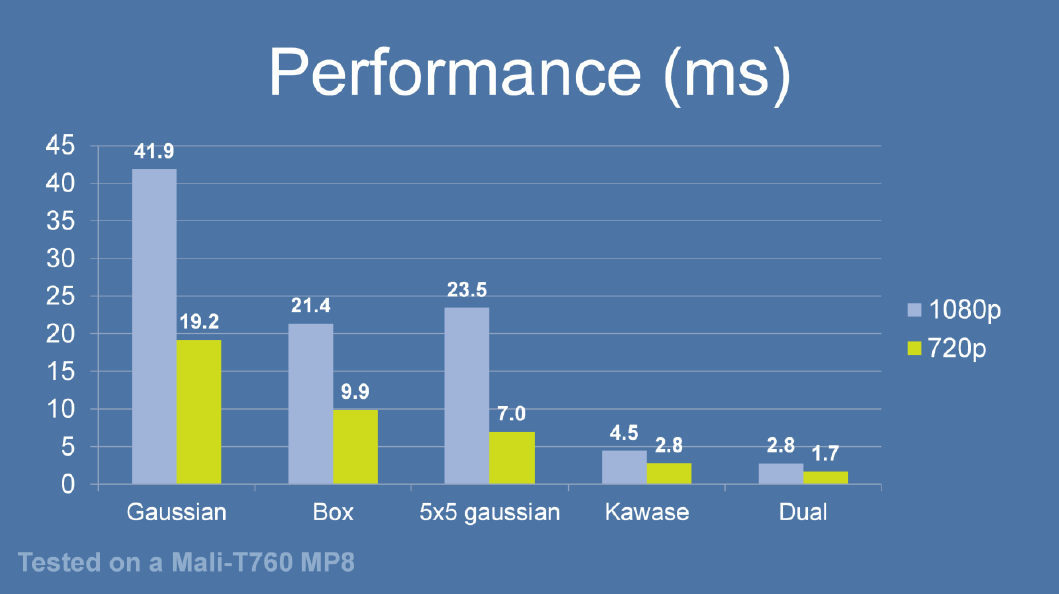
Dual Kawase Blur,简称 Dual Blur,是一种衍生自 Kawase Blur 的模糊算法,其由两种不同的 Blur Kernel 构成。相较于 Kawase Blur 在两个大小相等的纹理之间进行乒乓 blit 的的思路,Dual Kawase Blur 的核心思路在于 blit 过程中进行降采样和升采样,即对 RT 进行了降采样以及升采样。
由于灵活的升降采样带来了 blit RT 所需计算量的减少等原因,Dual Kawase Blur 相对而言有更好的性能。下图是相同条件下几种模糊算法的性能对比,可以看到,Dual Kawase Blur 在其中具有最佳的性能表现。
为了带来更好的性能表现,可以将 uv 的偏移放在 Vert Shader 中进行,而 Fragment Shader 中基本上仅进行采样即可。
此外,为了支持合图也能使用,这里我修改了顶点数据。
// Dual Kawase Blur (双重模糊)
// 教程地址:https://github.com/QianMo/X-PostProcessing-Library/tree/master/Assets/X-PostProcessing/Effects/DualKawaseBlur
CCEffect %{
techniques:
- name: Down
passes:
- name: Down
vert: vs:Down
frag: fs:Down
blendState:
targets:
- blend: true
rasterizerState:
cullMode: none
properties: &prop
texture: { value: white }
resolution: { value: [1920, 1080] }
offset: { value: 1, editor: { range: [0, 100] }}
alphaThreshold: { value: 0.5 }
- name: Up
passes:
- name: Up
vert: vs:Up
frag: fs:Up
blendState:
targets:
- blend: true
rasterizerState:
cullMode: none
properties: *prop
}%
CCProgram vs %{
precision highp float;
#include
#include
in vec3 a_position;
in vec4 a_color;
out vec4 v_color;
#if USE_TEXTURE
in vec2 a_uv0;
out vec2 v_uv0;
out vec4 v_uv1;
out vec4 v_uv2;
out vec4 v_uv3;
out vec4 v_uv4;
#endif
uniform Properties {
vec2 resolution;
float offset;
};
vec4 Down () {
vec4 pos = vec4(a_position, 1);
#if CC_USE_MODEL
pos = cc_matViewProj * cc_matWorld * pos;
#else
pos = cc_matViewProj * pos;
#endif
#if USE_TEXTURE
vec2 uv = a_uv0;
vec2 texelSize = 0.5 / resolution;
v_uv0 = uv;
v_uv1.xy = uv - texelSize * vec2(offset); //top right
v_uv1.zw = uv + texelSize * vec2(offset); //bottom left
v_uv2.xy = uv - vec2(texelSize.x, -texelSize.y) * vec2(offset); //top right
v_uv2.zw = uv + vec2(texelSize.x, -texelSize.y) * vec2(offset); //bottom left
#endif
v_color = a_color;
return pos;
}
vec4 Up () {
vec4 pos = vec4(a_position, 1);
#if CC_USE_MODEL
pos = cc_matViewProj * cc_matWorld * pos;
#else
pos = cc_matViewProj * pos;
#endif
#if USE_TEXTURE
vec2 uv = a_uv0;
vec2 texelSize = 0.5 / resolution;
v_uv0 = uv;
v_uv1.xy = uv + vec2(-texelSize.x * 2., 0) * offset;
v_uv1.zw = uv + vec2(-texelSize.x, texelSize.y) * offset;
v_uv2.xy = uv + vec2(0, texelSize.y * 2.) * offset;
v_uv2.zw = uv + texelSize * offset;
v_uv3.xy = uv + vec2(texelSize.x * 2., 0) * offset;
v_uv3.zw = uv + vec2(texelSize.x, -texelSize.y) * offset;
v_uv4.xy = uv + vec2(0, -texelSize.y * 2.) * offset;
v_uv4.zw = uv - texelSize * offset;
#endif
v_color = a_color;
return pos;
}
}%
CCProgram fs %{
precision highp float;
#include
#include
#include 有了 effect 后,需要创建2个材质分别对应 techniques 中的 Down 与 Up,示例代码中用 materialDown、materialUp 来表示2个材质。
通过摄像机截图,得到初始 RT 后(纹理倒置),对初始 RT 进行降采样和模糊得到新的 RT,重复若干次后,对最后的 RT 进行相同次数的升采样和模糊,得到最终满足效果的 RT。当降采样 scale 不为1时,设置 RT 尺寸时会自动向下取整,倒置最终效果会有黑边,iteration 次数越大越明显,且 iteration 存在上限,实际使用时可自行取舍。
/**
 * 模糊渲染
 * @param offset 模糊半径
 * @param iteration 模糊迭代次数
 * @param scale 降采样缩放比例
 */
blur(offset: number, iteration: number, scale: number = 0.5) {
    // 设置源结点、目标sprite
    const spriteDst = this.spriteDst,
        nodeSrc = this.spriteSrc.node;
    // 设置材质
    const material = this.materialDown;
    this.materialDown.setProperty('resolution', cc.v2(nodeSrc.width, nodeSrc.height));
    this.materialDown.setProperty('offset', offset);
    this.materialUp.setProperty('resolution', cc.v2(nodeSrc.width, nodeSrc.height));
    this.materialUp.setProperty('offset', offset);
    // 创建临时 RenderTexture
    let srcRT = new cc.RenderTexture(),
        lastRT = new cc.RenderTexture();
    // 获取初始 RenderTexture
    this.getRenderTexture(nodeSrc, lastRT);
    // 多 Pass 处理
    // 注:由于 OpenGL 中的纹理是倒置的,所以双数 Pass 的出的图像是颠倒的

    // 记录升降纹理时纹理尺寸
    let pyramid: [number, number][] = [], tw: number = lastRT.width, th: number = lastRT.height;
    //Downsample
    for (let i = 0; i < iteration; i++) {
        pyramid.push([tw, th]);
        [lastRT, srcRT] = [srcRT, lastRT];
        // 缩小截图尺寸,提高效率
        // 缩小尺寸时,RT会自动向下取整,导致黑边
        tw = Math.max(tw * scale, 1), th = Math.max(th * scale, 1);
        this.renderWithMaterial(srcRT, lastRT, this.materialDown, cc.size(tw, th));
    }
    // Upsample
    for (let i = iteration - 1; i >= 0; i--) {
        [lastRT, srcRT] = [srcRT, lastRT];
        this.renderWithMaterial(srcRT, lastRT, this.materialUp, cc.size(pyramid[i][0], pyramid[i][1]));
    }
    // 使用经过处理的 RenderTexture
    this.renderTexture = lastRT;
    spriteDst.spriteFrame = new cc.SpriteFrame(this.renderTexture);
    // 翻转纹理y轴
    spriteDst.spriteFrame.setFlipY(true);
    // 销毁不用的临时 RenderTexture
    srcRT.destroy();
}
以上是本次的分享,希望可以给大家一点启发和帮助!欢迎点击【阅读原文】前往论坛专贴一起讨论交流,完整代码见代码仓库:
https://github.com/RicardoZhou/CreatorStudy/tree/master/assets/Menu/Shader/DualBlur
参考资料
[1]如何重绘《江南百景图》,大城小胖
[2]基于 RenderTexture 实现多 Pass 的 Kawase Blur,陈皮皮
https://forum.cocos.org/t/topic/126481
[4]高品质后处理:十种图像模糊算法的总结与实现,毛星云
https://zhuanlan.zhihu.com/p/125744132
[5]自定义顶点格式,GT
https://forum.cocos.org/t/topic/95087