CSS 如何画一个实心、带边缘色(气泡聊天框)、圆角的三角形
回复交流,加入前端编程面试算法每日一题群
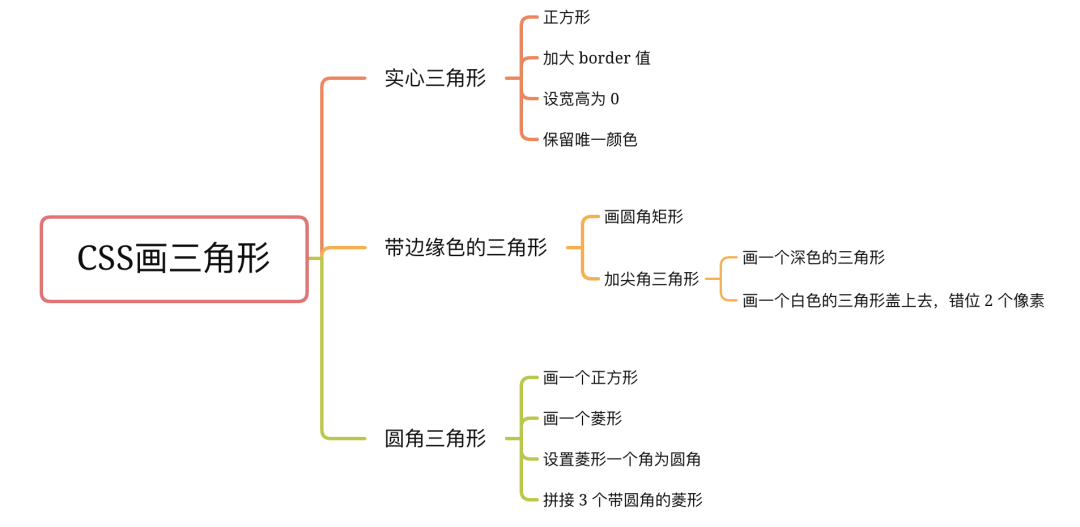
最终实现效果:(从左到右分别是实心、带边缘色、圆角三角形)

实心三角形
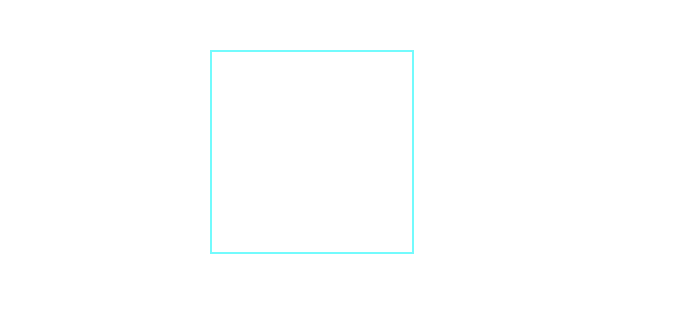
步骤一:正方形
先画个正方形:
<div class="filled-triangle"></div>
<div class="margin-triangle">hi, sister</div>
<div class="rounded-triangle"></div>
<style>
  .filled-triangle {
    width: 100px;
    height: 100px;
    border: 1px solid cyan;
  }
</style>
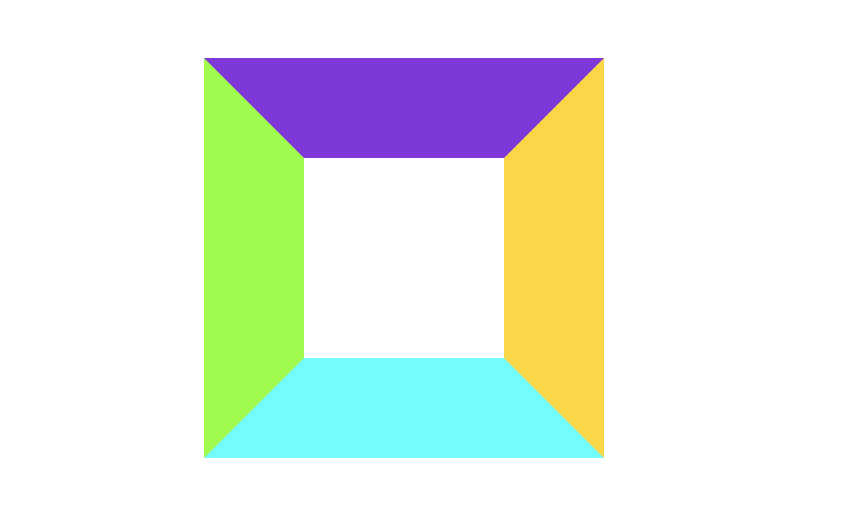
步骤二:加大 border
将 border 的值加大,并设为不同的颜色
<style>
  .filled-triangle {
    width: 100px;
    height: 100px;
    border-bottom: 50px solid cyan;
    border-top: 50px solid blueviolet;
    border-left: 50px solid chartreuse;
    border-right: 50px solid gold;
  }
</style>
步骤三:宽高均设为 0
然后把它的高度和宽度去掉,剩下四个border,就变成了:
<style>
  .filled-triangle {
    width: 0px;
    height: 0px;
    border-bottom: 50px solid cyan;
    border-top: 50px solid blueviolet;
    border-left: 50px solid chartreuse;
    border-right: 50px solid gold;
  }
</style>
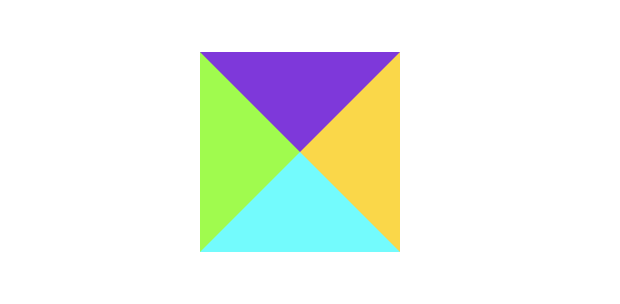
可以看到,我们现在已经得到四个三角形了
步骤四:保留唯一颜色(等腰三角形)
想要哪个三角形,就保留哪个三角形的颜色,其他的都设置为透明
<style>
  .filled-triangle {
    width: 0px;
    height: 0px;
    border-bottom: 50px solid cyan;
    border-top: 50px solid transparent;
    border-left: 50px solid transparent;
    border-right: 50px solid transparent;
  }
</style>

这样我们就得到了一个等腰三角形
简化代码
其实,我们不需要把四个 border 都设置一遍,只需设置你想要画的三角形所涉及到的三条边的 border 即可
以上步的画最上面的三角形为例,只需设置下、左、右三条边即可
<style>
  .filled-triangle {
    width: 0px;
    height: 0px;
    border-bottom: 50px solid cyan;
    border-left: 50px solid transparent;
    border-right: 50px solid transparent;
  }
</style>

不等腰三角形
上图为等腰三角形,之所以为等腰,是因为所有的边框宽度是一样的,如果我们将边框宽度设置为不同,那会怎样?
例如:
<style>
  .filled-triangle {
    width: 0px;
    height: 0px;
    border-bottom: 100px solid cyan;
    border-top: 100px solid transparent;
    border-left: 50px solid transparent;
    border-right: 50px solid transparent;
  }
</style>

我们可以不局限于保留一条边框,我们可以保留两条,于是我们可以告别等腰,得到更加锐利的三角:
<style>
  .filled-triangle {
    width: 0px;
    height: 0px;
    border-bottom: 50px solid cyan;
    border-top: 50px solid transparent;
    border-left: 50px solid cyan;
    border-right: 50px solid transparent;
  }
</style>

上面都是底边在水平线上;当底边与水平线不重合时,可以利用宽高比和CSS3中的 transform 属性和 rotate 相结合,来实现我们想要呈现的三角形效果
气泡聊天框(带边缘色的三角形)
步骤一:画圆角矩形
<div class="margin-triangle">hi, sister</div>
<style>
  .margin-triangle {
    position: relative;
    width: 300px;
    height: 60px;
    padding: 10px;
    border: 1px solid cyan;
    border-radius: 8px;
  }
</style>

步骤二:加尖角三角形
1. 画一个深色的三角形
先画一个深色的三角形,然后再画一个同样大小白色的三角形盖在它上面,两个三角形错位 2 个像素,这样深色三角形的边缘就刚好露出一个像素
.margin-triangle::before{
    position: absolute;
    top: 34px;
    left: -10px;
    border-top: 6px solid transparent;
    border-bottom: 6px solid transparent;
    border-right: 10px solid cyan;
    content: '';
  }

2. 画一个白色的三角形盖上去,错位 2 个像素
.margin-triangle::after{
    position: absolute;
    top: 34px;
    left: -8px;
    border-top: 6px solid transparent;
    border-bottom: 6px solid transparent;
    border-right: 10px solid #fff;
    content: '';
  }

圆角三角形
步骤一:画一个正方形
<div class="rounded-triangle"></div>
<style>
  .rounded-triangle {
    width:  50px;
    height: 50px;
    background-color: cyan;
  }
</style>

步骤二:画一个菱形
利用 CSS transform 属性旋转、倾斜、缩放
<style>
  .rounded-triangle {
    width:  50px;
    height: 50px;
    background-color: cyan;
    transform: rotate(-60deg) skewX(-30deg) scale(1, 0.866);
  }
</style>

步骤三:设置一个角为圆角
.rounded-triangle:after {
    border-top-right-radius: 30%;
  }

步骤四:拼接 3 个带圆角的菱形
<div class="rounded-triangle"></div>
<style>
  .rounded-triangle {
    width:  50px;
    height: 50px;
    border-top-right-radius: 30%;
    background-color: cyan;
    transform: rotate(-60deg) skewX(-30deg) scale(1,.866);
  }
  .rounded-triangle:before,
  .rounded-triangle:after {
    content: '';
    position: absolute;
    background-color: inherit;
    width:  50px;
    height: 50px;
    border-top-right-radius: 30%;
  }
  .rounded-triangle:before {
    transform: rotate(-135deg) skewX(-45deg) scale(1.414, .707) translate(0,-50%);
  }
  .rounded-triangle:after {
    transform: rotate(135deg) skewY(-45deg) scale(.707, 1.414) translate(50%);
  }
</style>

参考:巧妙的实现带圆角的三角形:https://juejin.cn/post/6984599136842547213
最后
号内回复:
120 套模版
评论
