
Android实现三角形气泡效果方式汇总
在开发过程中,我们可能会经常遇到这样的需求样式:
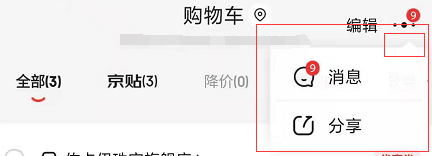
这张图是截取京东消息通知的弹出框,我们可以看到右上方有个三角形的气泡效果,这只是其中一种,三角形的方向还可以是上、下、左、右。
通过截图可以发现,气泡由正三角形和圆角长方形组成,于是可以通过组合来形成三角形气泡的效果,下面我们通过三种方式进行实现。
实现方式:
1、通过.9图进行实现;
2、通过shape方式实现;
3、通过自定义view的方式实现;
实现逻辑:
1、通过.9图进行实现
这种方式就不用说了吧,找你们UI小姐姐切一个.9图,使用即可,不过这种方式的图片需要占一定体积哦。
2、通过shape方式实现
正三角形
<layer-list xmlns:android="http://schemas.android.com/apk/res/android"><item><rotateandroid:fromDegrees="45"android:pivotX="-40%"android:pivotY="80%"><shape android:shape="rectangle"><sizeandroid:width="15dp"android:height="15dp" /><solid android:color="#ffffff" /></shape></rotate></item></layer-list>
倒三角形
<layer-list xmlns:android="http://schemas.android.com/apk/res/android"><item><rotateandroid:fromDegrees="45"android:pivotX="135%"android:pivotY="15%"><shape android:shape="rectangle"><sizeandroid:width="15dp"android:height="15dp" /><solid android:color="#ffffff" /></shape></rotate></item></layer-list>
左三角形
<layer-list xmlns:android="http://schemas.android.com/apk/res/android"><item><rotateandroid:fromDegrees="-45"android:pivotX="85%"android:pivotY="-35%">><shape android:shape="rectangle"><sizeandroid:width="15dp"android:height="15dp" /><solid android:color="#ffffff" /></shape></rotate></item></layer-list>
右三角形
<layer-list xmlns:android="http://schemas.android.com/apk/res/android"><item><rotateandroid:fromDegrees="-45"android:pivotX="15%"android:pivotY="135%">><shape android:shape="rectangle"><sizeandroid:width="15dp"android:height="15dp" /><solid android:color="#ffffff" /></shape></rotate></item></layer-list>
上面就是通过shape方式实现各个方向的代码,这种方式缺点比较明显,如果要变化不同的角的位置需要再写不同的布局。
3、通过自定义view的方式实现
由于是比较简单这里就不讲解每个怎么搞了,可以复制过去直接用
添加自定义属性
<declare-styleable name="TriangleView"><attr name="trv_color" format="color" /><attr name="trv_direction"><enum name="top" value="0" /><enum name="bottom" value="1" /><enum name="right" value="2" /><enum name="left" value="3" /></attr></declare-styleable>
自定义代码文件
public class TriangleView extends View {private static final int TOP = 0;private static final int BOTTOM = 1;private static final int RIGHT = 2;private static final int LEFT = 3;private static final int DEFUALT_WIDTH = 10;private static final int DEFUALT_HEIGHT = 6;private static final int DEFUALT_COLOR = R.color.FFF;private Paint mPaint;private int mColor;private int mWidth;private int mHeight;private int mDirection;private Path mPath;public TriangleView(final Context context) {this(context, null);}public TriangleView(Context context, @Nullable AttributeSet attrs) {this(context, attrs, 0);}public TriangleView(final Context context, final AttributeSet attrs, final int defStyleAttr) {super(context, attrs, defStyleAttr);init();TypedArray typedArray = context.getTheme().obtainStyledAttributes(attrs, R.styleable.TriangleView, 0, 0);mColor = typedArray.getColor(R.styleable.TriangleView_trv_color, ContextCompat.getColor(getContext(), DEFUALT_COLOR));mDirection = typedArray.getInt(R.styleable.TriangleView_trv_direction, mDirection);typedArray.recycle();mPaint.setColor(mColor);}private void init() {mPaint = new Paint();mPaint.setAntiAlias(true);mPaint.setStyle(Paint.Style.FILL);mPath = new Path();mDirection = TOP;}protected void onMeasure(int widthMeasureSpec, int heightMeasureSpec) {super.onMeasure(widthMeasureSpec, heightMeasureSpec);mWidth = MeasureSpec.getSize(widthMeasureSpec);mHeight = MeasureSpec.getSize(heightMeasureSpec);final int widthMode = MeasureSpec.getMode(widthMeasureSpec);final int heightMode = MeasureSpec.getMode(heightMeasureSpec);if (mWidth == 0 || widthMode != MeasureSpec.EXACTLY) {mWidth = (int) PixelUtil.dp2px(DEFUALT_WIDTH);}if (mHeight == 0 || heightMode != MeasureSpec.EXACTLY) {mHeight = (int) PixelUtil.dp2px(DEFUALT_HEIGHT);}setMeasuredDimension(mWidth, mHeight);}protected void onDraw(Canvas canvas) {super.onDraw(canvas);switch (mDirection) {case TOP:mPath.moveTo(0, mHeight);mPath.lineTo(mWidth, mHeight);mPath.lineTo(mWidth / 2, 0);break;case BOTTOM:mPath.moveTo(0, 0);mPath.lineTo(mWidth / 2, mHeight);mPath.lineTo(mWidth, 0);break;case RIGHT:mPath.moveTo(0, 0);mPath.lineTo(0, mHeight);mPath.lineTo(mWidth, mHeight / 2);break;case LEFT:mPath.moveTo(0, mHeight / 2);mPath.lineTo(mWidth, mHeight);mPath.lineTo(mWidth, 0);break;default:break;}mPath.close();canvas.drawPath(mPath, mPaint);}}
布局文件添加
<com.sjl.keeplive.triange.TriangleViewandroid:layout_width="10dp"android:layout_height="6dp"app:trv_color="@color/FFF"app:trv_direction="top" />
通过自定义的方式可以搞定四个方向,而且在代码中也可以使用,动态添加,动态改变颜色,还是比较好的方式。
到这里就完成啦.
评论