
妙啊!MMDetection 训练自定义数据集
点击上方“AI算法与图像处理”,选择加"星标"或“置顶”
重磅干货,第一时间送达
导读
上一篇讲到如何安装MMDetection,今天要分享如何使用 MMDetection 训练自定义数据集,其实非常简单!
前言
深度学习发展到现在已经有很多优秀的模型,同时很多大公司也会在内部开发自己的框架,快速的实现业务,从而产生实际价值。
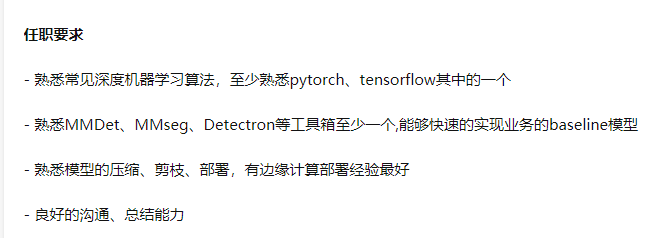
如下面的招聘要求一样,市场需要这些能熟练使用现有工具快速实现,MMDetection 是一个非常好的选择。
在本文中,你将知道如何使用定制的数据集推断、测试和训练预定义的模型。我们以ballon数据集为例来描述整个过程。
气球数据集:https://github.com/matterport/Mask_RCNN/tree/master/samples/balloon
https://github.com/matterport/Mask_RCNN/releases
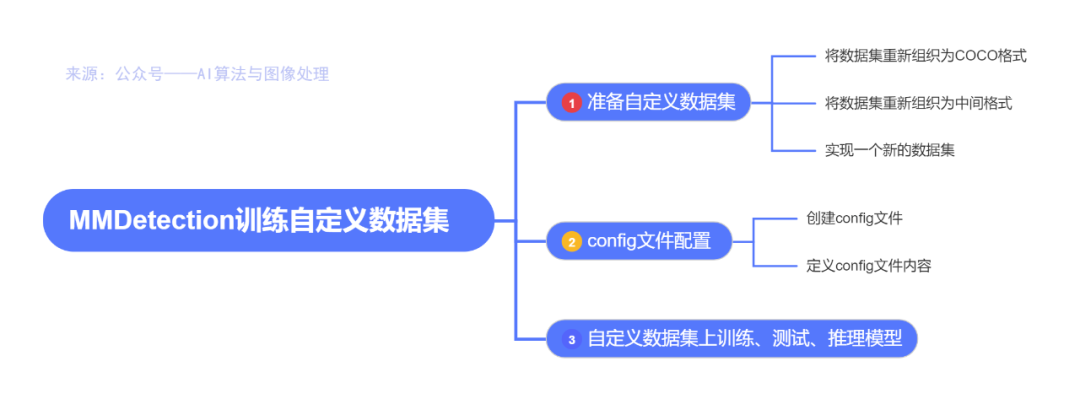
1、准备自定义数据集
官方教程:https://mmdetection.readthedocs.io/en/latest/2_new_data_model.html
有三种方法在MMDetection中支持新的数据集:
将数据集重新组织为COCO格式。
将数据集重新组织为中间格式。
实现一个新的数据集。
官方建议使用前两种方法,这两种方法通常比第三种方法简单。
在本文中,我们给出了一个将数据转换为COCO格式的示例。
注意:MMDetection目前只支持评估COCO格式数据集的mask AP。因此,例如实例分割任务,用户应该将数据转换为coco格式。
COCO 标注格式
以下是实例分割所需的COCO格式所需的关键,完整的细节请参考这里。
https://cocodataset.org/#format-data
{
    "images": [image],
    "annotations": [annotation],
    "categories": [category]
}


image = {
    "id": int,
    "width": int,
    "height": int,
    "file_name": str,
}

annotation = {
    "id": int,
    "image_id": int,
    "category_id": int,
    "segmentation": RLE or [polygon],
    "area": float,
    "bbox": [x,y,width,height],
    "iscrowd": 0 or 1,
}

categories = [{
    "id": int,
    "name": str,
    "supercategory": str,
}]
假设我们使用ballon数据集。下载数据之后,我们需要实现一个函数来将注释格式转换为COCO格式。然后我们可以使用实现的COCODataset加载数据,并执行训练和评估。
如果你看一下数据集,你会发现数据集的格式如下:
{'base64_img_data': '','file_attributes': {},'filename': '34020010494_e5cb88e1c4_k.jpg','fileref': '','regions': {'0': {'region_attributes': {},'shape_attributes': {'all_points_x': [1020,1000,994,1003,1023,1050,1089,1134,1190,1265,1321,1361,1403,1428,1442,1445,1441,1427,1400,1361,1316,1269,1228,1198,1207,1210,1190,1177,1172,1174,1170,1153,1127,1104,1061,1032,1020],'all_points_y': [963,899,841,787,738,700,663,638,621,619,643,672,720,765,800,860,896,942,990,1035,1079,1112,1129,1134,1144,1153,1166,1166,1150,1136,1129,1122,1112,1084,1037,989,963],'name': 'polygon'}}},'size': 1115004}
annotation 是一个JSON文件,其中每个 key 都表示图像的所有注释。将ballon数据集转换为coco格式的代码如下所示。
import os.path as ospimport mmcvdef convert_balloon_to_coco(ann_file, out_file, image_prefix):data_infos = mmcv.load(ann_file)annotations = []images = []obj_count = 0for idx, v in enumerate(mmcv.track_iter_progress(data_infos.values())):filename = v['filename']img_path = osp.join(image_prefix, filename)width = mmcv.imread(img_path).shape[:2]images.append(dict(id = idx,file_name = filename,height=height,width = width))bboxes = []labels = []masks = []for _, obj in v['regions'].items():assert not obj['region_attributes']obj = obj['shape_attributes']px = obj['all_points_x']py = obj['all_points_y']poly = [(x+0.5, y+0.5) for x,y in zip(px,py)]poly = [p for x in poly for p in x]y_min, x_max, y_max = (min(py), max(px),max(py))data_anno = dict(image_id = idx,id = obj_count,category_id = 0,bbox = [x_min, y_min, x_max-x_min, y_max-y_min],area = (x_max - x_min)*(y_max - y_min),segmentation = [poly],iscrowd =0)annotations.append(data_anno)obj_count += 1coco_format_json = dict(images = images,annotations = annotations,categories=[{'id':0, 'name':'balloon'}])out_file)# 对验证集数据进行处理是,将下面路径中的train 替换成val 即可# 注意数据集 balloon 的路径自行调整ann_file = './balloon/train/via_region_data.json'= './balloon/train/annotation_coco.json'image_prefix = './balloon/train'out_file, image_prefix)
注释:
# 可以加载 json, yaml, pkl 文件
import mmcv
mmcv.load('test.json')

# 刷新位置的进度条方式
mmcv.track_iter_progress(tasks)
参考资料:https://zhuanlan.zhihu.com/p/126725557
https://mmcv.readthedocs.io/en/stable/
通过上面的函数,用户可以成功地将标注文件转换成json格式,然后我们可以使用CocoDataset对模型进行训练和评估。
2、config文件配置
第二步是准备一个 config,这样数据集就可以成功加载。假设我们想使用带有FPN的Mask R-CNN,在balloon数据集上训练检测器的配置如下。假设配置在configs/balloon/目录下,命名为mask_rcnn_r50_caffe_fpn_mstrain-poly_1x_balloon.py。配置如下所示。
# The new config inherits a base config to highlight the necessary modification_base_ = '../mask_rcnn/mask_rcnn_r50_caffe_fpn_mstrain-poly_1x_coco.py'# We also need to change the num_classes in head to match the dataset's annotationmodel = dict(roi_head=dict(bbox_head=dict(num_classes=1),mask_head=dict(num_classes=1)))# Modify dataset related settingsdataset_type = 'COCODataset'classes = ('balloon',)data = dict(train=dict(img_prefix='balloon/train/',classes=classes,ann_file='balloon/train/annotation_coco.json'),val=dict(img_prefix='balloon/val/',classes=classes,ann_file='balloon/val/annotation_coco.json'),test=dict(img_prefix='balloon/val/',classes=classes,ann_file='balloon/val/annotation_coco.json'))# We can use the pre-trained Mask RCNN model to obtain higher performanceload_from = 'checkpoints/mask_rcnn_r50_caffe_fpn_mstrain-poly_3x_coco_bbox_mAP-0.408__segm_mAP-0.37_20200504_163245-42aa3d00.pth'
注意:
这里的_base_ 要修改成
_base_ = '../mask_rcnn/mask_rcnn_r50_caffe_fpn_mstrain-poly_1x_coco.py'
官方提供的路径有一点问题
3、自定义数据集上训练、测试、推理模型
训练一个新模型
使用新的config 训练一个模型,直接运行下面的代码即可:
python tools/train.py configs/balloon/mask_rcnn_r50_caffe_fpn_mstrain-poly_1x_balloon.py
如果报错
 raise IOError(f'{filename} is not a checkpoint file')
OSError: checkpoints/mask_rcnn_r50_caffe_fpn_mstrain-poly_3x_coco_bbox_mAP-0.408__segm_mAP-0.37_20200504_163245-42aa3d00.pth is not a checkpoint file
建议去官方提供的预训练模型下载地址去下载,并放置在checkpoints 文件夹下
https://mmdetection.readthedocs.io/en/latest/model_zoo.html
直接下载:http://download.openmmlab.com/mmdetection/v2.0/mask_rcnn/mask_rcnn_r50_caffe_fpn_mstrain-poly_3x_coco/mask_rcnn_r50_caffe_fpn_mstrain-poly_3x_coco_bbox_mAP-0.408__segm_mAP-0.37_20200504_163245-42aa3d00.pth
注意:
大概需要 9 G 的现存才能跑的起来。。。
测试并推理
测试训练好的模型,直接运行:
python tools/test.py configs/balloon/mask_rcnn_r50_caffe_fpn_mstrain-poly_1x_balloon.py work_dirs/mask_rcnn_r50_caffe_fpn_mstrain-poly_1x_balloon.py/latest.pth --eval bbox segm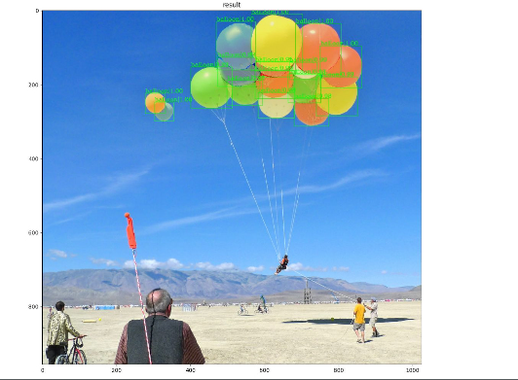
好的今天的分享就到这里,如果对你有所帮助,记得三连哈!笔芯,新年快乐

个人微信(如果没有备注不拉群!) 请注明:地区+学校/企业+研究方向+昵称
下载1:何恺明顶会分享
在「AI算法与图像处理」公众号后台回复:何恺明,即可下载。总共有6份PDF,涉及 ResNet、Mask RCNN等经典工作的总结分析
下载2:终身受益的编程指南:Google编程风格指南
在「AI算法与图像处理」公众号后台回复:c++,即可下载。历经十年考验,最权威的编程规范!
下载3 CVPR2020 在「AI算法与图像处理」公众号后台回复:CVPR2020,即可下载1467篇CVPR 2020论文
觉得不错就点亮在看吧
