SpringBoot+Mybatis+MySQL实现读写分离
点击上方蓝色字体,选择“标星公众号”
优质文章,第一时间送达
作者 | loimh
来源 | urlify.cn/NNV7rm
在Springboot中使用数据库主从复制实现读写分离,操作数据时操作主表,查询操作使用从表。
我就直接跳过创建SpringBoot应用的步骤了,直接开始操作如何配置读写分离。
1、我的Maven依赖如下,大家可以复制
"1.0" encoding="UTF-8"?>
"http://maven.apache.org/POM/4.0.0" xmlns:xsi="http://www.w3.org/2001/XMLSchema-instance"
         xsi:schemaLocation="http://maven.apache.org/POM/4.0.0 https://maven.apache.org/xsd/maven-4.0.0.xsd">
    4.0.0

        org.springframework.boot
        spring-boot-starter-parent
        2.3.3.RELEASE


    com.example
    demo
    0.0.1-SNAPSHOT
    demo
    Demo project for Spring Boot


        1.8


            org.springframework.boot
            spring-boot-starter-aop


            org.springframework.boot
            spring-boot-starter-jdbc


            org.springframework.boot
            spring-boot-starter-web


            org.mybatis.spring.boot
            mybatis-spring-boot-starter
            1.3.2


            org.apache.commons
            commons-lang3
            3.8


            mysql
            mysql-connector-java
            runtime


            org.springframework.boot
            spring-boot-starter-test
            test


            com.alibaba
            fastjson
            1.2.46


            org.springframework.boot
            spring-boot-starter-data-redis


            org.springframework.boot
            spring-boot-starter-mail


            org.springframework.boot
            spring-boot-devtools

            true


                org.springframework.boot
                spring-boot-maven-plugin
2、配置数据源,我的application.yml配置如下,大家根据自己的配置进行修改。
#主从数据库配置
spring:
  datasource:
    master:
      jdbc-url: jdbc:mysql://localhost:3306/task_db?serverTimezone=UTC
      username: root
      password: Caiyi0.0
      driver-class-name: com.mysql.jdbc.Driver
    slave1:
      jdbc-url: jdbc:mysql://172.18.237.231:3307/task_db?serverTimezone=UTC
      username: root   # 只读账户
      password: mysql
      driver-class-name: com.mysql.jdbc.Driver
3、然后我们进行多数据源配置,新建一个config目录,创建一个DataSourceConfig.class文件,加上@Configuration注解。
package com.example.demo.config;

import com.example.demo.bean.MyRoutingDataSource;
import com.example.demo.enums.DBTypeEnum;
import org.springframework.beans.factory.annotation.Qualifier;
import org.springframework.boot.context.properties.ConfigurationProperties;
import org.springframework.boot.jdbc.DataSourceBuilder;
import org.springframework.context.annotation.Bean;
import org.springframework.context.annotation.Configuration;
import org.springframework.context.annotation.Primary;

import javax.sql.DataSource;
import java.util.HashMap;
import java.util.Map;


@Configuration
public class DataSourceConfig {

    @Bean(name = "masterDataSource")
    @ConfigurationProperties("spring.datasource.master")
    public DataSource masterDataSource(){
        return DataSourceBuilder.create().build();
    }


    @Bean(name = "slave1DataSource")
    @ConfigurationProperties("spring.datasource.slave1")
    public DataSource slave1DataSource() {
        return DataSourceBuilder.create().build();
    }


    @Bean
    @Primary
    public DataSource myRoutingDataSource(@Qualifier("masterDataSource") DataSource masterDataSource, @Qualifier("slave1DataSource") DataSource slave1DataSource) {
        Map targetDataSources = new HashMap<>();
        targetDataSources.put(DBTypeEnum.MASTER, masterDataSource);
        targetDataSources.put(DBTypeEnum.SLAVE1, slave1DataSource);
        MyRoutingDataSource myRoutingDataSource = new MyRoutingDataSource();
        myRoutingDataSource.setDefaultTargetDataSource(masterDataSource);
        myRoutingDataSource.setTargetDataSources(targetDataSources);
        return myRoutingDataSource;
    }
}
这里我们配置了3个数据源,一个主数据源,一个从数据源,一个路由数据源。前2个数据源都是为了生成第3个数据源,而且后续我们只用这最后一个路由数据源。
4、然后我们配置一个MyBatis的配置,因为我们现在有3个数据源,所以我们需要为事务管理器和MyBatis手动指定一个明确的数据源。
package com.example.demo.config;

import org.apache.ibatis.session.SqlSessionFactory;
import org.mybatis.spring.SqlSessionFactoryBean;
import org.springframework.context.annotation.Bean;
import org.springframework.context.annotation.Configuration;
import org.springframework.core.io.support.PathMatchingResourcePatternResolver;
import org.springframework.jdbc.datasource.DataSourceTransactionManager;
import org.springframework.transaction.PlatformTransactionManager;

import javax.annotation.Resource;
import javax.sql.DataSource;

@Configuration
public class MyBatisConfig {

    @Resource(name = "myRoutingDataSource")
    private DataSource myRoutingDataSource;

    @Bean
    public SqlSessionFactory sqlSessionFactory() throws Exception {
        SqlSessionFactoryBean sqlSessionFactoryBean = new SqlSessionFactoryBean();
        sqlSessionFactoryBean.setDataSource(myRoutingDataSource);
        sqlSessionFactoryBean.setMapperLocations(new PathMatchingResourcePatternResolver().getResources("classpath:mapper/*.xml"));
        return sqlSessionFactoryBean.getObject();
    }

    @Bean
    public PlatformTransactionManager platformTransactionManager() {
        return new DataSourceTransactionManager(myRoutingDataSource);
    }
}
5 、设置路由Key/查找数据源
目标数据源就是两个数据源,一个主数据源和从数据源,但是使用的时候要查找数据源。
首先,我们先定义一个枚举类来代表这三个数据源
package com.example.demo.enums;

public enum  DBTypeEnum {
    MASTER, SLAVE1;
}
接下来,我们通过ThreadLocal将数据源设置到每个线程上下文中
package com.example.demo.bean;

import com.example.demo.enums.DBTypeEnum;

import java.util.concurrent.atomic.AtomicInteger;

public class DBContextHolder {
    private static final ThreadLocal contextHolder = new ThreadLocal<>();

    private static final AtomicInteger counter = new AtomicInteger(-1);

    public static void set(DBTypeEnum dbType) {
        contextHolder.set(dbType);
    }

    public static DBTypeEnum get() {
        return contextHolder.get();
    }

    public static void master() {
        set(DBTypeEnum.MASTER);
        System.out.println("切换到master");
    }

    public static void slave() {
            set(DBTypeEnum.SLAVE1);
            System.out.println("切换到slave1");
    }
}
获取路由Key
package com.example.demo.bean;

import org.springframework.jdbc.datasource.lookup.AbstractRoutingDataSource;
import org.springframework.lang.Nullable;

public class MyRoutingDataSource extends AbstractRoutingDataSource {

    @Nullable
    @Override
    protected Object determineCurrentLookupKey() {
        return DBContextHolder.get();
    }
}
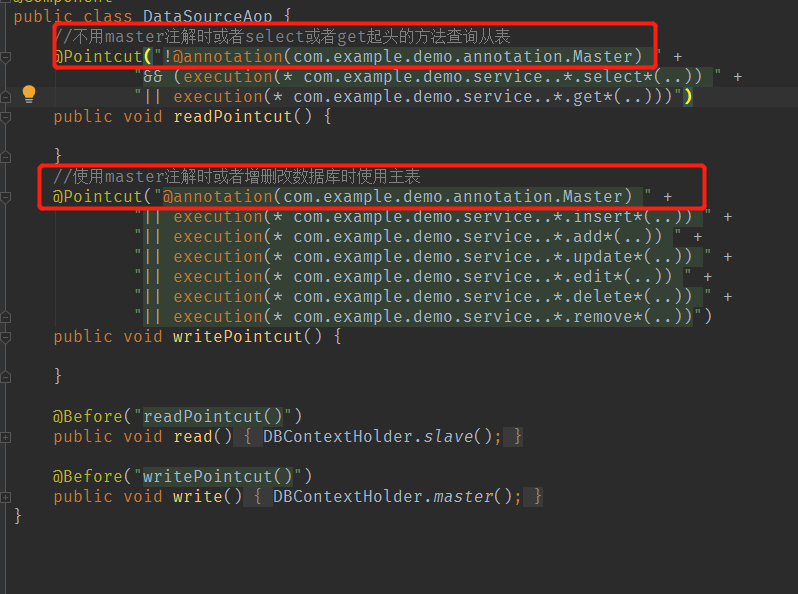
默认情况下,所有的查询都走从库,插入/修改/删除走主库。我们通过方法名来区分操作类型(CRUD),我们通过过Spring的AOP来进行配置
package com.example.demo.aop;

import com.example.demo.bean.DBContextHolder;
import org.aspectj.lang.annotation.Aspect;
import org.aspectj.lang.annotation.Before;
import org.aspectj.lang.annotation.Pointcut;
import org.springframework.stereotype.Component;

@Aspect
@Component
public class DataSourceAop {
    //不用master注解时或者select或者get起头的方法查询从表
    @Pointcut("!@annotation(com.example.demo.annotation.Master) " +
            "&& (execution(* com.example.demo.service..*.select*(..)) " +
            "|| execution(* com.example.demo.service..*.get*(..)))")
    public void readPointcut() {

    }
    //使用master注解时或者增删改数据库时使用主表
    @Pointcut("@annotation(com.example.demo.annotation.Master) " +
            "|| execution(* com.example.demo.service..*.insert*(..)) " +
            "|| execution(* com.example.demo.service..*.add*(..)) " +
            "|| execution(* com.example.demo.service..*.update*(..)) " +
            "|| execution(* com.example.demo.service..*.edit*(..)) " +
            "|| execution(* com.example.demo.service..*.delete*(..)) " +
            "|| execution(* com.example.demo.service..*.remove*(..))")
    public void writePointcut() {

    }

    @Before("readPointcut()")
    public void read() {
        DBContextHolder.slave();
    }

    @Before("writePointcut()")
    public void write() {
        DBContextHolder.master();
    }
}
如果有特殊情况,例如某些情况下我们需要强制读主库,针对这种情况,我们可以自定义一个注解,然后用这注解标注的方法就读主库。
package com.example.demo.annotation;

public @interface Master {
}
至此,配置完成,下面我们进行测试。
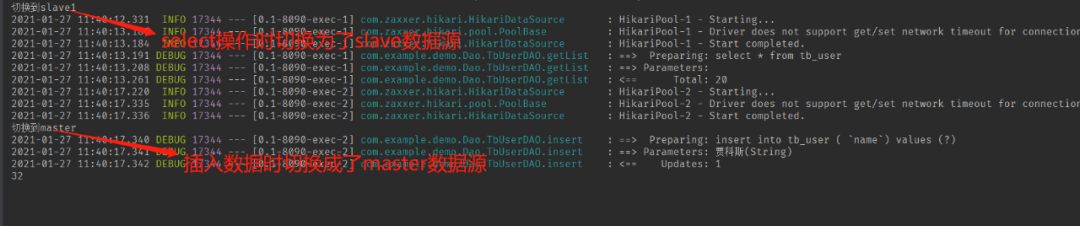
6、测试
假设我们有一个User表。
package com.example.demo.serviceImpl;

import com.example.demo.Dao.TbUserDAO;
import com.example.demo.entity.TbUser;
import com.example.demo.service.UserService;
import org.apache.tomcat.util.http.fileupload.IOUtils;
import org.slf4j.Logger;
import org.slf4j.LoggerFactory;
import org.springframework.beans.factory.annotation.Autowired;
import org.springframework.cache.annotation.CacheEvict;
import org.springframework.cache.annotation.CachePut;
import org.springframework.cache.annotation.Cacheable;
import org.springframework.stereotype.Service;
import org.springframework.transaction.annotation.Transactional;
import org.springframework.web.multipart.MultipartFile;

import java.io.File;
import java.io.FileOutputStream;
import java.io.IOException;
import java.util.List;
import java.util.UUID;

@Service
public class UserServiceImpl implements UserService {

    private static final Logger logger = LoggerFactory.getLogger(UserServiceImpl.class);

    @Autowired
    TbUserDAO userDAO;

    @CachePut(value = "user", key = "#user.id")
    @Transactional
    @Override
    public int insert(TbUser user) {
        int i=userDAO.insert(user);
        System.out.println(user.getId());
        return i;

    }

    @CacheEvict(value = {"userById"}, key = "#id")
    @Override
    public int deleteByPrimaryKey(String id) {
        Integer userId= new Integer(id);
        return userDAO.deleteByPrimaryKey(userId);
    }

    @Override
    public List getList(TbUser user) {
        return  userDAO.getList(user);
    }

    @Cacheable(value ={"userById"}, key = "#id")
    @Override
    public TbUser selectById(String id) {
        System.out.println("从数据库查");
        Integer userId= new Integer(id);
        return  userDAO.selectByPrimaryKey(userId);
    }

    @CacheEvict(value = {"userById"}, key = "#user.id")
    @Override
    public int updateByPrimaryKey(TbUser user) {
        return userDAO.updateByPrimaryKey(user);
    }

    @Override
    public String uploadFile(MultipartFile zipFile) {
        String targetFilePath = "H:\\uploadFile";
        String fileName = UUID.randomUUID().toString().replace("-", "");
        File targetFile = new File(targetFilePath + File.separator + fileName);

        FileOutputStream fileOutputStream = null;
        try {
            fileOutputStream = new FileOutputStream(targetFile);
            IOUtils.copy(zipFile.getInputStream(), fileOutputStream);
            logger.info("------>>>>>>uploaded a file successfully!<<<<<<------");
        } catch (IOException e) {
            return "false";
        } finally {
            try {
                fileOutputStream.close();
            } catch (IOException e) {
                logger.error("", e);
            }
        }
        return "成功";
    }
}
Controller代码如下:
package com.example.demo.controller;

import com.alibaba.fastjson.JSONObject;
import com.example.demo.Dao.TbUserDAO;
import com.example.demo.entity.TbUser;
import com.example.demo.service.UserService;
import com.example.demo.utils.APIException;
import com.example.demo.utils.ResultVO;
import com.example.demo.utils.SendMailUtil;
import com.fasterxml.jackson.databind.util.JSONPObject;
import org.springframework.beans.factory.annotation.Autowired;
import org.springframework.data.redis.core.RedisTemplate;
import org.springframework.data.redis.serializer.RedisSerializer;
import org.springframework.data.redis.serializer.StringRedisSerializer;
import org.springframework.stereotype.Controller;
import org.springframework.web.bind.MethodArgumentNotValidException;
import org.springframework.web.bind.annotation.*;
import org.springframework.web.multipart.MultipartFile;

import java.lang.reflect.Type;
import java.util.List;

@RestController
@RequestMapping("/User")
public class UserController {

    @Autowired
    UserService userService;

    @Autowired
    SendMailUtil sendMailUtil;

    @Autowired
    RedisTemplate redisTemplate;


    @RequestMapping(value = "/insertUser",method = RequestMethod.POST )
    public int insertUser(@RequestBody String Json){
        TbUser jsonpObject=JSONObject.parseObject(Json, (Type) TbUser.class);
        return userService.insert(jsonpObject);
    }
    @RequestMapping(value = "/updateUser",method = RequestMethod.POST )
    public int updateUser(@RequestBody String Json){
        TbUser jsonpObject=JSONObject.parseObject(Json, (Type) TbUser.class);
        return userService.updateByPrimaryKey(jsonpObject);
    }
    @RequestMapping(value = "/hello",method = RequestMethod.GET)
    public String hello(){
        return "hello world";
    }

    @PostMapping("/deleteUser")
    public int deleteUserById(@RequestParam String id){
        return userService.deleteByPrimaryKey(id);
    }

    @PostMapping("/selectById")
    public TbUser selectUserById(@RequestParam String id){
        return userService.selectById(id);
    }

    @PostMapping("/getList")
    public List getList(@RequestBody String json) {
        //给qq邮箱发送邮件事例
//        sendMailUtil.sendMail("765783376@qq.com","邮件标题","邮件内容");
//        try{
//            int i=1/0;
//        }catch (Exception e){
//            throw new APIException(3000,e.getMessage());
//        }

        TbUser jsonpObject=JSONObject.parseObject(json, (Type) TbUser.class);
        return userService.getList(jsonpObject);
    }


    /**
     * 图片上传接口
     * @param
     * @return
     */
    @PostMapping("/upload")
    public String  Upload(@RequestParam("file") MultipartFile zipFile) {
        return userService.uploadFile(zipFile);
    }


}
如果项目启动出错,请查看启动类是否配置了@SpringBootApplication(exclude= {DataSourceAutoConfiguration.class})

锋哥最新SpringCloud分布式电商秒杀课程发布
👇👇👇
👆长按上方微信二维码 2 秒
感谢点赞支持下哈