
PopupWindow 使用详解
和你一起终身学习,这里是程序员Android
经典好文推荐,通过阅读本文,您将收获以下知识点:
一、PopupWindow简介
二、PopupWindow 的使用方法
三、底部PopupWindow的实现
一、PopupWindow简介
在学习PopupWindow之前,我们先了解一下PopupWindow的继承关系。
PopupWindow继承关系如下:
java.lang.Object
   ↳
     android.widget.PopupWindow
PopupWindow 是一个可以在Activity之上显示任意View的控件。在Android经常使用,效果跟Dialog效果类似,不同点在于可以控制显示的位置,比如底部显示等。
二、PopupWindow 的使用方法
主要是调用PopWindow的构造方法,通过LayoutInflater 将Layout转换成View,然后将View 传递过去,既可以实现,具体可以参考PopupWindow 源码,源码路径如下:framework/base/core/java/android/widget/PopupWindow.java
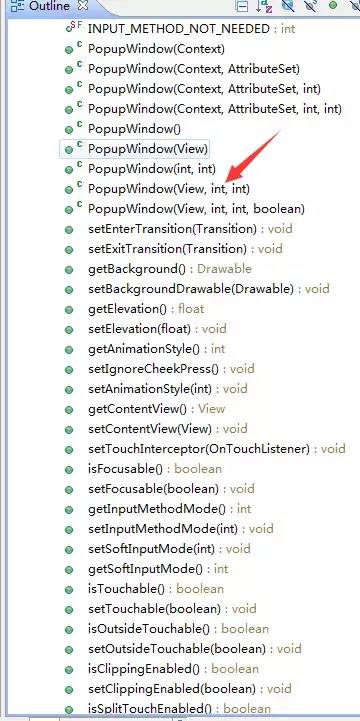
PopWindows构造方法及常用方法
三、底部PopupWindow的实现
1. PopupWindow实现效果
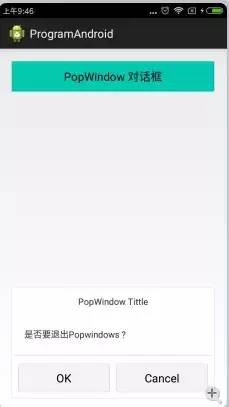
底部Popwindow实现效果
2. PopWindow 实现类
public class PopWindowMethods extends Activity {
    private View mPopView;
    private PopupWindow mPopupWindow;
    private Button btn_pop_ok;
    private Button btn_pop_cancel;

    @Override
    protected void onCreate(Bundle savedInstanceState) {
        // TODO Auto-generated method stub
        super.onCreate(savedInstanceState);
        setContentView(R.layout.activity_popwindow);

        InitPopWindow();
        InitView();
        InitClick();
    }

    /**
     *
     */
    private void InitClick() {
        // TODO Auto-generated method stub
        btn_pop_ok.setOnClickListener(new OnClickListener() {

            @Override
            public void onClick(View v) {
                // TODO Auto-generated method stub
                Toast.makeText(getApplicationContext(), "ok", 0).show();
            }
        });

        btn_pop_cancel.setOnClickListener(new OnClickListener() {

            @Override
            public void onClick(View v) {
                // TODO Auto-generated method stub
                Toast.makeText(getApplicationContext(), "cancel", 0).show();
            }
        });
    }

    /**
     *
     */
    private void InitPopWindow() {
        // TODO Auto-generated method stub
        // 将布局文件转换成View对象,popupview 内容视图
        mPopView = getLayoutInflater().inflate(R.layout.popwindow_layout, null);
        // 将转换的View放置到 新建一个popuwindow对象中
        mPopupWindow = new PopupWindow(mPopView,
                LinearLayout.LayoutParams.WRAP_CONTENT,
                LinearLayout.LayoutParams.WRAP_CONTENT);
        // 点击popuwindow外让其消失
        mPopupWindow.setOutsideTouchable(true);
        // mpopupWindow.setBackgroundDrawable(background);

    }

    /**
     *
     */
    private void InitView() {
        btn_pop_ok = (Button) mPopView.findViewById(R.id.btn_pop_ok);
        btn_pop_cancel = (Button) mPopView.findViewById(R.id.btn_pop_cancel);

    }

    @SuppressLint("NewApi")
    public void ShowPopWindow(View view) {
        if (mPopupWindow.isShowing()) {
            mPopupWindow.dismiss();
        } else {
            // 设置PopupWindow 显示的形式 底部或者下拉等
            // 在某个位置显示
            mPopupWindow.showAtLocation(mPopView, Gravity.BOTTOM, 0, 30);
            // 作为下拉视图显示
            // mPopupWindow.showAsDropDown(mPopView, Gravity.CENTER, 200, 300);
        }

        // Toast.makeText(
        // getApplicationContext(),
        // "Launcher:"
        // + PackageUtils.isLauncherAPK(getApplicationContext(),
        // "com.miui.home"),
        // 0).show();
    }
}
3. PopupWindow布局
<RelativeLayout xmlns:android="http://schemas.android.com/apk/res/android"
    android:layout_width="match_parent"
    android:layout_height="wrap_content"
    android:layout_marginLeft="16dp"
    android:layout_marginRight="16dp"
    android:layout_marginTop="16dp"
    android:background="@drawable/popwindow_bg" >

    <LinearLayout
        android:layout_width="match_parent"
        android:layout_height="wrap_content"
        android:layout_centerInParent="true"
        android:gravity="center"
        android:orientation="vertical" >

        <TextView
            android:id="@+id/tv_pop_tittle"
            android:layout_width="match_parent"
            android:layout_height="45dp"
            android:gravity="center"
            android:text="PopWindow Tittle" />

        <TextView
            android:id="@+id/tv_pop_content"
            android:layout_width="match_parent"
            android:layout_height="wrap_content"
            android:gravity="left|center_horizontal"
            android:padding="20dp"
            android:text="是否要退出Popwindows ? " />

        <View
            android:layout_width="match_parent"
            android:layout_height="1dp"
            android:layout_margin="3dp"
            android:background="@color/white_line" />

        <LinearLayout
            android:layout_width="match_parent"
            android:layout_height="wrap_content"
            android:orientation="horizontal" >

            <Button
                android:id="@+id/btn_pop_ok"
                android:layout_width="0dp"
                android:layout_height="45dp"
                android:layout_marginBottom="10dp"
                android:layout_marginLeft="10dp"
                android:layout_marginTop="10dp"
                android:layout_weight="1"
                android:background="@drawable/custom_btn_white_selector"
                android:gravity="center"
                android:text="OK" />

            <Button
                android:id="@+id/btn_pop_cancel"
                android:layout_width="0dp"
                android:layout_height="45dp"
                android:layout_margin="10dp"
                android:layout_marginBottom="10dp"
                android:layout_marginRight="10dp"
                android:layout_marginTop="10dp"
                android:layout_weight="1"
                android:background="@drawable/custom_btn_white_selector"
                android:gravity="center"
                android:text="Cancel" />
        LinearLayout>
    LinearLayout>

RelativeLayout>
至此,本篇已结束。转载网络的文章,小编觉得很优秀,欢迎点击阅读原文,支持原创作者,如有侵权,恳请联系小编删除。同时感谢您的阅读,期待您的关注。
点个在看,方便您使用时快速查找!
评论