
NIO之缓冲区详解
点击关注公众号,Java干货及时送达

作者 | 汪伟俊
出品 | Java技术迷(ID:JavaFans1024)
先来介绍NIO中的一个基本概念,缓冲区。在NIO中,任何数据的读写都需要借助缓冲区,你可以把缓冲区理解成一个数组,当要写入数据时就向数组中存值,当要读取数据时就从数组中取值。
创建缓冲区
对于缓冲区的创建,JDK提供了两种方式(以字节缓冲区ByteBuffer为例):
allocate wrap
其中allocate用于创建一个指定大小的缓冲区:
@Test
public void buffer(){
    // 指定长度的缓冲区
    ByteBuffer byteBuffer = ByteBuffer.allocate(5);
    for (int i = 0; i < 5; i++) {
        // 从缓冲区中获取数据
        System.out.print(byteBuffer.get() + "\t");
    }
}
运行结果:
0 0 0 0 0
通过缓冲区的get方法可以获取缓冲区中的数据,初始为数据类型的零值。
而wrap方法可以创建一个指定内容的缓冲区:
@Test
public void buffer(){
    // 指定内容的缓冲区
    ByteBuffer wrap = ByteBuffer.wrap("test".getBytes());
    for (int i = 0; i < 4; i++) {
        System.out.print((char) wrap.get() + "\t");
    }
}
运行结果:
t e s t
那么缓冲区内部的具体结构是如何的呢?数据的存取是怎样进行的呢?你需要了解缓冲区中的几个标记:
position:当前索引位置 limit:最大索引位置 capacity:缓冲区的总容量 remaining:缓冲区的剩余容量
来创建一个容量为10的缓冲区,然后分别输出这些标记的值:
@Test
public void buffer(){
    ByteBuffer allocate = ByteBuffer.allocate(10);
    System.out.print(allocate.position() + "\t"); // 当前索引位置
    System.out.print(allocate.limit() + "\t"); // 最大索引位置,初始等于缓冲区大小
    System.out.print(allocate.capacity() + "\t"); // 返回缓冲区的总长度
    System.out.print(allocate.remaining() + "\t"); // 剩余能操作的容量(limit - position)
}
运行结果:
0 10 10 10
每个标记的位置如下图所示:

position指向的是当前索引位置,当向缓冲区中添加数据时,position便会随之移动,而limit指向的是最大索引位置(初始等于capacity),即position最大不会等于limit,remaining为缓冲区的剩余容量,remaining = limit - position。
向缓冲区添加数据
现在向缓冲区添加一个数据:
// 向缓冲区添加一个字节
allocate.put((byte) 97);
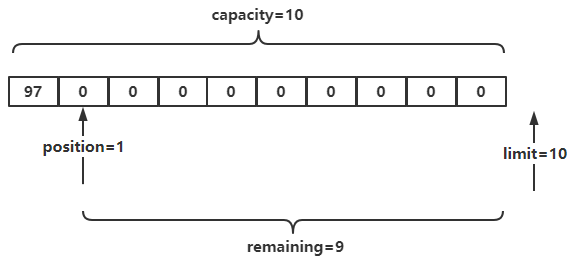
此时缓冲区标记会如何变化呢?首先position会右移一位,然后remaining变为9,其它的不影响,如下图所示:
我们可以试验一下是不是这样:
@Test
public void buffer(){
    ByteBuffer allocate = ByteBuffer.allocate(10);
    // 向缓冲区添加一个字节
    allocate.put((byte) 97);
    System.out.print(allocate.position() + "\t");
    System.out.print(allocate.limit() + "\t");
    System.out.print(allocate.capacity() + "\t");
    System.out.print(allocate.remaining() + "\t");
}
运行结果:
1 10 10 9
结果正如我们所料。
缓冲区的put方法还能够传递一个数组,将一串数据进行添加:
// 向缓冲区添加一个字节
allocate.put("0123456789".getBytes());
若是当前缓冲区已经满了,则再向一个满的缓冲区添加数据会抛出异常:
@Test
public void buffer(){
    ByteBuffer allocate = ByteBuffer.allocate(10);
    allocate.put("0123456789".getBytes());
    allocate.put((byte) 1);
}
运行结果:
java.nio.BufferOverflowException
 at java.nio.Buffer.nextPutIndex(Buffer.java:521)
    at java.nio.HeapByteBuffer.put(HeapByteBuffer.java:169)
    at com.wwj.nio.BufferDemo.buffer(BufferDemo.java:144)
通过缓冲区的hasRemaining方法可以判断当前缓冲区是否还能够继续添加数据:
@Test
public void buffer(){
    ByteBuffer allocate = ByteBuffer.allocate(10);
    System.out.println(allocate.hasRemaining());
    allocate.put("0123456789".getBytes());
    System.out.println(allocate.hasRemaining());
}
运行结果:
true
false
缓冲区支持动态修改标记位置,以达到重新写入的需求:
@Test
public void buffer(){
    ByteBuffer allocate = ByteBuffer.allocate(10);
    allocate.put("0123456789".getBytes());
    // 修改当前索引位置
    allocate.position(0);
    allocate.put((byte) 1);
    System.out.print(allocate.position() + "\t");
    System.out.print(allocate.limit() + "\t");
    System.out.print(allocate.capacity() + "\t");
    System.out.print(allocate.remaining() + "\t");
}
运行结果:
1 10 10 9
把position位置修改为0之后,又相当于对一个空的缓冲区进行操作了。
读取缓冲区数据
接下来介绍一下缓冲区数据的读取,在最开始我们已经使用过get方法来读取缓冲区的数据了,如下:
@Test
public void buffer() {
    ByteBuffer allocate = ByteBuffer.allocate(10);
    allocate.put("0123".getBytes());
    for (int i = 0; i < 4; i++) {
        System.out.print(allocate.get() + "\t");
    }
}
大家可以猜一猜运行结果是什么呢:
0 0 0 0
也许有同学很奇怪,为什么添加的数据没有被读取出来,其实,如果你掌握了缓冲区中的标记,就能明白是为什么。
在创建了一个容量为10的缓冲区之后,标记如下图所示:
当向缓冲区添加了一个字节数组后,标记发生了变化:
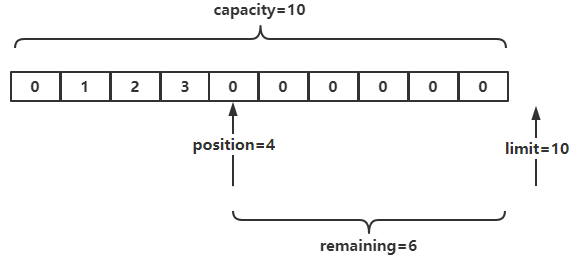
此时我们调用get方法进行读取,它将从position位置也就是索引4位置开始往后读取,这样读取到的数据当然就是0了,若是想读取添加到缓冲区中的数据,则需要将position移动到索引0位置才行,不过JDK已经提供了这样的方法给我们:
@Test
public void buffer() {
    ByteBuffer allocate = ByteBuffer.allocate(10);
    allocate.put("0123".getBytes());
    // 切换为读模式
    allocate.flip();
    for (int i = 0; i < allocate.limit(); i++) {
        System.out.print((char) allocate.get() + "\t");
    }
}
运行结果:
0 1 2 3
查看一下flip方法的源码:
public final Buffer flip() {
    limit = position;
    position = 0;
    mark = -1;
    return this;
}
关键就在于limit = position和position = 0,通过改变这两个标记后:
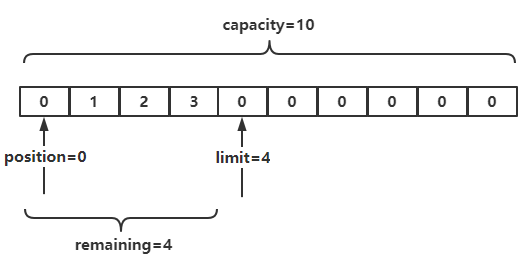
position重新回到了索引0的位置,这样就可以进行正常的读取了,而limit也修改为了写入数据的末尾位置,可以通过判断limit来终止读取条件。
与写入数据一样,缓冲区在读取数据的时候,也会不停地移动position,当所有数据都被读取后,再次读取数据将会抛出异常,因为position必须小于等于limit:
@Test
public void buffer() {
    ByteBuffer allocate = ByteBuffer.allocate(10);
    allocate.put("0123".getBytes());
    // 切换为读模式
    allocate.flip();
    for (int i = 0; i < allocate.limit(); i++) {
        System.out.print((char) allocate.get() + "\t");
    }
    allocate.get();
}
运行结果:
0 1 2 3
java.nio.BufferUnderflowException
 at java.nio.Buffer.nextGetIndex(Buffer.java:500)
 at java.nio.HeapByteBuffer.get(HeapByteBuffer.java:135)
 at com.wwj.nio.BufferDemo.buffer(BufferDemo.java:148)
但是通过索引读取数据将不会判断position是否小于等于limit,也不会移动position:
@Test
public void buffer() {
    ByteBuffer allocate = ByteBuffer.allocate(10);
    allocate.put("0123".getBytes());
    // 切换为读模式
    allocate.flip();
    for (int i = 0; i < allocate.limit(); i++) {
        System.out.print((char) allocate.get() + "\t");
    }
    // 通过索引读取数据
    System.out.println((char) allocate.get(1));
}
运行结果:
0 1 2 3 1
数据读取完毕后,若是想重新对该缓冲区进行读取,则可以将position手动置为0,也可以调用JDK提供的方法:
// 调用rewind方法可以将当前索引重置为0
allocate.rewind();
rewind方法内部也是对position进行赋值为0的操作:
public final Buffer rewind() {
    position = 0;
    mark = -1;
    return this;
}
若是想重新对缓冲区进行写入,则调用clear方法:
// 切换写模式,此时会将当前索引置为0,将最大索引置为缓冲区容量
allocate.clear();
注意rewind方法和clear方法的区别,它们虽然都会将position置为0,但是clear方法还会将limit置为capacity的值,所以当想要再次读取缓冲区中的数据时,则可以调用rewind方法;当想要再次写入数据到缓冲区时,则可以调用clear方法。
来验证一下:
@Test
public void buffer() {
    ByteBuffer allocate = ByteBuffer.allocate(10);
    allocate.put("0123".getBytes());
    // 切换为读模式
    allocate.flip();
    for(int i = 0;i <allocate.limit();++i){
        allocate.get();
    }
    System.out.print("position:" + allocate.position() + "\t");
    System.out.print("limit:" + allocate.limit() + "\t");
    System.out.print("capacity:" + allocate.capacity() + "\t");
    System.out.print("remaining:" + allocate.remaining() + "\t");
    System.out.println();

    allocate.rewind();
    System.out.print("position:" + allocate.position() + "\t");
    System.out.print("limit:" + allocate.limit() + "\t");
    System.out.print("capacity:" + allocate.capacity() + "\t");
    System.out.print("remaining:" + allocate.remaining() + "\t");
    System.out.println();

    allocate.clear();
    System.out.print("position:" + allocate.position() + "\t");
    System.out.print("limit:" + allocate.limit() + "\t");
    System.out.print("capacity:" + allocate.capacity() + "\t");
    System.out.print("remaining:" + allocate.remaining() + "\t");
}
运行结果:
position:4  limit:4  capacity:10  remaining:0
position:0  limit:4  capacity:10  remaining:4
position:0  limit:10 capacity:10  remaining:10
往 期 推 荐
点分享
点收藏
点点赞
点在看


