
图像的点云拼接-原理讲解与代码实现
理解好图像的点云拼接,需要从相机的模型说起。理解相机的成像原理之后,便可更为深刻的理解图像的点云如何拼接在一起。
首先说下相机的概念与原理。
相机概念与原理
相机的作用:将三维世界中的坐标点(单位为米)映射到二维图像平面(单位为像素)。
通常我们见到的相机都是针孔相机,但是不是简单的 针孔,还有透镜的畸变存在,所以在做图像处理时要进行畸变校正。
由于畸变的存在,我们在使用相机之前都要进行相机标定。
目的就是求出内参对于简单的应用求出径向畸变和切向畸变就够了。
所谓的外参就是相机的位姿。
有了外参、内参、图像、深度信息 便可以把图像中的点,转到世界坐标系下,并带有RGB的颜色。就形成了所谓的点云。
相关的公式也很好理解 ,就是通过相似三角形的原理。
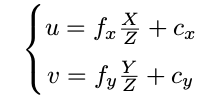
注意其中fx 、fy、 cx 、cy也就是相机的内参了。在相机出厂时会给出。
理解了相机的概念与原理,来编辑代码实现下。
Code实现
全部代码
先放上全部代码,再进行分段讲解
using namespace std;int main( int argc, char** argv ){vector<cv::Mat> colorImgs,depthImgs;//彩色图和深度图vector<Eigen::Isometry3d> poses;//相机位姿ifstream fin("../pose.txt");//文件读入 相机位置 文件if(!fin)//相机位姿读入失败{cerr<<"请在有pose.txt的目录下运行此程序"<<endl;return 1;}for(int i=0;i<5;i++){boost::format fmt("../%s/%d.%s");//图像文件格式colorImgs.push_back(cv::imread((fmt%"color"%(i+1)%"png").str())); // 读取彩色图像depthImgs.push_back( cv::imread( (fmt%"depth"%(i+1)%"pgm").str(), -1 )); // 使用 -1 读取原始图像//读取相机位姿double data[7]={0};for(auto& d:data)fin>>d;Eigen::Quaterniond q( data[6], data[3], data[4], data[5] );Eigen::Isometry3d T(q);T.pretranslate( Eigen::Vector3d( data[0], data[1], data[2] ));poses.push_back( T );}//相机内参double cx=325.5;double cy=253.5;double fx=518.0;double fy=519.0;double depthScale = 1000.0;cout<<"正在将图像转换为点云..."<<endl;//定义点云使用的格式 用XYZRGBtypedef pcl::PointXYZRGB PointT;typedef pcl::PointCloud<PointT> PointCloud;//新建一个点云PointCloud::Ptr pointCloud( new PointCloud );for(int i=0;i<5;i++){cout<<"转换图像中:"<<i+1<<endl;cv::Mat color = colorImgs[i];//获得 要处理的彩色图像cv::Mat depth = depthImgs[i];//获得 要处理的深度图像Eigen::Isometry3d T = poses[i];//获得 对应的posefor(int v=0 ; v<color.rows;v++)//处理每个像素{for(int u=0 ; u<color.cols;u++){unsigned int d = depth.ptr<unsigned short>(v)[u];//深度值if(d==0) continue;//为0 表示没有测量到Eigen::Vector3d point;//相机坐标系下的点//计算相机坐标系下的点的坐标point[2] = double(d)/depthScale;point[0] = (u-cx)*point[2]/fx;point[1] = (v-cy)*point[2]/fy;Eigen::Vector3d pointWorld = T*point;//转换到世界坐标系下PointT p;//声明点云p.x = pointWorld[0];//赋值点云位置p.y = pointWorld[1];p.z = pointWorld[2];p.b = color.data[ v*color.step+u*color.channels() ];//赋值点云对应RGB颜色p.g = color.data[ v*color.step+u*color.channels()+1 ];p.r = color.data[ v*color.step+u*color.channels()+2 ];pointCloud->points.push_back( p );}}}pointCloud->is_dense = false;cout<<"点云共有"<<pointCloud->size()<<"个点."<<endl;pcl::io::savePCDFileBinary("map.pcd", *pointCloud );//保存点云文件return 0;}
代码讲解
vector<cv::Mat> colorImgs,depthImgs;//彩色图和深度图vector<Eigen::Isometry3d> poses;//相机位姿ifstream fin("../pose.txt");//文件读入 相机位置 文件if(!fin)//相机位姿读入失败{cerr<<"请在有pose.txt的目录下运行此程序"<<endl;return 1;}for(int i=0;i<5;i++){boost::format fmt("../%s/%d.%s");//图像文件格式colorImgs.push_back(cv::imread((fmt%"color"%(i+1)%"png").str())); // 读取彩色图像depthImgs.push_back( cv::imread( (fmt%"depth"%(i+1)%"pgm").str(), -1 )); // 使用 -1 读取原始图像//读取相机位姿double data[7]={0};for(auto& d:data)fin>>d;Eigen::Quaterniond q( data[6], data[3], data[4], data[5] );Eigen::Isometry3d T(q);T.pretranslate( Eigen::Vector3d( data[0], data[1], data[2] ));poses.push_back( T );}
读取对应路径下的彩色图像、深度图像、相机的位姿。
上面说了,有了这三个量再加上相机内参,就可以得到点云。
//相机内参double cx=325.5;double cy=253.5;double fx=518.0;double fy=519.0;double depthScale = 1000.0;
传说中的相机内参
//定义点云使用的格式 用XYZRGBtypedef pcl::PointXYZRGB PointT;typedef pcl::PointCloud<PointT> PointCloud;//新建一个点云PointCloud::Ptr pointCloud( new PointCloud );
声明pcl的格式创建一个点云,然后开始for循环处理每一张图片和对应的深度图片与相机位姿。
cv::Mat color = colorImgs[i];//获得 要处理的彩色图像cv::Mat depth = depthImgs[i];//获得 要处理的深度图像Eigen::Isometry3d T = poses[i];//获得 对应的pose
得到要处理的彩色图像深度图像对应的pose,然后for循环处理每一个像素。
unsigned int d = depth.ptr<unsigned short>(v)[u];//深度值得到深度信息
Eigen::Vector3d point;//相机坐标系下的点//计算相机坐标系下的点的坐标point[2] = double(d)/depthScale;point[0] = (u-cx)*point[2]/fx;point[1] = (v-cy)*point[2]/fy;
通过:
这个公式得到相机坐标系下的 x,y,z
Eigen::Vector3d pointWorld = T*point;//转换到世界坐标系下相机坐标系下的点通过坐标变换转到世界坐标系下。
PointT p;//声明点云p.x = pointWorld[0];//赋值点云位置p.y = pointWorld[1];p.z = pointWorld[2];p.b = color.data[ v*color.step+u*color.channels() ];//赋值点云对应RGB颜色p.g = color.data[ v*color.step+u*color.channels()+1 ];p.r = color.data[ v*color.step+u*color.channels()+2 ];
赋值点云的坐标与颜色。
pcl::io::savePCDFileBinary("map.pcd", *pointCloud );//保存点云文件保存成点云文件。
—版权声明—
来源:古月居
仅用于学术分享,版权属于原作者。
若有侵权,请联系微信号:yiyang-sy 删除或修改!
—THE END—
评论