SpringBoot整合Redis使用Restful风格实现CRUD功能
真香!24W字的Java面试手册(点击查看)
前言
本篇文章主要介绍的是SpringBoot整合Redis,使用Restful风格实现的CRUD功能。
Redis 介绍
Redis 是完全开源免费的,遵守BSD协议,是一个高性能的key-value数据库。Redis 与其他 key - value缓存产品有以下三个特点:
Redis支持数据的持久化,可以将内存中的数据保存在磁盘中,重启的时候可以再次加载进行使用。 Redis不仅仅支持简单的key-value类型的数据,同时还提供list,set,zset,hash等数据结构的存储。 Redis支持数据的备份,即master-slave模式的数据备份。
更多的使用说明可以查看官方的文档。官方文档: https://redis.io
SpringBoot整合Redis
说明:如果想直接获取工程那么可以直接跳到底部,通过链接下载工程代码。
环境要求 JDK:1.8 SpringBoot:1.5.15.RELEASE Redis:3.2或以上。
Tips:Redis的偶数为稳定版本,奇数为非稳定版本,所以在使用的时候最好使用偶数的版本!
首先还是Maven的相关依赖:
<properties>
    <project.build.sourceEncoding>UTF-8</project.build.sourceEncoding>
    <project.reporting.outputEncoding>UTF-8</project.reporting.outputEncoding>
    <java.version>1.8</java.version>
    <fastjson>1.2.41</fastjson>
    <springboot>1.5.15.RELEASE</springboot>
  </properties>
  <dependencies>
  <dependency>
   <groupId>org.springframework.boot</groupId>
   <artifactId>spring-boot-starter-web</artifactId>
   <version>${springboot}</version>
  </dependency>
  <dependency>
   <groupId>org.springframework.boot</groupId>
   <artifactId>spring-boot-devtools</artifactId>
   <optional>true</optional>
   <version>${springboot}</version>
  </dependency>

  <dependency>
   <groupId>org.springframework.boot</groupId>
   <artifactId>spring-boot-starter-test</artifactId>
   <version>${springboot}</version>
   <scope>test</scope>
  </dependency>

  <dependency>
   <groupId>org.springframework.boot</groupId>
   <artifactId>spring-boot-starter-data-redis</artifactId>
   <version>${springboot}</version>
  </dependency>

  <dependency>
   <groupId>com.alibaba</groupId>
   <artifactId>fastjson</artifactId>
   <version>${fastjson}</version>
  </dependency>

  </dependencies>
添加了相应的maven依赖之后,我们再来查看配置。 Redis配置的说明在下面中已经说的很详细了,这里就不在过多说明了,不过需要注意的是如果Redis是集群版的话,需要使用这个spring.redis.cluster.nodes这个配置,该配置为Redis的Host加上Port,多个之间用,逗号隔开。 application.properties的配置如下:
# Redis服务器地址
# 单机版配置
spring.redis.host = 127.0.0.1
spring.redis.port = 6379
# redis最大重连数
redis.cluster.max-redirects=3
# Redis服务器连接密码(默认为空)
redis.password=
# 最大空闲数
redis.maxIdle=5
# 连接池的最大数据库连接数。
redis.maxTotal=5
# 最大建立连接等待时间。如果超过此时间将接到异常。设为-1表示无限制。
redis.maxWaitMillis=1000
# 连接的最小空闲时间 默认1800000毫秒(30分钟)
redis.minEvictableIdleTimeMillis=300000
# 每次释放连接的最大数目,默认3
redis.numTestsPerEvictionRun=3
# 逐出扫描的时间间隔(毫秒) 如果为负数,则不运行逐出线程, 默认-1
redis.timeBetweenEvictionRunsMillis=30000
# 是否在从池中取出连接前进行检验,如果检验失败,则从池中去除连接并尝试取出另一个
redis.testOnBorrow=true
# 在空闲时检查有效性, 默认false
redis.testWhileIdle=true
代码编写
首先是编写Redis的配置类,对Redis这块进行配置。在使用SpringBoot整合Redis的时候,SpringBoot是可以根据配置自动完成Redis的相关配置,不过为了更灵活一点,我们这边还是手动加载一下配置,配置成自己想要的那种效果吧。首先,配置一个Redis的连接池,使用redis.clients.jedis.JedisPoolConfig这个类来进行实现,相关的配置在代码的注释中说明得很详细了,这里就不在过多讲述了;然后,再来配置一个Redis的工厂,加载Redis的连接池配置,这里我们也可以进行一下设置,如果Redis设置了密码,我们就加载改密码,否则就不进行加载。继而,我们再来设置数据存入Redis的序列化的方式并开启事务。这里也顺便说下为什么要设置序列化器,如果不设置,那么在用实体类(未序列化)进行存储的时候,会提示错误: Failed to serialize object using DefaultSerializer; 当然,也可以不设置,不过存储的实体类必须进行序列化。最后,我们再来实例化RedisTemplate的对象,加载上述的配置。在使用的时候,只需要使用如下的方式注入就可以使用了
@Autowired
RedisTemplate<String, Object> redisTemplate;
Redis的配置类的代码如下:
/**
 *
 * @Title: RedisConfig
 * @Description: redis初始化配置
 * @Version:1.0.0
 * @author pancm
 * @date 2018年6月7日
 */
@Component
public class RedisConfig {
 @Value("${redis.maxIdle}")
 private Integer maxIdle;
 @Value("${redis.maxTotal}")
 private Integer maxTotal;
 @Value("${redis.maxWaitMillis}")
 private Integer maxWaitMillis;
 @Value("${redis.minEvictableIdleTimeMillis}")
 private Integer minEvictableIdleTimeMillis;
 @Value("${redis.numTestsPerEvictionRun}")
 private Integer numTestsPerEvictionRun;
 @Value("${redis.timeBetweenEvictionRunsMillis}")
 private long timeBetweenEvictionRunsMillis;
 @Value("${redis.testOnBorrow}")
 private boolean testOnBorrow;
 @Value("${redis.testWhileIdle}")
 private boolean testWhileIdle;
 @Value("${redis.cluster.max-redirects}")
 private Integer mmaxRedirectsac;
 @Value("${redis.password}")
 private String redispwd;
 /**
  * JedisPoolConfig 连接池
  *
  * @return
  */
 @Bean
 public JedisPoolConfig jedisPoolConfig() {
  JedisPoolConfig jedisPoolConfig = new JedisPoolConfig();
  // 最大空闲数
  jedisPoolConfig.setMaxIdle(maxIdle);
  // 连接池的最大数据库连接数
  jedisPoolConfig.setMaxTotal(maxTotal);
  // 最大建立连接等待时间
  jedisPoolConfig.setMaxWaitMillis(maxWaitMillis);
  // 逐出连接的最小空闲时间 默认1800000毫秒(30分钟)
  jedisPoolConfig.setMinEvictableIdleTimeMillis(minEvictableIdleTimeMillis);
  // 每次逐出检查时 逐出的最大数目 如果为负数就是 : 1/abs(n), 默认3
  jedisPoolConfig.setNumTestsPerEvictionRun(numTestsPerEvictionRun);
  // 逐出扫描的时间间隔(毫秒) 如果为负数,则不运行逐出线程, 默认-1
  jedisPoolConfig.setTimeBetweenEvictionRunsMillis(timeBetweenEvictionRunsMillis);
  // 是否在从池中取出连接前进行检验,如果检验失败,则从池中去除连接并尝试取出另一个
  jedisPoolConfig.setTestOnBorrow(testOnBorrow);
  // 在空闲时检查有效性, 默认false
  jedisPoolConfig.setTestWhileIdle(testWhileIdle);
  return jedisPoolConfig;
 }

 /**
  * 配置工厂
  */
 @Bean
 public JedisConnectionFactory JedisConnectionFactory(JedisPoolConfig jedisPoolConfig) {
  JedisConnectionFactory JedisConnectionFactory = new JedisConnectionFactory(jedisPoolConfig);
  if (redispwd == null || redispwd.length() == 0) {
   JedisConnectionFactory.setPassword
当然,如果自己想使用自定义的Redis工具类进行实现,那么只需在该配置类中注册一个Bean注入封装一下就可以了,然后在工具类中加载一下就可以了。配置类中添加:
@Bean(name = "redisUtil")
public RedisUtil redisUtil(RedisTemplate<String, Object> redisTemplate) {
 RedisUtil redisUtil = new RedisUtil();
 redisUtil.setRedisTemplate(redisTemplate);
 return redisUtil;
}'
Redis的工具类添加如下代码:
private RedisTemplate<String, Object> redisTemplate;
public void setRedisTemplate(RedisTemplate<String, Object> redisTemplate) {
 this.redisTemplate = redisTemplate;
}
使用Redis工具类示例:
   @Resource
private RedisUtil redisUtil;
讲完Redis的配置类之后,我们再来进行编写相应的实体类、dao层、service层和Controller层的代码了。由于这块的代码比较简单,因此这里我就简单的贴下代码了。
实体类
又是万能的用户表 (^▽^)
代码如下:
public class User implements Serializable{
 private static final long serialVersionUID = 1L;
 /** 编号 */
  private int id;
  /** 姓名 */
  private String name;
  /** 年龄 */
  private int age;

  public User(){
  }
 public int getId() {
  return id;
 }

 public void setId(int id) {
  this.id = id;
 }
 public String getName() {
  return name;
 }
 public void setName(String name) {
  this.name = name;
 }
 public int getAge() {
  return age;
 }
 public void setAge(int age) {
  this.age = age;
 }
 public String toString() {
  return JSONObject.toJSONString(this);
 }
}
Dao 数据层
这里我是使用的自定义的Redis工具类,其实也就是对RedisTemplate做了二次封装。因为使用的是set(集合)方式存储的,所以我这边把用户数据的ID作为key,用户数据作为value了。
实现类的代码如下:
<pre style="overflow: auto; font-family: consolas, Menlo, "PingFang SC", "Microsoft YaHei", monospace; font-size: 13px; margin: 0px; padding: 10px; color: rgb(77, 77, 76); background: rgb(247, 247, 247); line-height: 1.6; border: none; width: 571px; font-style: normal; font-variant-ligatures: normal; font-variant-caps: normal; font-weight: 400; letter-spacing: normal; orphans: 2; text-align: left; text-indent: 0px; text-transform: none; widows: 2; word-spacing: 0px; -webkit-text-stroke-width: 0px; text-decoration-thickness: initial; text-decoration-style: initial; text-decoration-color: initial;">@Repository
public class UserDaoImpl implements UserDao {
@Resource
private RedisUtil redisUtil;
@Override
public void addUser(User user) {
redisUtil.set(String.valueOf(user.getId()), user.toString());
}
@Override
public void updateUser(User user) {
redisUtil.set(String.valueOf(user.getId()), user.toString());
}
@Override
public void deleteUser(int id) {
redisUtil.del(String.valueOf(id));
}
@Override
public User findByUserId(int id) {
String data = redisUtil.get(String.valueOf(id)).toString();
User user = JSON.parseObject(data, User.class);
return user;
}
}
</pre>
业务层这边处理比较简单,成功就返回true,失败就返回false。
@Service
public class UserServiceImpl implements UserService {
 private  final Logger logger = LoggerFactory.getLogger(this.getClass());
 @Autowired
    private UserDao userDao;

 @Override
 public boolean addUser(User user) {
  boolean flag=false;
  try{
   userDao.addUser(user);
   flag=true;
  }catch(Exception e){
   logger.error("新增失败!",e);
  }
  return flag;
 }
 @Override
 public boolean updateUser(User user) {
  boolean flag=false;
  try{
   userDao.updateUser(user);
   flag=true;
  }catch(Exception e){
   logger.error("修改失败!",e);
  }
  return flag;
 }
 @Override
 public boolean deleteUser(int id) {
  boolean flag=false;
  try{
   userDao.deleteUser(id);
   flag=true;
  }catch(Exception e){
   logger.error("删除失败!",e);
  }
  return flag;
 }
 @Override
 public User findByUserId(int id) {
  return userDao.findByUserId(id);
 }
}
Controller 控制层
控制层这边也比较简单,使用Restful风格实现的CRUD功能。
代码如下:
<pre style="overflow: auto; font-family: consolas, Menlo, "PingFang SC", "Microsoft YaHei", monospace; font-size: 13px; margin: 0px; padding: 10px; color: rgb(77, 77, 76); background: rgb(247, 247, 247); line-height: 1.6; border: none; width: 642px; font-style: normal; font-variant-ligatures: normal; font-variant-caps: normal; font-weight: 400; letter-spacing: normal; orphans: 2; text-align: left; text-indent: 0px; text-transform: none; widows: 2; word-spacing: 0px; -webkit-text-stroke-width: 0px; text-decoration-thickness: initial; text-decoration-style: initial; text-decoration-color: initial;">@RestController
@RequestMapping(value = "/api")
public class UserRestController {
private final Logger logger = LoggerFactory.getLogger(this.getClass());
@Autowired
private UserService userService;
@PostMapping("/user")
public boolean addUser(@RequestBody User user) {
logger.info("开始新增...");
return userService.addUser(user);
}
@PutMapping("/user")
public boolean updateUser(@RequestBody User user) {
logger.info("开始更新...");
return userService.updateUser(user);
}
@DeleteMapping("/user")
public boolean delete(@RequestParam(value = "id", required = true) int userId) {
logger.info("开始删除...");
return userService.deleteUser(userId);
}
@GetMapping("/user")
public User findByUserId(@RequestParam(value = "id", required = true) int userId) {
logger.info("开始查询所有数据...");
return userService.findByUserId(userId);
}
}
</pre>
App 入口
和普通的SpringBoot项目基本一样。
代码如下:
<pre style="overflow: auto; font-family: consolas, Menlo, "PingFang SC", "Microsoft YaHei", monospace; font-size: 13px; margin: 0px; padding: 10px; color: rgb(77, 77, 76); background: rgb(247, 247, 247); line-height: 1.6; border: none; width: 414px; font-style: normal; font-variant-ligatures: normal; font-variant-caps: normal; font-weight: 400; letter-spacing: normal; orphans: 2; text-align: left; text-indent: 0px; text-transform: none; widows: 2; word-spacing: 0px; -webkit-text-stroke-width: 0px; text-decoration-thickness: initial; text-decoration-style: initial; text-decoration-color: initial;">@SpringBootApplication
public class App
{
public static void main( String[] args )
{
SpringApplication.run(App.class, args);
System.out.println("程序正在运行...");
}
}
</pre>
功能测试
我们成功启动该程序之后,使用Postman工具来进行接口测试。
POST http://localhost:8180/api/user
Body参数为:
{“id”:1,”name”:”xuwujing”,”age”:18}
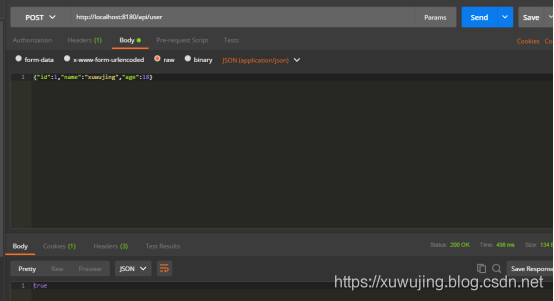
界面返回true,表示新增成功了!
然后在进行查询,使用GET请求。
GET http://localhost:8180/api/user?id=1
返回:
{“id”:1,”name”:”xuwujing”,”age”:18}
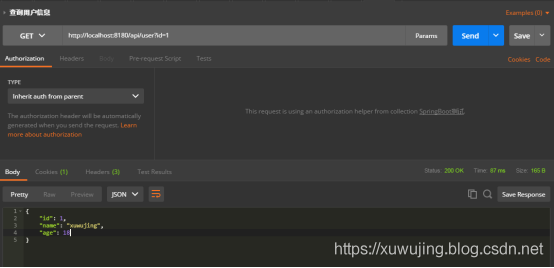
我们再来使用RedisDesktopManager工具进行查询看下,是否真的写入到Redis中去了。
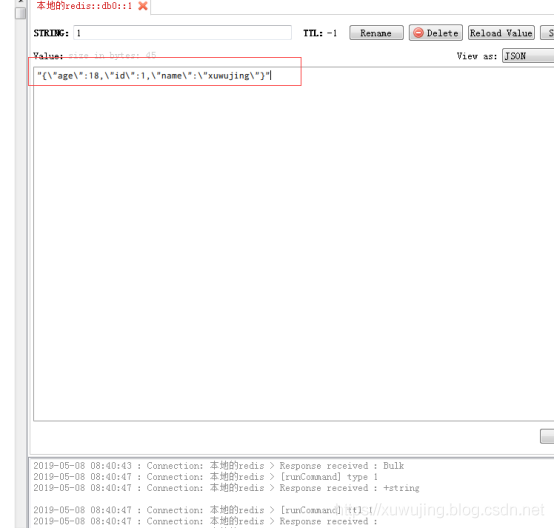 可以看到已经成功写入到Redis中了。
然后我们再来更新下更新该数据,使用PUT方式请求。
PUT http://localhost:8180/api/user
这里只是更改了下age年龄,Body参数为:
{“id”:1,”name”:”xuwujing”,”age”:19}
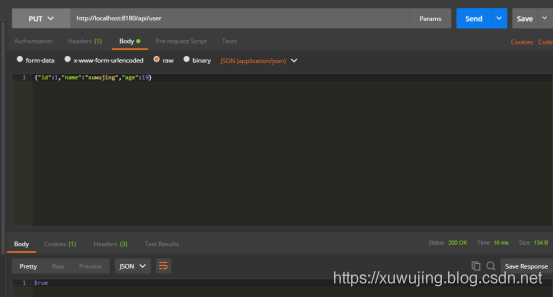 可以看到已经成功更新了。
最后我们再来查询一遍看下是否成功更新。
GET http://localhost:8180/api/user?id=1
返回:
{“id”:1,”name”:”xuwujing”,”age”:19}
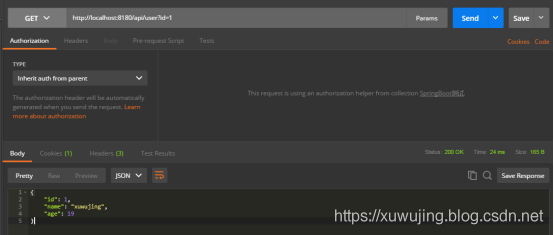 可以看到已经成功更新了。
其它
其实SpringBoot整合Redis整个项目很早之前就已经写好并且上传到Github了,但是一直没有抽出时间写篇博客讲述(还有很多SpringBoot的项目也是如此)
关于SpringBoot整合Redis的文章就讲解到这里了,如有不妥,欢迎指正!
项目地址
SpringBoot整合Redis的项目工程地址: https://github.com/xuwujing/springBoot-study/tree/master/springboot-Redis
如有文章对你有帮助,
“在看”和转发是对我最大的支持!
点击文末“阅读原文”可直达

