使用Transformer来做物体检测
点击左上方蓝字关注我们

转载自 | 学算法的小黑狗


介绍
DEtection TRansformer (DETR)是Facebook研究团队巧妙地利用了Transformer 架构开发的一个目标检测模型。在这篇文章中,我将通过分析DETR架构的内部工作方式来帮助提供一些关于它的直觉。
下面,我将解释一些结构,但是如果你只是想了解如何使用模型,可以直接跳到代码部分。

结构
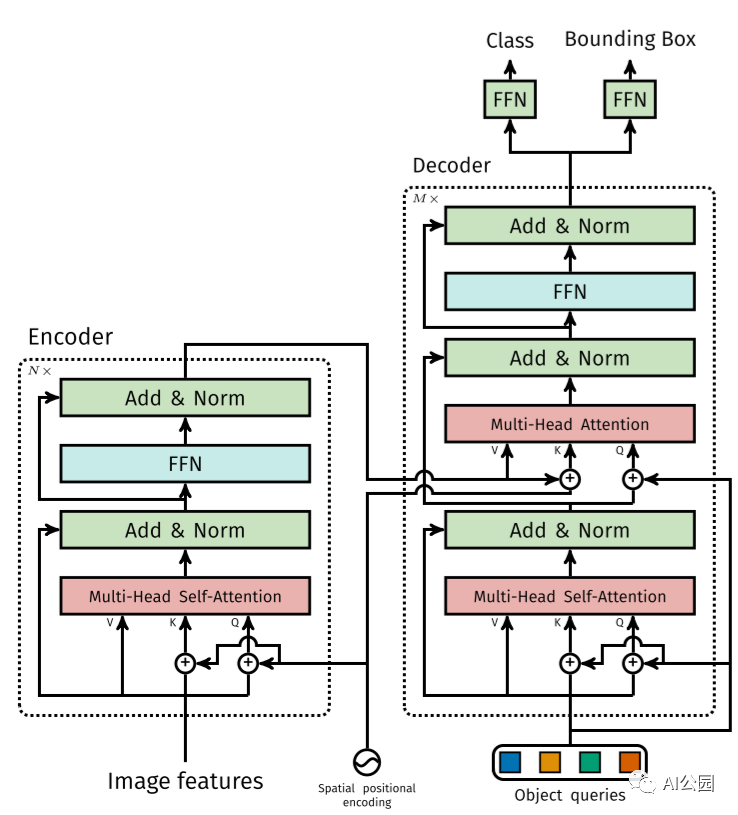
DETR模型由一个预训练的CNN骨干(如ResNet)组成,它产生一组低维特征集。这些特征被格式化为一个特征集合并添加位置编码,输入一个由Transformer组成的编码器和解码器中,和原始的Transformer论文中描述的Encoder-Decoder的使用方式非常的类似。解码器的输出然后被送入固定数量的预测头,这些预测头由预定义数量的前馈网络组成。每个预测头的输出都包含一个类预测和一个预测框。损失是通过计算二分匹配损失来计算的。

该模型做出了预定义数量的预测,并且每个预测都是并行计算的。

CNN主干
假设我们的输入图像,有三个输入通道。CNN backbone由一个(预训练过的)CNN(通常是ResNet)组成,我们用它来生成C个具有宽度W和高度H的低维特征(在实践中,我们设置C=2048, W=W₀/32和H=H₀/32)。
这留给我们的是C个二维特征,由于我们将把这些特征传递给一个transformer,每个特征必须允许编码器将每个特征处理为一个序列的方式重新格式化。这是通过将特征矩阵扁平化为H⋅W向量,然后将每个向量连接起来来实现的。

扁平化的卷积特征再加上空间位置编码,位置编码既可以学习,也可以预定义。

The Transformer
Transformer几乎与原始的编码器-解码器架构完全相同。不同之处在于,每个解码器层并行解码N个(预定义的数目)目标。该模型还学习了一组N个目标的查询,这些查询是(类似于编码器)学习出来的位置编码。


目标查询
下图描述了N=20个学习出来的目标查询(称为prediction slots)如何聚焦于一张图像的不同区域。

“我们观察到,在不同的操作模式下,每个slot 都会学习特定的区域和框大小。“ —— DETR的作者
理解目标查询的直观方法是想象每个目标查询都是一个人。每个人都可以通过注意力来查看图像的某个区域。一个目标查询总是会问图像中心是什么,另一个总是会问左下角是什么,以此类推。

使用PyTorch实现简单的DETR
import torch
import torch.nn as nn
from torchvision.models import resnet50

class SimpleDETR(nn.Module):
"""
Minimal Example of the Detection Transformer model with learned positional embedding
"""
 def __init__(self, num_classes, hidden_dim, num_heads,
             num_enc_layers, num_dec_layers):
    super(SimpleDETR, self).__init__()
    self.num_classes = num_classes
    self.hidden_dim = hidden_dim
    self.num_heads = num_heads
    self.num_enc_layers = num_enc_layers
    self.num_dec_layers = num_dec_layers
    # CNN Backbone
    self.backbone = nn.Sequential(
         *list(resnet50(pretrained=True).children())[:-2])
    self.conv = nn.Conv2d(2048, hidden_dim, 1)
    # Transformer
    self.transformer = nn.Transformer(hidden_dim, num_heads,
         num_enc_layers, num_dec_layers)
    # Prediction Heads
    self.to_classes = nn.Linear(hidden_dim, num_classes+1)
    self.to_bbox = nn.Linear(hidden_dim, 4)
    # Positional Encodings
    self.object_query = nn.Parameter(torch.rand(100, hidden_dim))
    self.row_embed = nn.Parameter(torch.rand(50, hidden_dim // 2)
    self.col_embed = nn.Parameter(torch.rand(50, hidden_dim // 2))

 def forward(self, X):
    X = self.backbone(X)
    h = self.conv(X)
    H, W = h.shape[-2:]
    pos_enc = torch.cat([
          self.col_embed[:W].unsqueeze(0).repeat(H,1,1),
          self.row_embed[:H].unsqueeze(1).repeat(1,W,1)],
       dim=-1).flatten(0,1).unsqueeze(1)
    h = self.transformer(pos_enc + h.flatten(2).permute(2,0,1),
    self.object_query.unsqueeze(1))
    class_pred = self.to_classes(h)
    bbox_pred = self.to_bbox(h).sigmoid()

    return class_pred, bbox_pred

二分匹配损失 (Optional)


框损失的计算为预测值与ground truth的L₁损失和的GIOU损失的线性组合。同样,如果你想象两个不相交的框,那么框的错误将不会提供任何有意义的上下文(我们可以从下面的框损失的定义中看到)。

可以把上面的等式看作是与预测相关联的总损失,其中面积误差的重要性是λᵢₒᵤ,距离误差的重要性是。

由于我们从已知的已知类的数目来预测类,那么类预测就是一个分类问题,因此我们可以使用交叉熵损失来计算类预测误差。我们将损失函数定义为每N个预测损失的总和:


为目标检测使用DETR
在这里,你可以学习如何加载预训练的DETR模型,以便使用PyTorch进行目标检测。
8.1 加载模型
首先导入需要的模块。
# Import required modules
import torch
from torchvision import transforms as T import requests # for loading images from web
from PIL import Image # for viewing images
import matplotlib.pyplot as plt
下面的代码用ResNet50作为CNN骨干从torch hub加载预训练的模型。其他主干请参见DETR github:https://github.com/facebookresearch/detr
detr = torch.hub.load('facebookresearch/detr',
                      'detr_resnet50',
                       pretrained=True)
8.2 加载一张图像
要从web加载图像,我们使用requests库:
url = 'https://www.tempetourism.com/wp-content/uploads/Postino-Downtown-Tempe-2.jpg' # Sample imageimage = Image.open(requests.get(url, stream=True).raw) plt.imshow(image)
plt.show()

8.3 设置目标检测的Pipeline
为了将图像输入到模型中,我们需要将PIL图像转换为张量,这是通过使用torchvision的transforms库来完成的。
transform = T.Compose([T.Resize(800),
                       T.ToTensor(),
                       T.Normalize([0.485, 0.456, 0.406],
                                  [0.229, 0.224, 0.225])])
上面的变换调整了图像的大小,将PIL图像进行转换,并用均值-标准差对图像进行归一化。其中[0.485,0.456,0.406]为各颜色通道的均值,[0.229,0.224,0.225]为各颜色通道的标准差。
我们装载的模型是预先在COCO Dataset上训练的,有91个类,还有一个表示空类(没有目标)的附加类。我们用下面的代码手动定义每个标签:
CLASSES =
['N/A', 'Person', 'Bicycle', 'Car', 'Motorcycle', 'Airplane', 'Bus', 'Train', 'Truck', 'Boat', 'Traffic-Light', 'Fire-Hydrant', 'N/A', 'Stop-Sign', 'Parking Meter', 'Bench', 'Bird', 'Cat', 'Dog', 'Horse', 'Sheep', 'Cow', 'Elephant', 'Bear', 'Zebra', 'Giraffe', 'N/A', 'Backpack', 'Umbrella', 'N/A', 'N/A', 'Handbag', 'Tie', 'Suitcase', 'Frisbee', 'Skis', 'Snowboard', 'Sports-Ball', 'Kite', 'Baseball Bat', 'Baseball Glove', 'Skateboard', 'Surfboard', 'Tennis Racket', 'Bottle', 'N/A', 'Wine Glass', 'Cup', 'Fork', 'Knife', 'Spoon', 'Bowl', 'Banana', 'Apple', 'Sandwich', 'Orange', 'Broccoli', 'Carrot', 'Hot-Dog', 'Pizza', 'Donut', 'Cake', 'Chair', 'Couch', 'Potted Plant', 'Bed', 'N/A', 'Dining Table', 'N/A','N/A', 'Toilet', 'N/A', 'TV', 'Laptop', 'Mouse', 'Remote', 'Keyboard', 'Cell-Phone', 'Microwave', 'Oven', 'Toaster', 'Sink', 'Refrigerator', 'N/A', 'Book', 'Clock', 'Vase', 'Scissors', 'Teddy-Bear', 'Hair-Dryer', 'Toothbrush']
如果我们想输出不同颜色的边框,我们可以手动定义我们想要的RGB格式的颜色
COLORS = [
    [0.000, 0.447, 0.741],
    [0.850, 0.325, 0.098],
    [0.929, 0.694, 0.125],
    [0.494, 0.184, 0.556],
    [0.466, 0.674, 0.188],
    [0.301, 0.745, 0.933]
]
8.4 格式化输出
我们还需要重新格式化模型的输出。给定一个转换后的图像,模型将输出一个字典,包含100个预测类的概率和100个预测边框。
每个包围框的形式为(x, y, w, h),其中(x,y)为包围框的中心(包围框是单位正方形[0,1]×[0,1]), w, h为包围框的宽度和高度。因此,我们需要将边界框输出转换为初始和最终坐标,并重新缩放框以适应图像的实际大小。
下面的函数返回边界框端点:
# Get coordinates (x0, y0, x1, y0) from model output (x, y, w, h)def get_box_coords(boxes):
    x, y, w, h = boxes.unbind(1)
    x0, y0 = (x - 0.5 * w), (y - 0.5 * h)
    x1, y1 = (x + 0.5 * w), (y + 0.5 * h)
    box = [x0, y0, x1, y1]
    return torch.stack(box, dim=1)
我们还需要缩放了框的大小。下面的函数为我们做了这些:
# Scale box from [0,1]x[0,1] to [0, width]x[0, height]def scale_boxes(output_box, width, height):
    box_coords = get_box_coords(output_box)
    scale_tensor = torch.Tensor(
                 [width, height, width, height]).to(
                 torch.cuda.current_device())    return box_coords * scale_tensor
现在我们需要一个函数来封装我们的目标检测pipeline。下面的detect函数为我们完成了这项工作。
# Object Detection Pipelinedef detect(im, model, transform):
    device = torch.cuda.current_device()
    width = im.size[0]
    height = im.size[1]

    # mean-std normalize the input image (batch-size: 1)
    img = transform(im).unsqueeze(0)
    img = img.to(device)

    # demo model only support by default images with aspect ratio    between 0.5 and 2    assert img.shape[-2] <= 1600 and img.shape[-1] <= 1600,    # propagate through the model
    outputs = model(img)    # keep only predictions with 0.7+ confidence
    probas = outputs['pred_logits'].softmax(-1)[0, :, :-1]
    keep = probas.max(-1).values > 0.85

    # convert boxes from [0; 1] to image scales
    bboxes_scaled = scale_boxes(outputs['pred_boxes'][0, keep], width, height)    return probas[keep], bboxes_scaled
现在,我们需要做的是运行以下程序来获得我们想要的输出:
probs, bboxes = detect(image, detr, transform)
8.5 绘制结果
现在我们有了检测到的目标,我们可以使用一个简单的函数来可视化它们。
# Plot Predicted Bounding Boxesdef plot_results(pil_img, prob, boxes,labels=True):
    plt.figure(figsize=(16,10))
    plt.imshow(pil_img)
    ax = plt.gca()

    for prob, (x0, y0, x1, y1), color in zip(prob, boxes.tolist(),   COLORS * 100):        ax.add_patch(plt.Rectangle((x0, y0), x1 - x0, y1 - y0,
             fill=False, color=color, linewidth=2))
        cl = prob.argmax()
        text = f'{CLASSES[cl]}: {prob[cl]:0.2f}'
        if labels:
            ax.text(x0, y0, text, fontsize=15,
                bbox=dict(facecolor=color, alpha=0.75))
    plt.axis('off')
    plt.show()
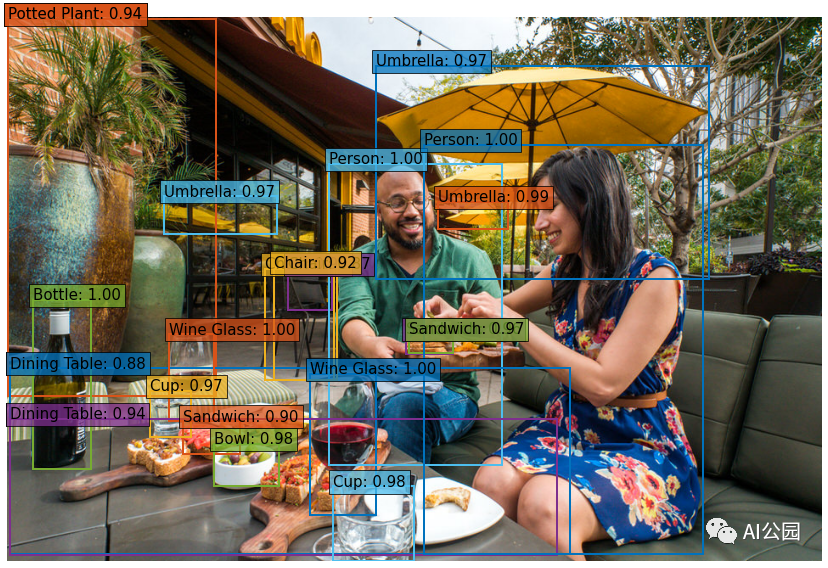
现在可以可视化结果:
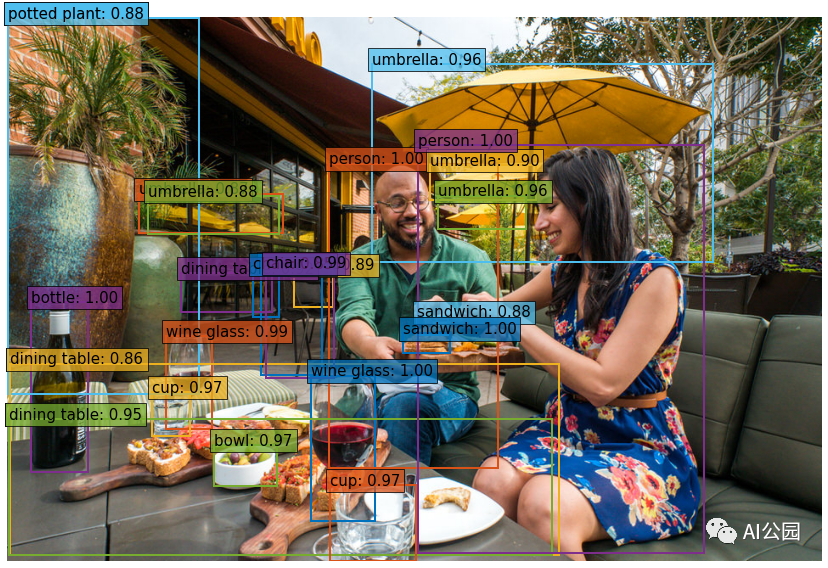
plot_results(image, probs, bboxes, labels=True)


英文原文
https://medium.com/swlh/object-detection-with-transformers-437217a3d62e
END
整理不易,点赞三连↓
