
PyTorch多GPU并行训练方法及问题整理

极市导读
本文详细地介绍了在PyTorch中进行单机多卡并行训练和多机多GPU训练的方法,并给出了几个常见问题的解决方案。
1.单机多卡并行训练
1.1.torch.nn.DataParallel
os.environ['CUDA_VISIBLE_DEVICES']来限制使用的GPU个数, 例如我要使用第0和第3编号的GPU, 那么只需要在程序中设置:os.environ['CUDA_VISIBLE_DEVICES'] = '0,3'
model = nn.DataParallel(model)model = model.cuda()
inputs = inputs.cuda()labels = labels.cuda()
model = Model(input_size, output_size)if torch.cuda.device_count() > 1:print("Let's use", torch.cuda.device_count(), "GPUs!")# dim = 0 [30, xxx] -> [10, ...], [10, ...], [10, ...] on 3 GPUsmodel = nn.DataParallel(model)model.to(device)
DataParallel的内部代码, 我们就可以发现, 其实是一样的:class DataParallel(Module):def __init__(self, module, device_ids=None, output_device=None, dim=0):super(DataParallel, self).__init__()if not torch.cuda.is_available():self.module = moduleself.device_ids = []returnif device_ids is None:device_ids = list(range(torch.cuda.device_count()))if output_device is None:output_device = device_ids[0]
device_ids的话, 程序会自动找到这个机器上面可以用的所有的显卡, 然后用于训练. 但是因为我们前面使用os.environ['CUDA_VISIBLE_DEVICES']限定了这个程序可以使用的显卡, 所以这个地方程序如果自己获取的话, 获取到的其实就是我们上面设定的那几个显卡.os.environ['CUDA_VISIBLE_DEVICES']对可以使用的显卡进行限定之后, 显卡的实际编号和程序看到的编号应该是不一样的, 例如上面我们设定的是os.environ['CUDA_VISIBLE_DEVICES']="0,2", 但是程序看到的显卡编号应该被改成了'0,1', 也就是说程序所使用的显卡编号实际上是经过了一次映射之后才会映射到真正的显卡编号上面的, 例如这里的程序看到的1对应实际的21.2.如何平衡DataParallel带来的显存使用不平衡的问题
DistributedDataParallel来代替 DataParallel(实际上DistributedDataParallel显存分配的也不是很平衡), 但是从某些角度来说, DataParallel使用起来确实比较方便, 而且最近使用 DistributedDataParallel 遇到一些小问题. 所以这里提供一个解决显存使用不平衡问题的方案:DataParallel 类之后进行了改写:class BalancedDataParallel(DataParallel):def __init__(self, gpu0_bsz, *args, **kwargs):self.gpu0_bsz = gpu0_bszsuper().__init__(*args, **kwargs)...
BalancedDataParallel 类使用起来和 DataParallel 类似, 下面是一个示例代码:my_net = MyNet()my_net = BalancedDataParallel(gpu0_bsz // acc_grad, my_net, dim=0).cuda()
batch_szie = 8gpu0_bsz = 2acc_grad = 1my_net = MyNet()my_net = BalancedDataParallel(gpu0_bsz // acc_grad, my_net, dim=0).cuda()
batch_szie = 16gpu0_bsz = 4acc_grad = 2my_net = MyNet()my_net = BalancedDataParallel(gpu0_bsz // acc_grad, my_net, dim=0).cuda()
1.3.torch.nn.parallel.DistributedDataParallel
DistributedDataParallel来代替DataParallel, 据说是因为DistributedDataParallel比DataParallel运行的更快, 然后显存分屏的更加均衡. 而且DistributedDataParallel功能更加强悍, 例如分布式的模型(一个模型太大, 以至于无法放到一个GPU上运行, 需要分开到多个GPU上面执行). 只有DistributedDataParallel支持分布式的模型像单机模型那样可以进行多机多卡的运算.当然具体的怎么个情况, 建议看官方文档.os.environ['CUDA_VISIBLE_DEVICES'], 然后再进行下面的步骤.DistributedDataParallel是支持多机多卡的, 所以这个需要先初始化一下, 如下面的代码:torch.distributed.init_process_group(backend='nccl', init_method='tcp://localhost:23456', rank=0, world_size=1)
torch.distributed.init_process_group(backend="nccl")model = DistributedDataParallel(model) # device_ids will include all GPU devices by default
main.py, 可以使用如下的方法进行(参考1 参考2):python -m torch.distributed.launch main.py
--local_rank, 否则运行还是会出错的。DataParallel很类似了.model = model.cuda()model = nn.parallel.DistributedDataParallel(model)
model加载到GPU, 然后才能使用DistributedDataParallel进行分发, 之后的使用和DataParallel就基本一样了2.多机多gpu训练
2.1.初始化
torch.distributed.init_process_group()进行初始化. torch.distributed.init_process_group()包含四个常用的参数backend: 后端, 实际上是多个机器之间交换数据的协议init_method: 机器之间交换数据, 需要指定一个主节点, 而这个参数就是指定主节点的world_size: 介绍都是说是进程, 实际就是机器的个数, 例如两台机器一起训练的话, world_size就设置为2rank: 区分主节点和从节点的, 主节点为0, 剩余的为了1-(N-1), N为要使用的机器的数量, 也就是world_size
2.1.1.初始化backend
backend, 也就是俗称的后端, 在pytorch的官方教程中提供了以下这些后端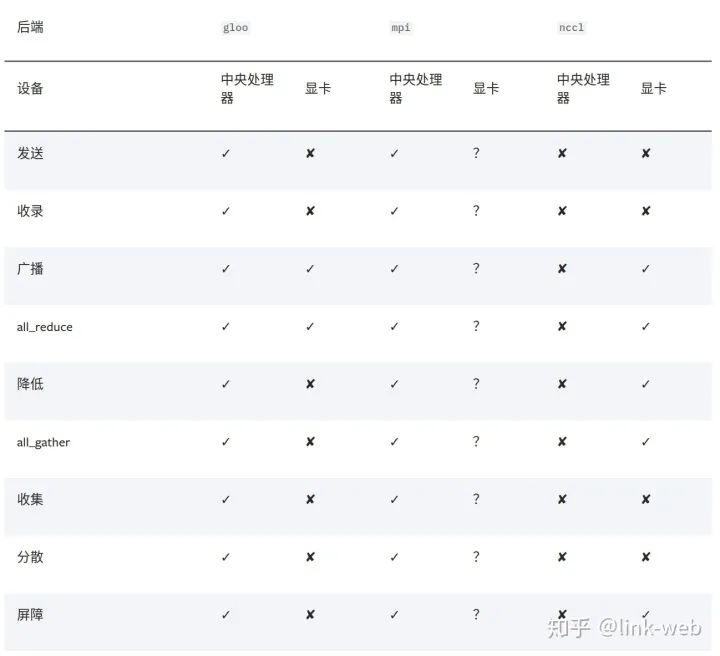
gloo, 因为表中可以看到 gloo对cpu的支持是最好的, 然后如果使用gpu进行分布式计算, 建议使用nccl, 实际测试中我也感觉到, 当使用gpu的时候, nccl的效率是高于gloo的. 根据博客和官网的态度, 好像都不怎么推荐在多gpu的时候使用mpinccl和gloo一般会自己寻找网络接口, 但是某些时候, 比如我测试用的服务器, 不知道是系统有点古老, 还是网卡比较多, 需要自己手动设置. 设置的方法也比较简单, 在Python的代码中, 使用下面的代码进行设置就行:import os# 以下二选一, 第一个是使用gloo后端需要设置的, 第二个是使用nccl需要设置的os.environ['GLOO_SOCKET_IFNAME'] = 'eth0'os.environ['NCCL_SOCKET_IFNAME'] = 'eth0'
ifconfig, 然后找到那个带自己ip地址的就是了, 我见过的一般就是em0, eth0, esp2s0之类的, 当然具体的根据你自己的填写. 如果没装ifconfig, 输入命令会报错, 但是根据报错提示安装一个就行了.2.1.2.初始化init_method
init_method的方法有两种, 一种是使用TCP进行初始化, 另外一种是使用共享文件系统进行初始化2.1.2.1.使用TCP初始化
import torch.distributed as distdist.init_process_group(backend, init_method='tcp://10.1.1.20:23456',rank=rank, world_size=world_size)
tcp://ip:端口号, 首先ip地址是你的主节点的ip地址, 也就是rank参数为0的那个主机的ip地址, 然后再选择一个空闲的端口号, 这样就可以初始化init_method了.2.1.2.2.使用共享文件系统初始化
import torch.distributed as distdist.init_process_group(backend, init_method='file:///mnt/nfs/sharedfile',rank=rank, world_size=world_size)
2.1.3.初始化rank和world_size
rank值不同, 但是主机的rank必须为0, 而且使用init_method的ip一定是rank为0的主机, 其次world_size是你的主机数量, 你不能随便设置这个数值, 你的参与训练的主机数量达不到world_size的设置值时, 代码是不会执行的.2.1.4.初始化中一些需要注意的地方
argparse模块(命令行参数的形式)输入, 不建议写死在代码中, 也不建议使用pycharm之类的IDE进行代码的运行, 强烈建议使用命令行直接运行.distributed.py:python distributed.py -bk nccl -im tcp://10.10.10.1:12345 -rn 0 -ws 2
rank为0, 同时设置了使用两个主机, 在从节点运行的时候, 输入的代码是下面这样:python distributed.py -bk nccl -im tcp://10.10.10.1:12345 -rn 1 -ws 2
rank的值, 其他的值一律不得修改, 否则程序就卡死了初始化到这里也就结束了.2.2.数据的处理-DataLoader
torch.utils.data.distributed.DistributedSampler来规避数据传输的问题. 首先看下面的代码:print("Initialize Dataloaders...")# Define the transform for the data. Notice, we must resize to 224x224 with this dataset and model.transform = transforms.Compose([transforms.Resize(224),transforms.ToTensor(),transforms.Normalize((0.5, 0.5, 0.5), (0.5, 0.5, 0.5))])# Initialize Datasets. STL10 will automatically download if not presenttrainset = datasets.STL10(root='./data', split='train', download=True, transform=transform)valset = datasets.STL10(root='./data', split='test', download=True, transform=transform)# Create DistributedSampler to handle distributing the dataset across nodes when training# This can only be called after torch.distributed.init_process_group is called# 这一句就是和平时使用有点不一样的地方train_sampler = torch.utils.data.distributed.DistributedSampler(trainset)# Create the Dataloaders to feed data to the training and validation stepstrain_loader = torch.utils.data.DataLoader(trainset, batch_size=batch_size, shuffle=(train_sampler is None), num_workers=workers, pin_memory=False, sampler=train_sampler)val_loader = torch.utils.data.DataLoader(valset, batch_size=batch_size, shuffle=False, num_workers=workers, pin_memory=False)
trainset送到了DistributedSampler中创造了一个train_sampler, 然后在构造train_loader的时候, 参数中传入了一个sampler=train_sampler. 使用这些的意图是, 让不同节点的机器加载自己本地的数据进行训练, 也就是说进行多机多卡训练的时候, 不再是从主节点分发数据到各个从节点, 而是各个从节点自己从自己的硬盘上读取数据.DistributedSampler来创造一个sampler提供给DataLoader, sampler的作用自定义一个数据的编号, 然后让DataLoader按照这个编号来提取数据放入到模型中训练, 其中sampler参数和shuffle参数不能同时指定, 如果这个时候还想要可以随机的输入数据, 我们可以在DistributedSampler中指定shuffle参数, 具体的可以参考官网的api, 拉到最后就是DistributedSampler2.3.模型的处理
DistributedDataParallelmodel = model.cuda()model = nn.parallel.DistributedDataParallel(model)
2.4.模型的保存与加载
def demo_checkpoint(rank, world_size):setup(rank, world_size)# setup devices for this process, rank 1 uses GPUs [0, 1, 2, 3] and# rank 2 uses GPUs [4, 5, 6, 7].n = torch.cuda.device_count() // world_sizedevice_ids = list(range(rank * n, (rank + 1) * n))model = ToyModel().to(device_ids[0])# output_device defaults to device_ids[0]ddp_model = DDP(model, device_ids=device_ids)loss_fn = nn.MSELoss()optimizer = optim.SGD(ddp_model.parameters(), lr=0.001)CHECKPOINT_PATH = tempfile.gettempdir() + "/model.checkpoint"if rank == 0:# All processes should see same parameters as they all start from same# random parameters and gradients are synchronized in backward passes.# Therefore, saving it in one process is sufficient.torch.save(ddp_model.state_dict(), CHECKPOINT_PATH)# Use a barrier() to make sure that process 1 loads the model after process# 0 saves it.dist.barrier()# configure map_location properlyrank0_devices = [x - rank * len(device_ids) for x in device_ids]device_pairs = zip(rank0_devices, device_ids)map_location = {'cuda:%d' % x: 'cuda:%d' % y for x, y in device_pairs}ddp_model.load_state_dict(torch.load(CHECKPOINT_PATH, map_location=map_location))optimizer.zero_grad()outputs = ddp_model(torch.randn(20, 10))labels = torch.randn(20, 5).to(device_ids[0])loss_fn = nn.MSELoss()loss_fn(outputs, labels).backward()optimizer.step()# Use a barrier() to make sure that all processes have finished reading the# checkpointdist.barrier()if rank == 0:os.remove(CHECKPOINT_PATH)cleanup()
dist.barrier(), 这个是来自torch.distributed.barrier(), 根据pytorch的官网的介绍, 这个函数的功能是同步所有的进程, 直到整组(也就是所有节点的所有GPU)到达这个函数的时候, 才会执行后面的代码, 看上面的代码, 可以看到, 在保存模型的时候, 是只找rank为0的点保存模型, 然后在加载模型的时候, 首先得让所有的节点同步一下, 然后给所有的节点加载上模型, 然后在进行下一步的时候, 还要同步一下, 保证所有的节点都读完了模型. 虽然我不清楚这样做的意义是什么, 但是官网说不这样做会导致一些问题, 我并没有实际操作, 不发表意见。rank=0的节点, 然后我看在论坛上, 有人也会保存所有节点的模型, 然后进行计算, 至于保存哪些, 我并没有做实验, 所以并不清楚到底哪种最好。推荐阅读

评论