相机校准—外参矩阵
点击上方“小白学视觉”,选择加"星标"或“置顶”
重磅干货,第一时间送达
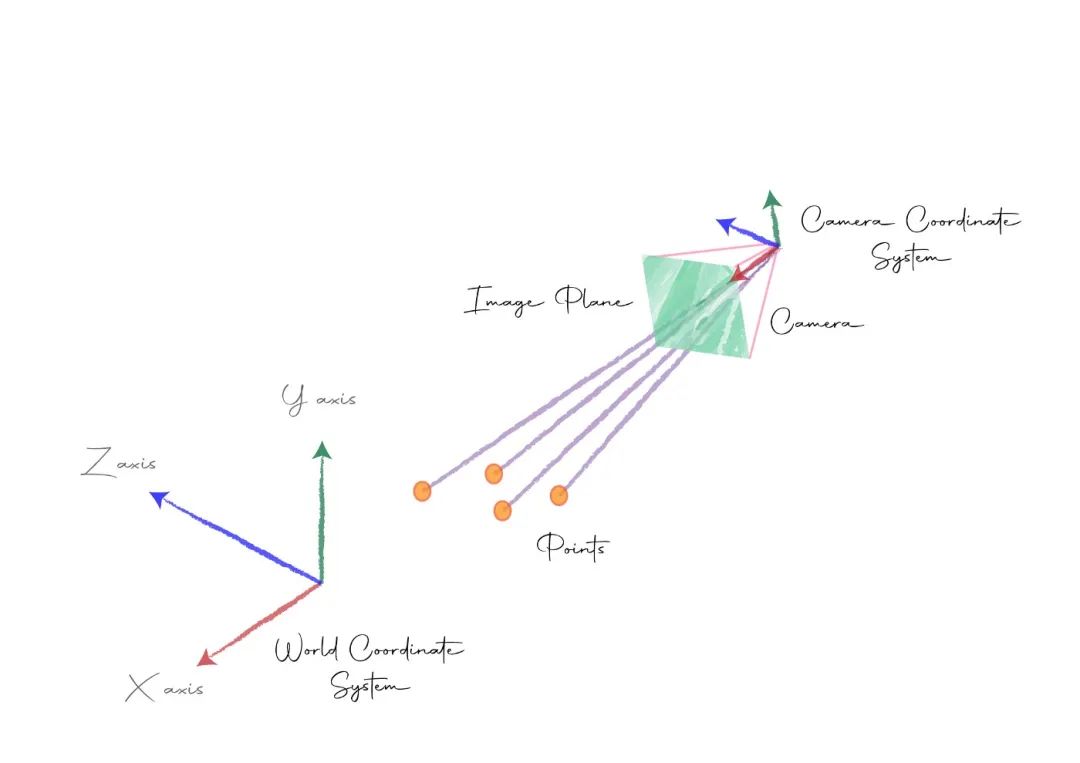
相机外参

有助于确定摄影机方向的旋转变换。 有助于移动相机的平移变换。
旋转
通过旋转改变坐标
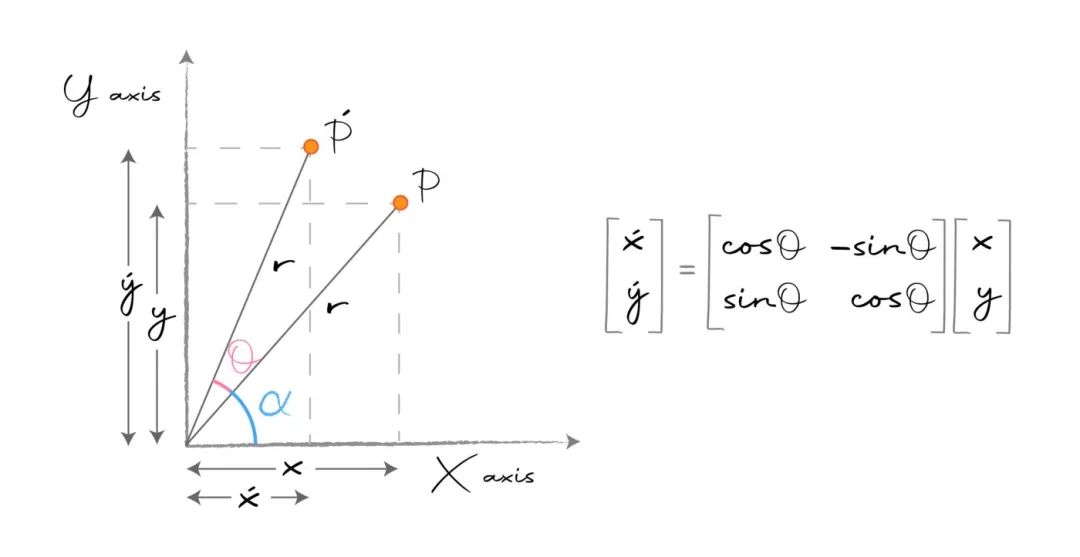
从图来看,
      sinα = y/r , cosα = x/r − [1]
⟹    xsinα = ycosα − [2]
同样的, x′ = rcos(θ+α)
⟹    x′ = (x/cosα) ∗ cos(θ+α) (from [1])
但,  cos(θ+α) = cosθcosα − sinθsinα
⟹    x′ = (x/cosα) ∗ (cosθcosα − sinθsinα)
⟹    x′ = xcosθ − xsinα ∗ (sinθ / cosα)
⟹    x′ = xcosθ − ycosα ∗ (sinθ / cosα) (from [2])
⟹    x′ = xcosθ − ysinθ

同样地,
      y′ = rsin(θ+α)
⟹    y′ = (y/sinα) ∗ sin(θ+α) (from [1])
但,  sin(θ+α) = sinθcosα + cosθsinα
⟹    y′ = (y/sinα) ∗ (sinθcosα + cosθsinα)
⟹    y′ = ycosθ + ycosα ∗ (sinθ / sinα)
⟹    y′ = ycosθ + xsinα ∗ (sinθ / sinα) (from [2])
⟹    y′ = ycosθ + xsinθ
⟹    y′ = xsinθ + ycosθ

因此我们有,
      x′ = xcosθ − ysinθ
      y′ = xsinθ + ycosθ

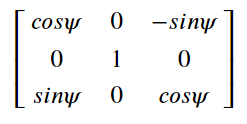
扩展到R3
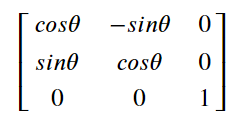
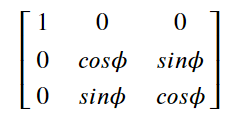
内参旋转与外参旋转
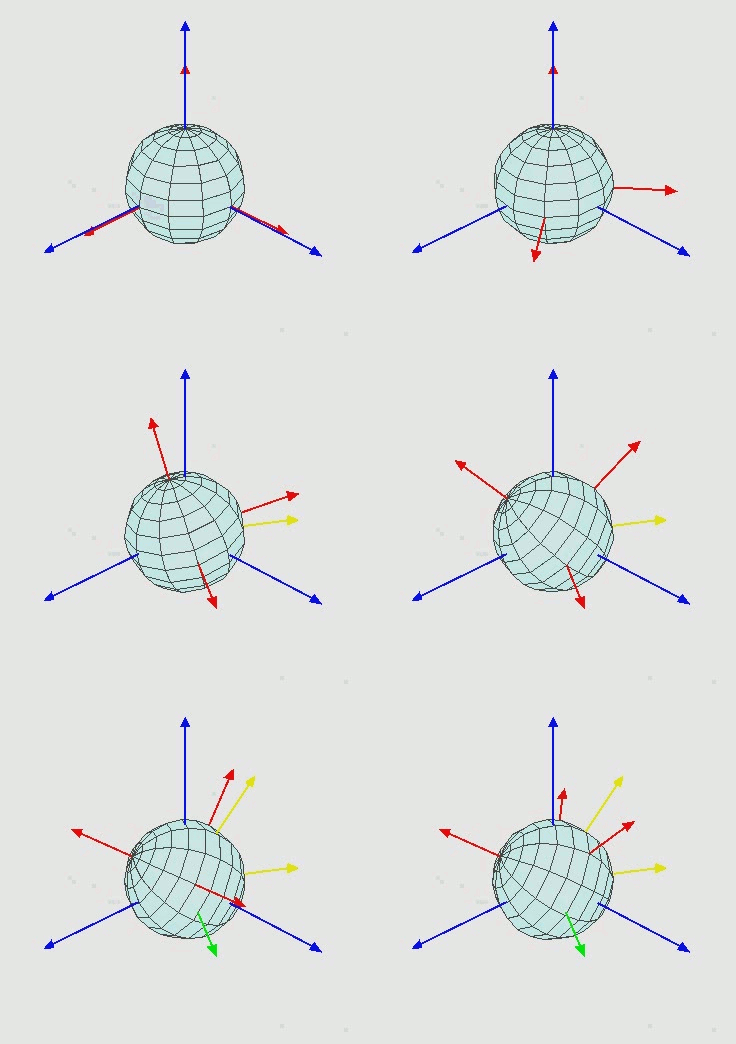
基变换
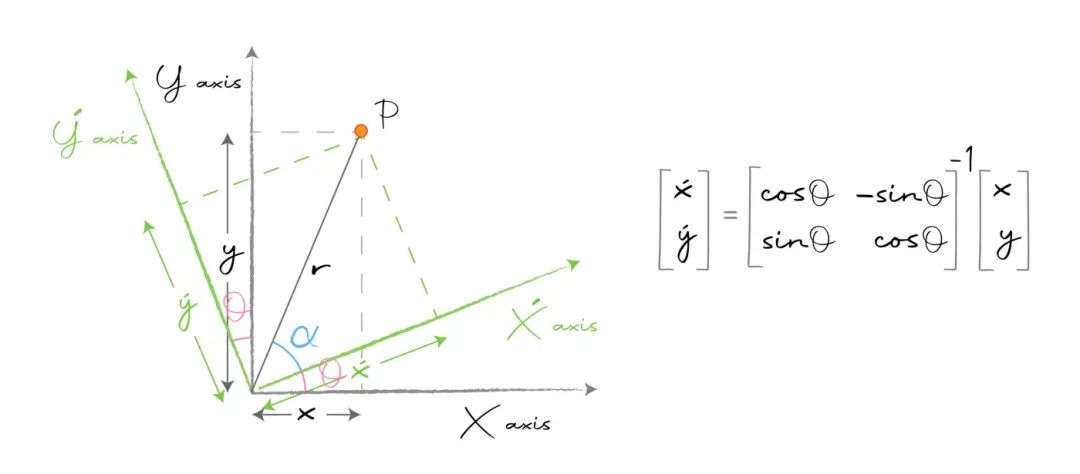
从这个图来看,
      sinα = y′/r , cosα = x′/r − [1]
⟹    x′sinα = y′cosα − [2]
同样, x = rcos(θ+α)
⟹    x = (x′/cosα) ∗ cos(θ+α) (from [1])
但,  cos(θ+α) = cosθcosα − sinθsinα
⟹    x = (x′ / cosα) ∗ (cosθcosα − sinθsinα)
⟹    x = x′cosθ − xsinα ∗ (sinθ / cosα)
⟹    x = x′cosθ − y′cosα ∗ (sinθ / cosα) (from [2])
⟹    x = x′cosθ − y′sinθ

同样地,
      y = rsin(θ+α)
⟹    y = (y′/sinα) ∗ sin(θ+α) (from [1])
但,  sin(θ+α) = sinθcosα + cosθsinα
⟹    y = (y′/sinα) ∗ (sinθcosα + cosθsinα)
⟹    y = y′cosθ + y′cosα ∗ (sinθ / sinα)
⟹    y = y′cosθ + x′sinα ∗ (sinθ / sinα) (from [2])
⟹    y = y′cosθ + x′sinθ
⟹    y = x′sinθ + y′cosθ

因此我们有,
      x = x′cosθ − y′sinθ
      y = x′sinθ + y′cosθ


线性变换与基变换的关系
平移
通过平移改变坐标
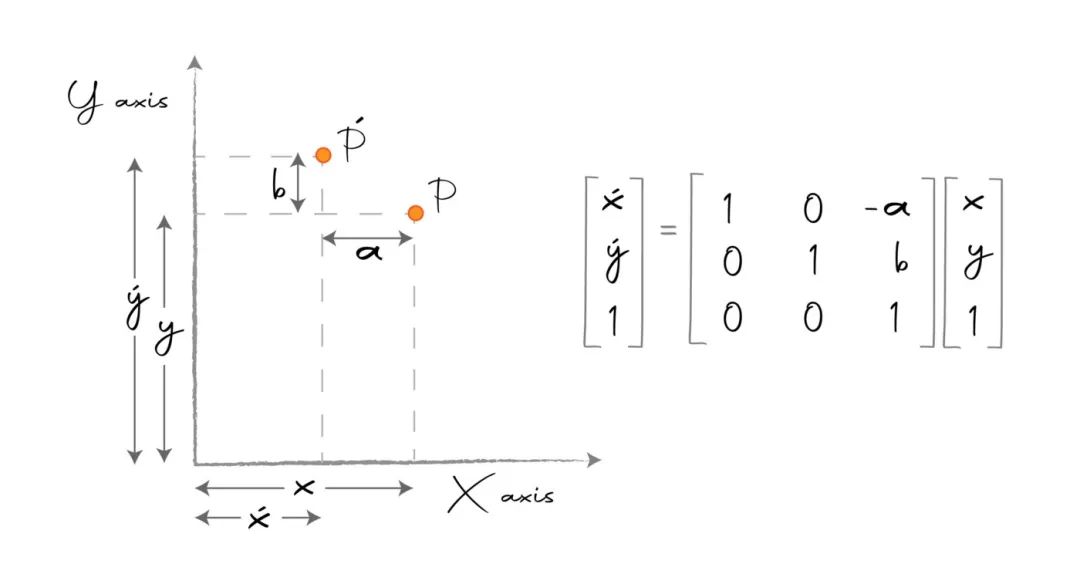
从这个图来看,
      x′ = x - a
      y′ = y + b
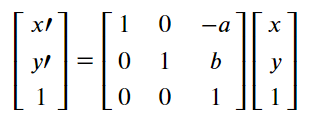
[x, y, 1] ≅ [x/1, y/1] = [x, y]
通过平移改变基
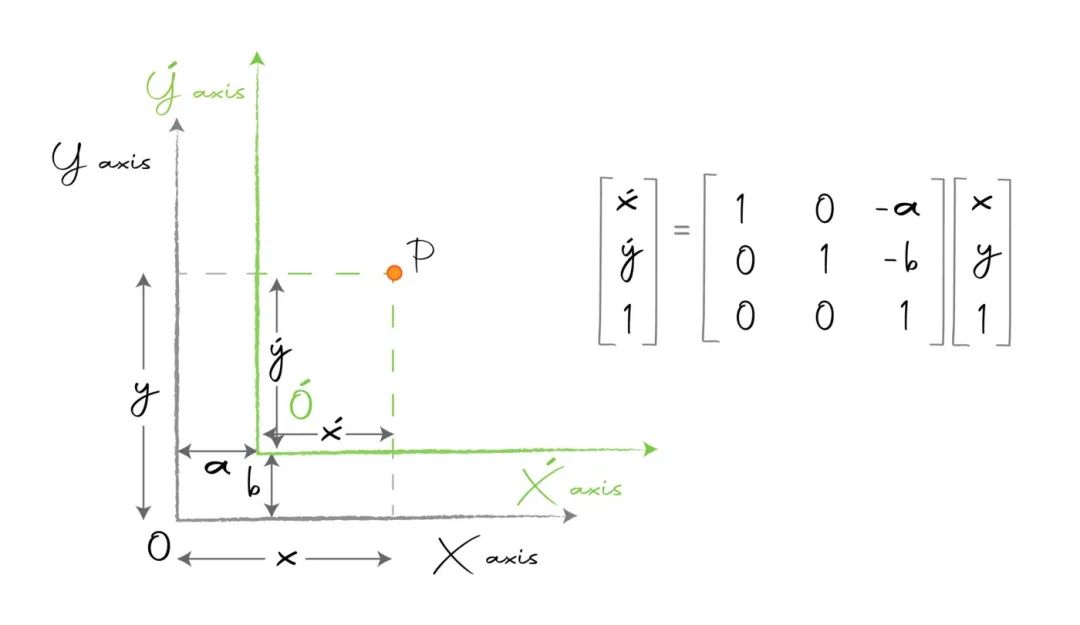
从图上看,
      x′ = x - a
      y′ = y - b
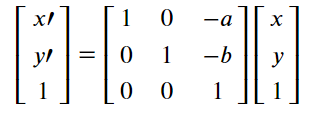
摄像机外参矩阵


自由度
简化矩阵
实例
设置
# create a virtual environment in anaconda
conda create -n camera-calibration-python python=3.6 anaconda
conda activate camera-calibration-python

# clone the repository and install dependencies
git clone https://github.com/wingedrasengan927/Image-formation-and-camera-calibration.git
cd Image-formation-and-camera-calibration
pip install -r requirements.txt
pytransform3d:这个库进行三维空间中的可视化和转换。 ipympl:它使matplotlib绘图具有交互性。
实例直觉
%matplotlib widget

import matplotlib.pyplot as plt
from utils import *
# rotate an angle of pi/4 along the standard Y axis
angles = [np.pi/4]
order = 'y'

# transalte by the given offset
offset = np.array([0, -8, 0])

# define parameters for the image plane
f = 2
img_size = (7, 7)
# create rotation transformation matrix
R = create_rotation_transformation_matrix(angles, order)
R_ = np.identity(4)
R_[:3, :3] = R

# create translation transformation matrix
T_ = create_translation_matrix(offset)
R_, T_
(array([[ 0.70710678,  0.        , -0.70710678,  0.        ],
        [ 0.        ,  1.        ,  0.        ,  0.        ],
        [ 0.70710678,  0.        ,  0.70710678,  0.        ],
        [ 0.        ,  0.        ,  0.        ,  1.        ]]),
 array([[ 1.,  0.,  0.,  0.],
        [ 0.,  1.,  0., -8.],
        [ 0.,  0.,  1.,  0.],
        [ 0.,  0.,  0.,  1.]]))
# create an image grid
xx, yy, Z = create_image_grid(f, img_size)

# convert the image grid to homogeneous coordinates
pt_h = convert_grid_to_homogeneous(xx, yy, Z, img_size)

# transform the homogeneous coordinates
pt_h_transformed = R_ @ T_ @ pt_h

# convert the transformed homogeneous coordinates back to the image grid
xxt, yyt, Zt = convert_homogeneous_to_grid(pt_h_transformed, img_size)
# define axis and figure
fig = plt.figure(figsize=(6, 4))
ax = fig.add_subplot(111,projection='3d')

# set limits
ax.set(xlim=(-10, 5), ylim=(-15, 5), zlim=(0, 10))

# plot the global basis and the transformed camera basis
ax = pr.plot_basis(ax)
ax = pr.plot_basis(ax, R, offset)

# plot the original and transformed image plane
ax.plot_surface(xx, yy, Z, alpha=0.75)
ax.plot_surface(xxt, yyt, Zt, alpha=0.75)

ax.set_title("camera transformation")
ax.set_xlabel("X-axis")
ax.set_ylabel("Y-axis")
ax.set_zlabel("Z-axis")
Text(0.5, 0, 'Z-axis')
E = np.linalg.inv(R_ @ T_)
# remove last row of E
E = E[:-1, :]
cw = np.array([-1/np.sqrt(2), -8, 1/np.sqrt(2), 1]) # homogeneous coordinates of the point wrt the world
cc = E @ cw.reshape(4, 1) # coordinates of the point wrt the camera
cc = cc.flatten()
cc
array([0., 0., 1.])
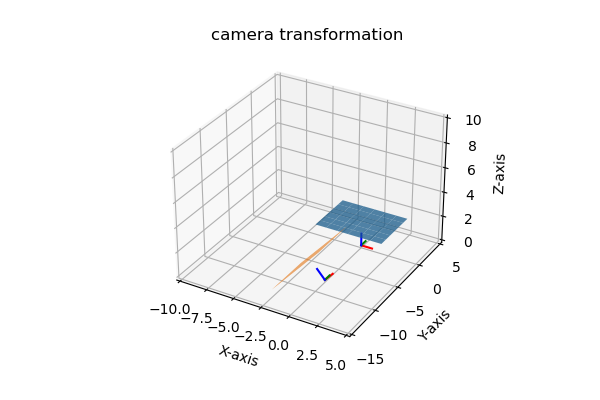
首先,我们导入必要的库。utils.py文件包含所有必要的帮助函数。%matplotlib widget启用了ipympl后端,使我们能够使用绘图。 接下来,我们定义必要的参数,如角度、旋转顺序、平移偏移、焦距和图像平面的大小。焦距和图像平面仅用于演示目的,我们将在下一篇文章中详细讨论它们。 在这里,我们保持简单,关于标准Y轴旋转𝜋/4。然而,我们可以围绕任何轴进行任意数量的旋转。注意旋转的顺序。我们的平移偏移量是[0,-8,0],沿Y轴8个单位。 使用这些参数,我们为旋转和平移创建变换矩阵。 接下来,我们使用变换矩阵转换最初位于原点的相机并绘制它。多亏了ipympl,图表是互动的。试着摆弄一下图表,用不同的视角来观看。
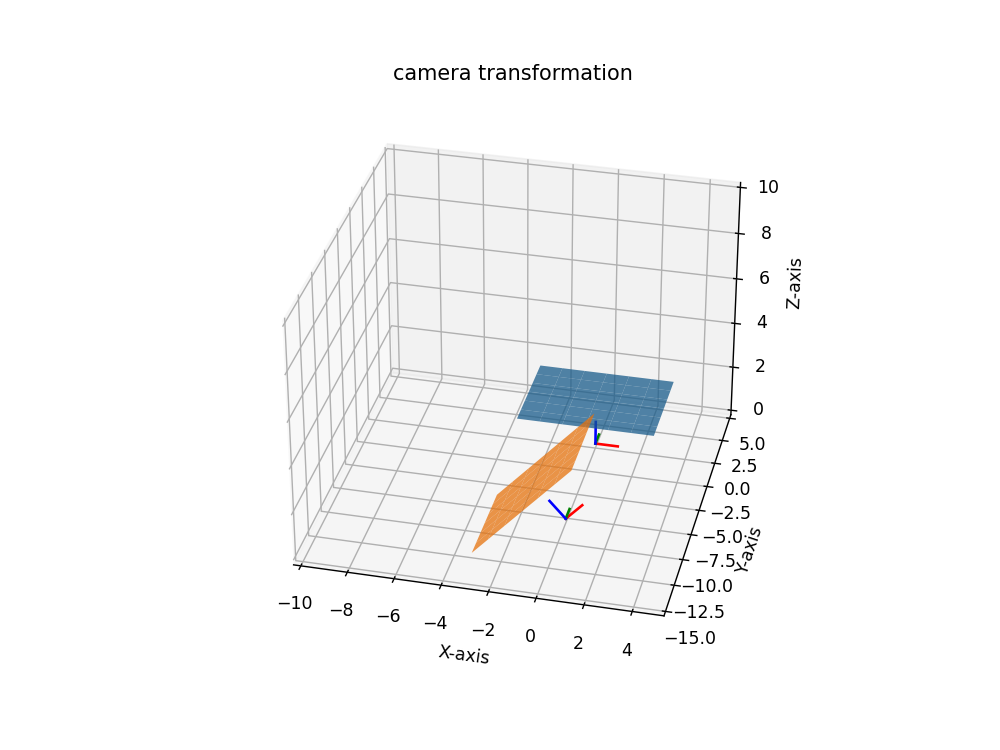
接下来,我们通过对变换矩阵求逆来创建基矩阵的变化,即相机外参矩阵。 最后,我们取一个世界坐标[-1/√2, -8, 1/√2],然后应用基变换的变化,得到相机的坐标为[0, 0, 1]。这是有意义的,因为该点位于相机Z轴的正上方。
好消息!
小白学视觉知识星球
开始面向外开放啦👇👇👇
下载1:OpenCV-Contrib扩展模块中文版教程 在「小白学视觉」公众号后台回复:扩展模块中文教程,即可下载全网第一份OpenCV扩展模块教程中文版,涵盖扩展模块安装、SFM算法、立体视觉、目标跟踪、生物视觉、超分辨率处理等二十多章内容。 下载2:Python视觉实战项目52讲 在「小白学视觉」公众号后台回复:Python视觉实战项目,即可下载包括图像分割、口罩检测、车道线检测、车辆计数、添加眼线、车牌识别、字符识别、情绪检测、文本内容提取、面部识别等31个视觉实战项目,助力快速学校计算机视觉。 下载3:OpenCV实战项目20讲 在「小白学视觉」公众号后台回复:OpenCV实战项目20讲,即可下载含有20个基于OpenCV实现20个实战项目,实现OpenCV学习进阶。 交流群
欢迎加入公众号读者群一起和同行交流,目前有SLAM、三维视觉、传感器、自动驾驶、计算摄影、检测、分割、识别、医学影像、GAN、算法竞赛等微信群(以后会逐渐细分),请扫描下面微信号加群,备注:”昵称+学校/公司+研究方向“,例如:”张三 + 上海交大 + 视觉SLAM“。请按照格式备注,否则不予通过。添加成功后会根据研究方向邀请进入相关微信群。请勿在群内发送广告,否则会请出群,谢谢理解~
评论

