
SQLite 使用详解

和你一起终身学习,这里是程序员Android
经典好文推荐,通过阅读本文,您将收获以下知识点:
一、创建数据库,数据表方法
二、插入数据库数据方法
三、删除数据库数据
四、查询数据库数据
五、修改数据库数据
六、数据库使用案例
Android 提供了对 SQLite 数据库的完全支持。应用中的任何类(不包括应用外部的类)均可按名称访问您所创建的任何数据库。如果想让自己创建的数据库供外部应用使用,请使用 ContentProvider对外提供接口。SQLite轻量级数据库使用方法如下:
一、创建数据库,数据表方法
创建数据库表方法如下:
1. 语法
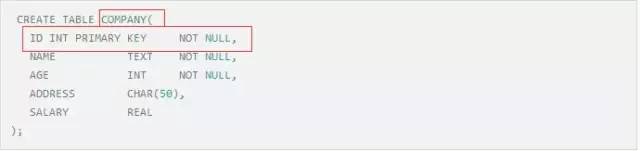
创建数据表语法 如下:

创建数据表语法
2. 举例
举例 如下:
举例
3.继承SQLiteDBHelper的创建数据库、数据表
Android 中创建数据库、数据表 方法如下:
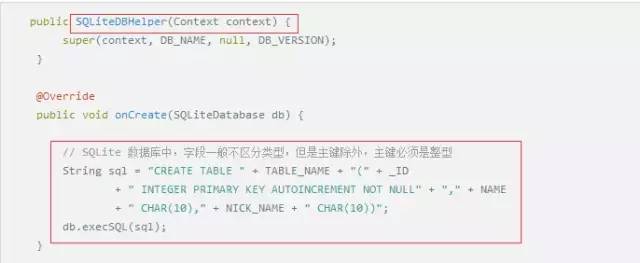
创建数据库、数据表
4.删除数据库表
删除数据库表方法如下:
DROP TABLE IF EXITS TABLE_NAME;
二、 插入数据库数据
1. 插入数据方法一
语法
INSERT INTO TABLE_NAME [(column1, column2, column3,...columnN)]
VALUES (value1, value2, value3,...valueN);
举例
INSERT INTO COMPANY (ID,NAME,AGE,ADDRESS,SALARY)
VALUES (1, 'Paul', 32, 'California', 20000.00 );
2. 插入数据方法二
语法
INSERT INTO TABLE_NAME VALUES (value1,value2,value3,...valueN);
举例
INSERT INTO COMPANY VALUES (7, 'James', 24, 'Houston', 10000.00 );
3. Android 封装insert()插入数据方法三
语法
insert(String table, String nullColumnHack, ContentValues values)
举例
private SQLiteDatabase db;
db.insert(SQLiteDBHelper.TABLE_NAME, null, values);
四、 删除数据库数据
1. 删除数据库数据方法一
语法
DELETE FROM table_name
WHERE [condition];
举例
DELETE FROM COMPANY WHERE ID = 7;
2.Android封装删除数据库数据方法二
语法
delete(String table, String whereClause, String[] whereArgs)
举例
private SQLiteDatabase db;
db.delete(SQLiteDBHelper.TABLE_NAME, "name=?",
                new String[] { "Jack" });
四、 查询数据库数据
1. 查询数据库方法一
语法
SELECT column1, column2, columnN FROM table_name;
查询表中所有数据的方法
SELECT * FROM table_name;
举例
//1.查询指定的列
SELECT ID, NAME, SALARY FROM COMPANY;
// 2.查询表中所有内容
SELECT * FROM COMPANY;
2. Android 封装查询数据库方法二
语法
query(String table, String[] columns, String selection,
            String[] selectionArgs, String groupBy, String having,
            String orderBy)
举例
private SQLiteDatabase db;
Cursor cursor = db.query(SQLiteDBHelper.TABLE_NAME, null, null, null,
                null, null, null);
五、 修改数据库数据
1. 修改数据库方法一
语法
UPDATE table_name
SET column1 = value1, column2 = value2...., columnN = valueN
WHERE [condition];
举例
UPDATE COMPANY SET ADDRESS = 'Texas' WHERE ID = 6;
2. Android update 封装修改数据库方法二
语法
update(String table, ContentValues values, String whereClause, String[] whereArgs)
举例
db.update(SQLiteDBHelper.TABLE_NAME, values, "nickname=?",
                new String[] { "J" });
六、数据库使用案例
实现效果
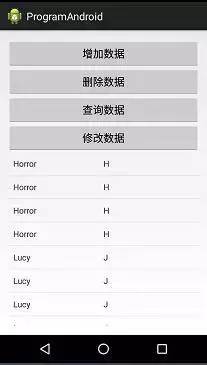
数据库增删改查
1. 创建数据库
创建数据库 方法如下:
public class SQLiteDBHelper extends SQLiteOpenHelper {
    public static String DB_NAME = "person.db";
    // version 必须大于1
    public static int DB_VERSION = 1;
    public static String TABLE_NAME = "person";
    public static String _ID = "_id";
    public static String NAME = "name";
    public static String NICK_NAME = "nickname";

    public SQLiteDBHelper(Context context, String name, CursorFactory factory,
            int version) {
        super(context, name, factory, version);
        // TODO Auto-generated constructor stub
    }

    public SQLiteDBHelper(Context context) {
        super(context, DB_NAME, null, DB_VERSION);
    }

    @Override
    public void onCreate(SQLiteDatabase db) {

        // SQLite 数据库中,字段一般不区分类型,但是主键除外,主键必须是整型
        String sql = "CREATE TABLE " + TABLE_NAME + "(" + _ID
                + " INTEGER PRIMARY KEY AUTOINCREMENT NOT NULL" + "," + NAME
                + " CHAR(10)," + NICK_NAME + " CHAR(10))";
        db.execSQL(sql);
    }

    // 数据库升级的处理方法,
    @Override
    public void onUpgrade(SQLiteDatabase db, int oldVersion, int newVersion) {

        if (newVersion > oldVersion) {
            // 删除老的数据表,创建新表
            String dropsql = "DROP TABLE IF EXITS " + TABLE_NAME;
            db.execSQL(dropsql);
            onCreate(db);
        }
    }

}
2. 数据库增加数据方法实现
数据库增加数据方法实现代码如下:
    //
    public void InsertSQL(View view) {

        InstertDB();
        QueryDB();
    }

    /**
     * 插入数据处理方法
     */
    private void InstertDB() {
        ContentValues values = new ContentValues();
        values.put("name", "Jack");
        values.put("nickname", "J");

        // 返回值:最近插入的那一行的行号
        long result = db.insert(SQLiteDBHelper.TABLE_NAME, null, values);
        if (result > 0) {
            Toast.makeText(getApplicationContext(), "添加成功", Toast.LENGTH_SHORT)
                    .show();
        } else {
            Toast.makeText(getApplicationContext(), "添加失败", Toast.LENGTH_SHORT)
                    .show();
        }
    }
3. 数据库删除内容方法实现
数据库删除内容方法实现代码如下:
    /**
     * 删除数据
     */
    private void DeleteDb() {
        int result = db.delete(SQLiteDBHelper.TABLE_NAME, "name=?",
                new String[] { "Jack" });
        if (result > 0) {
            Toast.makeText(getApplicationContext(), "删除成功", Toast.LENGTH_SHORT)
                    .show();
        } else {
            Toast.makeText(getApplicationContext(), "无Jack", Toast.LENGTH_SHORT)
                    .show();
        }
    }
4. 数据库修改内容方法实现
数据库修改内容方法实现代码如下:
    /**
     * 修改数据
     */
    private void UpdateDb() {
        // update person set name="Kitty" where nickname="J"
        ContentValues values = new ContentValues();
        values.put("name", "Lucy");

        int result = db.update(SQLiteDBHelper.TABLE_NAME, values, "nickname=?",
                new String[] { "J" });

        if (result > 0) {
            QueryDB();
        }
    }
5. 数据库查询方法实现
数据库查询方法实现代码如下:
    /**
     * 查询数据处理方法
     */
    private void QueryDB() {
        // Select * from person where name= ?
        // db.rawQuery(s)
        // cursor 游标--》 结果集合
        // 当使用SimpleCusorAdapter 时候,cursor 这个记过里面 必须包含“_id”,这个字段
        // Cursor cursor = db.query(SQLiteDBHelper.TABLE_NAME, null, "name=?",
        // new String[] { "Jack" }, null, null, null);
        Cursor cursor = db.query(SQLiteDBHelper.TABLE_NAME, null, null, null,
                null, null, null);

        while (cursor.moveToNext()) {

            String name = cursor.getString(cursor.getColumnIndex("name"));
            String nickname = cursor.getString(cursor
                    .getColumnIndex("nickname"));
        }
        // 将一个新的cusor跟原有的custor 交换
        adapter.swapCursor(cursor);
        adapter.notifyDataSetChanged();
    }
6. 布局如下
<LinearLayout xmlns:android="http://schemas.android.com/apk/res/android"
    xmlns:tools="http://schemas.android.com/tools"
    android:layout_width="match_parent"
    android:layout_height="match_parent"
    android:orientation="vertical" >
    <Button
        android:id="@+id/insertdata"
        android:layout_width="match_parent"
        android:layout_height="wrap_content"
        android:onClick="InsertSQL"
        android:text="增加数据" />
    <Button
        android:id="@+id/deletedata"
        android:layout_width="match_parent"
        android:layout_height="wrap_content"
        android:onClick="DeleteSQL"
        android:text="删除数据" />
    <Button
        android:id="@+id/quarydata"
        android:layout_width="match_parent"
        android:layout_height="wrap_content"
        android:onClick="QuarySQL"
        android:text="查询数据" />
    <Button
        android:id="@+id/modifydata"
        android:layout_width="match_parent"
        android:layout_height="wrap_content"
        android:onClick="ModifySQL"
        android:text="修改数据" />
    <ListView
        android:id="@+id/lv"
        android:layout_width="match_parent"
        android:layout_height="match_parent" />
LinearLayout>
7. ListView item布局如下
<LinearLayout xmlns:android="http://schemas.android.com/apk/res/android"
    xmlns:tools="http://schemas.android.com/tools"
    android:layout_width="match_parent"
    android:layout_height="wrap_content"
    android:gravity="center_vertical"
    android:orientation="horizontal"
    android:padding="10dp" >

    <TextView
        android:id="@+id/name"
        android:layout_width="0dp"
        android:layout_height="wrap_content"
        android:layout_weight="1"
        android:text="name" />

    <TextView
        android:id="@+id/nickname"
        android:layout_width="0dp"
        android:layout_height="wrap_content"
        android:layout_weight="1"
        android:text="nickname" />

LinearLayout>
至此,本篇已结束。转载网络的文章,小编觉得很优秀,欢迎点击阅读原文,支持原创作者,如有侵权,恳请联系小编删除。同时感谢您的阅读,期待您的关注。
评论