Python 还能实现图片去雾?FFA 去雾算法、暗通道去雾算法用起来! | 附代码
点击上方“AI算法与图像处理”,选择加"星标"或“置顶”
重磅干货,第一时间送达
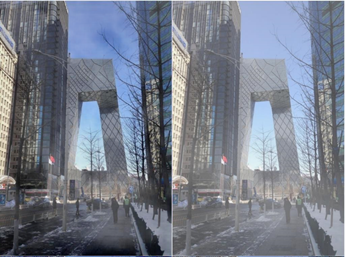
在过去的几十年中,单图像去雾作为基本的低级视觉任务已引起了计算机视觉社区和人工智能公司的越来越多的关注。其中最为典型的便是北大&北航提出FFA-Net去雾新网络和何凯明博士提出的暗通道去雾算法,现所有源码已开源。其论文链接:https://arxiv.org/abs/1911.07559。 而今天我们就将针对这两个项目进行实践。其中得到的去雾效果如下:


实验前的准备
首先我们使用的python版本是3.6.5所用到的模块如下:

FFA去雾算法


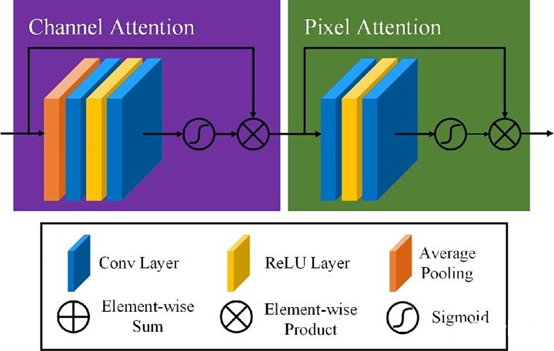
其中训练FFA模型的部分代码如下:
def default_conv(in_channels, out_channels, kernel_size, bias=True):
    return nn.Conv2d(in_channels, out_channels, kernel_size,padding=(kernel_size//2), bias=bias)
class PALayer(nn.Module):
    def __init__(self, channel):
        super(PALayer, self).__init__()
        self.pa = nn.Sequential(
                nn.Conv2d(channel, channel // 8, 1, padding=0, bias=True),
                nn.ReLU(inplace=True),
                nn.Conv2d(channel // 8, 1, 1, padding=0, bias=True),
                nn.Sigmoid()
        )
    def forward(self, x):
        y = self.pa(x)
        return x * y
class CALayer(nn.Module):
    def __init__(self, channel):
        super(CALayer, self).__init__()
        self.avg_pool = nn.AdaptiveAvgPool2d(1)
        self.ca = nn.Sequential(
                nn.Conv2d(channel, channel // 8, 1, padding=0, bias=True),
                nn.ReLU(inplace=True),
                nn.Conv2d(channel // 8, channel, 1, padding=0, bias=True),
                nn.Sigmoid()
        )
    def forward(self, x):
        y = self.avg_pool(x)
        y = self.ca(y)
        return x * y
class Block(nn.Module):
    def __init__(self, conv, dim, kernel_size,):
        super(Block, self).__init__()
        self.conv1=conv(dim, dim, kernel_size, bias=True)
        self.act1=nn.ReLU(inplace=True)
        self.conv2=conv(dim,dim,kernel_size,bias=True)
        self.calayer=CALayer(dim)
        self.palayer=PALayer(dim)
    def forward(self, x):
        res=self.act1(self.conv1(x))
        res=res+x
        res=self.conv2(res)
        res=self.calayer(res)
        res=self.palayer(res)
        res += x
        return res
class Group(nn.Module):
    def __init__(self, conv, dim, kernel_size, blocks):
        super(Group, self).__init__()
        modules = [ Block(conv, dim, kernel_size)  for _ in range(blocks)]
        modules.append(conv(dim, dim, kernel_size))
        self.gp = nn.Sequential(*modules)
    def forward(self, x):
        res = self.gp(x)
        res += x
        return res
class FFA(nn.Module):
    def __init__(self,gps,blocks,conv=default_conv):
        super(FFA, self).__init__()
        self.gps=gps
        self.dim=64
        kernel_size=3
        pre_process = [conv(3, self.dim, kernel_size)]
        assert self.gps==3
        self.g1= Group(conv, self.dim, kernel_size,blocks=blocks)
        self.g2= Group(conv, self.dim, kernel_size,blocks=blocks)
        self.g3= Group(conv, self.dim, kernel_size,blocks=blocks)
        self.ca=nn.Sequential(*[
            nn.AdaptiveAvgPool2d(1),
            nn.Conv2d(self.dim*self.gps,self.dim//16,1,padding=0),
            nn.ReLU(inplace=True),
            nn.Conv2d(self.dim//16, self.dim*self.gps, 1, padding=0, bias=True),
            nn.Sigmoid()
            ])
        self.palayer=PALayer(self.dim)
        post_precess = [
            conv(self.dim, self.dim, kernel_size),
            conv(self.dim, 3, kernel_size)]
        self.pre = nn.Sequential(*pre_process)
        self.post = nn.Sequential(*post_precess)
    def forward(self, x1):
        x = self.pre(x1)
        res1=self.g1(x)
        res2=self.g2(res1)
        res3=self.g3(res2)
        w=self.ca(torch.cat([res1,res2,res3],dim=1))
        w=w.view(-1,self.gps,self.dim)[:,:,:,None,None]
        out=w[:,0,::]*res1+w[:,1,::]*res2+w[:,2,::]*res3
        out=self.palayer(out)
        x=self.post(out)
        return x + x1
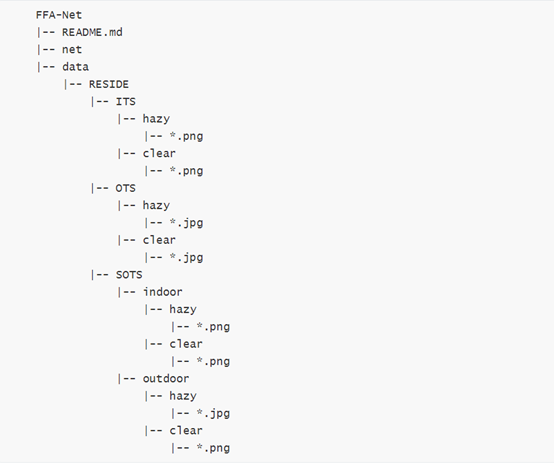
python main.py --net='ffa' --crop --crop_size=240 --blocks=19--gps=3 --bs=2 --lr=0.0001 --trainset='its_train' --testset='its_test' --steps=500000--eval_step=5000
命令实现模型的训练功能。
使用
python test.py --task='its or ots' --test_imgs='test_imgs'
来测试模型效果:
最终得到效果如下:


暗通道去雾算法搭建
何恺明的暗通道先验(dark channel prior)去雾算法是CV界去雾领域很有名的算法,关于该算法的论文"Single Image Haze Removal Using DarkChannel Prior"一举获得2009年CVPR最佳论文。作者统计了大量的无雾图像,发现一条规律:每一幅图像的每一个像素的RGB三个颜色通道中,总有一个通道的灰度值很低。基于这个几乎可以视作是定理的先验知识,作者提出暗通道先验的去雾算法。


1、滤波函数:
def zmMinFilterGray(src, r=7):
    '''if r <= 0:
        returnsrc
    h, w =src.shape[:2]
    I = src
    res =np.minimum(I  , I[[0]+range(h-1)  , :])
    res =np.minimum(res, I[range(1,h)+[h-1], :])
    I = res
    res =np.minimum(I  , I[:, [0]+range(w-1)])
    res =np.minimum(res, I[:, range(1,w)+[w-1]])
    returnzmMinFilterGray(res, r-1)'''
    return cv2.erode(src,np.ones((2*r+1, 2*r+1)))
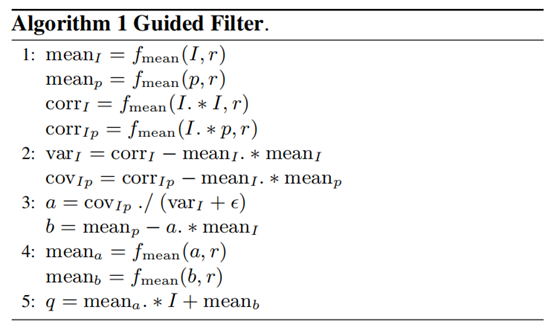
def guidedfilter(I, p, r, eps):
    '''引导滤波,直接参考网上的matlab代码'''
    height, width = I.shape
    m_I = cv2.boxFilter(I, -1, (r,r))
    m_p = cv2.boxFilter(p, -1, (r,r))
    m_Ip = cv2.boxFilter(I*p, -1, (r,r))
    cov_Ip = m_Ip-m_I*m_p
    m_II = cv2.boxFilter(I*I, -1, (r,r))
    var_I = m_II-m_I*m_I
    a = cov_Ip/(var_I+eps)
    b = m_p-a*m_I
    m_a = cv2.boxFilter(a, -1, (r,r))
    m_b = cv2.boxFilter(b, -1, (r,r))
    return m_a*I+m_b
计算大气遮罩图像V1和光照值A, V1 = 1-t/A
def getV1(m, r, eps, w, maxV1):  #输入rgb图像,值范围[0,1]
    '''计算大气遮罩图像V1和光照值A, V1 = 1-t/A'''
    V1 = np.min(m,2)                                         #得到暗通道图像
    V1 = guidedfilter(V1, zmMinFilterGray(V1,7), r, eps)     #使用引导滤波优化
    bins = 2000
    ht = np.histogram(V1, bins)                              #计算大气光照A
    d = np.cumsum(ht[0])/float(V1.size)
    for lmax in range(bins-1, 0, -1):
        if d[lmax]<=0.999:
            break
    A  = np.mean(m,2)[V1>=ht[1][lmax]].max()

    V1 = np.minimum(V1*w, maxV1)                   #对值范围进行限制
    return V1,A
得到的运行程序结果如下:

import cv2
import numpy as np
def zmMinFilterGray(src, r=7):
   '''最小值滤波,r是滤波器半径'''
   '''if r <= 0:
       return src
   h, w = src.shape[:2]
    I= src
   res = np.minimum(I  ,I[[0]+range(h-1)  , :])
   res = np.minimum(res, I[range(1,h)+[h-1], :])
    I= res
   res = np.minimum(I  , I[:,[0]+range(w-1)])
   res = np.minimum(res, I[:, range(1,w)+[w-1]])
   return zmMinFilterGray(res, r-1)'''
   return cv2.erode(src, np.ones((2 * r + 1, 2 * r + 1)))  # 使用opencv的erode函数更高效
def guidedfilter(I, p, r, eps):
    '''引导滤波'''
   height, width = I.shape
   m_I = cv2.boxFilter(I, -1, (r, r))
   m_p = cv2.boxFilter(p, -1, (r, r))
   m_Ip = cv2.boxFilter(I * p, -1, (r, r))
   cov_Ip = m_Ip - m_I * m_p
   m_II = cv2.boxFilter(I * I, -1, (r, r))
   var_I = m_II - m_I * m_I
    a= cov_Ip / (var_I + eps)
    b= m_p - a * m_I
   m_a = cv2.boxFilter(a, -1, (r, r))
   m_b = cv2.boxFilter(b, -1, (r, r))
   return m_a * I + m_b
def getV1(m, r, eps, w, maxV1):  # 输入rgb图像,值范围[0,1]
   '''计算大气遮罩图像V1和光照值A, V1 = 1-t/A'''
    V1 = np.min(m, 2)  # 得到暗通道图像
   V1 = guidedfilter(V1, zmMinFilterGray(V1, 7), r, eps)  # 使用引导滤波优化
   bins = 2000
   ht = np.histogram(V1, bins)  # 计算大气光照A
    d= np.cumsum(ht[0]) / float(V1.size)
   for lmax in range(bins - 1, 0, -1):
       if d[lmax] <= 0.999:
           break
    A= np.mean(m, 2)[V1 >= ht[1][lmax]].max()
   V1 = np.minimum(V1 * w, maxV1)  # 对值范围进行限制
   return V1, A
def deHaze(m, r=81, eps=0.001, w=0.95,maxV1=0.80, bGamma=False):
    Y= np.zeros(m.shape)
   V1, A = getV1(m, r, eps, w, maxV1) # 得到遮罩图像和大气光照
   for k in range(3):
       Y[:, :, k] = (m[:, :, k] - V1) / (1 - V1 / A)  # 颜色校正
    Y= np.clip(Y, 0, 1)
   if bGamma:
       Y = Y ** (np.log(0.5) / np.log(Y.mean()))  # gamma校正,默认不进行该操作
   return Y
video = "1.mp4"
cap = cv2.VideoCapture(video)
while cap.isOpened():
   _,frame = cap.read()
   frame = cv2.flip(frame, -180)
   cv2.imwrite("temp.jpg",frame)
    m= deHaze(frame / 255.0) * 255
   height, width = m.shape[:2]
    #缩小图像
   size = (int(width * 0.5), int(height * 0.5))
   shrink = cv2.resize(m, size, interpolation=cv2.INTER_AREA)
   cv2.imwrite('defog.jpg', shrink)
   img = cv2.imread("defog.jpg")
   cv2.imshow("frame",img)
   key = cv2.waitKey(1) & 0xFF
   if key == ord("q"):
       break
cap.release()
cv2.destroyAllWindows()作者介绍:
李秋键,CSDN 博客专家,CSDN达人课作者。硕士在读于中国矿业大学,开发有taptap安卓武侠游戏一部,vip视频解析,文意转换工具,写作机器人等项目,发表论文若干,多次高数竞赛获奖等等。
源码GitHub地址:
https://github.com/zhilin007/FFA-Net
最后的最后求一波分享!
YOLOv4 trick相关论文已经下载并放在公众号后台
关注“AI算法与图像处理”,回复 “200714”获取
个人微信 请注明:地区+学校/企业+研究方向+昵称 如果没有备注不拉群!
评论

