Mesh7# wasm扩展Envoy使用详解
引言
我们想要网格的服务发现、路由、熔断降级、负载均衡,这些流量治理都在数据面Envoy中执行才行。Envoy也提供的Filter机制来做这些功能,通常有以下方式:
通过C++代码自定义filter重新编译Envoy 使用Lua脚本扩展filter 使用wasm扩展Envoy
第一种C++编译学习成本过高,维护也困难,第二种适合用于实现简单功能可以,第三种是重点发展方向通过其他语言编写filter,通过wasm编译运行嵌入在Envoy中运行,通过可移植的二进制指令实现,以下特性:
动态加载到Envoy中执行 无需修改Envoy代码容易维护 支持较多开发语言比如tinygo 进程级隔离在VM沙箱运行部影响Envoy进程
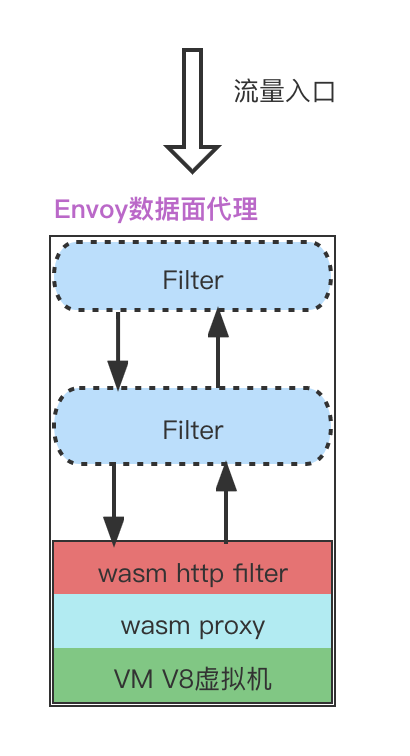
流量进过Envoy示意图:

安装Isito1.9.9
当前最新版本为v0.0.33,支持的Istio为1.9.X
https://github.com/solo-io/wasm/releases/
卸载原来的istio1.10版本,安装1.9.9
istioctl x uninstall --purge
istio1.9.9安装路径,具体安装过程见前面文章
https://github.com/istio/istio/releases/download/1.9.9/istio-1.9.9-linux-amd64.tar.gz
声明式挂载wasme
下面有详细的安装建议,生产环境建议使用声明式挂载:
https://docs.solo.io/web-assembly-hub/latest/tutorial_code/wasme_operator/
1.安装Wasme CRDs
kubectl apply -f https://github.com/solo-io/wasm/releases/latest/download/wasme.io_v1_crds.yaml

# kubectl apply -f wasme.io_v1_crds.yaml
customresourcedefinition.apiextensions.k8s.io/filterdeployments.wasme.io created
2.安装Operator components
kubectl apply -f https://github.com/solo-io/wasm/releases/latest/download/wasme-default.yaml

# kubectl apply -f wasme-default.yaml
namespace/wasme created
serviceaccount/wasme-operator created
serviceaccount/wasme-cache created
configmap/wasme-cache created
clusterrole.rbac.authorization.k8s.io/wasme-operator created
clusterrole.rbac.authorization.k8s.io/wasme-cache created
clusterrolebinding.rbac.authorization.k8s.io/wasme-operator created
clusterrolebinding.rbac.authorization.k8s.io/wasme-cache created
daemonset.apps/wasme-cache created
deployment.apps/wasme-operator created
3.校验是否安装成功
# kubectl get pod -n wasme
NAME                              READY   STATUS    RESTARTS   AGE
wasme-cache-96mnm                 1/1     Running   0          23s
wasme-cache-ktnpb                 1/1     Running   0          23s
wasme-cache-w929m                 1/1     Running   0          23s
wasme-operator-75bbf94974-nb684   1/1     Running   0          23s
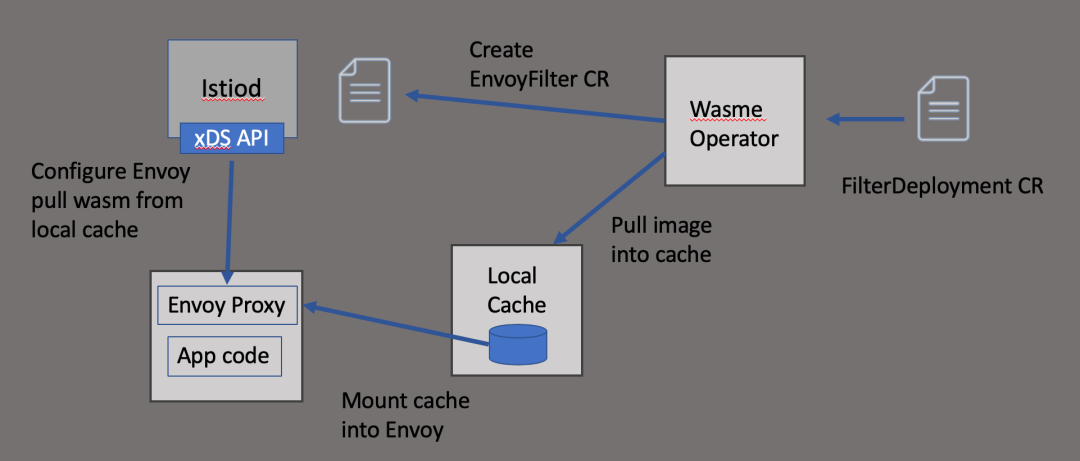
挂载工作原理

命令行安装
官方安装文档
https://docs.solo.io/web-assembly-hub/latest/tutorial_code/getting_started/
网络好的可以使用快速安装命令
curl -sL https://run.solo.io/wasme/install | sh
从install_cli.sh安装脚本看做了什么事情
if [ "$(uname -s)" = "Darwin" ]; then OS=darwin // Mac为darwinelse OS=linuxfi// 更名和授予执行权限cd "$HOME"mkdir -p ".wasme/bin"mv "${tmp}/${filename}" ".wasme/bin/wasme"chmod +x ".wasme/bin/wasme"// 添加到环境变量export PATH=\$HOME/.wasme/bin:\$PATH"
Mac可以下载wasme-darwin-amd64,照着安装就是了。
https://github.com/solo-io/wasm/releases/download/v0.0.33/wasme-darwin-amd64
export PATH=$PATH:/Users/yongliang/work/software_install/wasme/binsource ~/.bash_profilechmod +x /Users/yongliang/work/software_install/wasme/bin/wasmewasme --versionwasme version 0.0.33
官方使用指南参见:
https://docs.solo.io/web-assembly-hub/latest/tutorial_code/build_tutorials/building_assemblyscript_filters/
先试用tinygo做个示例看看效果
wasme init melon-filterUse the arrow keys to navigate: ↓ ↑ → ← ? What language do you wish to use for the filter: cpp rust assemblyscript ▸ tinygo
执行后:
wasme init melon-filter✔ tinygo✔ istio:1.7.x, gloo:1.6.x, istio:1.8.x, istio:1.9.x
目录结构
-rw-r--r-- 1 yongliang staff 83 11 15 19:26 go.mod-rw-r--r-- 1 yongliang staff 676 11 15 19:26 go.sum-rw-r--r-- 1 yongliang staff 1707 11 15 19:26 main.go-rw-r--r-- 1 yongliang staff 162 11 15 19:26 runtime-config.json
runtime-config.json是wamse构建filter使用的,必须包含rootIds字段
{ "type": "envoy_proxy", "abiVersions": ["v0-4689a30309abf31aee9ae36e73d34b1bb182685f", "v0.2.1"], "config": { "rootIds": [ "root_id" ] }}
main.go是生成的示例代码,主要在返回response头部Header添加了信息,修改成「”hello“,“melon”」
func (ctx *httpHeaders) OnHttpResponseHeaders(numHeaders int, endOfStream bool) types.Action { if err := proxywasm.SetHttpResponseHeader("hello", "melon"); err != nil { proxywasm.LogCriticalf("failed to set response header: %v", err) } return types.ActionContinue}
Filter构建
构建的过程耗时较长,多等一会
wasme build tinygo /Users/yongliang/GoLandProjects/melon-filter -t xxx/base/melon-add-header:v0.1Unable to find image 'quay.io/solo-io/ee-builder:0.0.33' locally0.0.33: Pulling from solo-io/ee-builderdf27e1f7c31e: Pull complete 0a8813a60e2e: Pull complete 3c2cba919283: Pull complete 26f4837a47c0: Pull complete dd7b292cf068: Pull complete 4a4d78f042bc: Pull complete 9108a736d6a0: Pull complete 70ac09daaa76: Pull complete 809bdff17a4d: Pull complete 31fc029d676e: Pull complete 85533903f7c2: Pull complete f87e543b124a: Pull complete 93d78f561264: Pull complete 8ba3d0f61e41: Pull complete d511201136be: Pull complete Digest: sha256:94b6ce4624b0c4ed4cfa4f311c8af57083b538949b5c88ce62ef984f9b81ef66Status: Downloaded newer image for quay.io/solo-io/ee-builder:0.0.33Building with tinygo...go: downloading github.com/tetratelabs/proxy-wasm-go-sdk v0.1.1INFO[2146] adding image to cache... filter file=/tmp/wasme066130090/filter.wasm tag="xxx/base/melon-add-header:v0.1"INFO[2146] tagged image digest="sha256:750d63889653e7117fcbc0831f10f0e1d3f7ec0c82fe5787b71d08a783e3393f" image="xxx/base/melon-add-header:v0.1"
构建完成,生成镜像
wasme listNAME TAG SIZE SHA UPDATEDxxxx/base/melon-add-header v0.1 247.6 kB 750d6388 15 Nov 21 20:23 CST
备注:官方构建教程参见
https://docs.solo.io/web-assembly-hub/latest/tutorial_code/build_tutorials/building_assemblyscript_filters/
镜像推送
将构建好的镜像需要推送到远程仓库
wasme push xxx/base/melon-add-header:v0.1INFO[0000] Pushing image xxxn/base/melon-add-header:v0.1 INFO[0004] Pushed xxx/base/melon-add-header:v0.1 INFO[0004] Digest: sha256:27aecb092318b2f922204ce722a34e5c2866baa168cf2f9f00c303b1982cfa9a
备注:官方推送教程参见
https://docs.solo.io/web-assembly-hub/latest/tutorial_code/push_tutorials/basic_push/
通过Kubernetes的自定义资源,通过FilterDeployment来实现,下面是melon-add-header.yaml内容
apiVersion: wasme.io/v1kind: FilterDeploymentmetadata: name: melon-add-header namespace: defaultspec: deployment: istio: kind: Deployment filter: image: xxx/base/melon-add-header:v0.1
执行部署命令
kubectl apply -f melon-add-header.yamlfilterdeployment.wasme.io/melon-add-header created
备注:官方教程参见
https://docs.solo.io/web-assembly-hub/latest/tutorial_code/wasme_operator/
1.访问网格Mesh服务

2.检验Response Headers添加了「hello:melon」

