
火爆全球的GAN,究竟是何方神圣?
故事时间
从前有一个人,他希望通过制造假币来发家致富。
于是,他开始学习制造假币。
一开始,他的技术太菜,制作的假币刚流入市场就被警察发现了。
他不甘心,于是继续学习来提升造假币技术,这一次,假币并没有被发现,他很开心的数着钱。
可是,过了一段时间,敏锐的警察使用刚刚学习到的新知识,破获了他的假币。
但他还是不甘示弱,继续提升造假币的技术
警察也继续学习新的假币鉴别技术
就这样,他的造假币技术一直在提升,警察鉴别假币的技术也在不断提升
在互相抗衡很久以后,他的造假币技术到了炉火纯青的地步,以至于警察都难以鉴别。
GAN是什么?
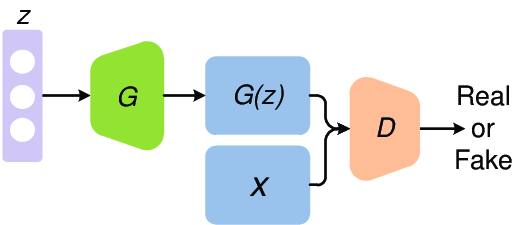
生成对抗网络(Generative adversarial network, GAN)由生成器(一般用表示)和判别器(一般用表示)组成,常用于生成"假"的东西,比如假的文本,假的人脸图像等等,本文以图像生成为例进行叙述。
生成器负责将从某分布中随机采样的噪声通过神经网络映射为"生成图像";判别器负责鉴定给定的图像是真实图像还是生成器生成的图像。
在上面的故事中,警察充当着判别器的角色,而造假币的人充当着生成器的角色。
造假币的人希望自己的假币能够骗过警察,而警察希望自己能够精准区分真钱币和假币,于是他们互相博弈,与彼此相对抗,最终,造假币者造出来的假币太过真实,就连警察也不能正确鉴别了,此时,就表明造假币的人成功了。
去掉故事的外衣,就是生成对抗网络的思想了:
生成器希望自己生成的假图像能够骗过判别器,而希望自己能够精准区分真实的图像与生成的图像,于是它们互相博弈,与彼此相对抗,最终,生成的的假图像太过真实,就连也不能正确鉴别了,此时,就表明我们的生成对抗网络训练成功了。
之后在做“假”图像生成的时候,只需将采样得到的随机噪声序列输入生成器,等待输出即可。
(求生欲:故事仅仅是为了更形象的介绍GAN,并无其他含义,不要多想)
GAN原理解析
生成器负责将从某分布中随机采样得到的噪声序列映射为与真实图像相似的生成图像,自然希望生成图像与真实图像越像越好。
这里,两者的相似度用生成图像所服从的分布与真实图像所服从的分布之间的距离来度量,距离越小,表明两个分布越相似。
那如何度量两个分布之间的距离呢?干脆直接用万能的神经网络来衡量两个分布之间的距离好了。
将两个分布之间的距离度量记作,由上面所讲可知,生成器希望生成图像所服从的分布与真实图像所服从的分布之间的越小越好,这样生成的图像才会更加接近真实图像。
而对于判别器来说,要分两种情况。第一,如果判别器的输入是真实图像,那么判别器希望此时输入图像所服从的分布与真实图像所服从的分布之间的越小越好;第二,如果判别器的输入是生成图像,那么判别器希望此时输入图像所服从的分布与真实图像所服从的分布之间的越大越好,因为只有这样判别器才能够正确地将真实图像与生成图像区分开来。
以上用文字描述了半天,其实完全可以由下面的公式来表示:

这个公式就是GAN的优化目标函数,它将我们上面所讲的内容信息整合到了一起,其中的就体现了“对抗”的思想。
用PyTorch写一个GAN
分别用0和1表示生成图像和真实图像的标签,根据上一部分的原理讲解,损失函数就有了。具体来说,生成器希望判别器误将生成图像(label:0)判定为真实图像(label:1),因此希望生成图像的判别结果与1越接近越好;而判别器则希望真实图像(label:1)的判别结果与1越接近越好,生成图像(label:0)的判别结果与0越接近越好,这样就能够很好的区分开两者了。用交叉熵度量以上损失即可。
现在,来实现基于卷积神经网络的GAN(也叫DCGAN),并使用它生成人脸。这是PyTorch官方的给出的例子,我们动手过一遍。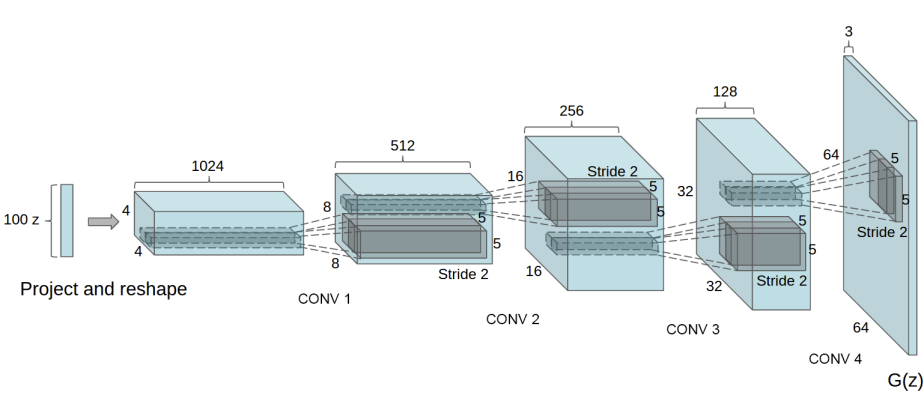
导入所需库
from __future__ import print_function
#%matplotlib inline
import argparse
import os
import random
import torch
import torch.nn as nn
import torch.nn.parallel
import torch.backends.cudnn as cudnn
import torch.optim as optim
import torch.utils.data
import torchvision.datasets as dset
import torchvision.transforms as transforms
import torchvision.utils as vutils
import numpy as np
import matplotlib.pyplot as plt
import matplotlib.animation as animation
from IPython.display import HTML
必要参数设置
# 设置随机种子
manualSeed = 999
random.seed(manualSeed)
torch.manual_seed(manualSeed)

# 数据下载到指定目录
dataroot = "data/celeba"

# Number of workers for dataloader
workers = 2

# 批量大小
batch_size = 128

# 将图像rezize到指定尺寸
image_size = 64

# 通道数,彩图为3
nc = 3

# 随机噪声序列的长度
nz = 100

# 生成器中特征图的个数
ngf = 64

# 判别器中特征图的个数
ndf = 64

# 训练迭代轮数
num_epochs = 5

# 学习率
lr = 0.0002

# Beta1 hyperparam for Adam optimizers
beta1 = 0.5

# Number of GPUs available. Use 0 for CPU mode.
ngpu = 1

# Decide which device we want to run on
device = torch.device("cuda:0" if (torch.cuda.is_available() and ngpu > 0) else "cpu")
数据准备
从https://drive.google.com/drive/folders/0B7EVK8r0v71pTUZsaXdaSnZBZzg下载数据集到本地,然后解压,路径如下

然后开始数据预处理
# We can use an image folder dataset the way we have it setup.
# 创建数据集
dataset = dset.ImageFolder(root=dataroot,
                           transform=transforms.Compose([
                               transforms.Resize(image_size),
                               transforms.CenterCrop(image_size),
                               transforms.ToTensor(),
                               transforms.Normalize((0.5, 0.5, 0.5), (0.5, 0.5, 0.5)),
                           ]))
# Create the dataloader
dataloader = torch.utils.data.DataLoader(dataset, batch_size=batch_size,
                                         shuffle=True, num_workers=workers)
画出第一个batch的前64张图片看一下
# Plot some training images
real_batch = next(iter(dataloader))
plt.figure(figsize=(8,8))
plt.axis("off")
plt.title("Training Images")
plt.imshow(np.transpose(vutils.make_grid(real_batch[0].to(device)[:64], padding=2, normalize=True).cpu(),(1,2,0)))

设置权值初始化方案
# 不同的层使用不同的权值初始化方案
def weights_init(m):
    classname = m.__class__.__name__
    if classname.find('Conv') != -1:
        nn.init.normal_(m.weight.data, 0.0, 0.02)
    elif classname.find('BatchNorm') != -1:
        nn.init.normal_(m.weight.data, 1.0, 0.02)
        nn.init.constant_(m.bias.data, 0)
搭建生成器和判别器网络
# 生成器网络
class Generator(nn.Module):
    def __init__(self, ngpu):
        super(Generator, self).__init__()
        self.ngpu = ngpu#设置是否使用gpu,1表示使用
        self.main = nn.Sequential(
            # 输入随机噪声z,转置卷积进行上采样
            nn.ConvTranspose2d( nz, ngf * 8, 4, 1, 0, bias=False),
            nn.BatchNorm2d(ngf * 8),
            nn.ReLU(True),
            # state size. (ngf*8) x 4 x 4
            nn.ConvTranspose2d(ngf * 8, ngf * 4, 4, 2, 1, bias=False),
            nn.BatchNorm2d(ngf * 4),
            nn.ReLU(True),
            # state size. (ngf*4) x 8 x 8
            nn.ConvTranspose2d( ngf * 4, ngf * 2, 4, 2, 1, bias=False),
            nn.BatchNorm2d(ngf * 2),
            nn.ReLU(True),
            # state size. (ngf*2) x 16 x 16
            nn.ConvTranspose2d( ngf * 2, ngf, 4, 2, 1, bias=False),
            nn.BatchNorm2d(ngf),
            nn.ReLU(True),
            # state size. (ngf) x 32 x 32
            nn.ConvTranspose2d( ngf, nc, 4, 2, 1, bias=False),
            nn.Tanh()
            # state size. (nc) x 64 x 64
        )

    def forward(self, input):
        return self.main(input)

# Create the generator
netG = Generator(ngpu).to(device)

# Handle multi-gpu if desired
if (device.type == 'cuda') and (ngpu > 1):
    netG = nn.DataParallel(netG, list(range(ngpu)))

# Apply the weights_init function to randomly initialize all weights
#  to mean=0, stdev=0.2.
netG.apply(weights_init)

# Print the model
print(netG)

#判别器网络
class Discriminator(nn.Module):
    def __init__(self, ngpu):
        super(Discriminator, self).__init__()
        self.ngpu = ngpu
        self.main = nn.Sequential(
            # input is (nc) x 64 x 64
            nn.Conv2d(nc, ndf, 4, 2, 1, bias=False),
            nn.LeakyReLU(0.2, inplace=True),
            # state size. (ndf) x 32 x 32
            nn.Conv2d(ndf, ndf * 2, 4, 2, 1, bias=False),
            nn.BatchNorm2d(ndf * 2),
            nn.LeakyReLU(0.2, inplace=True),
            # state size. (ndf*2) x 16 x 16
            nn.Conv2d(ndf * 2, ndf * 4, 4, 2, 1, bias=False),
            nn.BatchNorm2d(ndf * 4),
            nn.LeakyReLU(0.2, inplace=True),
            # state size. (ndf*4) x 8 x 8
            nn.Conv2d(ndf * 4, ndf * 8, 4, 2, 1, bias=False),
            nn.BatchNorm2d(ndf * 8),
            nn.LeakyReLU(0.2, inplace=True),
            # state size. (ndf*8) x 4 x 4
            nn.Conv2d(ndf * 8, 1, 4, 1, 0, bias=False),
            nn.Sigmoid()
        )

    def forward(self, input):
        return self.main(input)

# Create the Discriminator
netD = Discriminator(ngpu).to(device)

# Handle multi-gpu if desired
if (device.type == 'cuda') and (ngpu > 1):
    netD = nn.DataParallel(netD, list(range(ngpu)))

# Apply the weights_init function to randomly initialize all weights
#  to mean=0, stdev=0.2.
netD.apply(weights_init)

# Print the model
print(netD)

设置优化器等
# 交叉熵损失函数
criterion = nn.BCELoss()

# Create batch of latent vectors that we will use to visualize
#  the progression of the generator
# 从正态分布中采样64个nz长度的随机噪声序列
fixed_noise = torch.randn(64, nz, 1, 1, device=device)

# Establish convention for real and fake labels during training
real_label = 1.
fake_label = 0.

# 设置优化器
optimizerD = optim.Adam(netD.parameters(), lr=lr, betas=(beta1, 0.999))
optimizerG = optim.Adam(netG.parameters(), lr=lr, betas=(beta1, 0.999))
开始训练
# 训练

# Lists to keep track of progress
img_list = []
G_losses = []
D_losses = []
iters = 0

print("Starting Training Loop...")
# For each epoch
for epoch in range(num_epochs):
    # For each batch in the dataloader
    for i, data in enumerate(dataloader, 0):

        ############################
        # (1) Update D network: maximize log(D(x)) + log(1 - D(G(z)))
        ###########################
        ## Train with all-real batch
        netD.zero_grad()
        # Format batch
        real_cpu = data[0].to(device)
        b_size = real_cpu.size(0)
        label = torch.full((b_size,), real_label, dtype=torch.float, device=device)
        # Forward pass real batch through D
        output = netD(real_cpu).view(-1)
        # Calculate loss on all-real batch
        errD_real = criterion(output, label)
        # Calculate gradients for D in backward pass
        errD_real.backward()
        D_x = output.mean().item()

        ## Train with all-fake batch
        # Generate batch of latent vectors
        noise = torch.randn(b_size, nz, 1, 1, device=device)
        # Generate fake image batch with G
        fake = netG(noise)
        label.fill_(fake_label)
        # Classify all fake batch with D
        output = netD(fake.detach()).view(-1)
        # Calculate D's loss on the all-fake batch
        errD_fake = criterion(output, label)
        # Calculate the gradients for this batch
        errD_fake.backward()
        D_G_z1 = output.mean().item()
        # Add the gradients from the all-real and all-fake batches
        errD = errD_real + errD_fake
        # Update D
        optimizerD.step()

        ############################
        # (2) Update G network: maximize log(D(G(z)))
        ###########################
        netG.zero_grad()
        label.fill_(real_label)  # fake labels are real for generator cost
        # Since we just updated D, perform another forward pass of all-fake batch through D
        output = netD(fake).view(-1)
        # Calculate G's loss based on this output
        errG = criterion(output, label)
        # Calculate gradients for G
        errG.backward()
        D_G_z2 = output.mean().item()
        # Update G
        optimizerG.step()

        # Output training stats
        if i % 50 == 0:
            print('[%d/%d][%d/%d]\tLoss_D: %.4f\tLoss_G: %.4f\tD(x): %.4f\tD(G(z)): %.4f / %.4f'
                  % (epoch, num_epochs, i, len(dataloader),
                     errD.item(), errG.item(), D_x, D_G_z1, D_G_z2))

        # Save Losses for plotting later
        G_losses.append(errG.item())
        D_losses.append(errD.item())

        # Check how the generator is doing by saving G's output on fixed_noise
        if (iters % 500 == 0) or ((epoch == num_epochs-1) and (i == len(dataloader)-1)):
            with torch.no_grad():
                fake = netG(fixed_noise).detach().cpu()
            img_list.append(vutils.make_grid(fake, padding=2, normalize=True))

        iters += 1

漫长的等待过后,终于训练好了。
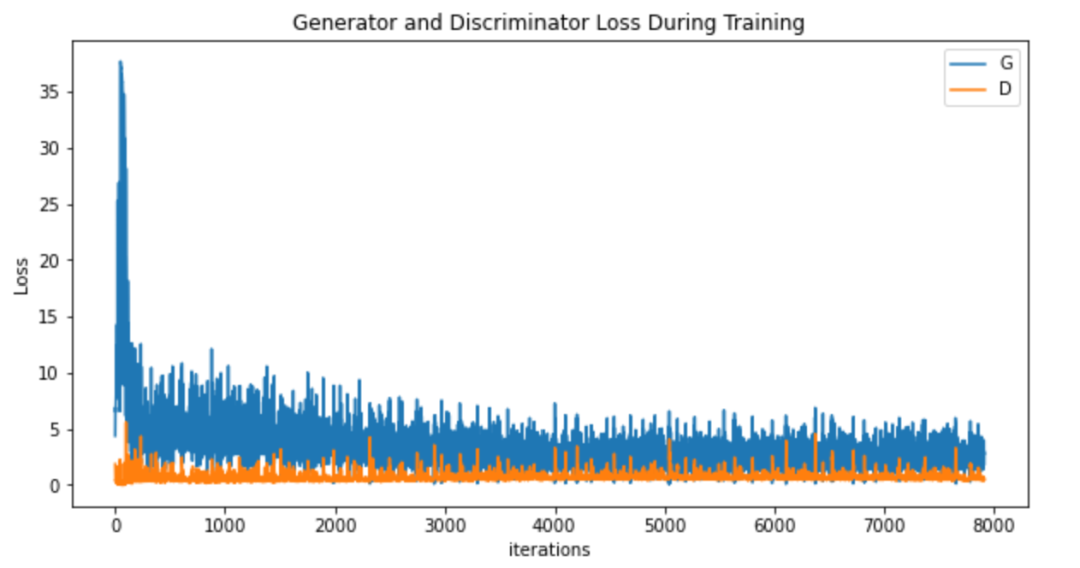
loss可视化
plt.figure(figsize=(10,5))
plt.title("Generator and Discriminator Loss During Training")
plt.plot(G_losses,label="G")
plt.plot(D_losses,label="D")
plt.xlabel("iterations")
plt.ylabel("Loss")
plt.legend()
plt.show()
生成图像的质量演变过程可视化
#%%capture
fig = plt.figure(figsize=(8,8))
plt.axis("off")
ims = [[plt.imshow(np.transpose(i,(1,2,0)), animated=True)] for i in img_list]
ani = animation.ArtistAnimation(fig, ims, interval=100, repeat_delay=1000, blit=True)
ani.save("pendulum.gif", writer='pillow')
#HTML(ani.to_jshtml())

上图呈现了由噪声图像到人脸图像的演变过程。注意,我们仅仅训练了5个epoch,因此生成的效果并不算太好,但总体能看出是人脸图像。你可以尝试增加epoch,再次训练。
写在后面
在GAN被提出以后,各式各样的对GAN的改进方案层出不穷,生成图像的质量也越来越好,甚至我们无法用肉眼分辨真实图像和生成图像。
GAN也有许多有趣好玩的应用,比如照片"去杂物",图像超分辨率,老照片修复,前段时间很火的AI还原皇帝,以及大家所熟知的AI换脸deepfake等等。
相信GAN的前途一片光明!也相信现在的你会点个赞/在看的,对吧?
深度学习资源下载
在NLP情报局公众号后台回复“三件套”,即可获取深度学习三件套:

推 荐 阅 读
参 考 资 料
[1]https://sthalles.github.io/intro-to-gans/ [2]https://www.researchgate.net/publication/331756737_Recent_Progress_on_Generative_Adversarial_Networks_GANs_A_Survey [3]https://spaces.ac.cn/archives/4439 [4]https://pytorch.org/tutorials/beginner/dcgan_faces_tutorial.html
欢 迎 关 注 👇
原创不易,有收获的话请帮忙点击分享、点赞、在看吧🙏