
OpenCV卡尔曼滤波介绍与代码演示
卡尔曼滤波原理
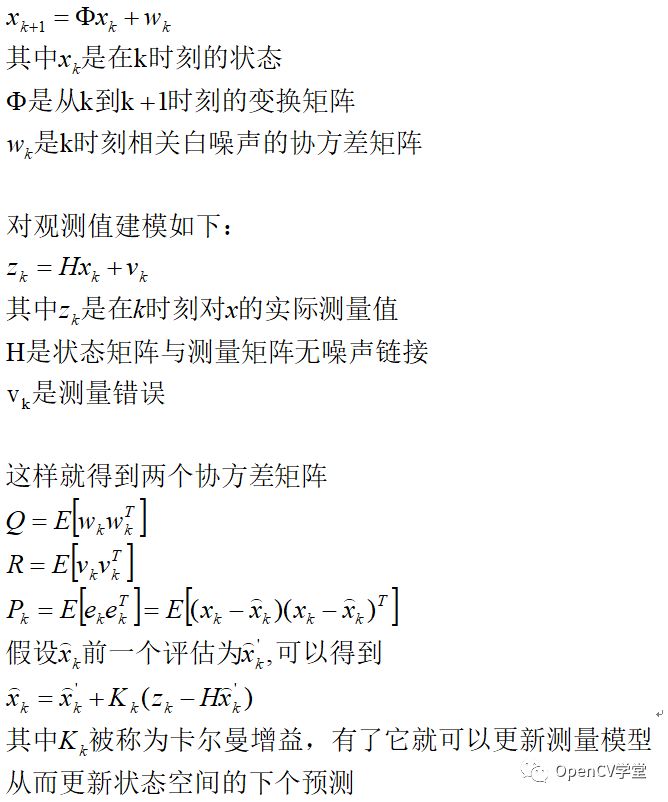
卡尔曼滤波最早可以追溯到Wiener滤波,不同的是卡尔曼采用状态空间来描述它的滤波器,卡尔曼滤波器同时具有模糊/平滑与预测功能,特别是后者在视频分析与对象跟踪应用场景中被发扬光大,在离散空间(图像或者视频帧)使用卡尔曼滤波器相对简单。假设我们根据一个处理想知道一个变量值如下:
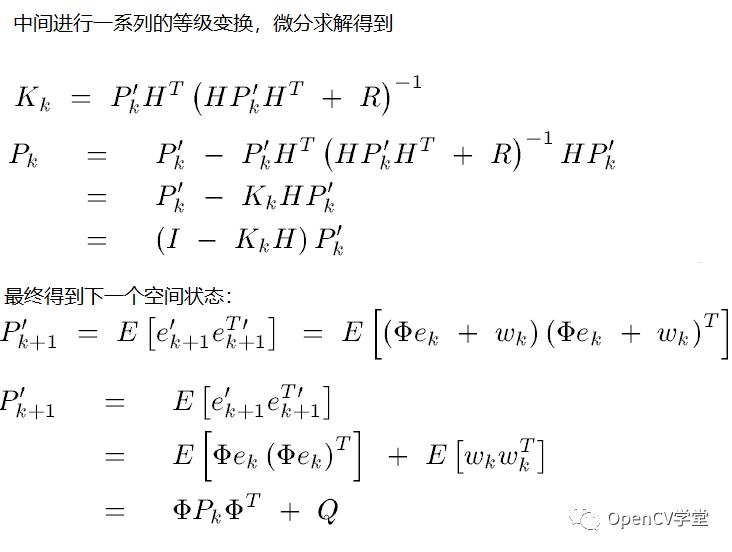
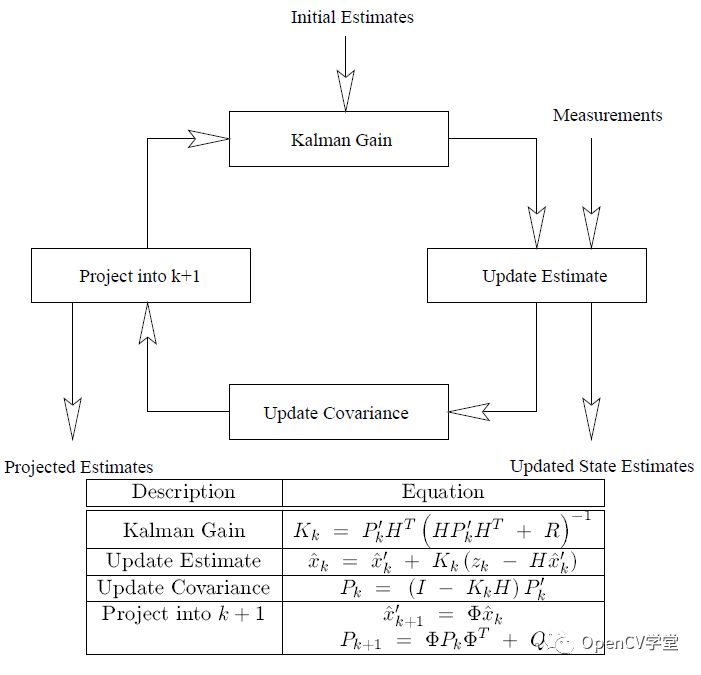
最终卡尔曼滤波完整的评估与空间预测模型工作流程如下:
OpenCV API
cv::KalmanFilter::KalmanFilter(
int dynamParams,
int measureParams,
int controlParams = 0,
int type = CV_32F
)
# dynamParams表示state的维度
# measureParams表示测量维度
# controlParams表示控制向量
# type表示创建的matrices代码演示
import cv2
from math import cos, sin, sqrt
import numpy as np
if __name__ == "__main__":
img_height = 500
img_width = 500
kalman = cv2.KalmanFilter(2, 1, 0)
cv2.namedWindow("Kalman", cv2.WINDOW_AUTOSIZE)
while True:
state = 0.1 * np.random.randn(2, 1)
# 初始化
kalman.transitionMatrix = np.array([[1., 1.], [0., 1.]])
kalman.measurementMatrix = 1. * np.ones((1, 2))
kalman.processNoiseCov = 1e-5 * np.eye(2)
kalman.measurementNoiseCov = 1e-1 * np.ones((1, 1))
kalman.errorCovPost = 1. * np.ones((2, 2))
kalman.statePost = 0.1 * np.random.randn(2, 1)
while True:
def calc_point(angle):
return (np.around(img_width/2 + img_width/3*cos(angle), 0).astype(int),
np.around(img_height/2 - img_width/3*sin(angle), 1).astype(int))
state_angle = state[0, 0]
state_pt = calc_point(state_angle)
# 预测
prediction = kalman.predict()
predict_angle = prediction[0, 0]
predict_pt = calc_point(predict_angle)
measurement = kalman.measurementNoiseCov * np.random.randn(1, 1)
# 生成测量
measurement = np.dot(kalman.measurementMatrix, state) + measurement
measurement_angle = measurement[0, 0]
measurement_pt = calc_point(measurement_angle)
# plot points
def draw_cross(center, color, d):
cv2.line(img,
(center[0] - d, center[1] - d), (center[0] + d, center[1] + d),
color, 1, cv2.LINE_AA, 0)
cv2.line(img,
(center[0] + d, center[1] - d), (center[0] - d, center[1] + d),
color, 1, cv2.LINE_AA, 0)
img = np.zeros((img_height, img_width, 3), np.uint8)
cv2.line(img, state_pt, measurement_pt, (0, 0, 255), 3, cv2.LINE_AA, 0)
cv2.line(img, state_pt, predict_pt, (255, 0, 0), 3, cv2.LINE_AA, 0)
# 校正预测与测量值差异
kalman.correct(measurement)
# 更新noise矩阵与状态
process_noise = sqrt(kalman.processNoiseCov[0,0]) * np.random.randn(2, 1)
state = np.dot(kalman.transitionMatrix, state) + process_noise
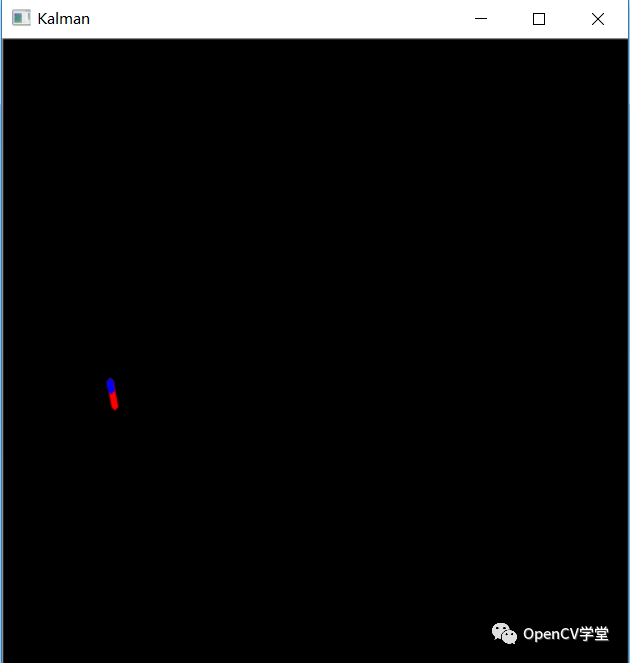
cv2.imshow("Kalman", img)
code = cv2.waitKey(100)
if code != -1:
break
if code in [27, ord('q'), ord('Q')]:
break
cv2.destroyWindow("Kalman")
——The End——
分享
收藏
点赞
在看


评论