(附代码&解析)实战|基于OpenCV的轮廓检测项目

cx = int(M ['m10'] / M ['m00'])
cy = int(M ['m01'] / M ['m00'])
获得质心点后,此质心点将表示对象这样就可以为与质心相对应的对象放置一个边界框。本次实验我们将使用橙色作为对象,首先我们需要安装打包的OpenCV和numpy软件包。
import cv2import numpy as np
插入图片使用“ cv2.imread()”:
#Read Picturesimg = cv2.imread('jeruk.png')
然后将RGB转换为HSV并创建黄色(橙色为右黄色)颜色分割:
#Convert RGB to HSVhsv = cv2.cvtColor(img,cv2.COLOR_BGR2HSV)#Range of yellow color segmentation / classificationlower = np.array([20,100,100], dtype=np.uint8)upper = np.array([40,255,255], dtype=np.uint8)mask = cv2.inRange(hsv, lower, upper)kernel = np.ones((25,25),np.uint8)
进行对象像素的增厚,然后减小尺寸,以使对象像素彼此不靠近:
# Thicken object pixelsdilation = cv2.dilate(mask,kernel,iterations = 1)# Minimized the object pixels so they're not stick togethererosion = cv2.erode(img,kernel,iterations = 1)
找到橙色的轮廓和阵列:
#Find Contourscontours, hierarchy = cv2.findContours(dilation,cv2.RETR_TREE,cv2.CHAIN_APPROX_SIMPLE)#Array Contourscontour = []
然后将原始图像复制到“ resultImg”变量:
#copy the original image to "resultImg"resultImg = (img).copy()
对轮廓进行迭代:
for i in range(len(contours)):#amount contours to cnt variablecnt = contours[i](x,y),radius = cv2.minEnclosingCircle(cnt)center = (int(x),int(y))if(int(radius) > 1):contour.append(cnt)resultImg = cv2.circle(resultImg,center,int(radius,(255,0,0),3)
最后一个阶段,显示检测结果的轮廓:
#displays resultscv2.imshow('image',resultImg)cv2.waitKey(0)cv2.destroyAllWindows()
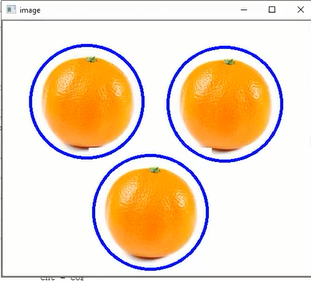
输出结果:

根据前面显示的橙色检测结果,可以通过轮廓检测橙色,该轮廓由橙色对象上存在蓝色圆圈标记。
双一流高校研究生团队创建 ↓
专注于目标检测原创并分享相关知识 ☞
整理不易,点赞三连!
评论
