
单行人跟踪
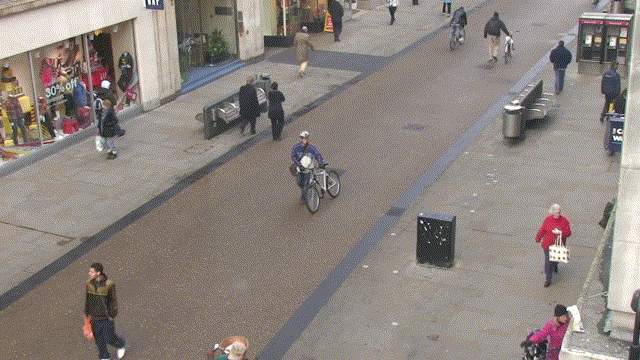
还记得前几章推文中的这张GIF吗,是的,今天我们就来实现一下这个单行人跟踪.
前提文件
首先,在开始实现之前,我们需要以下的一些文件:
前几章推文中训练好的行人重识别模型

目标检测算法,这里我使用的是Yolov5
使用到的源码地址: https://github.com/ultralytics/yolov5
一段行人的视频
一张要跟踪的行人的图片

准备工作
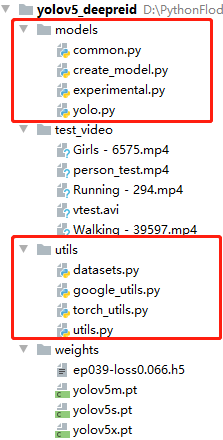
首先我们先clone一下yolov5的源码,并下载好对应的预训练模型,然后,新建一个项目,将Yolov5源码中的models以及utils文件复制过来,并且,将我们行人重识别的模型和权重也分别复制到models与weights中.
接着,我们进行编码,首先导入依赖库:
from utils.datasets import *from utils.utils import *import base64import osimport tensorflow as tfimport torchfrom models.create_model import Create_Modelimport heapqos.environ['CUDA_VISIBLE_DEVICES'] = "-1"print(torch.cuda.is_available())
接着,定义以下的三个函数,用来进行特征距离计算,以及物理距离计算:
# 获得特征距离def person_distance(person_encodings, person_unknow):if len(person_encodings) == 0:return np.empty((0))l1 = np.sqrt(np.sum(np.square(person_encodings - person_unknow), axis=-1))return l1#判断阈值def com_person(person_list, person, tolerance=1):dis = person_distance(person_list, person)return dis,list(dis <= tolerance)# 获得最相似的行人def get_top1(centerxy_list, centerxy):centerxy_arr = np.array(centerxy_list)cenarr = np.array(centerxy)dis = list(np.sqrt(np.sum(np.square(centerxy_arr - cenarr), axis=-1)))min_num_index_list = map(dis.index, heapq.nsmallest(1, dis))return list(min_num_index_list)
关键代码编写
接着,是关键代码的编写,我们先定义一个run函数,先加载模型与摄像头,并进行参数的定义:
def run():# 加载yolo检测模型device = torch_utils.select_device('cpu')model = torch.load(model_path, map_location=device)['model']model.to(device).eval()input_size = (215, 90, 3)model_, pred_model = Create_Model(inpt=input_size, num_classes=1812)model_.load_weights('weights\ep039-loss0.066.h5')names = model.names if hasattr(model, 'names') else model.modules.names# 加载摄像头video_capture = cv2.VideoCapture(Cam_num)video_FourCC = int(video_capture.get(cv2.CAP_PROP_FOURCC))video_fps = video_capture.get(cv2.CAP_PROP_FPS)video_size = (int(video_capture.get(cv2.CAP_PROP_FRAME_WIDTH)),int(video_capture.get(cv2.CAP_PROP_FRAME_HEIGHT)))out = cv2.VideoWriter('output.mp4', video_FourCC, video_fps, video_size)index = 0unknow_person_emb =[]center_xy = []know_center_xy_list=[]know_person_emb=None
然后,定义一个while循环,用来读取视频流的数据,进行检测与识别,这里代码比较长,具体流程如下:
读取每一帧的图片进行目标检测
过滤其他目标,只处理perosn目标
获取person目标的ROI并提取特征
进行特征距离以及物理距离的计算
判断是否满足识别阈值
识别成功进行绘制
# 读取视频流数据while True:im0 = video_capture.read()iimage = im0.copy()# 数据标准化img = letterbox(im0, new_shape=image_size)[0]img = img[:, :, ::-1].transpose(2, 0, 1)img = np.ascontiguousarray(img)img = torch.from_numpy(img).to(device)img = img.half() if half else img.float() # uint8 to fp16/32img /= 255.0 # 0 - 255 to 0.0 - 1.0if img.ndimension() == 3:img = img.unsqueeze(0)# 目标检测计算pred = model(img, augment=False)[0]# uint8 to fp16/32if half:pred = pred.float()# 将目标检测的结果进行NMS处理,去掉多余的框pred = non_max_suppression(pred, conf_thres, iou_thres,fast=True, classes=None, agnostic=False)# 循环处理获取到的目标数据for i, det in enumerate(pred):# 当图片中存在目标时if det is not None and len(det):# 获得目标数据:, :4] = scale_coords(img.shape[2:], det[:, :4], im0.shape).round()id = 0# 获得目标的 坐标,准确度以及类别for *xyxy, conf, cls in det:# 这里我们只针对人这一类别进行计算if names[int(cls)] == 'person':# 获得左上角 以及右下角的坐标c2 = (int(xyxy[0]), int(xyxy[1])), (int(xyxy[2]), int(xyxy[3]))# 获得ROI 区域y_min = c1y_max = c2roi = iimage[y_min:y_max, x_min:x_max]roi = cv2.resize(roi,(90,215))# ROI数据标准化,进入行人重识别别模型image_1 = np.asarray(roi).astype(np.float64) / 255photo1 = np.expand_dims(image_1 ,0)output1 = pred_model.predict(photo1)# 获得中心点坐标centerx = x_min+(x_max-x_min)/2centery = y_min+(y_max-y_min)/2=1# 如果当前是第一帧,则提取已知图片的特则,# 这一步可以放到前面进行处理if index ==0:unknow_person_emb.append(output1)center_xy.append([centerx,centery])know_img = cv2.imread('person.jpg')know_img = cv2.resize(know_img,(90,215))know_img = np.asarray(know_img).astype(np.float64) / 255know_img = np.expand_dims(know_img, 0)know_person_emb = pred_model.predict(know_img)# 如果已经不是第一帧了,就进行识别else:# 获得最为接近的行人特征以及坐标# 这里使用上一帧以及当前桢的坐标进行对比# 一般来说两桢之间,行人的移动距离不会太大,我们用这个来辅助判断min_index=get_top1(center_xy,[centerx,centery])# 获得特征距离矩阵com_p = com_person(unknow_person_emb, know_person_emb, tolerance=0.8)# 如果最相似的行人的索引与特征距离矩阵中最小值的索引相同# 并且这个特征距离小于阈值,就说明找到了目标if min_index[0] == dit.argmin() and com_p[dit.argmin()] == True:# 将识别结果绘制到图片中label = 'ID-%s' % (1)im0, label=label, color=(0,255,0), line_thickness=5)# 更新坐标以及特征=[centerx,centery]know_person_emb = output1# 只保存10个坐标数据 用于绘制行走路径if len(know_center_xy_list) < 10:centery])else:know_center_xy_list.remove(know_center_xy_list[0])centery])# 绘制目标的行走路径for i in range(1, len(know_center_xy_list)):y1 = know_center_xy_list[i - 1]y2 = know_center_xy_list[i](int(x1), int(y1)), (int(x2), int(y2)), (0, 255, 0), 2)# 未找到该人,进行绘制else:unknow_person_emb.append(output1)centery])label = 'ID-%s' % ('unknow')im0, label=label, color=(0,0,255), line_thickness=5)# 将每一帧的图片进行保存out.write(im0)=1cv2.namedWindow('image',cv2.WINDOW_NORMAL)im0)if cv2.waitKey(1) == ord('q'):breakvideo_capture.release()out.release()cv2.destroyAllWindows()
程序运行
最后,定义一些路径以及参数,即可右键运行程序.
if __name__ == '__main__':# 基本设置model_path = 'weights\yolov5s.pt'hand_model_path = 'weights\hand_pose.h5'Cam_num = r'test_video\person_test.mp4'image_size = 416conf_thres = 0.4iou_thres = 0.4device = 'cpu'half = False# 运行with torch.no_grad():run()
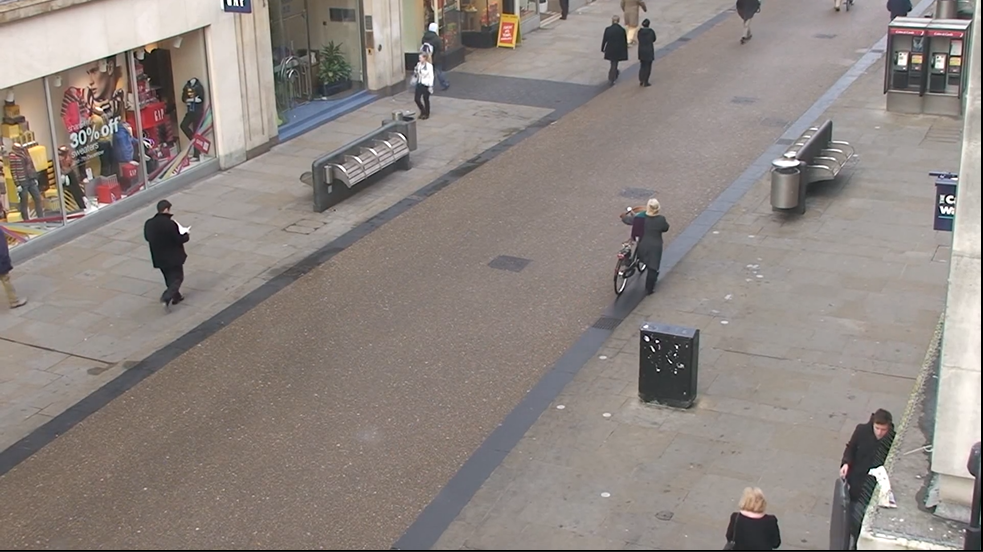
程序运行结果如下:
本章属于单行人目标跟踪,在下一章中我们将实现多行人跟踪,难度相对来说高了一点,喜欢的同学记得关注噢!
评论
全部评论
QS251564abce3cedde92023-07-10 17:26
QS251564abce3cedde92023-07-10 17:26