Go - 实现项目内链路追踪
为什么项目内需要链路追踪?
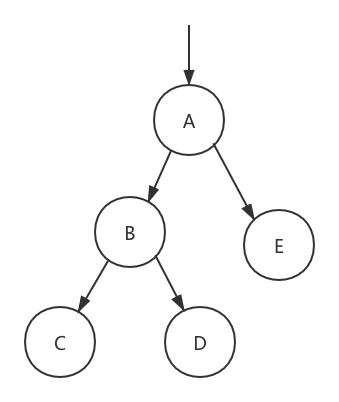
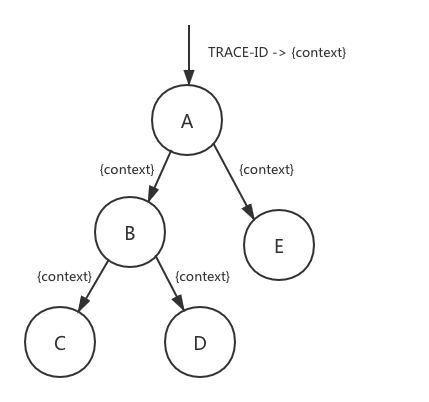
当一个请求中,请求了多个服务单元,如果请求出现了错误或异常,很难去定位是哪个服务出了问题,这时就需要链路追踪。

这个图画的比较简单,从图中可以清晰的看出他们之间的调用关系,通过一个例子说明下链路的重要性,比如对方调我们一个接口,反馈在某个时间段这接口太慢了,在排查代码发现逻辑比较复杂,不光调用了多个三方接口、操作了数据库,还操作了缓存,怎么快速定位是哪块执行时间很长?
不卖关子,先说下本篇文章最终实现了什么,如果感兴趣再继续往下看。
实现了通过记录如下参数,来进行问题定位,关于每个参数的结构在下面都有介绍。
// Trace 记录的参数
type Trace struct {
    mux                sync.Mutex
    Identifier         string    `json:"trace_id"`             // 链路 ID
    Request            *Request  `json:"request"`              // 请求信息
    Response           *Response `json:"response"`             // 响应信息
    ThirdPartyRequests []*Dialog `json:"third_party_requests"` // 调用第三方接口的信息
    Debugs             []*Debug  `json:"debugs"`               // 调试信息
    SQLs               []*SQL    `json:"sqls"`                 // 执行的 SQL 信息
    Redis              []*Redis  `json:"redis"`                // 执行的 Redis 信息
    Success            bool      `json:"success"`              // 请求结果 true or false
    CostSeconds        float64   `json:"cost_seconds"`         // 执行时长(单位秒)
}
参数结构
链路 ID
String 例如:4b4f81f015a4f2a01b00。如果请求 Header 中存在 TRACE-ID,就使用它,反之,重新创建一个。将 TRACE_ID 放到接口返回值中,这样就可以通过这个标示查到这一串的信息。
请求信息
Object,结构如下:
type Request struct {
 TTL        string      `json:"ttl"`         // 请求超时时间
 Method     string      `json:"method"`      // 请求方式
 DecodedURL string      `json:"decoded_url"` // 请求地址
 Header     interface{} `json:"header"`      // 请求 Header 信息
 Body       interface{} `json:"body"`        // 请求 Body 信息
}
响应信息
Object,结构如下:
type Response struct {
 Header          interface{} `json:"header"`                      // Header 信息
 Body            interface{} `json:"body"`                        // Body 信息
 BusinessCode    int         `json:"business_code,omitempty"`     // 业务码
 BusinessCodeMsg string      `json:"business_code_msg,omitempty"` // 提示信息
 HttpCode        int         `json:"http_code"`                   // HTTP 状态码
 HttpCodeMsg     string      `json:"http_code_msg"`               // HTTP 状态码信息
 CostSeconds     float64     `json:"cost_seconds"`                // 执行时间(单位秒)
}
调用三方接口信息
Object,结构如下:
type Dialog struct {
 mux         sync.Mutex
 Request     *Request    `json:"request"`      // 请求信息
 Responses   []*Response `json:"responses"`    // 返回信息
 Success     bool        `json:"success"`      // 是否成功,true 或 false
 CostSeconds float64     `json:"cost_seconds"` // 执行时长(单位秒)
}
这里面的 Request 和 Response 结构与上面保持一致。
细节来了,为什么 Responses 结构是 []*Response ?
是因为 HTTP 可以进行重试请求,比如当请求对方接口的时候,HTTP 状态码为 503 http.StatusServiceUnavailable,这时需要重试,我们也需要把重试的响应信息记录下来。
调试信息
Object 结构如下:
type Debug struct {
 Key         string      `json:"key"`          // 标示
 Value       interface{} `json:"value"`        // 值
 CostSeconds float64     `json:"cost_seconds"` // 执行时间(单位秒)
}
SQL 信息
Object,结构如下:
type SQL struct {
 Timestamp   string  `json:"timestamp"`     // 时间,格式:2006-01-02 15:04:05
 Stack       string  `json:"stack"`         // 文件地址和行号
 SQL         string  `json:"sql"`           // SQL 语句
 Rows        int64   `json:"rows_affected"` // 影响行数
 CostSeconds float64 `json:"cost_seconds"`  // 执行时长(单位秒)
}
Redis 信息
Object,结构如下:
type Redis struct {
 Timestamp   string  `json:"timestamp"`       // 时间,格式:2006-01-02 15:04:05
 Handle      string  `json:"handle"`          // 操作,SET/GET 等
 Key         string  `json:"key"`             // Key
 Value       string  `json:"value,omitempty"` // Value
 TTL         float64 `json:"ttl,omitempty"`   // 超时时长(单位分)
 CostSeconds float64 `json:"cost_seconds"`    // 执行时间(单位秒)
}
请求结果
Bool,这个和统一定义返回值有点关系,看下代码:
// 错误返回
c.AbortWithError(code.ErrParamBind.WithErr(err))

// 正确返回
c.Payload(code.OK.WithData(data))
当错误返回时 且 ctx.Writer.Status() != http.StatusOK 时,为 false,反之为 true。
执行时长
Float64,例如:0.041746869,记录的是从请求开始到请求结束所花费的时间。
如何收集参数?
这时有老铁会说了:“规划的稍微还行,使用的时候会不会很麻烦?”
“No,No,使用起来一丢丢都不麻烦”,接着往下看。
无需关心的参数
链路 ID、请求信息、响应信息、请求结果、执行时长,这 5 个参数,开发者无需关心,这些都在中间件封装好了。
调用第三方接口的信息
只需多传递一个参数即可。
在这里厚脸皮自荐下 httpclient 包 。
支持设置失败时重试,可以自定义重试次数、重试前延迟等待时间、重试的满足条件; 支持设置失败时告警,可以自定义告警渠道(邮件/微信)、告警的满足条件; 支持设置调用链路;
调用示例代码:
// httpclient 是项目中封装的包
api := "http://127.0.0.1:9999/demo/post"
params := url.Values{}
params.Set("name", name)
body, err := httpclient.PostForm(api, params,
    httpclient.WithTrace(ctx.Trace()),  // 传递上下文
)
调试信息
只需多传递一个参数即可。
调用示例代码:
// p 是项目中封装的包
p.Println("key", "value",
 p.WithTrace(ctx.Trace()), // 传递上下文
)
SQL 信息
稍微复杂一丢丢,需要多传递一个参数,然后再写一个 GORM 插件。
使用的 GORM V2 自带的 Callbacks 和 Context 知识点,细节不多说,可以看下这篇文章:基于 GORM 获取当前请求所执行的 SQL 信息。
调用示例代码:
// 原来查询这样写
err := u.db.GetDbR().
    First(data, id).
    Where("is_deleted = ?", -1).
    Error

// 现在只需这样写
err := u.db.GetDbR().
    WithContext(ctx.RequestContext()).
    First(data, id).
    Where("is_deleted = ?", -1).
    Error

// .WithContext 是 GORM V2 自带的。
// 插件的代码就不贴了,去上面的文章查看即可。
Redis 信息
只需多传递一个参数即可。
调用示例代码:
// cache 是基于 go-redis 封装的包
d.cache.Get("name",
    cache.WithTrace(c.Trace()),
)
核心原理是啥?
在这没关子可卖,看到这相信老铁们都知道了,就两个:一个是 拦截器,另一个是 Context。

如何记录参数?
将以上数据转为 JSON 结构记录到日志中。
JSON 示例
{
    "level":"info",
    "time":"2021-01-30 22:32:48",
    "caller":"core/core.go:444",
    "msg":"core-interceptor",
    "domain":"go-gin-api[fat]",
    "method":"GET",
    "path":"/demo/trace",
    "http_code":200,
    "business_code":1,
    "success":true,
    "cost_seconds":0.054025302,
    "trace_id":"2cdb2f96934f573af391",
    "trace_info":{
        "trace_id":"2cdb2f96934f573af391",
        "request":{
            "ttl":"un-limit",
            "method":"GET",
            "decoded_url":"/demo/trace",
            "header":{
                "Accept":[
                    "application/json"
                ],
                "Accept-Encoding":[
                    "gzip, deflate, br"
                ],
                "Accept-Language":[
                    "zh-CN,zh;q=0.9,en;q=0.8"
                ],
                "Authorization":[
                    "eyJhbGciOiJIUzI1NiIsInR5cCI6IkpXVCJ9.eyJVc2VySUQiOjEsIlVzZXJOYW1lIjoieGlubGlhbmdub3RlIiwiZXhwIjoxNjEyMTAzNTQwLCJpYXQiOjE2MTIwMTcxNDAsIm5iZiI6MTYxMjAxNzE0MH0.2yHDdP7cNT5uL5xA0-j_NgTK4GrW-HGn0KUxcbZfpKg"
                ],
                "Connection":[
                    "keep-alive"
                ],
                "Referer":[
                    "http://127.0.0.1:9999/swagger/index.html"
                ],
                "Sec-Fetch-Dest":[
                    "empty"
                ],
                "Sec-Fetch-Mode":[
                    "cors"
                ],
                "Sec-Fetch-Site":[
                    "same-origin"
                ],
                "User-Agent":[
                    "Mozilla/5.0 (Macintosh; Intel Mac OS X 10_15_6) AppleWebKit/537.36 (KHTML, like Gecko) Chrome/88.0.4324.96 Safari/537.36"
                ]
            },
            "body":""
        },
        "response":{
            "header":{
                "Content-Type":[
                    "application/json; charset=utf-8"
                ],
                "Trace-Id":[
                    "2cdb2f96934f573af391"
                ],
                "Vary":[
                    "Origin"
                ]
            },
            "body":{
                "code":1,
                "msg":"OK",
                "data":[
                    {
                        "name":"Tom",
                        "job":"Student"
                    },
                    {
                        "name":"Jack",
                        "job":"Teacher"
                    }
                ],
                "id":"2cdb2f96934f573af391"
            },
            "business_code":1,
            "business_code_msg":"OK",
            "http_code":200,
            "http_code_msg":"OK",
            "cost_seconds":0.054024874
        },
        "third_party_requests":[
            {
                "request":{
                    "ttl":"5s",
                    "method":"GET",
                    "decoded_url":"http://127.0.0.1:9999/demo/get/Tom",
                    "header":{
                        "Authorization":[
                            "eyJhbGciOiJIUzI1NiIsInR5cCI6IkpXVCJ9.eyJVc2VySUQiOjEsIlVzZXJOYW1lIjoieGlubGlhbmdub3RlIiwiZXhwIjoxNjEyMTAzNTQwLCJpYXQiOjE2MTIwMTcxNDAsIm5iZiI6MTYxMjAxNzE0MH0.2yHDdP7cNT5uL5xA0-j_NgTK4GrW-HGn0KUxcbZfpKg"
                        ],
                        "Content-Type":[
                            "application/x-www-form-urlencoded; charset=utf-8"
                        ],
                        "TRACE-ID":[
                            "2cdb2f96934f573af391"
                        ]
                    },
                    "body":null
                },
                "responses":[
                    {
                        "header":{
                            "Content-Length":[
                                "87"
                            ],
                            "Content-Type":[
                                "application/json; charset=utf-8"
                            ],
                            "Date":[
                                "Sat, 30 Jan 2021 14:32:48 GMT"
                            ],
                            "Trace-Id":[
                                "2cdb2f96934f573af391"
                            ],
                            "Vary":[
                                "Origin"
                            ]
                        },
                        "body":"{"code":1,"msg":"OK","data":{"name":"Tom","job":"Student"},"id":"2cdb2f96934f573af391"}",
                        "http_code":200,
                        "http_code_msg":"200 OK",
                        "cost_seconds":0.000555089
                    }
                ],
                "success":true,
                "cost_seconds":0.000580202
            },
            {
                "request":{
                    "ttl":"5s",
                    "method":"POST",
                    "decoded_url":"http://127.0.0.1:9999/demo/post",
                    "header":{
                        "Authorization":[
                            "eyJhbGciOiJIUzI1NiIsInR5cCI6IkpXVCJ9.eyJVc2VySUQiOjEsIlVzZXJOYW1lIjoieGlubGlhbmdub3RlIiwiZXhwIjoxNjEyMTAzNTQwLCJpYXQiOjE2MTIwMTcxNDAsIm5iZiI6MTYxMjAxNzE0MH0.2yHDdP7cNT5uL5xA0-j_NgTK4GrW-HGn0KUxcbZfpKg"
                        ],
                        "Content-Type":[
                            "application/x-www-form-urlencoded; charset=utf-8"
                        ],
                        "TRACE-ID":[
                            "2cdb2f96934f573af391"
                        ]
                    },
                    "body":"name=Jack"
                },
                "responses":[
                    {
                        "header":{
                            "Content-Length":[
                                "88"
                            ],
                            "Content-Type":[
                                "application/json; charset=utf-8"
                            ],
                            "Date":[
                                "Sat, 30 Jan 2021 14:32:48 GMT"
                            ],
                            "Trace-Id":[
                                "2cdb2f96934f573af391"
                            ],
                            "Vary":[
                                "Origin"
                            ]
                        },
                        "body":"{"code":1,"msg":"OK","data":{"name":"Jack","job":"Teacher"},"id":"2cdb2f96934f573af391"}",
                        "http_code":200,
                        "http_code_msg":"200 OK",
                        "cost_seconds":0.000450153
                    }
                ],
                "success":true,
                "cost_seconds":0.000468387
            }
        ],
        "debugs":[
            {
                "key":"res1.Data.Name",
                "value":"Tom",
                "cost_seconds":0.000005193
            },
            {
                "key":"res2.Data.Name",
                "value":"Jack",
                "cost_seconds":0.000003907
            },
            {
                "key":"redis-name",
                "value":"tom",
                "cost_seconds":0.000009816
            }
        ],
        "sqls":[
            {
                "timestamp":"2021-01-30 22:32:48",
                "stack":"/Users/xinliang/github/go-gin-api/internal/api/repository/db_repo/user_demo_repo/user_demo.go:76",
                "sql":"SELECT `id`,`user_name`,`nick_name`,`mobile` FROM `user_demo` WHERE user_name = 'test_user' and is_deleted = -1 ORDER BY `user_demo`.`id` LIMIT 1",
                "rows_affected":1,
                "cost_seconds":0.031969072
            }
        ],
        "redis":[
            {
                "timestamp":"2021-01-30 22:32:48",
                "handle":"set",
                "key":"name",
                "value":"tom",
                "ttl":10,
                "cost_seconds":0.009982091
            },
            {
                "timestamp":"2021-01-30 22:32:48",
                "handle":"get",
                "key":"name",
                "cost_seconds":0.010681579
            }
        ],
        "success":true,
        "cost_seconds":0.054025302
    }
}
zap 日志组件
有对日志收集感兴趣的老铁们可以往下看,trace_info 只是日志的一个参数,具体日志参数包括:
| 参数 | 数据类型 | 说明 |
|---|---|---|
| level | String | 日志级别,例如:info,warn,error,debug |
| time | String | 时间,例如:2021-01-30 16:05:44 |
| caller | String | 调用位置,文件+行号,例如:core/core.go:443 |
| msg | String | 日志信息,例如:xx 错误 |
| domain | String | 域名或服务名,例如:go-gin-api[fat] |
| method | String | 请求方式,例如:POST |
| path | String | 请求路径,例如:/user/create |
| http_code | Int | HTTP 状态码,例如:200 |
| business_code | Int | 业务状态码,例如:10101 |
| success | Bool | 状态,true or false |
| cost_seconds | Float64 | 花费时间,单位:秒,例如:0.01 |
| trace_id | String | 链路ID,例如:ec3c868c8dcccfe515ab |
| trace_info | Object | 链路信息,结构化数据。 |
| error | String | 错误信息,当出现错误时才有这字段。 |
| errorVerbose | String | 详细的错误堆栈信息,当出现错误时才有这字段。 |
日志记录可以使用 zap,logrus ,这次我使用的 zap,简单封装一下即可,比如:
支持设置日志级别; 支持设置日志输出到控制台; 支持设置日志输出到文件; 支持设置日志输出到文件(可自动分割);
总结
这个功能比较常用,使用起来也很爽,比如调用方发现接口出问题时,只需要提供 TRACE-ID 即可,我们就可以查到关于它整个链路的所有信息。
以上代码都在 go-gin-api 项目中,地址:https://github.com/xinliangnote/go-gin-api
推荐阅读
