如何使用 NestJs、PostgreSQL、Redis 构建基于用户设备的授权验证

设备认证和授权在网络应用安全方面至关重要。由于设备连接的增加,只有受信任的设备才能访问和与应用程序的资源进行交互,这一点至关重要。本文将解决一个现实问题,并为开发人员提供实用的见解,以增强其应用程序的安全性。
设备认证和授权在确保Web应用程序安全方面起着至关重要的作用。它们是维护敏感数据、用户账户和应用程序整体完整性的综合安全策略的重要组成部分。
设备认证是验证设备身份和合法性的过程,该设备试图访问系统或应用程序。当设备身份得到验证后,设备授权便着重于确定它在应用程序中可以执行哪些操作。
以下是设备认证和授权重要性的一些原因:
它防止未经授权的访问信息和非法用户。
它减轻了账户劫持攻击。
它增强了双因素认证(two-factor authentication)。
它为在线银行或金融交易等活动增加了额外的安全层。
它可以帮助防止跨站请求伪造(CSRF)攻击。
它保护用户的隐私,从而减少其个人信息的潜在曝光。
我们将使用NestJs和Redis来进行演示。NestJs是一个用于构建服务器端应用程序的NodeJs框架。我们将在该项目的服务器端使用它。Redis是一个开源的内存数据存储,用作数据库、缓存、流引擎和消息代理。在本文中,我们将利用缓存功能。借助NestJs作为我们的后端服务器,Redis用于缓存,以及PostgreSQL用于数据库,让我们进行设备认证和授权。
创建我们的 Docker-compose 文件
创建项目文件夹 device-authentication ,或者你可以随意命名。在其中创建一个文件 docker-compose.yaml 。使用Docker,我们不需要在本地机器上安装PostgreSQL数据库或Redis。
# device-authentication/docker-compose.yaml
version: "3.7"
services:
 postgres:
   image: postgres:13-alpine
   restart: always
   env_file:
     - .env
   environment:
     - POSTGRES_USER=$POSTGRES_USER
     - POSTGRES_PASSWORD=$POSTGRES_PASSWORD
   ports:
     - "$POSTGRES_PORT:$POSTGRES_PORT_DOCKER"

   volumes:
     - postgres_data:/var/lib/postgresql/data
   networks:
     - db_network

 redis:
   image: redis
   container_name: our_redis
   command: redis-server --save 60 1 --loglevel warning
   env_file:
     - .env
   environment:
     - ALLOW_EMPTY_PASSWORD=yes
     - REDIS_REPLICATION_MODE=master
   ports:
     - "6379:6379"
   hostname: redis
   restart: always
   depends_on:
     - postgres

volumes:
 postgres_data:

networks:
 db_network:
总的来说,上面的 docker-compose.yml 文件定义了两个服务:PostgreSQL和Redis。我们将Redis服务命名为 our_redis 。我们还设置了它们的配置、依赖关系、环境变量、端口、卷和网络。
创建.env文件
在我们开始容器之前,我们需要创建一个 .env 来存储我们的环境变量。现在,创建该文件并添加以下内容:
POSTGRES_USER=postgres

POSTGRES_URL=postgresql://postgres:12345@localhost:5432/device-postgres?schema=public

POSTGRES_PASSWORD=12345

POSTGRES_PORT_DOCKER=5432

POSTGRES_PORT=5432
在上述的 .env 文件中,我们指定了我们的PostgreSQL数据库的用户。我们还设置了我们数据库的URL、数据库的端口以及PostgreSQL密码。
启动我们的容器
运行下面的命令来启动我们的容器。
docker compose up
我们应该看到以下内容:

安装 NestJs
为了与我们的容器进行通信,我们需要一个后端服务器。
通过运行以下命令在全局安装 Nestjs CLI:
npm i -g @nestjs/cli
进入 device-authentication 文件夹,并通过运行以下命令创建一个 NestJs 应用程序:
nest new .安装其他依赖
安装以下依赖项:
npm i typeorm @nestjs/typeorm dotenv @nestjs/cache-manager cache-manager cache-manager-redis-store@2 @types/cache-manager-redis-store @nestjs/jwt device-detector-js
在上面的依赖项中,我们有以下内容:
@nestjs/cache-manager :这有助于将缓存功能集成到应用程序中。
cache-manager :这使得函数在缓存中的封装变得容易。
cache-manager-redis-store@2 :这是Redis版本2的缓存存储实现。
@nestjs/jwt :这是一个基于 jsonwebtoken 包的Nest的JWT实用程序模块。
device-detector-js :这将解析或检测任何用户代理和浏览器、操作系统、设备等。
dotenv :该模块帮助将环境变量从 .env 文件加载到 process.env 中。
typeorm @nestjs/typeorm :由于我们使用PostgreSQL,我们需要它作为我们的对象关系模型。
运行我们的服务器
运行下面的命令来启动我们的服务器。
npm run start:dev
我们应该在控制台中看到以下内容:
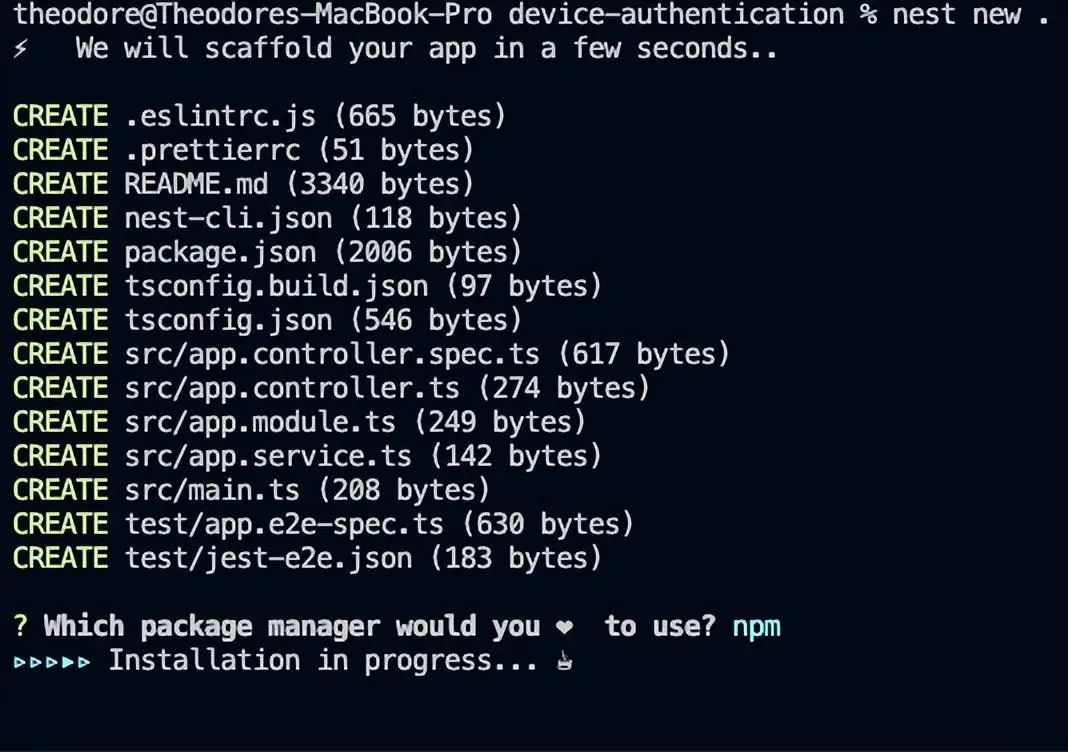
创建用户实体
对于这个简单的项目,我们需要一个用户实体。用户实体将具有列 id , name , email 和 password 。在 src 文件夹内,创建一个名为 entities 的文件夹,并在其中创建一个文件 user.ts 。然后,在这个新文件中添加以下代码。
// src/entities/user.ts
import { Column, Entity, PrimaryGeneratedColumn } from "typeorm";

@Entity()
export class User {
 @PrimaryGeneratedColumn("uuid")
 id?: string;

 @Column({ type: "varchar", nullable: false })
 name: string;

 @Column({ type: "varchar", nullable: false, unique: true })
 email: string;

 @Column({ type: "varchar", nullable: false })
 password: string;
}

export default User;
上面代码中的 id 列是主字段。
创建 Redis Provider
在这一点上,我们需要创建一个关于Redis的代码程序来处理用户设备上的缓存。它将允许我们在Redis缓存中获取、设置、删除和重置键。
在 src 文件夹内创建一个名为 providers 的文件夹。在这个“providers”文件夹内创建一个名为 redis-cache 的文件夹。在这个新文件夹内,创建文件 redis-cache.module.ts 和 redis-cache.service.ts 。现在将以下内容添加到这些新文件中:
在 redis-cache.service.ts 文件中添加以下内容:
// /src/providers/redis-cache/redis-cache.service.ts
import { Inject, Injectable } from "@nestjs/common";
import { CACHE_MANAGER } from "@nestjs/cache-manager";
import { Cache } from "cache-manager";

@Injectable()
export class RedisCacheService {
 constructor(@Inject(CACHE_MANAGER) private readonly cache: Cache) {}

 async get(key: string): Promise<any> {
   return await this.cache.get(key);
 }

 async set<T>(key: string, value: T) {
   await this.cache.set(key, value);
 }

 async reset() {
   await this.cache.reset();
 }

 async del(key: string) {
   await this.cache.del(key);
 }
}
从上面的代码中,我们导入了 Inject 和 Injectable ,以允许我们的 RedisCacheService 可以注入依赖项。我们还导入了 CACHE-MANAGER 令牌,用于注入缓存管理器实例。
在 redis-cache.module.ts 文件中添加以下内容:
import { Module } from "@nestjs/common";
import { RedisCacheService } from "./redis-cache.service";
import { CacheModule } from "@nestjs/cache-manager";
import * as redisStore from "cache-manager-redis-store";

@Module({
 imports: [
   CacheModule.register({
     isGlobal: true,
     store: redisStore,
     host: "localhost",
     port: "6379",
     ttl: 300, // 5 minutes
   }),
 ],
 providers: [RedisCacheService],
 exports: [RedisCacheService],
})
export class RedisCacheModule {}
在上面的代码中,我们将我们的缓存模块注册为 redisStore 。我们将主机和端口指定为 localhost 和 6379 。回想一下,在我们的 docker-compose.yaml 文件中,我们将 ttl (存活时间)设置为 300 秒,即5分钟。因此,存储在我们的Redis存储中的数据将在 300 秒后过期并被删除。最后,我们提供并导出了 RedisCacheModule ,以便其他模块可以使用。
实施认证模块
在认证模块中,我们将使用JSON Web Tokens。这样,当用户注册我们的应用程序时,我们仍然可以通过验证我们给予他们的令牌来验证任何进一步的请求。
此外,通过这个令牌,我们可以比较他们在发出这些请求时所使用的设备。
在“src”文件夹内创建一个名为 modules 的文件夹。在modules文件夹内创建一个文件夹 auth 。
创建身份验证服务
我们将创建一个身份验证服务来处理注册和登录功能。在 auth 文件夹中,创建一个 auth.service.ts 文件,并添加以下内容:
// src/modules/auth/auth.service.ts
import { HttpException, HttpStatus, Injectable } from "@nestjs/common";
import { JwtService } from "@nestjs/jwt";
import User from "src/entities/user";
import { InjectRepository } from "@nestjs/typeorm";
import { Repository } from "typeorm";

export type TUser = {
 id?: string;
 name?: string;
 email: string;
 password: string;
};

@Injectable()
export class AuthService {
 constructor(
   private jwtService: JwtService,
   @InjectRepository(User) private UserRepo: Repository<User>,
 ) {}

 async signUp(name, email, password) {
   const foundUser: TUser = await this.UserRepo.findOne({
     where: { email },
   });
   if (foundUser) {
     throw new HttpException("user already exists", HttpStatus.BAD_REQUEST);
   }
   const newUser: TUser = this.UserRepo.create({ name, email, password });
   await this.UserRepo.save(newUser);

   const payload = {
     id: newUser.id,
     name: newUser.name,
     email: newUser.email,
   };

   return {
     access_token: await this.jwtService.signAsync(payload),
     statusCode: 200,
   };
 }

 async signIn(email, password) {
   const foundUser: TUser = await this.UserRepo.findOne({
     where: { email },
   });

   if (!foundUser) {
     throw new HttpException("User not registered", HttpStatus.BAD_REQUEST);
   }

   if (foundUser?.password !== password) {
     throw new HttpException(
       "Email or password is incorrect!",
       HttpStatus.BAD_REQUEST,
     );
   }
   const payload = {
     id: foundUser.id,
     name: foundUser.name,
     email: foundUser.email,
   };

   return {
     access_token: await this.jwtService.signAsync(payload),
     statusCode: 200,
   };
 }
}
当客户注册或登录时,我们会向客户返回一个访问令牌,即 jwt 令牌。
注意:我们可以通过将 jwt 令牌传递给请求头来使用cookies或会话。但为了简单起见,我们将在请求和响应体之间使用 jwt 令牌。
这些令牌包含了发起这些请求的用户的有效载荷。
创建身份验证控制器
我们还没有创建一个控制器来调用我们的服务。在 auth 文件夹内,创建文件 auth.controller.ts 。
// src/modules/auth/auth.controller.ts
import { Controller, Post, Req, Res, Body } from "@nestjs/common";
import { AuthService } from "./auth.service";
import { Request, Response } from "express";

@Controller("auth")
export class AuthController {
 constructor(private readonly AuthServiceX: AuthService) {}

 @Post("signup")
 async signup(
   @Req() req: Request,
   @Res() res: Response,
   @Body() body: { name: string; email: string; password: string },
 ) {
   let { name, email, password } = body;
   let newUser = await this.AuthServiceX.signUp(name, email, password);
   res.status(newUser.statusCode).send(newUser);
 }

 @Post("signin")
 async signin(
   @Req() req: Request,
   @Res() res: Response,
   @Body() body: { email; password },
 ) {
   let { email, password } = body;
   let user = await this.AuthServiceX.signIn(email, password);
   res.status(user.statusCode).send(user);
 }
}
上面的控制器处理对 /auth 路由的请求。注册路由 /auth/signup 从请求体中获取用户详细信息,并调用 AuthServiceX 的 signUp() 函数,这是我们之前创建的身份验证服务的实例。
组合认证模块
我们想要导入认证控制器和服务以及 jwt 服务。因此,在 auth 模块中创建文件 auth.module.ts ,并将以下内容添加到文件中:
// src/modules/auth/auth.module.ts
import { Module } from "@nestjs/common";
import { AuthService } from "./auth.service";
import { AuthController } from "./auth.controller";
import { JwtModule } from "@nestjs/jwt";
import { RedisCacheModule } from "src/providers/redis-cache/redis-cache.module";
import { TypeOrmModule } from "@nestjs/typeorm";
import User from "../../entities/user";

@Module({
 imports: [
   JwtModule.register({
     secret: "skdf234w3mer",
     signOptions: { expiresIn: "5m" },
   }),
   RedisCacheModule,
   TypeOrmModule.forFeature([User]),
 ],
 providers: [AuthService],
 controllers: [AuthController],
})
export class AuthModule {}
在上面的文件中,我们导入了 JwtModule 和 TypeOrmModule ,因为我们在我们的认证模块的服务和控制器中需要它们。虽然 RedisCacheModule 尚未被使用,但我们还是导入了它。然后我们还提供了 AuthService 和 AuthController 。
注意:我们配置了 JWTModule ,使令牌在5分钟后过期,这是我们Redis缓存中每个键值数据的过期时间。
更新app.module.ts
此外,我们需要更新我们应用程序的应用模块,以整合我们的认证模块和其他在应用程序中所需的模块。在我们的 src 文件夹中更新 app.module.ts 文件,添加以下内容:
// src/app.module.ts
import { Module } from "@nestjs/common";
import { AppController } from "./app.controller";
import { AppService } from "./app.service";
import { RedisCacheModule } from "./providers/redis-cache/redis-cache.module";
import { TypeOrmModule, TypeOrmModuleOptions } from "@nestjs/typeorm";
import { config } from "dotenv";
import User from "./entities/user";
import { AuthModule } from "./modules/auth/auth.module";
config();

export const dbConfig: TypeOrmModuleOptions = {
 url: process.env.POSTGRES_URL,
 type: "postgres",
 entities: [User],
 synchronize: true,
} as TypeOrmModuleOptions;

@Module({
 imports: [TypeOrmModule.forRoot(dbConfig), RedisCacheModule, AuthModule],
 controllers: [AppController],
 providers: [AppService],
})
export class AppModule {}
在上面的代码中,我们配置了我们的PostgreSQL数据库。此外,我们还导入了 TypeOrmModule , RedisCacheModule 和 AuthModule 。
测试我们的身份验证模块
到目前为止,我们还没有测试过我们的应用。现在,让我们注册并登录。

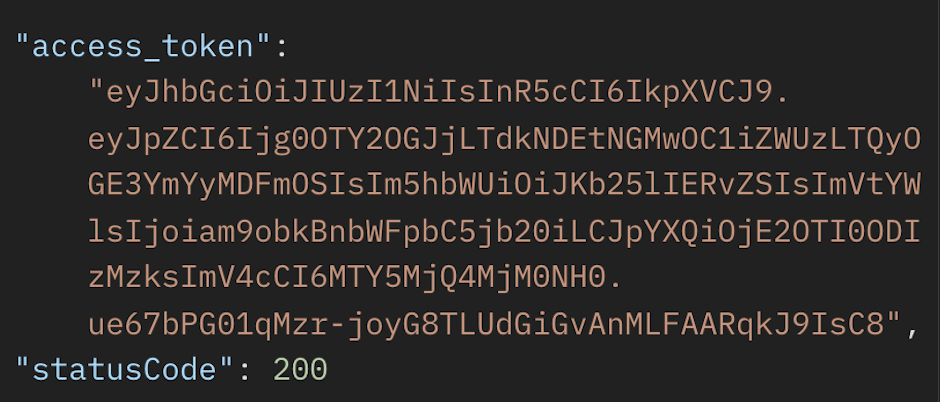
当用户注册或登录时,他们会收到一个访问令牌,通过该令牌他们可以发送请求。
这就是设备认证和授权的作用。我们需要确保使用相同的访问令牌进行请求的是同一用户和设备,而不是未经授权的用户或设备。
添加Redis和设备检测器
用户的令牌和设备必须缓存在我们的Redis存储中。这很棒,因为它提高了应用程序的性能。正如我们将看到的,除非我们检查存储并验证用户的设备,否则我们将无法调用路由。
创建身份验证守卫
一个守卫将通过要求请求中存在有效的JWT来帮助我们保护终端点。此外,我们还将确保请求是由有效用户设备发出的。在 auth 文件夹中创建一个 auth.guard.ts 文件,并添加以下代码:
// src/modules/auth/auth.guard.ts
import {
 CanActivate,
 ExecutionContext,
 HttpException,
 HttpStatus,
 Injectable,
 UnauthorizedException,
} from "@nestjs/common";
import { JwtService } from "@nestjs/jwt";
import { Request } from "express";
import * as DeviceDetector from "device-detector-js";
import { RedisCacheService } from "src/providers/redis-cache/redis-cache.service";

@Injectable()
export class AuthGuard implements CanActivate {
 private deviceDetector = new DeviceDetector();

 constructor(
   private jwtService: JwtService,
   private redisCacheService: RedisCacheService,
 ) {}

 async canActivate(context: ExecutionContext): Promise<boolean> {
   const request = context.switchToHttp().getRequest();
   const token = this.extractTokenFromBody(request);
   const clientDevice = this.getUserDevice(request);

   if (!token) {
     throw new UnauthorizedException();
   }
   try {
     const payload = await this.jwtService.verifyAsync(token);

     // add payload information to request object
     request["payload"] = payload;

     // check if user is already logged in
     let deviceToken = await this.redisCacheService.get(payload.email);
     deviceToken = await JSON.parse(deviceToken);

     if (deviceToken) {
       if (
         !(
           deviceToken.token === payload.email &&
           deviceToken.device.client === clientDevice.client.name
         )
       ) {
         // user is not authorized
         throw new HttpException(
           "You are already logged in on another device",
           HttpStatus.UNAUTHORIZED,
         );
       }
     } else {
       // cache user device
       let emailKey = payload.email;
       let newDeviceToken = {
         token: emailKey,
         device: {
           client: clientDevice.client.name,
           type: clientDevice.client.type,
           version: clientDevice.client.version,
         },
       };

       await this.redisCacheService.set(
         emailKey,
         JSON.stringify(newDeviceToken),
       );
     }
   } catch (error) {
     throw new UnauthorizedException(error.message);
   }

   return true;
 }

 private extractTokenFromBody(request: Request): string | undefined {
   const token = request.body["access-token"];
   return token;
 }

 private getUserDevice(request: Request) {
   const device = this.deviceDetector.parse(request.headers["user-agent"]);
   return device;
 }
}
在上面的代码中,在 line 17 中,我们创建了一个新的设备检测器实例 deviceDetector ,以帮助我们获取客户端设备信息。我们创建了执行上下文 canActivate ,如果当前请求可以继续,则返回true或false。
注意:在 line 36 中,我们将用户有效负载添加到请求对象中。这样我们就可以在路由处理程序中访问它。我们将在本文的注销部分中看到这一点。
lines 79-82 , extractTokenFromBody() 函数帮助我们从请求的主体中提取令牌。正如名称所示, getUserDevice() 函数在 lines 84-87 中获取用户的设备详细信息。用户的设备信息将如下所示:
// A typical device
{
 "client": {
   "type": "browser",
   "name": "Chrome",
   "version": "69.0",
   "engine": "Blink",
   "engineVersion": ""
 },
 "os": {
   "name": "Mac",
   "version": "10.13",
   "platform": ""
 },
 "device": {
   "type": "desktop",
   "brand": "Apple",
   "model": ""
 },
 "bot": null
}
在 lines 24-30 中,我们从用户的请求中获取了令牌和用户的设备。JWT令牌已经通过验证。如果没有令牌,我们会抛出未经授权的异常。
在上面的代码中,以下的 lines 36 and 37 帮助我们使用从用户获取的负载中的 email 地址来获取用户的最后活跃设备,使用我们的 redisCacheService 实例的 get() 方法。
帮助验证缓存用户设备是否与用户当前发送请求的设备相同。如果不相同, lines 47-50 将抛出一个错误,错误信息为 "You are already logged in on another device." 。
更新认证服务
现在,我们希望限制客户端尝试使用其他设备登录,并限制从我们的服务器访问资源。因此,我们需要在用户登录时缓存用户的有效载荷和设备信息。我们还需要创建一个名为 sayHello() 的新方法,用于身份验证保护。通过添加下面的函数来更新 auth.service.ts :
// src/module/auth/auth.service.ts
import {
 HttpException,
 HttpStatus,
 Injectable,
 UnauthorizedException,
} from "@nestjs/common";
import { JwtService } from "@nestjs/jwt";
import { RedisCacheService } from "src/providers/redis-cache/redis-cache.service";
import User from "src/entities/user";
import { InjectRepository } from "@nestjs/typeorm";
import { Repository } from "typeorm";
import { Tuser } from "./auth.dto";
import * as DeviceDetector from "device-detector-js";

export type TUser = {
 id?: string;
 name?: string;
 email: string;
 password: string;
};

@Injectable()
export class AuthService {
 private deviceDetector = new DeviceDetector();

 constructor(
   private jwtService: JwtService,
   @InjectRepository(User) private UserRepo: Repository<User>,
   private redisCacheService: RedisCacheService,
 ) {}

 async signUp(name, email, password) {
   const foundUser: TUser = await this.UserRepo.findOne({
     where: { email },
   });
   if (foundUser) {
     throw new HttpException("user already exists", HttpStatus.BAD_REQUEST);
   }
   const newUser: TUser = this.UserRepo.create({ name, email, password });
   await this.UserRepo.save(newUser);

   const payload = {
     id: newUser.id,
     name: newUser.name,
     email: newUser.email,
   };

   return {
     access_token: await this.jwtService.signAsync(payload),
     statusCode: 200,
   };
 }

 async signIn(email, password, req) {
   const foundUser: TUser = await this.UserRepo.findOne({
     where: { email },
   });

   if (!foundUser) {
     throw new HttpException("User not registered", HttpStatus.BAD_REQUEST);
   }

   if (foundUser?.password !== password) {
     throw new HttpException(
       "Email or password is incorrect!",
       HttpStatus.BAD_REQUEST,
     );
   }
   const payload = {
     id: foundUser.id,
     name: foundUser.name,
     email: foundUser.email,
   };

   try {
     // check if user is already signed in on another device
     const clientDevice = this.deviceDetector.parse(req.headers["user-agent"]);
     let deviceToken = await this.redisCacheService.get(payload.email);
     deviceToken = await JSON.parse(deviceToken);

     // if user is logged in on another device
     if (
       deviceToken &&
       !(
         deviceToken.token === payload.email &&
         deviceToken?.device?.client === clientDevice.client.name
       )
     ) {
       throw new HttpException(
         "You are already logged in on another device",
         HttpStatus.FORBIDDEN,
       );
     } else {
       // cache user's device
       let emailKey = payload.email;
       let newDeviceToken = {
         token: emailKey,
         device: {
           client: clientDevice.client.name,
           type: clientDevice.client.type,
           version: clientDevice.client.version,
         },
       };
       await this.redisCacheService.set(
         emailKey,
         JSON.stringify(newDeviceToken),
       );

       return {
         message: "Signin successful!",
         access_token: await this.jwtService.signAsync(payload),
         statusCode: 200,
       };
     }
   } catch (error) {
     throw new UnauthorizedException(error.message);
   }
 }

 async sayHello() {
   return {
     message: "Hello!",
     statusCode: 200,
   };
 }
}
我们在上面的代码中导入了 RedisCacheService 和 DeviceDetector 。
从 line 77-94 ,我们通过将请求头传递给 deviceDetector 实例来检查用户是否已经登录。然后,我们将设备与其他可能已登录的设备进行比较。如果设备和电子邮件地址匹配,我们会抛出一个错误。在某些情况下,为了提高安全性,可能不会使用电子邮件。
在 lines 95-114 中,如果用户没有在其他地方登录,我们会缓存设备。
在 lines 121-125 中,我们创建了 sayHello() 服务,如果设备已经授权,它将返回 "Hello!" 作为响应。这只是为了演示已经认证或未认证的设备尝试进行 GET 请求时的情况。
更新身份验证控制器
通过导入身份验证守卫并创建一个路由 /hello 来更新auth控制器,用于 signUp() 服务函数。
// src/auth/auth.controller.ts
import {
 Controller,
 Post,
 Req,
 Res,
 Body,
 UseGuards,
 Get,
} from "@nestjs/common";
import { AuthService } from "./auth.service";
import { Request, Response } from "express";
import { AuthGuard } from "./auth.guard";

@Controller("auth")
export class AuthController {
 constructor(private readonly AuthServiceX: AuthService) {}

 @Post("signup")
 async signup(
   @Req() req: Request,
   @Res() res: Response,
   @Body() body: { name: string; email: string; password: string },
 ) {
   let { name, email, password } = body;
   let newUser = await this.AuthServiceX.signUp(name, email, password);
   res.status(newUser.statusCode).send(newUser);
 }

 @Post("signin")
 async signin(
   @Req() req: Request,
   @Res() res: Response,
   @Body() body: { email; password },
 ) {
   let { email, password } = body;
   let user = await this.AuthServiceX.signIn(email, password);
   res.status(user.statusCode).send(user);
 }
 // Guard this route
 @UseGuards(AuthGuard)
 @Get("hello")
 async sayHello(@Req() req: Request, @Res() res: Response) {
   let { statusCode, message } = await this.AuthServiceX.sayHello();
   res.status(statusCode).send(message);
 }
}
在上面的代码中,我们导入了身份验证守卫,以验证用户在访问 /auth/hello 路由时的设备。回想一下身份验证服务的 signUp() 方法。
使用不同的客户端设备进行测试
为了测试我们的应用程序,我们需要使用Postman、HTTPie和CURL作为客户端设备。所以让我们使用Postman登录我们的应用程序,然后使用访问令牌向 /auth/hello 路由发送请求。
所以,我们使用Postman进行登录。
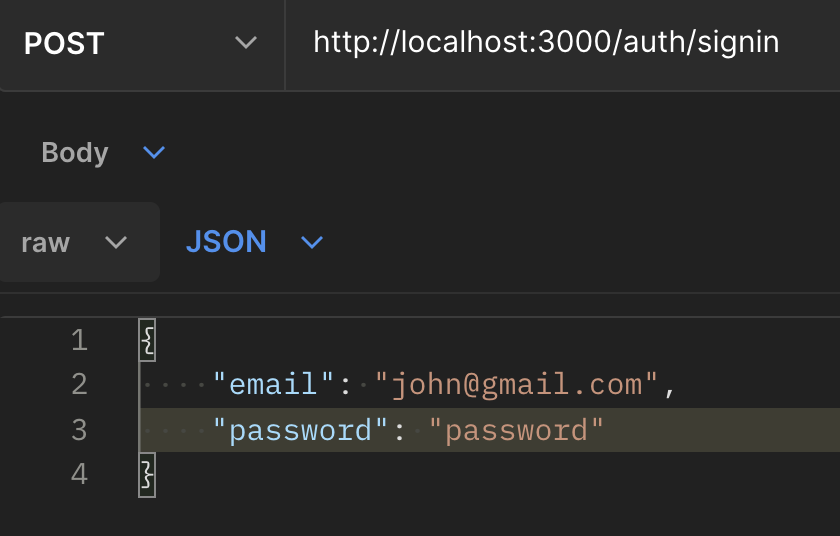
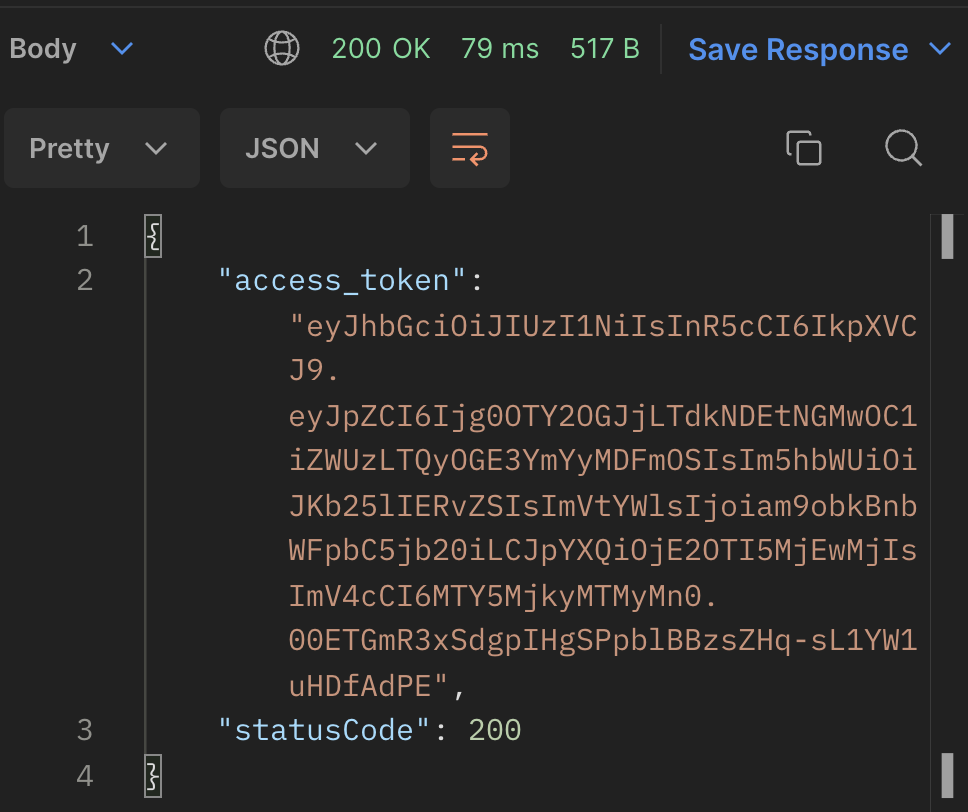
现在,让我们使用Postman、CURL和HTTpie访问 /auth/hello 路由。
使用Postman进行测试
通过授权设备发送一个请求。
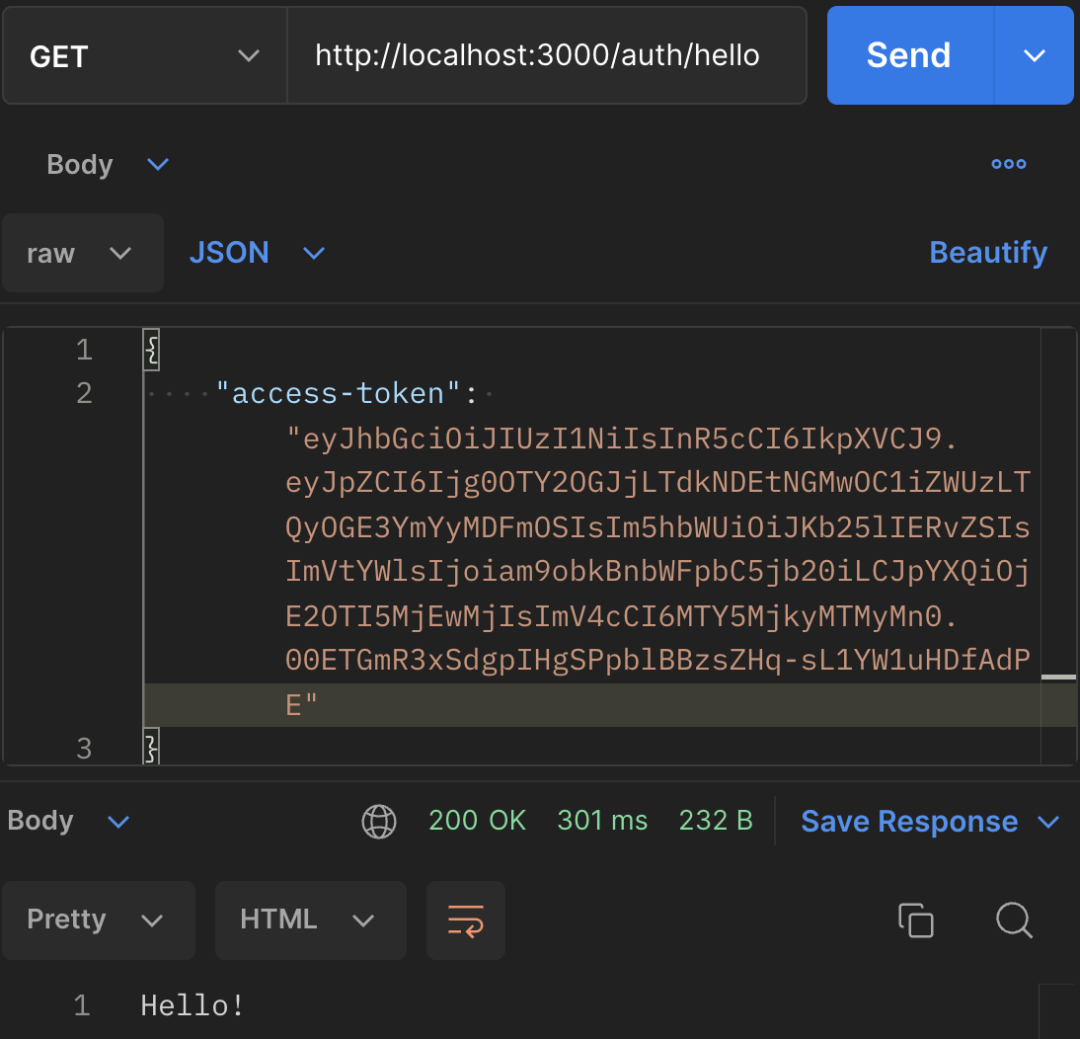
正如我们所看到的,请求成功并返回了状态码 200 和响应 "Hello!" 。原因是我们使用了这个设备进行登录。
使用HTTpie进行测试
现在我们可以访问JWT令牌,这是我们在Postman登录时返回的 access-token ,让我们使用该令牌在另一台设备上发出请求。

从上面的图片可以看出,该请求未成功,因为它来自一个未经授权的设备。
使用CURL进行测试
现在,让我们使用CURL在另外一个设备进行请求
curl --location --request GET 'http://localhost:3000/auth/hello' \ --header
'Content-Type: application/json' \ --data-raw '{ "access-token":
"eyJhbGciOiJIUzI1NiIsInR5cCI6IkpXVCJ9.eyJpZCI6Ijg0OTY2OGJjLTdkNDEtNGMwOC1iZWUzLTQyOGE3YmYyMDFmOSIsIm5hbWUiOiJKb25lIERvZSIsImVtYWlsIjoiam9obkBnbWFpbC5jb20iLCJpYXQiOjE2OTI5MjEwMjIsImV4cCI6MTY5MjkyMTMyMn0.00ETGmR3xSdgpIHgSPpblBBzsZHq-sL1YW1uHDfAdPE"
}'
这也未能获取资源,如下所示:

退出登录
当用户退出登录时,我们希望能够从Redis缓存中删除他们的密钥或数据。这将在身份验证控制器和身份验证服务中实现。在身份验证控制器中,我们将添加我们创建的守卫,并将请求对象传递给我们将创建的服务函数。在服务中,我们将创建一个函数,用于从Redis缓存中删除用户的电子邮件密钥。
将以下代码添加到身份验证控制器中:
// src/auth/auth.controller.ts
...
@UseGuards(AuthGuard)
@Get("signout")
async signout(@Req() req: Request, @Res() res: Response) {
 let { statusCode, message } = await this.AuthServiceX.signout(req);
 res.status(statusCode).send(message);
}
...
在上面的代码中,我们将请求对象传递给身份验证服务的 signout() 函数,我们很快就会创建这个函数。这是因为我们需要用户的电子邮件来能够从Redis缓存中删除他们的密钥和信息。请记住,我们的请求对象有一个 payload 属性,我们在创建身份验证守卫时给了这个对象。
将以下代码添加到身份验证服务中:
// src/auth/auth.controller.ts
...
async signout(req) {
 const { email } = req.payload;
 await this.redisCacheService.del(email);
 return {
   message: "Signout successful",
   statusCode: 200,
 };
}
...
在上面的代码中,我们调用了 del() 实例的 redisCacheService 方法。这将从包含用户设备详细信息的缓存中删除用户的电子邮件键。
注意:由于密钥已从Redis缓存中删除,我们还必须在成功注销后从客户端删除JWT令牌。
完整代码
https://github.com/Theodore-Kelechukwu-Onyejiaku/nestjs-device-auth-template
结束
正如我们所看到的,设备认证和授权在Web应用程序的安全中起着重要作用。我们使用Redis Cache存储和设备检测器包来存储用户已登录设备的键值信息以及他们的JSON Web令牌,从而确保当他们尝试登录或访问资源时,他们的设备得到认证。
由于文章内容篇幅有限,今天的内容就分享到这里,文章结尾,我想提醒您,文章的创作不易,如果您喜欢我的分享,请别忘了点赞和转发,让更多有需要的人看到。同时,如果您想获取更多前端技术的知识,欢迎关注我,您的支持将是我分享最大的动力。我会持续输出更多内容,敬请期待。
