
SpringBoot四大核心组件,你知道几个?

来源:blog.csdn.net/u011909918/
前言
先透露一下,四大组件分别是:starter, autoconfigure, CLI 以及actuator。下面我们就来详细介绍一些他们有什么用。
一、Spring Boot Starter
1.1 Starter的应用示例
<dependency>
    <groupId>org.springframework.boot</groupId>
    <artifactId>spring-boot-starter-thymeleaf</artifactId>
</dependency>

<dependency>
    <groupId>org.mybatis.spring.boot</groupId>
    <artifactId>mybatis-spring-boot-starter</artifactId>
    <version>1.3.2</version>
</dependency>
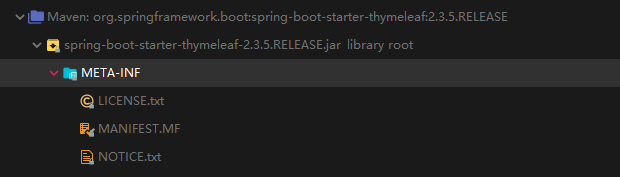
在我们的Spring Boot项目种的POM文件中总会看到这两种依赖:
spring-boot-starter-xxx 和 xxx-spring-boot-starter。
这就是spring boot的四大组件之一的starter。
a、spring-boot-starter-thymeleaf
b、mybatis-spring-boot-starter
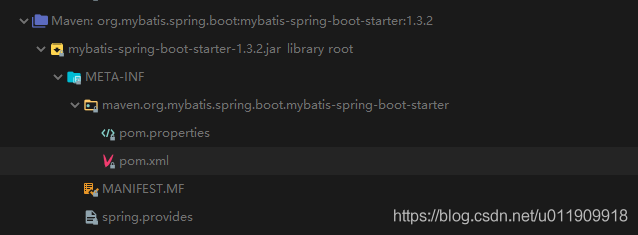
两种starter的区别就是 >>
官方提供的starter是这样的:spring-boot-starter-xxx 非官方的starter是这样的:xxx-spring-boot-starter
其中xxx就是我们想要依赖的组件或者jar包。上例就是我们spring boot用来引入thymeleaf引擎和mybatis框架所配置的依赖。引入之后通过简单的约定配置就可以正常使用。比如:
Thymeleaf引擎约定配置:
##前端引擎配置
spring:
  thymeleaf:
    enabled: true
    servlet:
      content-type: text/html
    mode: HTML
    # 页面前缀
    prefix: classpath:/templates/
    # 后缀
    suffix: .html
Mybatis约定配置:
mybatis:
  mapper-locations: classpath:mapper/*.xml  #注意:一定要对应mapper映射xml文件的所在路径
  type-aliases-package: com.hi.ld.vo.system  # 注意:对应实体类的路径
  configuration:
    log-impl: org.apache.ibatis.logging.stdout.StdOutImpl
下面让我们来看看以前怎么配置thymeleaf。
1.2 Spring Boot之前的Thymeleaf和Mybatis应用
废话不多说,直接上代码:
1.2.1 Thymeleaf配置
a. 添加对应依赖:
<dependency>
  <groupId>org.thymeleaf</groupId>
  <artifactId>thymeleaf-spring5</artifactId>
  <version>3.0.11.RELEASE</version>
</dependency>
<dependency>
  <groupId>org.thymeleaf.extras</groupId>
  <artifactId>thymeleaf-extras-java8time</artifactId>
  <version>3.0.4.RELEASE</version>
</dependency>
b. bean配置
<bean id="templateResolver"
       class="org.thymeleaf.templateresolver.ServletContextTemplateResolver">
  <property name="prefix" value="/WEB-INF/templates/" />
  <property name="suffix" value=".html" />
  <property name="templateMode" value="HTML5" />
</bean>

<bean id="templateEngine"
      class="org.thymeleaf.spring4.SpringTemplateEngine">
  <property name="templateResolver" ref="templateResolver" />
</bean>

<bean class="org.thymeleaf.spring4.view.ThymeleafViewResolver">
  <property name="templateEngine" ref="templateEngine" />
</bean>
1.2.2 Mybatis配置
a. 添加对应依赖:
 <dependency>
   <groupId>org.springframework.boot</groupId>
   <artifactId>spring-boot-starter-jdbc</artifactId>
 </dependency>
 <dependency>
   <groupId>org.mybatis</groupId>
   <artifactId>mybatis</artifactId>
 </dependency>
 <dependency>
   <groupId>org.mybatis</groupId>
   <artifactId>mybatis-spring</artifactId>
 </dependency>
b. bean配置
下面的第3, 4步骤就是Mybatis相关配置。第一步是引入资源配置。第二步是配置数据源
<?xml version="1.0" encoding="UTF-8"?>
<beans xmlns="http://www.springframework.org/schema/beans"
 xmlns:xsi="http://www.w3.org/2001/XMLSchema-instance" xmlns:context="http://www.springframework.org/schema/context"
 xsi:schemaLocation="http://www.springframework.org/schema/beans
 http://www.springframework.org/schema/beans/spring-beans.xsd
 http://www.springframework.org/schema/context
 http://www.springframework.org/schema/context/spring-context.xsd">
 <!-- 配置整合mybatis过程 -->
 <!-- 1.配置数据库相关参数properties的属性:${url} -->
 <context:property-placeholder location="classpath:jdbc.properties" />

 <!-- 2.数据库连接池 -->
 <bean id="dataSource" class="com.mchange.v2.c3p0.ComboPooledDataSource">
  <!-- 配置连接池属性 -->
  <property name="driverClass" value="${jdbc.driver}" />
  <property name="jdbcUrl" value="${jdbc.url}" />
  <property name="user" value="${jdbc.username}" />
  <property name="password" value="${jdbc.password}" />

  <!-- c3p0连接池的私有属性 -->
  <property name="maxPoolSize" value="30" />
  <property name="minPoolSize" value="10" />
  <!-- 关闭连接后不自动commit -->
  <property name="autoCommitOnClose" value="false" />
  <!-- 获取连接超时时间 -->
  <property name="checkoutTimeout" value="10000" />
  <!-- 当获取连接失败重试次数 -->
  <property name="acquireRetryAttempts" value="2" />
 </bean>

 <!-- 3.配置SqlSessionFactory对象 -->
 <bean id="sqlSessionFactory" class="org.mybatis.spring.SqlSessionFactoryBean">
  <!-- 注入数据库连接池 -->
  <property name="dataSource" ref="dataSource" />
  <!-- 配置MyBaties全局配置文件:mybatis-config.xml -->
  <property name="configLocation" value="classpath:mybatis-config.xml" />
  <!-- 扫描entity包 使用别名 -->
  <property name="typeAliasesPackage" value="com.soecode.lyf.entity" />
  <!-- 扫描sql配置文件:mapper需要的xml文件 -->
  <property name="mapperLocations" value="classpath:mapper/*.xml" />
 </bean>

 <!-- 4.配置扫描Dao接口包,动态实现Dao接口,注入到spring容器中 -->
 <bean class="org.mybatis.spring.mapper.MapperScannerConfigurer">
  <!-- 注入sqlSessionFactory -->
  <property name="sqlSessionFactoryBeanName" value="sqlSessionFactory" />
  <!-- 给出需要扫描Dao接口包 -->
  <property name="basePackage" value="com.soecode.lyf.dao" />
 </bean>
</beans>
1.2.3 小结
a、Starter 帮我们封装好了所有需要的依赖,避免我们自己添加导致的一些Jar包冲突或者缺少包的情况;
b、Starter帮我们自动注入了需要的Bean实例到Spring 容器中,不需要我们手动配置(这个可以说是starter干的,实际上并不是,这里埋个坑,下面解答);
所以: starter包的内容就是pom文件,就是一个依赖传递包。
对了,如果您正在学习Spring Boot,那么推荐一个连载多年还在继续更新的免费教程:http://blog.didispace.com/spring-boot-learning-2x/
二、Spring Boot Autoconfigure
2.1 autoconfigure 简介
autoconfigure在我们的开发中并不会被感知,因为它是存在与我们的starter中的。所以我们的每个starter都是依赖autoconfigure的:
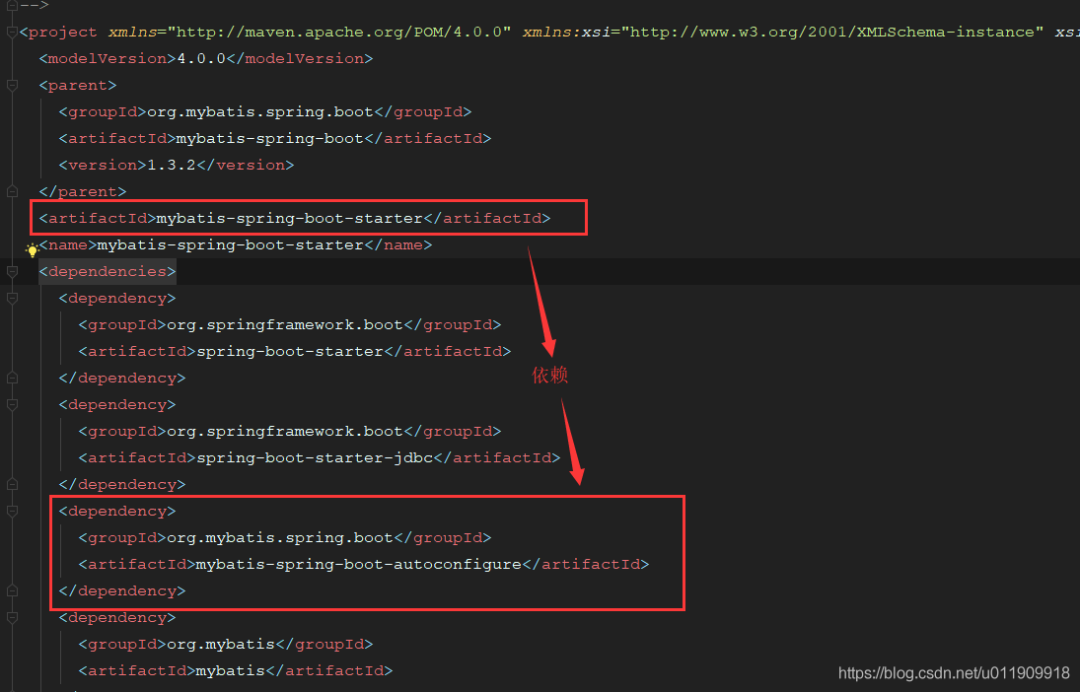
当然我们也可以把autoconfig的内容直接放在starter包里边。
a. spring-boot-autoconfigure:
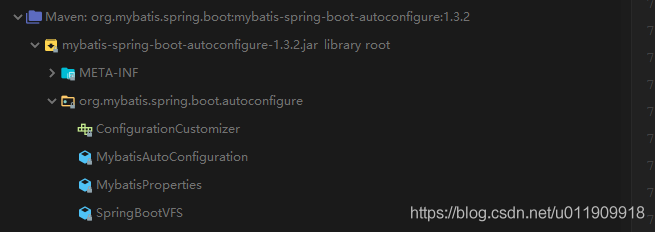
注意:这里有个点,就是官网提供的configure大多数在spring-boot-autoconfigure包里边,并没有单独创建新包。
b、mybatis-spring-boot-autoconfigure
2.2 小结
autoconfigure内容是配置Bean实例到Spring容器的实际代码实现包,然后提供给starter依赖。所以说1.2.3中的b项所说的配置Bean实例到Spring容器中实际是autoconfigure做的,因为是starter依赖它,所以也可以说是starter干的。
所以:autocinfigure是starter体现出来的能力的代码实现
三、Spring Boot CLI
Spring Boot CLI是一个命令行使用Spring Boot的客户端工具;主要功能如下:
运行groovy脚本 => 官网2.1 打包groovy文件到jar => 官网2.3 初始化Spring Boot项目 => 官网2.4 其他
先上个官网文档:
https://docs.spring.io/spring-boot/docs/current/reference/html/spring-boot-cli.html
因为这个我们用的比较少,所以就不多赘述了。个人感觉比较流脾的功能就是命令行直接执行groovy脚本了。
四、Spring Boot actuator
actuator是Spring Boot的监控插件,本身提供了很多接口可以获取当前项目的各项运行状态指标。
官网文档:
https://docs.spring.io/spring-boot/docs/2.4.0/reference/html/production-ready-features.html#production-ready
名词解释:
Endpoints: 需要监控的端点。参考官网第二节官网文档
可用的端点:
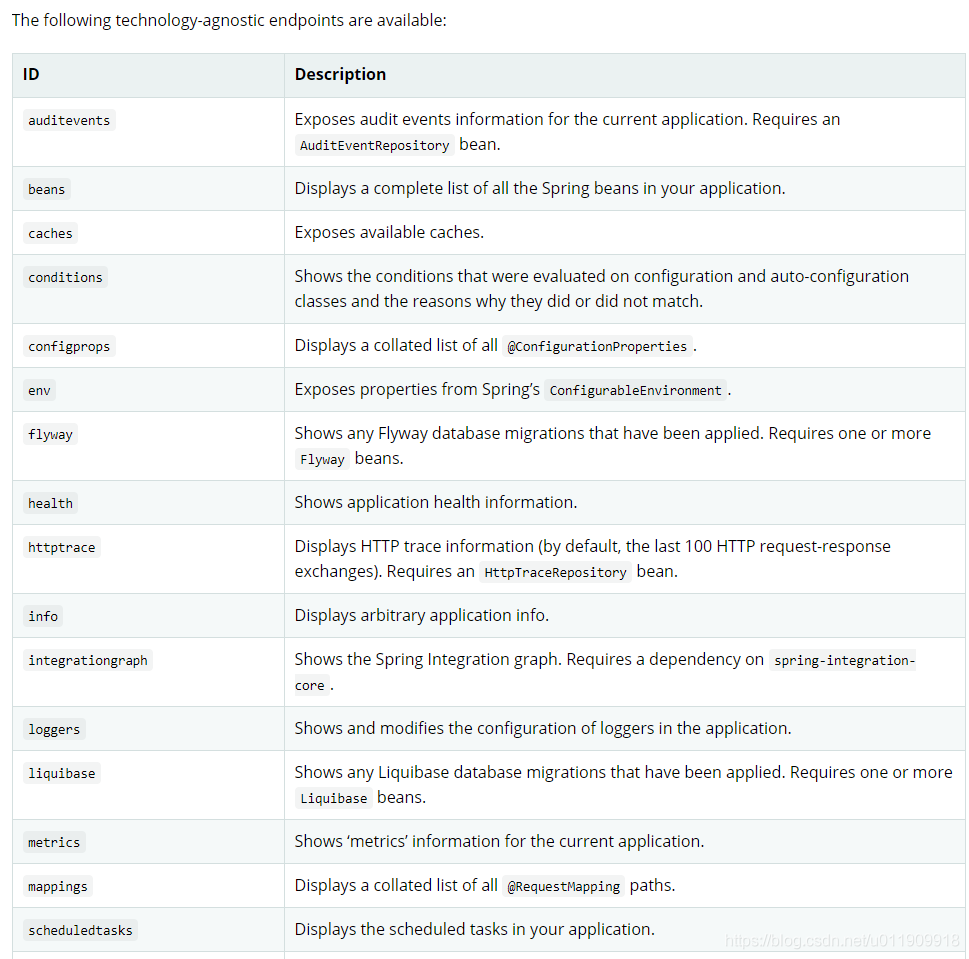
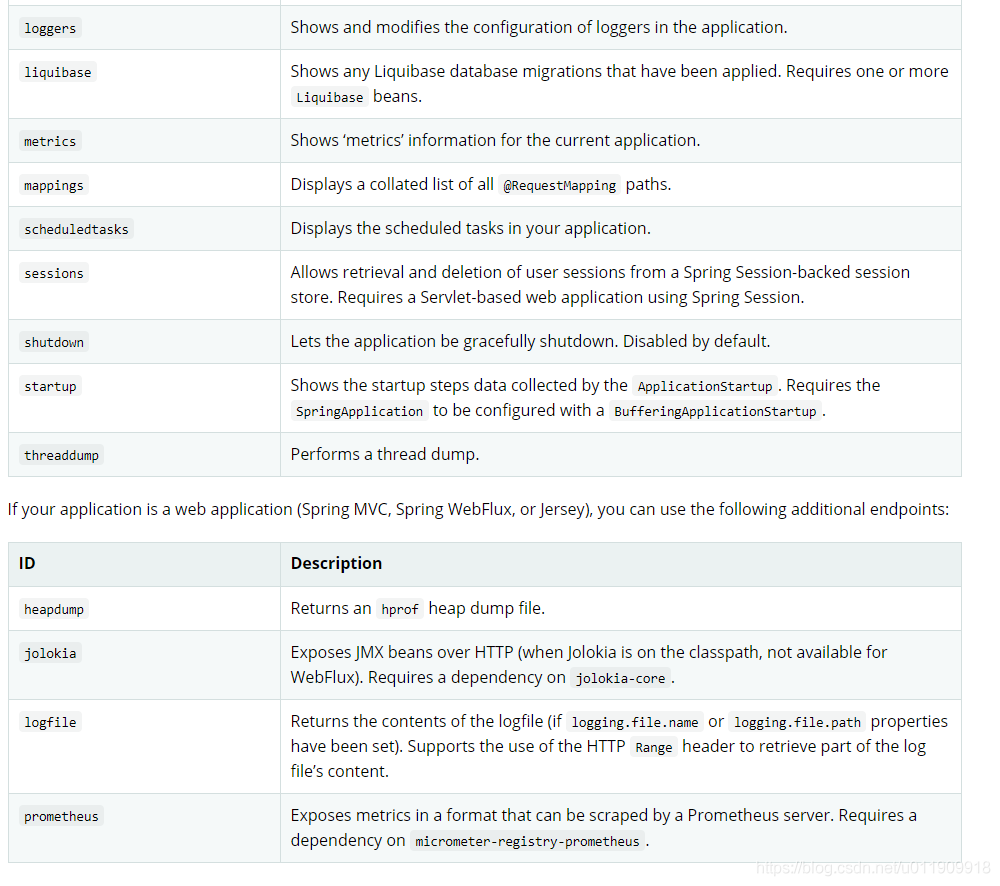
下方的是web工程的端点。
使用方法如下:
4.1 添加依赖
<dependency>
    <groupId>org.springframework.boot</groupId>
    <artifactId>spring-boot-starter-actuator</artifactId>
</dependency>
4.2 配置需要开启监控的端点
management:
  endpoint:
    health: # 开启健康监控端点
      enabled: true
    beans: # 开启Bean实例监控端点
      enabled: true
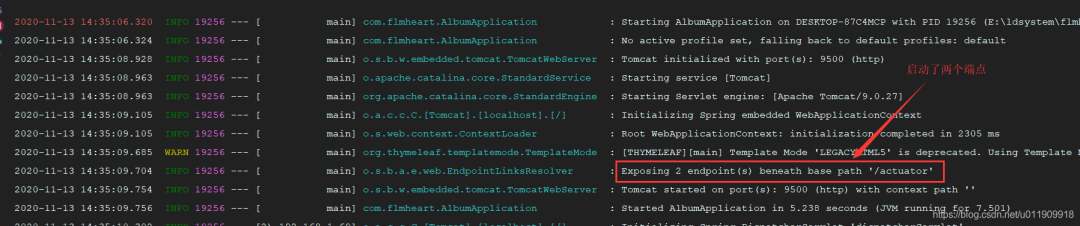
4.3 启动服务并验证
4.3.1 启动结果
4.3.2 查看各个监控信息
浏览器访问(查看监控信息地址):http://localhost:9500/actuator
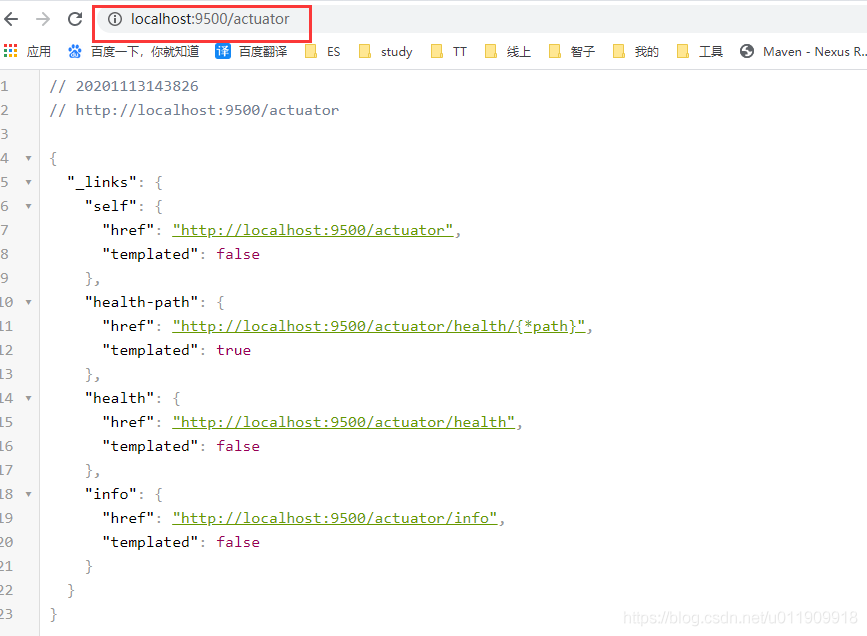
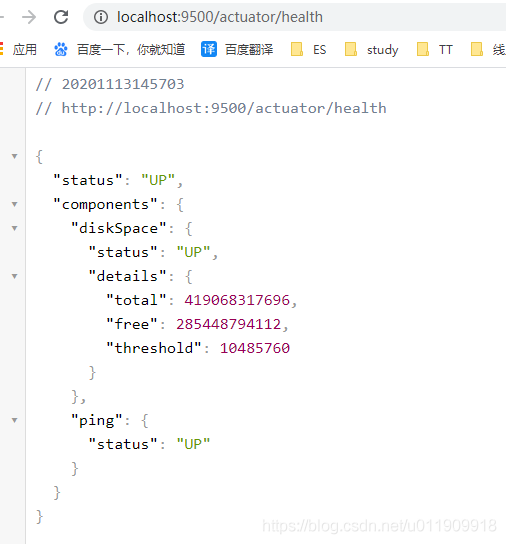
查看服务健康状态:
总结
本文主要介绍了Spring Boot的四大组件的作用,其中主要是starter和autoconfigure,另外的CLI和actuator用的并不多,所以没有仔细介绍。
往期推荐