
Python 神器 Celery 源码解析(3)

Celery是一款非常简单、灵活、可靠的分布式系统,可用于处理大量消息,并且提供了一整套操作此系统的工具。Celery 也是一款消息队列工具,可用于处理实时数据以及任务调度。
本文是是celery源码解析的第三篇,在前两篇里分别介绍了vine和py-amqp:
本篇我们继续celery的基础库: kombu,一个python实现的消息库,在celery中承担核心的消息处理流程。本文包括下面几个部分:
AMQP协议 kombu概述 kombu使用指南 Producer && Consumer 解析 Exchange && Queue 解析 Message 解析 Connection 解析 Matcher && serialization 小结 小技巧
AMQP 概念
接上篇,我们继续学习AMQP的相关概念。理解这些基础概念对kombu为什么这样实现很有帮助。这次我们用小故事来模拟kombu的消息处理流程。
小学三年级的小明同学喜欢同桌的小红同学,喜欢她的马尾和笑容,经常写小纸条给她。这里小纸条就是Message,小明同学是Producer, 小红同学是Consumer,这种直接投递的方式是direct。有时候,小红同学不在座位上,小明就把纸条放在她的抽屉里。抽屉就当做Queue使用,临时存放投递的消息。老师发现小明和小红上课经常有小动作后,棒打鸳鸯把他们分开了,他们不再是同桌。小明同学没法忘记小红的笑容,距离产生了更多的美,就拜托前面的小马帮他递小纸条,纸条封面上写着“请给小红”。小马就是Exchange,小马的前座也是Exchange,“请给小红”就是消息的route-key。常在河边走,哪有不湿脚。有次纸条被老师抓住,老师让小明同学在讲台上把纸条的内容讲给大家听。当众念小纸条这叫广播, 也就是fanout。
幼稚的小故事也是一种真实的生活,谁又没有写过小纸条呢,请暂停回忆一分钟:) 。业务是生活场景的一种抽象,代码又是更高层一点的抽象。理解业务,就对代码上的概念不发楞。
以上这些概念Exchange,Queue都是broker要实现的内容。可是客户端Producer/Consumer也包含,这是为什么呢?消息传输过程可不可以简化成一个客户端只使用producer发送消息,另外一个客户端只使用consumer消费消息呢?这样也不是不行,前提是AMQP协议中exchange和queue的创建及绑定,需要使用管理工具在broker先创建好,这无疑约束了AMPQ使用的灵活性。kombu中包含了Exchange,Queue模型,主要是用来对broker的管理。
kombu概述
kombu是植物家族的重要一员, 芹菜(celery)、葡萄藤(vine)、海带(kombu)是快乐的一家人。我们解析kombu,采用的版本是 5.0.0, 主要模块如下:
| 模块 | 功能 |
|---|---|
| abstract.py | 抽象的绑定实现,对象是否可以绑定到channel |
| compression.py | 压缩算法的汇总 |
| connection.py | broker的连接 |
| entity.py | 实体类,包括Exchange,binding和Queue对象的实现 |
| matcher.py | 匹配策略 |
| message.py | 消息对象,并且附带消息的操作接口ack,reject等 |
| messaging.py | 消息处理,包括Producer和Consumer |
| mixins.py,pools.py,simple.py | 增强功能或者提升便捷使用的封装 |
| serialization.py | 序列化算法的汇总 |
| transport | 对接各种存储引擎的数据传输实现,主要有内存,redis,pyamqp(RabbitMQ) 等 |
| asynchronous | 异步实现 |
kombu底层使用pyamqp提供的AMQP协议支持,并完成Producer,Consumer,Exchange,Queue等模型实现。
kombu 使用指南
老规矩,先从kombu的使用开始。下面是一个生产者发送消息的示例:
# kombu-5.0.0/examples/complete_send.py

from kombu import Connection, Producer, Exchange, Queue

exchange = Exchange('kombu_demo', type='direct')

with Connection('amqp://guest:guest@localhost:5672//') as connection:

    producer = Producer(connection)
    # 消息需要使用exchange
    producer.publish({'hello': 'world'},
                     exchange=exchange,
                     routing_key='kombu_demo',
                     serializer='json', compression='zlib')
生产者示例包括下面几步:
创建名为kombu_demo的exchange 创建到broker的connection并使用其作为上下文 使用connection创建发送消息的producer 使用创建完成的producer发送普通的json消息到创建好的exchange,并且指明routing_key为kombu_demo。约定消息使用json序列化,zlib算法压缩。
消费者的示例会略微复杂一点:
kombu-5.0.0/examples/complete_receive.py

from pprint import pformat

from kombu import Connection, Exchange, Queue, Consumer, eventloop

exchange = Exchange('kombu_demo', type='direct')
queue = Queue('kombu_demo', exchange, routing_key='kombu_demo')

# 格式化函数
def pretty(obj):
    return pformat(obj, indent=4)

#: This is the callback applied when a message is received.
def handle_message(body, message):
    print(f'Received message: {body!r}')
    print('  properties:\n{}'.format(pretty(message.properties)))
    print('  delivery_info:\n{}'.format(pretty(message.delivery_info)))
    message.ack()

with Connection('amqp://guest:guest@localhost:5672//') as connection:

    with Consumer(connection, queue, callbacks=[handle_message]):

        for _ in eventloop(connection):
            pass
消费者示例主要包括下面几步:
同样创建名为kombu_demo的exchange 创建名为kombu_demo的queue, 绑定到exchange,并且设置消费的routing_key 创建callback函数,接收body和message。body是纯粹的业务信息,message则包含一些投递信息,并且可以使用message直接执行ack回应给broker。 和生产者一样,创建到broker的connection并使用其作为上下文 使用connection创建消费者,消费者需要绑定到queue,并且设置callback函数 持续监听connection上的事件循环
我们再回头看看下图,对比一下示例,加强理解:
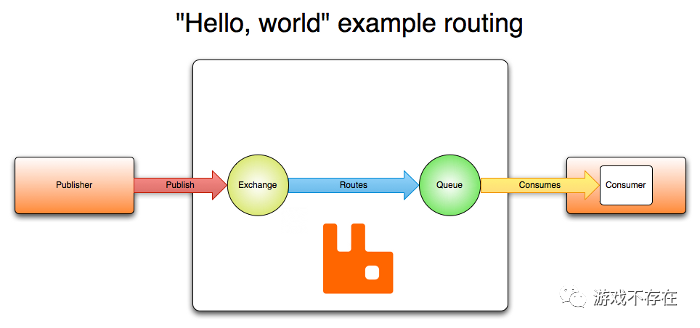
示例中的生产者位于图的左半区,消费者位于图的右半区。中间部分的broker,在文章的第一篇里,我们使用redis服务作为broker。示例还有重要的一点就是,全程没有创建channel,都是自动创建的。一般情况下,我们有3个进程,Producer进程和Consumer进程通过Broker进程进行消息的处理,这是一个典型的分布式系统。
Producer && Consumer 解析
Proudcer解析
Proudcer的构造函数:
class Producer:
    def __init__(self, channel, exchange=None, routing_key=None,
                 serializer=None, auto_declare=None, compression=None,
                 on_return=None):
        self._channel = channel
        self.exchange = exchange
        self.routing_key = routing_key or self.routing_key
        self.serializer = serializer or self.serializer
        self.compression = compression or self.compression
        self.on_return = on_return or self.on_return
        self._channel_promise = None
        if self.exchange is None:
            # 默认的exchange
            self.exchange = Exchange('')
        ...

        if self._channel:
            self.revive(self._channel)

    def revive(self, channel):
        """Revive the producer after connection loss."""
        if is_connection(channel):
            connection = channel
            self.__connection__ = connection
            channel = ChannelPromise(lambda: connection.default_channel)
        if isinstance(channel, ChannelPromise):
            self._channel = channel
            self.exchange = self.exchange(channel)
        else:
            # Channel already concrete
            self._channel = channel
            if self.on_return:
                self._channel.events['basic_return'].add(self.on_return)
            self.exchange = self.exchange(channel)
Producer除了设置自身的属性外,还包括对channel的处理。前文介绍过connection也是channel的一种,这里要先处理好connection,然后再从connection获得默认的channel。同时对于已经成功的channel,则进行将producer绑定到channel。self.exchange(channel) 等同于 self.exchange.__call__(channel)。producer创建完成后,可以通过publish方法发送消息:
def publish(self, body, routing_key=None, delivery_mode=None,
                mandatory=False, immediate=False, priority=0,
                content_type=None, content_encoding=None, serializer=None,
                headers=None, compression=None, exchange=None, retry=False,
                retry_policy=None, declare=None, expiration=None, timeout=None,
                **properties):
    # 初始化routing-key, exchange
    routing_key = self.routing_key if routing_key is None else routing_key
    exchange_name, properties['delivery_mode'] = self._delivery_details(
            exchange or self.exchange, delivery_mode,
        )
    # 准备body和body类型,编码
    body, content_type, content_encoding = self._prepare(
            body, serializer, content_type, content_encoding,
            compression, headers)

    # 使用message封装body
    message = self.channel.prepare_message(
        body, priority, content_type,
        content_encoding, headers, properties,
    )
    ...
    # 利用channel发送消息
    return channel.basic_publish(
        message,
        exchange=exchange, routing_key=routing_key,
        mandatory=mandatory, immediate=immediate,
        timeout=timeout
    )
Producer是对channel的业务封装,创建时候有channel则使用channel,没有channel则使用connection的default_channel。Producer发送消息的过程,完成exchange和message包装后,使用channel进行发送。
Consumer解析
Consumer的构造函数和上下文:
class Consumer:

    def __init__(self, channel, queues=None, no_ack=None, auto_declare=None,
                 callbacks=None, on_decode_error=None, on_message=None,
                 accept=None, prefetch_count=None, tag_prefix=None):
        self.channel = channel
        # Queue的列表
        self.queues = maybe_list(queues or [])
        self.no_ack = self.no_ack if no_ack is None else no_ack
        # 消息的回调函数
        self.callbacks = (self.callbacks or [] if callbacks is None
                          else callbacks)
        # 自定义的消息处理方法
        self.on_message = on_message
        self.tag_prefix = tag_prefix
        self._active_tags = {}
        ...

        if self.channel:
            self.revive(self.channel)

    def revive(self, channel):
        """Revive consumer after connection loss."""
        self._active_tags.clear()
        channel = self.channel = maybe_channel(channel)
        # modify dict size while iterating over it is not allowed
        for qname, queue in list(self._queues.items()):
            # name may have changed after declare
            self._queues.pop(qname, None)
            queue = self._queues[queue.name] = queue(self.channel)
            # queue和channel绑定
            queue.revive(channel)
        ...

    def __enter__(self):
        self.consume()
        return self
Consumer和Producer类似,设置完属性后也要处理好channel,不同的是其中的queue(在producer中是exchange)和channel绑定并提供一个上下文环境。在上下文环境中进行消息消费:
def consume(self, no_ack=None):
    tag = self._add_tag(queue, consumer_tag)
    # 每个queue消息消息
    for queue in self._queues:
        queue.consume(tag, self._receive_callback,
                          no_ack=no_ack, nowait=nowait)

def _receive_callback(self, message):
    accept = self.accept
    on_m, channel, decoded = self.on_message, self.channel, None
    try:
        ...
        # 消息反序列化
        decoded = None if on_m else message.decode()
    except Exception as exc:
        if not self.on_decode_error:
            raise
        self.on_decode_error(message, exc)
    else:
        return on_m(message) if on_m else self.receive(decoded, message)

def receive(self, body, message):
    """Method called when a message is received.

    This dispatches to the registered :attr:`callbacks`.

    Arguments:
        body (Any): The decoded message body.
        message (~kombu.Message): The message instance.

    Raises:
        NotImplementedError: If no consumer callbacks have been
            registered.
    """
    # 执行callback
    callbacks = self.callbacks
    ...
    # 默认就是body和message回传给业务函数
    [callback(body, message) for callback in callbacks]
consumer可以使用多个queue,每个queue消费消息的时候可以使用覆盖处理函数或者使用系统的处理函数。一般情况下callback会获得到解码后的body和消息原文。如何持续的消费消息,在connection部分再介绍。
Exchange && Queue 解析
producer需要使用exchange,consumer需要使用queue,消息是通过exchange和queue搭桥传递的。Exchange和Queue有共同的父类MaybeChannelBound:
              +-------------------+
              | MaybeChannelBound |
              +-------^-----------+
                      |
     +----------------+----------------+
     |                                 |
+----+-----+                       +---+---+
| Exchange |                       | Queue |
+----------+                       +-------+
MaybeChannelBound约定了类对channel的绑定行为:
class MaybeChannelBound(Object):

    _channel = None
    _is_bound = False

    def __call__(self, channel):
        """`self(channel) -> self.bind(channel)`."""
        return self.bind(channel)
_channel 和 _is_bound 都是类属性,可以知道channel在类上重用 __call__魔法函数让类方法, 比如exchange(channel)和queue(channel)执行的时候会自动执行绑定到channel的动作。
下面绑定channel的动作和是否绑定的判断也可以验证这一点。
def maybe_bind(self, channel):
    """Bind instance to channel if not already bound."""
    if not self.is_bound and channel:
        self._channel = maybe_channel(channel)
        self.when_bound()
        self._is_bound = True
    return self

@property
def is_bound(self):
    """Flag set if the channel is bound."""
    return self._is_bound and self._channel is not None
exchange对象的创建和绑定到channel:
class Exchange(MaybeChannelBound):
    def __init__(self, name='', type='', channel=None, **kwargs):
        super().__init__(**kwargs)
        self.name = name or self.name
        self.type = type or self.type
        self.maybe_bind(channel)
        ...
创建完成的exchange对象需要进行申明,申明的过程就是让broker创建exchange的过程:
def declare(self, nowait=False, passive=None, channel=None):
    """Declare the exchange.

    Creates the exchange on the broker, unless passive is set
    in which case it will only assert that the exchange exists.

    Argument:
        nowait (bool): If set the server will not respond, and a
            response will not be waited for. Default is :const:`False`.
    """
    if self._can_declare():
        passive = self.passive if passive is None else passive
        # 依托于channel
        return (channel or self.channel).exchange_declare(
            exchange=self.name, type=self.type, durable=self.durable,
            auto_delete=self.auto_delete, arguments=self.arguments,
            nowait=nowait, passive=passive,
        )
queue对象创建完成后也需要绑定到channel:
class Queue(MaybeChannelBound):
    def __init__(self, name='', exchange=None, routing_key='',
                 channel=None, bindings=None, on_declared=None,
                 **kwargs):
        super().__init__(**kwargs)
        self.name = name or self.name
        self.maybe_bind(channel)
        ...
然后申明queue,这个过程包括下面3个步骤:
def declare(self, nowait=False, channel=None):
    """Declare queue and exchange then binds queue to exchange."""
    if not self.no_declare:
        # - declare main binding.
        self._create_exchange(nowait=nowait, channel=channel)
        self._create_queue(nowait=nowait, channel=channel)
        self._create_bindings(nowait=nowait, channel=channel)
    return self.name

def _create_exchange(self, nowait=False, channel=None):
    if self.exchange:
        # 隐式申明exchange
        self.exchange.declare(nowait=nowait, channel=channel)

def _create_queue(self, nowait=False, channel=None):
    # 申明queue
    self.queue_declare(nowait=nowait, passive=False, channel=channel)
    if self.exchange and self.exchange.name:
        # 绑定queue和exchange
        self.queue_bind(nowait=nowait, channel=channel)

def _create_bindings(self, nowait=False, channel=None):
    for B in self.bindings:
        channel = channel or self.channel
        B.declare(channel)
        B.bind(self, nowait=nowait, channel=channel)
queue的申明也是让broker创建queue:
def queue_declare(self, nowait=False, passive=False, channel=None):
    ...
    ret = channel.queue_declare(
            queue=self.name,
            passive=passive,
            durable=self.durable,
            exclusive=self.exclusive,
            auto_delete=self.auto_delete,
            arguments=queue_arguments,
            nowait=nowait,
        )
    ...
queue比exchange多一个步骤就是bind到exchange。queue_bind的工作是让broker创建queue和exchange的关联关系。
def queue_bind(self, nowait=False, channel=None):
    """Create the queue binding on the server."""
    return (channel or self.channel).queue_bind(
        queue=self.name,
        exchange=exchange,
        routing_key=routing_key,
        arguments=arguments,
        nowait=nowait,
    )
从Exchange和Queue的实现,我们可以知道生产者不用关心消费者的实现,只需要创建和申明exchange即可。消费者则是需要知道生产者,除了创建和申明queue后,还需要绑定queue和exchange的关系。又因为消费者和生产者在不同的进程,即使生成者创建了exchange,消费者也需要在本地隐式创建exchange对象。
Message 解析
消息对象,除了纯粹的数据结构外,也包含channel的引用,毕竟消息可以直接执行ack动作:
class Message:
    def __init__(self, body=None, delivery_tag=None,
                 content_type=None, content_encoding=None, delivery_info=None,
                 properties=None, headers=None, postencode=None,
                 accept=None, channel=None, **kwargs):
        # 通道,主要的API来源
        self.channel = channel
        # 投递标签,可以用来响应
        self.delivery_tag = delivery_tag
        ...
        self.headers = headers or {}
        self.body = body
        ...
        self._state = 'RECEIVED'
消息本身还带有四个状态:
RECEIVED默认状态ACK完成ack响应REJECTED拒绝消息REQUEUED重新投递消息
其中 {'ACK', 'REJECTED', 'REQUEUED'} 三个状态的转换都需要使用channel进行操作broker,成功后再切换:
def ack(self, multiple=False):
    # 回应ACK
    self.channel.basic_ack(self.delivery_tag, multiple=multiple)
    self._state = 'ACK'

def reject(self, requeue=False):
    # 拒绝(抛弃消息)
    self.channel.basic_reject(self.delivery_tag, requeue=requeue)
    self._state = 'REJECTED'

def requeue(self):
    # 拒绝(退回消息)(和reject区别在requeue=True)
    self.channel.basic_reject(self.delivery_tag, requeue=True)
    self._state = 'REQUEUED'
消息上附带的信息,通过不同的load方法进行序列化:
from .serialization import loads

@property
def payload(self):
    return loads(self.body, self.content_type,
                     self.content_encoding, accept=self.accept)
Connection 解析
Connection负责管理producer/consumer到broker的网络连接:
class Connection:
    def __init__(self, hostname='localhost', userid=None,
                 password=None, virtual_host=None, port=None, insist=False,
                 ssl=False, transport=None, connect_timeout=5,
                 transport_options=None, login_method=None, uri_prefix=None,
                 heartbeat=0, failover_strategy='round-robin',
                 alternates=None, **kwargs):
        ...
        params = self._initial_params = {
            'hostname': hostname, 'userid': userid,
            'password': password, 'virtual_host': virtual_host,
            'port': port, 'insist': insist, 'ssl': ssl,
            'transport': transport, 'connect_timeout': connect_timeout,
            'login_method': login_method, 'heartbeat': heartbeat
        }
        ...

        self._init_params(**params)
        ...
重点在_init_params中对各种支持AQMP协议的broker的管理, 比如redis,RobbitMQ:
def _init_params(self, hostname, userid, password, virtual_host, port,
                 insist, ssl, transport, connect_timeout,
                 login_method, heartbeat):
    transport = transport or 'amqp'
    if transport == 'amqp' and supports_librabbitmq():
        transport = 'librabbitmq'
    if transport == 'rediss' and ssl_available and not ssl:
        logger.warning(
            'Secure redis scheme specified (rediss) with no ssl '
            'options, defaulting to insecure SSL behaviour.'
        )
        ssl = {'ssl_cert_reqs': CERT_NONE}
    self.hostname = hostname
    self.userid = userid
    self.password = password
    self.login_method = login_method
    # 虚拟主机隔离
    self.virtual_host = virtual_host or self.virtual_host
    self.port = port or self.port
    self.insist = insist
    self.connect_timeout = connect_timeout
    self.ssl = ssl
    # 传输类
    self.transport_cls = transport
    self.heartbeat = heartbeat and float(heartbeat)
配置完connection信息后,就需要创建网络连接。这个过程通过调用connection属性或者default_channel属性时候自动创建:
@property
def connection(self):
    """The underlying connection object.

    Warning:
        This instance is transport specific, so do not
        depend on the interface of this object.
    """
    if not self._closed:
        if not self.connected:
            # 创建连接
            return self._ensure_connection(
                max_retries=1, reraise_as_library_errors=False
            )
        return self._connection

@property
def default_channel(self):
    """Default channel.

    Created upon access and closed when the connection is closed.

    Note:
        Can be used for automatic channel handling when you only need one
        channel, and also it is the channel implicitly used if
        a connection is passed instead of a channel, to functions that
        require a channel.
    """
    # make sure we're still connected, and if not refresh.
    conn_opts = self._extract_failover_opts()
    # 创建连接
    self._ensure_connection(**conn_opts)

    if self._default_channel is None:
        self._default_channel = self.channel()
    return self._default_channel
连接创建完成后,继续创建channel:
def channel(self):
    """Create and return a new channel."""
    self._debug('create channel')
    chan = self.transport.create_channel(self.connection)
    return chan

def create_transport(self):
    # 创建传输连接
    return self.get_transport_cls()(client=self)

def get_transport_cls(self):
    """Get the currently used transport class."""
    transport_cls = self.transport_cls
    if not transport_cls or isinstance(transport_cls, str):
        transport_cls = get_transport_cls(transport_cls)
    return transport_cls
创建broker的连接过程,是通过transport的创建,其中细节涉及对不同类型的broker服务的适配,内容挺多,我们下一章再进行解析。
Matcher && serialization
Matcher负责处理消息的匹配机制,serialization复杂消息的序列化。两者的实现方式类似,都使用注册中心模式+策略模式实现。
Matcher的注册中心:
class MatcherRegistry:
    """Pattern matching function registry."""
    """匹配器的注册中心"""

    MatcherNotInstalled = MatcherNotInstalled
    matcher_pattern_first = ["pcre", ]

    def __init__(self):
        self._matchers = {}
        self._default_matcher = None

#: Global registry of matchers.
registry = MatcherRegistry()
注册glob(模糊)模式和pcre(正则)模式两种策略:
def register_glob():
    """Register glob into default registry."""
    """使用glob(通配符)匹配"""
    registry.register('glob', fnmatch)


def register_pcre():
    """Register pcre into default registry."""
    """使用正则匹配"""
    registry.register('pcre', rematch)


# Register the base matching methods.
register_glob()
register_pcre()
匹配消息的方法,就是使用模式进行识别:
def match(self, data, pattern, matcher=None, matcher_kwargs=None):
    """Call the matcher."""
    if matcher and not self._matchers.get(matcher):
        raise self.MatcherNotInstalled(
            f'No matcher installed for {matcher}'
        )
    # 默认使用通配符匹配
    match_func = self._matchers[matcher or 'glob']
    # 通配符和正则匹配的传参先后顺序有差异
    if matcher in self.matcher_pattern_first:
        first_arg = bytes_to_str(pattern)
        second_arg = bytes_to_str(data)
    else:
        first_arg = bytes_to_str(data)
        second_arg = bytes_to_str(pattern)
    return match_func(first_arg, second_arg, **matcher_kwargs or {})
Serializer的注册中心:
class SerializerRegistry:
    """The registry keeps track of serialization methods."""
    """序列化方法的注册中心"""

    def __init__(self):
        self._encoders = {}
        self._decoders = {}
        self._default_encode = None
        self._default_content_type = None
        self._default_content_encoding = None
        # 记录禁用的编解码类型
        self._disabled_content_types = set()
        # 双向字典,可以进行互查
        self.type_to_name = {}
        self.name_to_type = {}

# 全局单例,并且导出函数绑定,使用API更简介
registry = SerializerRegistry()
dumps = registry.dumps
loads = registry.loads
register = registry.register
unregister = registry.unregister
json, yaml, pickle和msgpack四种序列化策略的注册:
def register_json():
    """Register a encoder/decoder for JSON serialization."""
    from kombu.utils import json as _json

    registry.register('json', _json.dumps, _json.loads,
                      content_type='application/json',
                      content_encoding='utf-8')

def register_yaml():
    """Register a encoder/decoder for YAML serialization.

    It is slower than JSON, but allows for more data types
    to be serialized. Useful if you need to send data such as dates

    """
    import yaml
    registry.register('yaml', yaml.safe_dump, yaml.safe_load,
                      content_type='application/x-yaml',
                      content_encoding='utf-8')

def register_pickle():
    """Register pickle serializer.

    The fastest serialization method, but restricts
    you to python clients.
    """
    def pickle_dumps(obj, dumper=pickle.dumps):
        return dumper(obj, protocol=pickle_protocol)

    registry.register('pickle', pickle_dumps, unpickle,
                      content_type='application/x-python-serialize',
                      content_encoding='binary')

def register_msgpack():
    """Register msgpack serializer.

    See Also:
        https://msgpack.org/.
    """
    pack = unpack = None
    import msgpack
    from msgpack import packb, unpackb

    def pack(s):
        return packb(s, use_bin_type=True)

    def unpack(s):
        return unpackb(s, raw=False)

    registry.register(
        'msgpack', pack, unpack,
        content_type='application/x-msgpack',
        content_encoding='binary',
    )

register_json()
register_pickle()
register_yaml()
register_msgpack()
反序列化的使用:
# kombu-5.0.0/kombu/serialization.py:285
# 导出策略
loads = registry.loads

# kombu-5.0.0/kombu/message.py:10
from .serialization import loads

class Message:
    def _decode(self):
        # 使用策略反序列化message-body
        return loads(self.body, self.content_type,
                     self.content_encoding, accept=self.accept)
小结
通过kombu的Producer可以发送消息到broker,使用Comsumer则可以消费消息。发送消息的时候需要使用Exchange,用来将消费分发到不同的目标Queue;消费消息的时候,需要使用Queue,Queue还需要通过绑定的方式和Exchange关联起来。Exchange和Queue都是使用底层的channel进行数据传输,所以需要进绑定(binding);还需要在远程的broker中创建,所以创建后的的Exchange和Queue需要进行申明(declare)。消息会附带上投递信息,进行序列化后从生产者到broker转发给消费者,消费者再使用投递信息上的序列化约定,将消息反序列成业务信息。
小技巧
pickle打包函数
pickle不仅支持数据接口的序列化,还支持函数的序列化:
python3
Python 3.8.5 (v3.8.5:580fbb018f, Jul 20 2020, 12:11:27)
[Clang 6.0 (clang-600.0.57)] on darwin
Type "help", "copyright", "credits" or "license" for more information.
>>> import pickle
>>>
>>> def hello(msg):
...     print("hello", msg)
...
>>> p = pickle.dumps(hello)
>>> p
b'\x80\x04\x95\x16\x00\x00\x00\x00\x00\x00\x00\x8c\x08__main__\x94\x8c\x05hello\x94\x93\x94.'
>>>
>>> q = pickle.loads(p)
>>>
>>> q("python")
hello python
>>>
上面的hello函数可以通过pickle打包,再重新解包执行。利用这个机制使用kombu,可以将producer进程的函数发送到consumer进程远程执行。pickle支持的数据类型还挺丰富,官方文档中介绍包括下面多种类型:
The following types can be pickled:

* None, True, and False

* integers, floating point numbers, complex numbers

* strings, bytes, bytearrays

* tuples, lists, sets, and dictionaries containing only picklable objects

* functions defined at the top level of a module (using def, not lambda)

* built-in functions defined at the top level of a module

* classes that are defined at the top level of a module

* instances of such classes whose __dict__ or the result of calling __getstate__() is picklable (see section Pickling Class Instances for details).
配置类的简化
Object提供了一种快速构建对象的方法:
class Object:
    """Common base class.

    Supports automatic kwargs->attributes handling, and cloning.
    """

    attrs = ()

    def __init__(self, *args, **kwargs):
        # attrs 在子类中定义
        for name, type_ in self.attrs:
            value = kwargs.get(name)
            # 从字典参数给属性动态赋值
            if value is not None:
                setattr(self, name, (type_ or _any)(value))
            else:
                try:
                    getattr(self, name)
                except AttributeError:
                    setattr(self, name, None)
Queue展示了这种方式的示例,比如max_length属性:
class Queue(MaybeChannelBound):
    attrs = (
        ..
        ('max_length', int),
        ...
    )
    def __init__(self, name='', exchange=None, routing_key='',
                 channel=None, bindings=None, on_declared=None,
                 **kwargs):
        self.name = name or self.name
        ...

    def queue_declare(self, nowait=False, passive=False, channel=None):
        ...
        queue_arguments = channel.prepare_queue_arguments(
            self.queue_arguments or {},
            expires=self.expires,
            message_ttl=self.message_ttl,
            max_length=self.max_length,
            max_length_bytes=self.max_length_bytes,
            max_priority=self.max_priority,
        )
        ...
在Queue的构造函数中并没有定义max_length属性,但是queue_declare中却可以直接使用这个属性,可以对比name属性感受一下差异。这对我们简化定义属性很多的对象有帮助,比如一些配置类。
使用count提供自增ID
itertools.count提供了一种通过迭代器生成递增ID的方法:
>>> from itertools import count
>>>
>>> for i in count():
...     if i % 10 == 0:
...             print(i)
...     if i>50:
...             break
...
0
10
20
30
40
50
参考链接
https://github.com/celery/kombu Talking to RabbitMQ with Python and Kombu https://medium.com/python-pandemonium/talking-to-rabbitmq-with-python-and-kombu-6cbee93b1298 一篇文章讲透彻了AMQP协议 https://jishuin.proginn.com/p/763bfbd2a068

还不过瘾?试试它们