
线上不停机无感升级 Nginx 版本实战!
你知道的越多,不知道的就越多,业余的像一棵小草!
你来,我们一起精进!你不来,我和你的竞争对手一起精进!
编辑:业余草
来源:juejin.cn/post/7277836494298447906
推荐:https://t.zsxq.com/126B9hJRR
自律才能自由
由于被第三方公司漏洞扫描、扫到大量Nginx漏洞、官网也有提供补丁、但是这种补丁一个一个打太麻烦了、直接升级到指定版本历史漏洞肯定也修复了。
第一想到的肯定是无感升级、为了不影响线上的环境正在跑的业务、百度去找了一下无感升级的流程后续总结一下。
查看当前Nginx一些信息
nginx -v     # 查看当前版本
nginx -V     # 查看当前版本、以及一些详细信息
开始升级
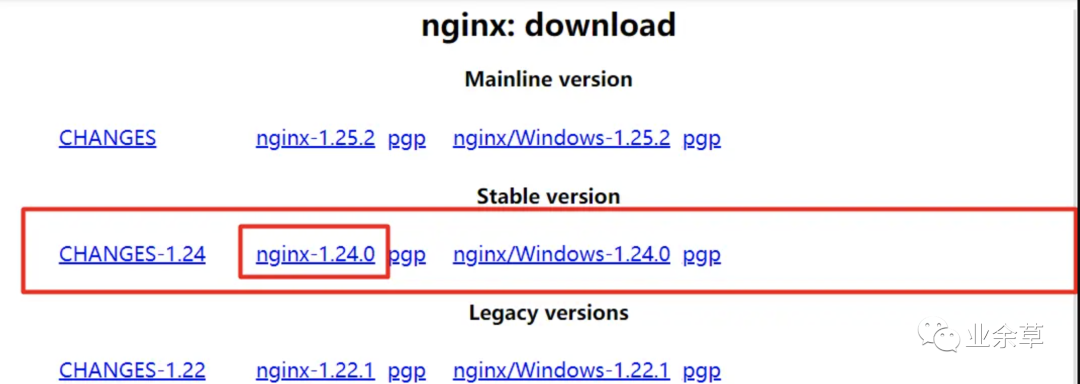
下载安装包
https://nginx.org/en/download.html 前往官网下载稳定版、或者其他版本、都一样尽量下载官网的稳定版
将下载好的安装包放入到服务器中

查看当前nginx版本

将最新版本nginx解压
tar -zxvf nginx-1.24.0.tar.gz
进入到解压后的nginx文件夹内
cd nginx-1.24.0
查看nginx详细信息
nginx -V
第一张情况图

第二种情况图

如:configure arguments:后无内容直接可以在当前目录下执行./configure 如:configure arguments:有内容就需要携带一起编译在当前目录下执行 ./configure --xxx
./configure --with-cc-opt='-g -O2 -fPIE -fstack-protector-strong -Wformat -Werror=format-security -Wdate-time -D_FORTIFY_SOURCE=2' --with-ld-opt='-Wl,-Bsymbolic-functions -fPIE -pie -Wl,-z,relro -Wl,-z,now' --prefix=/usr/share/nginx --conf-path=/etc/nginx/nginx.conf --http-log-path=/var/log/nginx/access.log --error-log-path=/var/log/nginx/error.log --lock-path=/var/lock/nginx.lock --pid-path=/run/nginx.pid --http-client-body-temp-path=/var/lib/nginx/body --http-fastcgi-temp-path=/var/lib/nginx/fastcgi --http-proxy-temp-path=/var/lib/nginx/proxy --http-scgi-temp-path=/var/lib/nginx/scgi --http-uwsgi-temp-path=/var/lib/nginx/uwsgi --with-debug --with-pcre-jit --with-ipv6 --with-http_ssl_module --with-http_stub_status_module --with-http_realip_module --with-http_auth_request_module --with-http_addition_module --with-http_dav_module --with-http_geoip_module --with-http_gunzip_module --with-http_gzip_static_module --with-http_image_filter_module --with-http_v2_module --with-http_sub_module --with-http_xslt_module --with-stream --with-stream_ssl_module --with-mail --with-mail_ssl_module --with-threads
执行这一步可能会出现编译失败的情况、就新版本可能会依赖一些其他包、所以执行会报错。
./configure: error: the HTTP rewrite module requires the PCRE library.
apt install libpcre3 libpcre3-dev


./configure: error: SSL modules require the OpenSSL library.
apt install libssl-dev


./configure: error: the HTTP XSLT module requires the libxml2/libxslt
apt install libxml2 libxml2-dev libxslt-dev


./configure: error: the HTTP image filter module requires the GD library.
apt install libgd-dev


./configure: error: the GeoIP module requires the GeoIP library.
apt install geoip-database libgeoip-dev


./configure: error: the HTTP gzip module requires the zlib library.
apt install zlib1g-dev
「注意apt命令可能一些服务上没有、你们可以选择使用yum安装的方式、百度找一下即可。」
这种情况是成功情况
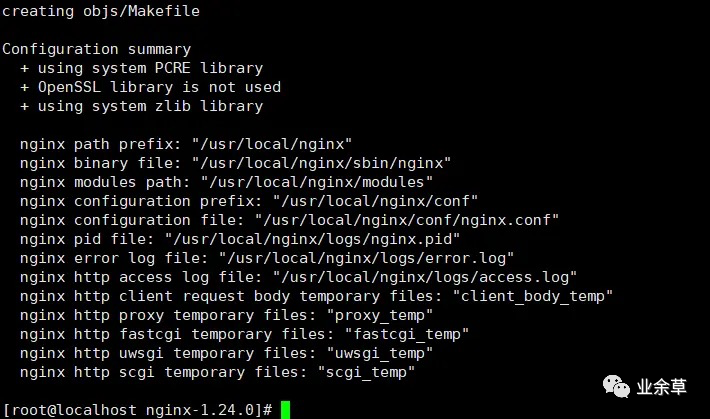
重新执行make
还在新nginx文件命令下执行make命令。

等执行完成后在新nginx文件目录下一个./objs/nginx文件、将旧nginx的启动文件备份一下、在将新nginx文件目录下一个./objs/nginx文件复制到旧文件位置
mv /usr/sbin/nginx  /usr/sbin/nginx.bak

cp objs/nginx /usr/sbin/nginx
看一下当前新nginx目录中的Makefile文件

如果upgrade对应的不是旧地址对应的nginx的需要进行手动修改一下。
修改好后、再新解压nginx.1.24.0文件目录下执行 make upgrade就升级好了
后续即可查看nginx版本、如果不放心有没有升级好、可以在执行make upgrade命令下先查看nginx进程ps -ef|grep nginx对比一下前后的进程是否变动了。