用 WebAssembly 为 Istio 扩展插上灵活的翅膀
Sealos 公众号已接入了 GPT-4,完全免费!欢迎前来调戏👇
❝
作者:cuisongliu。Sealos 核心 Maintainer,Kubernetes、Helm、Sealer、Openyurt和 NVIDIA 等项目 commiter。
Istio 引入了 WebAssembly 扩展的概念,允许开发者通过将自定义的 WebAssembly 模块插入 Istio 的 Envoy 代理来扩展 Istio 的功能。这为 Istio 带来了更高的灵活性和可扩展性,开发者可以在不改变 Istio 核心代码的情况下添加自定义功能。
WebAssembly 在 Istio 中的工作原理
WebAssembly 是一种沙盒技术,可以用于扩展 Istio 代理(Envoy)的能力。 Proxy-Wasm 沙盒 API 取代了 Mixer 作为 Istio 主要的扩展机制。
WebAssembly 沙盒的目标:
效率 - 这是一种低延迟,低 CPU 和内存开销的扩展机制。
功能 - 这是一种可以执行策略,收集遥测数据和执行有效荷载变更的扩展机制。
隔离 - 一个插件中程序的错误或是崩溃不会影响其它插件。
配置 - 插件使用与其它 Istio API 一致的 API 进行配置。可以动态的配置扩展。
运维 - 扩展可以以仅日志,故障打开或者故障关闭的方式进行访问和部署。
扩展开发者 - 可以用多种编程语言编写。
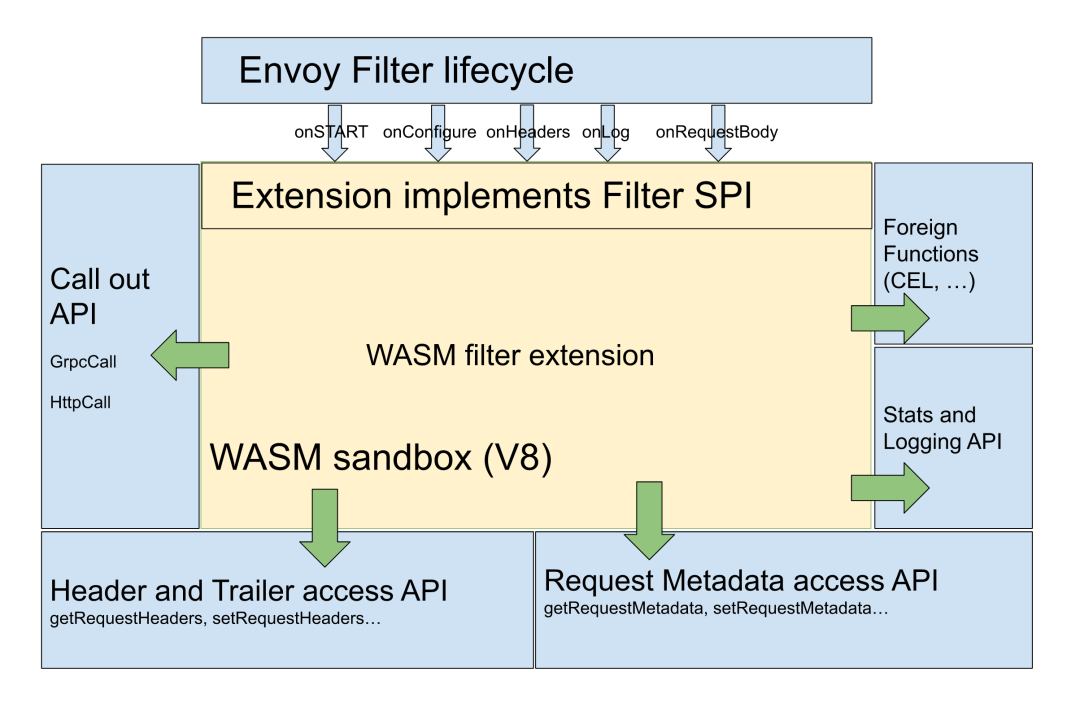
高级架构
Istio 扩展(Proxy-Wasm 插件)有几个组成部分:
过滤器服务提供方接口(SPI) 用于为过滤器构建 Proxy-Wasm 插件。
沙盒 在 Envoy 中嵌入 V8 Wasm 运行时。
主机 API 用于处理请求头,尾和元数据。
调出 API 针对 gRPC 和 HTTP 请求。
统计和记录 API 用于度量统计和监控。
应用场景
自定义流量管理:开发者可以使用 WebAssembly 模块实现自定义的流量控制策略,如 AB 测试、灰度发布等。
安全策略:通过 WebAssembly 模块,可以实现自定义的安全策略,例如访问控制、防火墙规则等。
日志和监控:开发者可以使用 WebAssembly 模块来收集特定流量的指标或日志。
ABI 规范定义 (Application Binary Interface)
应用程序二进制接口(ABI)规范定义了 L4/L7 代理与作为 WebAssembly 模块交付的扩展之间使用的约定。这些规范最初为 Envoy 项目中的 WebAssembly 开发而创建,但在代理无关,使用者可以在不同的代理之间使用相同的 Proxy-Wasm 扩展。
SDKs
Istio 提供了多种 WebAssembly SDK,方便开发者使用不同编程语言编写插件:
C++ SDK[1]
Rust SDK[2]
AssemblyScript SDK[3]
TinyGo SDK[4]
Istio Wasm Plugin 介绍
Istio Wasm Plugin[5]是一种通过 WebAssembly 过滤器来扩展 Istio 代理功能的机制。通过设置插件的阶段(phase)和优先级(priority),可以在用户提供的 Wasm 插件和 Istio 内部过滤器之间配置复杂的交互。
以下是一些使用示例:
使用本地文件读取 wasm 插件:
apiVersion: extensions.istio.io/v1alpha1
kind: WasmPlugin
metadata:
  name: openid-connect
  namespace: istio-ingress
spec:
  selector:
    matchLabels:
      istio: ingressgateway
  url: file:///opt/filters/openid.wasm
  sha256: 1ef0c9a92b0420cf25f7fe5d481b231464bc88f486ca3b9c83ed5cc21d2f6210
  phase: AUTHN
  pluginConfig:
    openid_server: authn
    openid_realm: ingress
使用 OCI 镜像读取 wasm 插件并设置拉取的 secret:
apiVersion: extensions.istio.io/v1alpha1
kind: WasmPlugin
metadata:
  name: openid-connect
  namespace: istio-ingress
spec:
  selector:
    matchLabels:
      istio: ingressgateway
  url: oci://private-registry:5000/openid-connect/openid:latest
  imagePullPolicy: IfNotPresent
  imagePullSecret: private-registry-pull-secret
  phase: AUTHN
  pluginConfig:
    openid_server: authn
    openid_realm: ingress
使用环境变量读取变量:
apiVersion: extensions.istio.io/v1alpha1
kind: WasmPlugin
metadata:
  name: openid-connect
  namespace: istio-ingress
spec:
  selector:
    matchLabels:
      istio: ingressgateway
  url: oci://private-registry:5000/openid-connect/openid:latest
  imagePullPolicy: IfNotPresent
  imagePullSecret: private-registry-pull-secret
  phase: AUTHN
  pluginConfig:
    openid_server: authn
    openid_realm: ingress
  vmConfig:
    env:
    - name: POD_NAME
      valueFrom: HOST
    - name: TRUST_DOMAIN
      value: "cluster.local"
使用 http 读取 wasm 插件:
apiVersion: extensions.istio.io/v1alpha1
kind: WasmPlugin
metadata:
  name: openid-connect
  namespace: istio-ingress
spec:
  selector:
    matchLabels:
      istio: ingressgateway
  url: https://private-bucket/filters/openid.wasm
  imagePullPolicy: Always
  phase: AUTHN
  pluginConfig:
    openid_server: authn
    openid_realm: ingress
  vmConfig:
    env:
    - name: POD_NAME
      valueFrom: HOST
    - name: TRUST_DOMAIN
      value: "cluster.local"
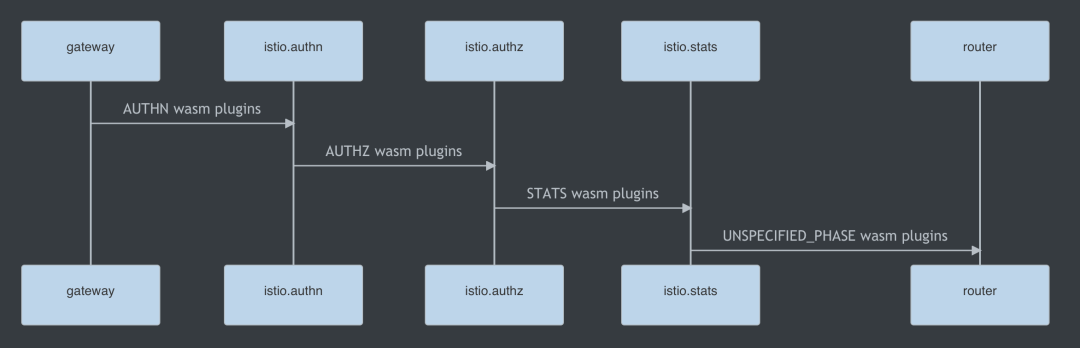
Wasm Plugin 与 Istio 执行顺序
Wasm 插件的执行顺序由阶段(phase)和优先级(priority)设置决定。在 Istio 代理收到请求时,根据 Wasm 插件的设置,将它们按照阶段进行分组,并在每个阶段内按优先级值进行排序。然后,Istio 代理按照阶段和优先级的顺序依次调用每个 Wasm 插件的逻辑,从而实现个性化处理和功能扩展。
WasmPlugin 支持字段
WasmPlugins 提供了一种通过 WebAssembly 过滤器扩展 Istio 代理功能的机制。以下是 WasmPlugins 支持的字段以及它们的描述:
selector: 用于选择将应用该插件配置的特定 pod/ 虚拟机集合的条件。
url: Wasm 模块或 OCI 容器的 URL。支持 file://,oci:// 和 http[s]:// 等协议。
sha256: SHA256 校验和,用于验证 Wasm 模块或 OCI 容器。
imagePullPolicy: 在通过 OCI 镜像或 http/https 获取 Wasm 模块时应用的拉取行为。
imagePullSecret: 用于 OCI 镜像拉取的凭据。
pluginConfig: 传递给插件的配置信息。
pluginName: 在 Envoy 配置中使用的插件名称。
phase: 确定将 WasmPlugin 插入过滤器链的位置。
priority: 确定在同一阶段中多个 WasmPlugin 的执行顺序。
vmConfig: 配置 Wasm 虚拟机(VM)的信息。
match: 用于指定哪些流量将传递给 WasmPlugin 的条件。
环境准备
wget https://github.com/labring/sealos/releases/download/v4.3.0/sealos_4.3.0_linux_amd64.tar.gz
tar -zxvf sealos_4.3.0_linux_amd64.tar.gz sealos
chmod a+x sealos
mv sealos /usr/bin/
sealos run labring/kubernetes-docker:v1.23.0 labring/helm:v3.12.0 labring/calico:v3.24.1
部署 Istio
sealos run labring/istio:1.16.2-min
安装 rust 语言环境
curl --proto '=https' --tlsv1.2 -sSf https://sh.rustup.rs | sh
❝
如果使用的国内环境,可以使用以下命令操作
export RUSTUP_DIST_SERVER="https://rsproxy.cn"
export RUSTUP_UPDATE_ROOT="https://rsproxy.cn/rustup"
curl --proto '=https' --tlsv1.2 -sSf https://rsproxy.cn/rustup-init.sh | sh
cat > ~/.cargo/config <<EOF
[source.crates-io]
replace-with = 'rsproxy-sparse'
[source.rsproxy]
registry = "https://rsproxy.cn/crates.io-index"
[source.rsproxy-sparse]
registry = "sparse+https://rsproxy.cn/index/"
[registries.rsproxy]
index = "https://rsproxy.cn/crates.io-index"
[net]
git-fetch-with-cli = true
EOF
初始化 rust wasm 项目
使用 JetBrains 插件
打开 Goland 并安装插件 Rust 后创建项目
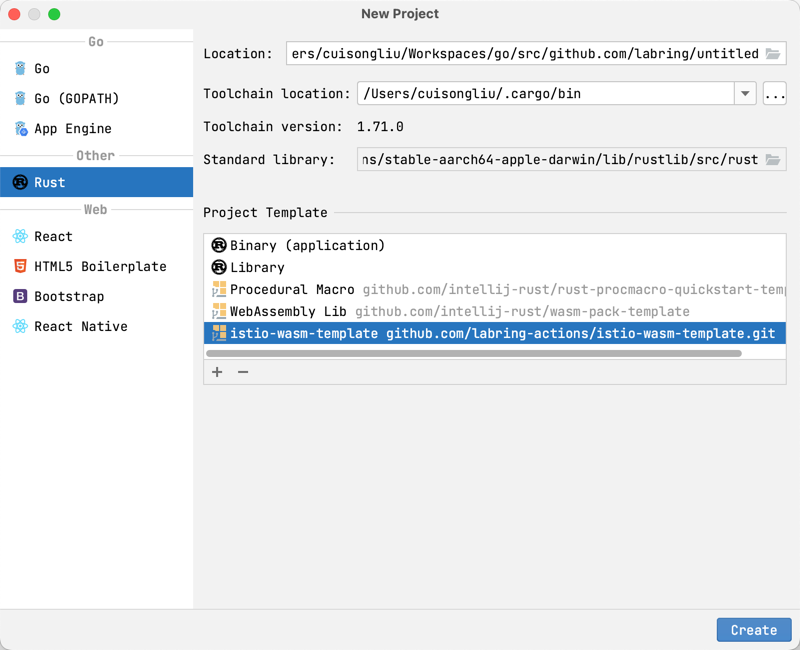
新增配置 istio-wasm-rust 模板 :
❝
填写模板地址 : https://github.com/labring-actions/istio-wasm-template.git
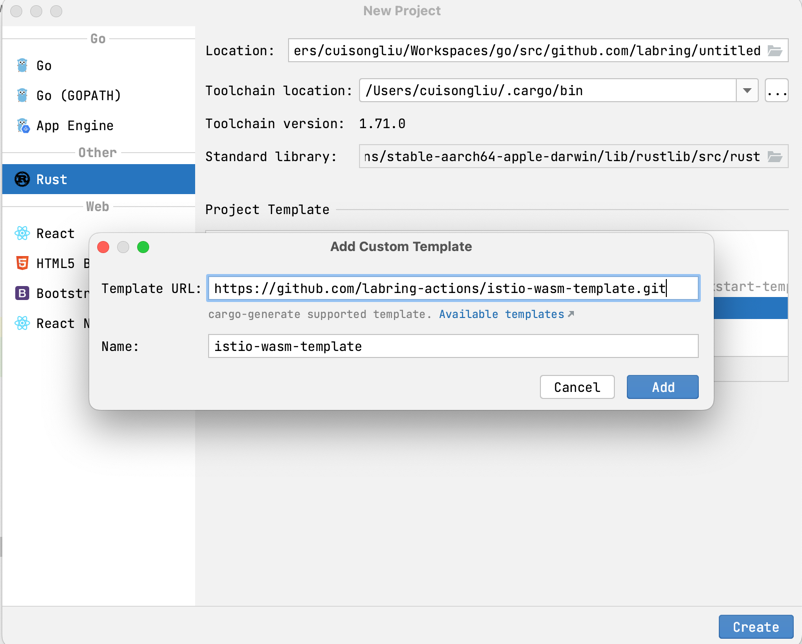
新建项目选择 istio-wasm-rust 模板
使用命令行
cargo install cargo-generate
cargo generate --git https://github.com/labring-actions/istio-wasm-template.git --name my-project
cd my-project
编译
本地编译:
make build
容器编译:
REPO=sealos.hub:5000 IMG=wasm/wasm-auth:latest make docker-build
部署
本地编译后部署
sealos login sealos.hub:5000
REPO=sealos.hub:5000 IMG=wasm/wasm-auth:v1 make oci-build
REPO=sealos.hub:5000 IMG=wasm/wasm-auth:latest make sealos-push
sealos run sealos.hub:5000/wasm/wasm-auth:latest
容器编译后部署
REPO=sealos.hub:5000 IMG=wasm/wasm-auth:latest make sealos-push
sealos run sealos.hub:5000/wasm/wasm-auth:latest
验证部署
kubectl get pod -n istio-system
NAME                                    READY   STATUS    RESTARTS   AGE
istio-ingressgateway-556959fc6f-prbbg   1/1     Running   0          4d15h
istiod-5b9c4f9bf9-w6xns                 1/1     Running   0          4d15h

kubectl logs -f -n istio-system istio-ingressgateway-556959fc6f-prbbg
...
2023-08-05T08:06:22.020843Z	info	wasm	fetching image wasm/wasm-auth from registry sealos.hub:5000 with tag v1
2023-08-05T08:06:22.049991Z	info	wasm	fetching image with plain text from sealos.hub:5000/wasm/wasm-auth:v1
注意事项:
默认配置是过滤的 istio-ingressgateway 的所有请求。如果需要调整,请修改 wasmplugin 的 selector 即可。
默认是看不到 wasm 相关的日志,需要修改 istio-ingressgateway 的日志级别,添加proxyComponentLogLevel配置wasm:debug或者wasm:info。
  - proxy
  - router
  - --domain
  - $(POD_NAMESPACE).svc.cluster.local
  - --proxyLogLevel=warning
  - --proxyComponentLogLevel=misc:error,wasm:debug
  - --log_output_level=default:info,wasm:debug
再看日志,可以看到已经打印了默认配置
2023-08-05T08:15:05.751195Z	debug	envoy wasm	wasm log: #on_configure -> {"password":"passw0rd","username":"admin"}
2023-08-05T08:15:05.751208Z	debug	envoy wasm	~Wasm 12 remaining active
2023-08-05T08:15:05.752986Z	debug	envoy wasm	wasm log: #on_configure -> {"password":"passw0rd","username":"admin"}
2023-08-05T08:15:05.753243Z	debug	envoy wasm	wasm log: #on_configure -> {"password":"passw0rd","username":"admin"}
2023-08-05T08:15:05.753372Z	debug	envoy wasm	wasm log: #on_configure -> {"password":"passw0rd","username":"admin"}
Rust SDK 说明
这里讲解一下 Rust SDK 的使用方法和一些常见问题。
如何获取pluginConfig的配置:
impl RootContext for HttpHeadersRoot {
    fn get_type(&self) -> Option<ContextType> {
        Some(ContextType::HttpContext)
    }

    fn create_http_context(&self, context_id: u32) -> Option<Box<dyn HttpContext>> {
        Some(Box::new(HttpHeaders { context_id }))
    }

    // 读取pluginConfig配置,直接解析json即可
    fn on_configure(&mut self, _plugin_configuration_size: usize) -> bool {
        if let Some(config_bytes) = self.get_plugin_configuration() {
            if let Ok(config_str) = std::str::from_utf8(&config_bytes) {
                debug!("#{} -> {}", "on_configure", config_str);
            } else {
                error!("Failed to convert configuration bytes to string");
                return false;
            }
        }
        true
    }
}
如何获取 HTTP 所有的请求头:
fn on_http_response_headers(&mut self, _: usize, _: bool) -> Action {
   for (name, value) in &self.get_http_response_headers() {
      info!("#{} <- {}: {}", self.context_id, name, value);
   }
   Action::Continue
}
如何获取 HTTP 的某个请求头:
if let Some(path) = self.get_http_request_header(":path")  {
    // TODO: do something with the path
}
如何强制修改请求头:
self.set_http_request_header(key, value);
如何终止请求并发送 401 响应:
fn on_http_request_headers(&mut self, _: usize, _: bool) -> Action {
    if let Some(path) = self.get_http_request_header(":path") {
        self.send_http_response(
            401,
            sdk::headers(),
            None,
        );
        return Action::Pause;
    }
    return Action::Continue;
}
如何发送请求给其他服务,并解析请求返回
参考代码 : https://github.com/proxy-wasm/proxy-wasm-rust-sdk/blob/master/examples/http_auth_random/src/lib.rs
❝
这里需要说明一下,它其实是支持的 wasm 的 enovy 的负载均衡的请求,并不支持直接请求 http 服务。所以我们需要先获取当前集群所支持的服务列表,然后再发送请求
找到你要查看 istio 的 istio-ingressgateway pod 名称
istioctl proxy-config clusters istio-ingressgateway-556959fc6f-prbbg.istio-system --fqdn sealos.hub -o yaml
找到其名字规则为 outbound|5000||sealos.hub 既 : DIRECTION|PORT||SERVICE_ALL_ADDR
fn on_http_request_headers(&mut self, _: usize, _: bool) -> Action {
    let upstream = format!("outbound|{}||{}", 5000, "sealos.hub");
        self.dispatch_http_call(
            &upstream,
            vec![
                (":method", "GET"), //设置请求方式
                (":path", "/bytes/1"), //设置请求路径
                (":authority", "sealos.hub:5000"), //设置请求地址
                (":scheme", "http"),
            ],
            None,
            vec![],
            Duration::from_secs(5),
        )
        .unwrap();
        Action::Pause
    }

fn on_http_call_response(&mut self, _: u32, _: usize, body_size: usize, _: usize) {
        if let Some(body) = self.get_http_call_response_body(0, body_size) {
            if !body.is_empty() && body[0] % 2 == 0 {
                info!("Access granted.");
                self.resume_http_request();
                return;
            }
        }
        info!("Access forbidden.");
        self.send_http_response(
            403,
            vec![("Powered-By", "proxy-wasm")],
            Some(b"Access forbidden.\n"),
        );
    }
总结一下:
使用dispatch_http_call方法向其他服务发送异步请求,在on_http_call_response方法中接收返回结果。
在on_http_call_response方法中,可以解析返回的结果,根据需要进行相应的处理。
如果需要根据请求结果来继续执行之前的数据,可以调用self.resume_http_request()。
以上就是关于 Rust SDK 的使用方法的简要说明。通过这些方法,您可以轻松地扩展和定制 Istio 的功能,并在请求的不同阶段对流量进行个性化处理。
引用链接
[1]
C++ SDK: https://github.com/proxy-wasm/proxy-wasm-cpp-sdk
[2]Rust SDK: https://github.com/proxy-wasm/proxy-wasm-rust-sdk
[3]AssemblyScript SDK: https://github.com/solo-io/proxy-runtime
[4]TinyGo SDK: https://github.com/tetratelabs/proxy-wasm-go-sdk
[5]Istio Wasm Plugin: https://istio.io/latest/zh/docs/reference/config/proxy_extensions/wasm-plugin/
关于 Sealos
Sealos 是一款以 Kubernetes 为内核的云操作系统发行版。它以云原生的方式,抛弃了传统的云计算架构,转向以 Kubernetes 为云内核的新架构,使企业能够像使用个人电脑一样简单地使用云。
🌟GitHub:https://github.com/labring/sealos
🏠官网:https://sealos.io
💻开发者论坛:https://forum.laf.run
关注 Sealos 公众号与我们一同成长👇👇👇