Netty 简易实战,傻瓜都能看懂!
点击关注公众号,Java干货及时送达
作者:rickiyang
出处:www.cnblogs.com/rickiyang/p/11074237.html
这一节我们来讲解Netty,使用Netty之前我们先了解一下Netty能做什么,无为而学,岂不是白费力气!
1.使用Netty能够做什么
开发异步、非阻塞的TCP网络应用程序; 开发异步、非阻塞的UDP网络应用程序; 开发异步文件传输应用程序; 开发异步HTTP服务端和客户端应用程序; 提供对多种编解码框架的集成,包括谷歌的Protobuf、Jboss marshalling、Java序列化、压缩编解码、XML解码、字符串编解码等,这些编解码框架可以被用户直接使用; 提供形式多样的编解码基础类库,可以非常方便的实现私有协议栈编解码框架的二次定制和开发; 基于职责链模式的Pipeline-Handler机制,用户可以非常方便的对网络事件进行拦截和定制; 所有的IO操作都是异步的,用户可以通过Future-Listener机制主动Get结果或者由IO线程操作完成之后主动Notify结果,用户的业务线程不需要同步等待; IP黑白名单控制; 打印消息码流; 流量控制和整形; 性能统计; 基于链路空闲事件检测的心跳检测
2. Netty常用类讲解
在这里我们就一些我们常用到的类做大致的讲解,然后再写入门程序的时候大致知道每一行都讲了什么。
EventLoop,EventLoopGroup
EventLoop目的是为Channel处理IO操作,一个EventLoop可以为多个Channel服务,EventLoopGroup会包含多个EventLoop。
BootStrap,ServerBootstrap
一个Netty应用通常由一个Bootstrap开始,它主要作用是配置整个Netty程序,串联起各个组件。分享:Spring Boot 学习笔记。
ChannelInitializer
当一个链接建立时,我们需要知道怎么来接收或者发送数据,当然,我们有各种各样的Handler实现来处理它,那么ChannelInitializer便是用来配置这些Handler,它会提供一个ChannelPipeline,并把Handler加入到ChannelPipeline。
Handler
为了支持各种协议和处理数据的方式,便诞生了Handler组件。Handler主要用来处理各种事件,这里的事件很广泛,比如可以是连接、数据接收、异常、数据转换等。
ChannelInboundHandler
一个最常用的Handler。这个Handler的作用就是处理接收到数据时的事件,也就是说,我们的业务逻辑一般就是写在这个Handler里面的,ChannelInboundHandler就是用来处理我们的核心业务逻辑。
Future
在Netty中所有的IO操作都是异步的,因此,你不能立刻得知消息是否被正确处理,但是我们可以过一会等它执行完成或者直接注册一个监听,具体的实现就是通过Future和ChannelFutures,他们可以注册一个监听,当操作执行成功或失败时监听会自动触发。总之,所有的操作都会返回一个ChannelFuture。
3. 第一个Helloworld
上面我们已经对常用类进行说明,下面我们就使用这些类来构建我们的第一个入门程序,本示例我使用的是maven来构建工程,如果你使用的是普通的项目则跳过第一步。另外,微信搜索Java技术栈,在后台回复:Maven,获取系列 Maven 教程。
首先引入maven jar包:
<dependency>
      <groupId>io.netty</groupId>
      <artifactId>netty-all</artifactId>
      <version>4.1.5.Final</version>
</dependency>
public class HelloWorldClient {
    private  int port;
    private  String address;

    public HelloWorldClient(int port,String address) {
        this.port = port;
        this.address = address;
    }

    public void start(){
        EventLoopGroup group = new NioEventLoopGroup();

        Bootstrap bootstrap = new Bootstrap();
        bootstrap.group(group)
                .channel(NioSocketChannel.class)
                .handler(new ClientChannelInitializer());

        try {
            Channel channel = bootstrap.connect(address,port).sync().channel();
            BufferedReader reader = new BufferedReader(new InputStreamReader(System.in));
            for(;;){
                String msg = reader.readLine();
                if(msg == null){
                    continue;
                }
                channel.writeAndFlush(msg + "\r\n");
            }
        } catch (Exception e) {
            e.printStackTrace();
        }finally {
            group.shutdownGracefully();
        }

    }

    public static void main(String[] args) {
        HelloWorldClient client = new HelloWorldClient(7788,"127.0.0.1");
        client.start();
    }
}
ChannelInitializer用来配置处理数据的handler:
public class ClientChannelInitializer extends  ChannelInitializer<SocketChannel> {

    protected void initChannel(SocketChannel socketChannel) throws Exception {
        ChannelPipeline pipeline = socketChannel.pipeline();

        /*
         * 这个地方的 必须和服务端对应上。否则无法正常解码和编码
         *
         * 解码和编码 我将会在下一节为大家详细的讲解。暂时不做详细的描述
         *
         * /
        pipeline.addLast("decoder", new StringDecoder());
        pipeline.addLast("encoder", new StringEncoder());

        // 我们自己的handler
        pipeline.addLast("handler", new HelloWorldClientHandler());
    }
}
public class HelloWorldClientHandler extends ChannelInboundHandlerAdapter {
    @Override
    public void channelRead(ChannelHandlerContext ctx, Object msg) throws Exception {
        System.out.println("server say : "+msg.toString());
    }

    @Override
    public void channelActive(ChannelHandlerContext ctx) throws Exception {
        System.out.println("Client is active");
    }

    @Override
    public void channelInactive(ChannelHandlerContext ctx) throws Exception {
        System.out.println("Client is close");
    }
}
public class HelloWordServer {
    private int port;

    public HelloWordServer(int port) {
        this.port = port;
    }

    public void start(){
        EventLoopGroup bossGroup = new NioEventLoopGroup();
        EventLoopGroup workGroup = new NioEventLoopGroup();

        ServerBootstrap server = new ServerBootstrap().group(bossGroup,workGroup)
                                    .channel(NioServerSocketChannel.class)
                                    .childHandler(new ServerChannelInitializer());

        try {
            ChannelFuture future = server.bind(port).sync();
            future.channel().closeFuture().sync();
        } catch (InterruptedException e) {
            e.printStackTrace();
        }finally {
            bossGroup.shutdownGracefully();
            workGroup.shutdownGracefully();
        }
    }

    public static void main(String[] args) {
        HelloWordServer server = new HelloWordServer(7788);
        server.start();
    }
}
public class ServerChannelInitializer extends ChannelInitializer<SocketChannel> {
    @Override
    protected void initChannel(SocketChannel socketChannel) throws Exception {
        ChannelPipeline pipeline = socketChannel.pipeline();

        // 字符串解码 和 编码
        pipeline.addLast("decoder", new StringDecoder());
        pipeline.addLast("encoder", new StringEncoder());

        // 自己的逻辑Handler
        pipeline.addLast("handler", new HelloWordServerHandler());
    }
}
public class HelloWordServerHandler extends ChannelInboundHandlerAdapter {

    @Override
    public void channelRead(ChannelHandlerContext ctx, Object msg) throws Exception {
        System.out.println(ctx.channel().remoteAddress()+"===>server: "+msg.toString());
        ctx.write("received your msg");
        ctx.flush();
    }

    @Override
    public void exceptionCaught(ChannelHandlerContext ctx, Throwable cause) throws Exception {
        super.exceptionCaught(ctx, cause);
        ctx.close();
    }
}
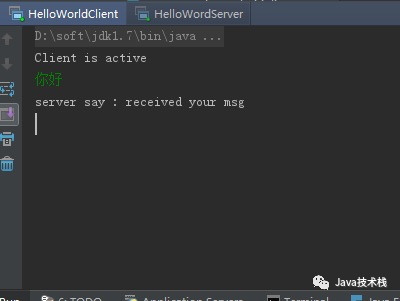
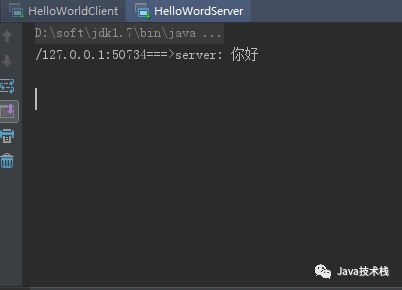
上面服务器端和客户端的代码都已经写完,下面我们先启动服务端,然后启动客户端,程序中我是在客户端让手动输入,输入结束之后回车,服务器端即可接受数据。
客户端:
服务端:



关注Java技术栈看更多干货
