Python 中解释 XGBoost 模型的学习曲线

XGBoost是梯度提升集成算法的强大而有效的实现。配置XGBoost模型的超参数可能具有挑战性,这通常会导致使用既费时又计算量大的大型网格搜索实验。配置XGBoost模型的另一种方法是在训练过程中算法的每次迭代评估模型的性能,并将结果绘制为学习曲线。这些学习曲线图提供了一种可以解释的诊断工具,并建议对模型超参数进行特定更改,从而可能会改善预测性能。
在本教程中,您将发现如何在Python中绘制和解释XGBoost模型的学习曲线。完成本教程后,您将知道:
学习曲线为了解诸如XGBoost之类的监督学习模型的训练动态提供了有用的诊断工具。
如何配置XGBoost来评估每次迭代的数据集并将结果绘制为学习曲线。
如何解释和使用学习曲线图来改善XGBoost模型的性能。
教程概述
本教程分为四个部分。他们是:
极端梯度提升
学习曲线
绘制XGBoost学习曲线
使用学习曲线调整XGBoost模型
极端梯度提升
梯度提升是指一类集成机器学习算法,可用于分类或回归预测建模问题。集成是根据决策树模型构建的。一次将一棵树添加到集合中,并进行调整以纠正由先前模型造成的预测误差。这是一种集成机器学习模型,称为Boosting。使用任何任意的微分损失函数和梯度下降优化算法对模型进行拟合。这给该技术起了名字,称为“梯度提升”,因为随着模型的拟合,损耗梯度被最小化,非常类似于神经网络。
Extreme Gradient Boosting(简称XGBoost)是梯度提升算法的一种有效的开源实现。因此,XGBoost是一个算法,一个开源项目和一个Python库。它最初是由Tianqi Chen开发的,并由Chen和Carlos Guestrin在其2016年的论文“ XGBoost:可扩展的树增强系统”中进行了描述。它被设计为既计算效率高(例如执行速度快)又高效,也许比其他开源实现更有效。使用XGBoost的两个主要原因是执行速度和模型性能。在分类和回归预测建模问题上,XGBoost主导结构化或表格数据集。证据表明,它是Kaggle竞争数据科学平台上竞赛获胜者的首选算法。
现在我们已经了解了XGBoost是什么以及为什么它很重要,让我们仔细研究一下学习曲线。
学习曲线
通常,学习曲线是在x轴上显示时间或经验并在y轴上显示学习或改善的图。
学习曲线广泛用于机器学习中的算法,这些算法会随着时间的推移逐步学习(优化其内部参数),例如深度学习神经网络。用于评估学习的指标可能会最大化,这意味着分数越高(数字越大)表示学习越多。一个例子是分类精度。
更常见的是使用最小化的分数,例如损失或错误,其中分数越高(数字越小)表示学习越多,而值0.0指示训练数据集学习得很好,并且没有犯错误。
在机器学习模型的训练过程中,可以评估训练算法每个步骤的模型当前状态。可以在训练数据集上对其进行评估,以了解模型的“学习程度”。也可以在不属于训练数据集的保留验证数据集上对其进行评估。通过对验证数据集进行评估,可以了解模型的“一般化”程度。
在训练数据集和验证数据集上进行训练时,通常会为机器学习模型创建双重学习曲线。学习曲线的形状和动态可用于诊断机器学习模型的行为,并进而建议可以进行配置更改的类型以改善学习和/或性能。
您可能会在学习曲线中观察到三种常见的动态变化;他们是:
欠拟合
过拟合
拟合适中
最常见的是,学习曲线用于诊断模型的过拟合行为,可以通过调整模型的超参数来解决。
过度拟合是指对训练数据集学习得太好的模型,包括统计噪声或训练数据集中的随机波动。过度拟合的问题在于,模型对训练数据的专业化程度越高,将其推广到新数据的能力就越差,从而导致推广误差增加。泛化误差的增加可以通过验证数据集上模型的性能来衡量。
现在我们已经熟悉了学习曲线,让我们看一下如何绘制XGBoost模型的学习曲线。
绘制XGBoost学习曲线
在本节中,我们将绘制XGBoost模型的学习曲线。
首先,我们需要一个数据集作为拟合和评估模型的基础。在本教程中,我们将使用合成的二进制(两类)分类数据集。
make_classification()scikit-learn函数可用于创建综合分类数据集。在这种情况下,我们将使用50个输入要素(列)并生成10,000个样本(行)。伪随机数生成器的种子是固定的,以确保每次生成样本时都使用相同的基本“问题”。
下面的示例生成综合分类数据集,并汇总生成数据的形状。
# test classification dataset
from sklearn.datasets import make_classification
# define dataset
X, y = make_classification(n_samples=10000, n_features=50, n_informative=50, n_redundant=0, random_state=1)
# summarize the dataset
print(X.shape, y.shape)
运行示例将生成数据并报告输入和输出组件的大小,从而确认期望的形状。
(10000, 50) (10000,)
接下来,我们可以在该数据集上拟合XGBoost模型,并绘制学习曲线。首先,我们必须将数据集分成一个部分,该部分将用于训练模型(训练),另一部分将不用于训练模型,但将被保留下来并用于评估模型的每一步训练 算法(测试集或验证集)。
# split data into train and test sets
X_train, X_test, y_train, y_test = train_test_split(X, y, test_size=0.50, random_state=1)
然后,我们可以使用默认超参数定义XGBoost分类模型。
# define the model
model = XGBClassifier()
接下来,可以将模型拟合到数据集上。在这种情况下,我们必须向训练算法指定要在训练集上评估模型性能的算法,并在每次迭代时(例如,在将每棵新树添加到集合中之后)对测试集进行测试。为此,我们必须指定要评估的数据集和要评估的指标。数据集必须指定为元组列表,其中每个元组都包含数据集的输入和输出列,并且列表中的每个元素都是要评估的不同数据集,例如 训练集和测试集。
# define the datasets to evaluate each iteration
evalset = [(X_train, y_train), (X_test,y_test)]
我们可能要评估许多指标,尽管考虑到这是分类任务,但我们将评估模型的对数损失(交叉熵),这是最小化的得分(值越低越好)。
这可以通过在调用fit()时指定“ evalmetric”参数并为其提供指标名称来实现,我们将评估“ logloss”。我们还可以通过“ evalset”参数指定要评估的数据集。fit()函数按照常规将训练数据集作为前两个参数。
# fit the model
model.fit(X_train, y_train, eval_metric='logloss', eval_set=evalset)
一旦模型适合,我们就可以将其性能评估为测试数据集上的分类准确性。
# evaluate performance
yhat = model.predict(X_test)
score = accuracy_score(y_test, yhat)
print('Accuracy: %.3f' % score)
然后,我们可以通过调用 evals_result()函数来检索为每个数据集计算的指标。
# retrieve performance metrics
results = model.evals_result()
这将返回一个字典,该字典首先按数据集(“ validation0”和“ validation1”)进行组织,然后按度量标准(“ logloss”)进行组织。我们可以为每个数据集创建度量的折线图。
# plot learning curves
pyplot.plot(results['validation_0']['logloss'], label='train')
pyplot.plot(results['validation_1']['logloss'], label='test')
# show the legend
pyplot.legend()
# show the plot
pyplot.show()
就是这样。综合所有这些,下面列出了在综合分类任务上拟合XGBoost模型并绘制学习曲线的完整示例。
# plot learning curve of an xgboost model
from sklearn.datasets import make_classification
from sklearn.model_selection import train_test_split
from sklearn.metrics import accuracy_score
from xgboost import XGBClassifier
from matplotlib import pyplot
# define dataset
X, y = make_classification(n_samples=10000, n_features=50, n_informative=50, n_redundant=0, random_state=1)
# split data into train and test sets
X_train, X_test, y_train, y_test = train_test_split(X, y, test_size=0.50, random_state=1)
# define the model
model = XGBClassifier()
# define the datasets to evaluate each iteration
evalset = [(X_train, y_train), (X_test,y_test)]
# fit the model
model.fit(X_train, y_train, eval_metric='logloss', eval_set=evalset)
# evaluate performance
yhat = model.predict(X_test)
score = accuracy_score(y_test, yhat)
print('Accuracy: %.3f' % score)
# retrieve performance metrics
results = model.evals_result()
# plot learning curves
pyplot.plot(results['validation_0']['logloss'], label='train')
pyplot.plot(results['validation_1']['logloss'], label='test')
# show the legend
pyplot.legend()
# show the plot
pyplot.show()
运行示例符合XGBoost模型,检索计算的指标并绘制学习曲线。
注意:由于算法或评估程序的随机性,或者数值精度的差异,您的结果可能会有所不同。考虑运行该示例几次并比较平均结果。
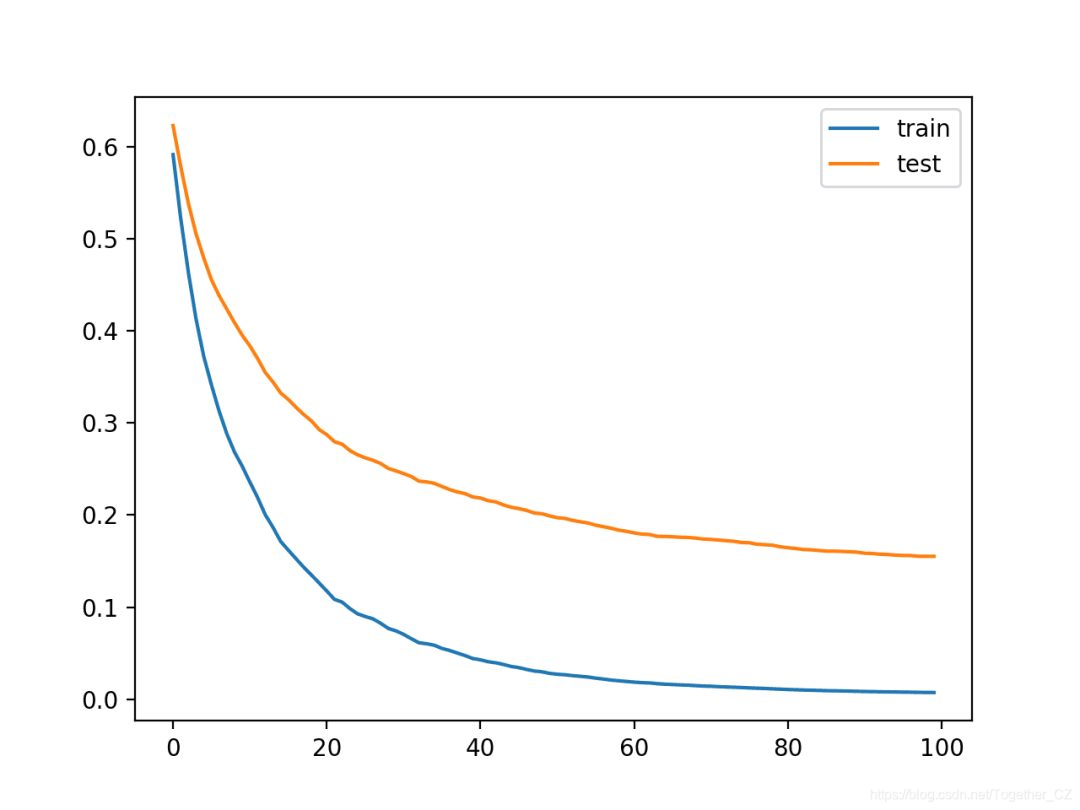
首先,报告了模型性能,表明该模型在保留测试集上实现了约94.5%的分类精度。
Accuracy: 0.945
该图显示了训练和测试数据集的学习曲线,其中x轴是算法的迭代次数(或添加到集合中的树数),y轴是模型的对数损失。每行显示给定数据集每次迭代的对数损失。从学习曲线上,我们可以看到,训练数据集上的模型性能(蓝线)比测试数据集上的模型性能(橙线)更好或更具有更低的损失,正如我们通常期望的那样。
现在,我们知道了如何为XGBoost模型绘制学习曲线,让我们看看如何使用这些曲线来改善模型性能。
使用学习曲线调整XGBoost模型
我们可以将学习曲线用作诊断工具。可以解释这些曲线并将其用作建议对模型配置进行特定更改的基础,这些更改可能会导致更好的性能。上一节中的模型和结果可以用作基线和起点。查看该图,我们可以看到两条曲线都在向下倾斜,这表明更多的迭代(添加更多的树)可能会导致损耗进一步降低。让我们尝试一下。我们可以通过默认为100的“ n_estimators”超参数来增加算法的迭代次数。让我们将其增加到500。
# define the model
model = XGBClassifier(n_estimators=500)
完整实例如下:
# plot learning curve of an xgboost model
from sklearn.datasets import make_classification
from sklearn.model_selection import train_test_split
from sklearn.metrics import accuracy_score
from xgboost import XGBClassifier
from matplotlib import pyplot
# define dataset
X, y = make_classification(n_samples=10000, n_features=50, n_informative=50, n_redundant=0, random_state=1)
# split data into train and test sets
X_train, X_test, y_train, y_test = train_test_split(X, y, test_size=0.50, random_state=1)
# define the model
model = XGBClassifier(n_estimators=500)
# define the datasets to evaluate each iteration
evalset = [(X_train, y_train), (X_test,y_test)]
# fit the model
model.fit(X_train, y_train, eval_metric='logloss', eval_set=evalset)
# evaluate performance
yhat = model.predict(X_test)
score = accuracy_score(y_test, yhat)
print('Accuracy: %.3f' % score)
# retrieve performance metrics
results = model.evals_result()
# plot learning curves
pyplot.plot(results['validation_0']['logloss'], label='train')
pyplot.plot(results['validation_1']['logloss'], label='test')
# show the legend
pyplot.legend()
# show the plot
pyplot.show()
运行示例可以拟合并评估模型,并绘制模型性能的学习曲线。
注意:由于算法或评估程序的随机性,或者数值精度的差异,您的结果可能会有所不同。考虑运行该示例几次并比较平均结果。
我们可以看到,更多的迭代导致准确性从大约94.5%提升到大约95.8%。
Accuracy: 0.958
从学习曲线中我们可以看到,确实,算法的其他迭代导致曲线继续下降,然后在经过150次迭代后趋于平稳,并保持在合理的水平。
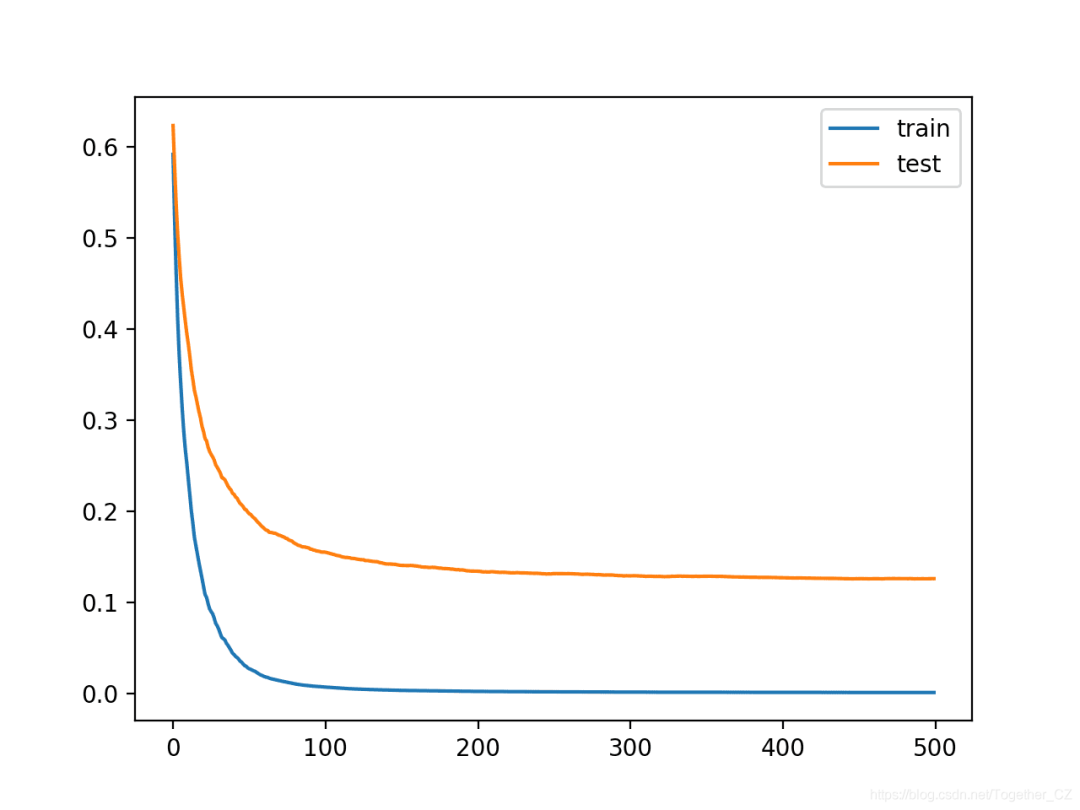
较长的平坦曲线可能表明该算法学习速度过快,并且放慢速度可能会受益。这可以使用学习率来实现,该学习率限制了添加到集合中的每棵树的贡献。可以通过“ eta”超参数进行控制,默认值为0.3。我们可以尝试较小的值,例如0.05。
# define the model
model = XGBClassifier(n_estimators=500, eta=0.05)
完整实例如下:
# plot learning curve of an xgboost model
from sklearn.datasets import make_classification
from sklearn.model_selection import train_test_split
from sklearn.metrics import accuracy_score
from xgboost import XGBClassifier
from matplotlib import pyplot
# define dataset
X, y = make_classification(n_samples=10000, n_features=50, n_informative=50, n_redundant=0, random_state=1)
# split data into train and test sets
X_train, X_test, y_train, y_test = train_test_split(X, y, test_size=0.50, random_state=1)
# define the model
model = XGBClassifier(n_estimators=500, eta=0.05)
# define the datasets to evaluate each iteration
evalset = [(X_train, y_train), (X_test,y_test)]
# fit the model
model.fit(X_train, y_train, eval_metric='logloss', eval_set=evalset)
# evaluate performance
yhat = model.predict(X_test)
score = accuracy_score(y_test, yhat)
print('Accuracy: %.3f' % score)
# retrieve performance metrics
results = model.evals_result()
# plot learning curves
pyplot.plot(results['validation_0']['logloss'], label='train')
pyplot.plot(results['validation_1']['logloss'], label='test')
# show the legend
pyplot.legend()
# show the plot
pyplot.show()
运行示例可以拟合并评估模型,并绘制模型性能的学习曲线。
注意:由于算法或评估程序的随机性,或者数值精度的差异,您的结果可能会有所不同。考虑运行该示例几次并比较平均结果。
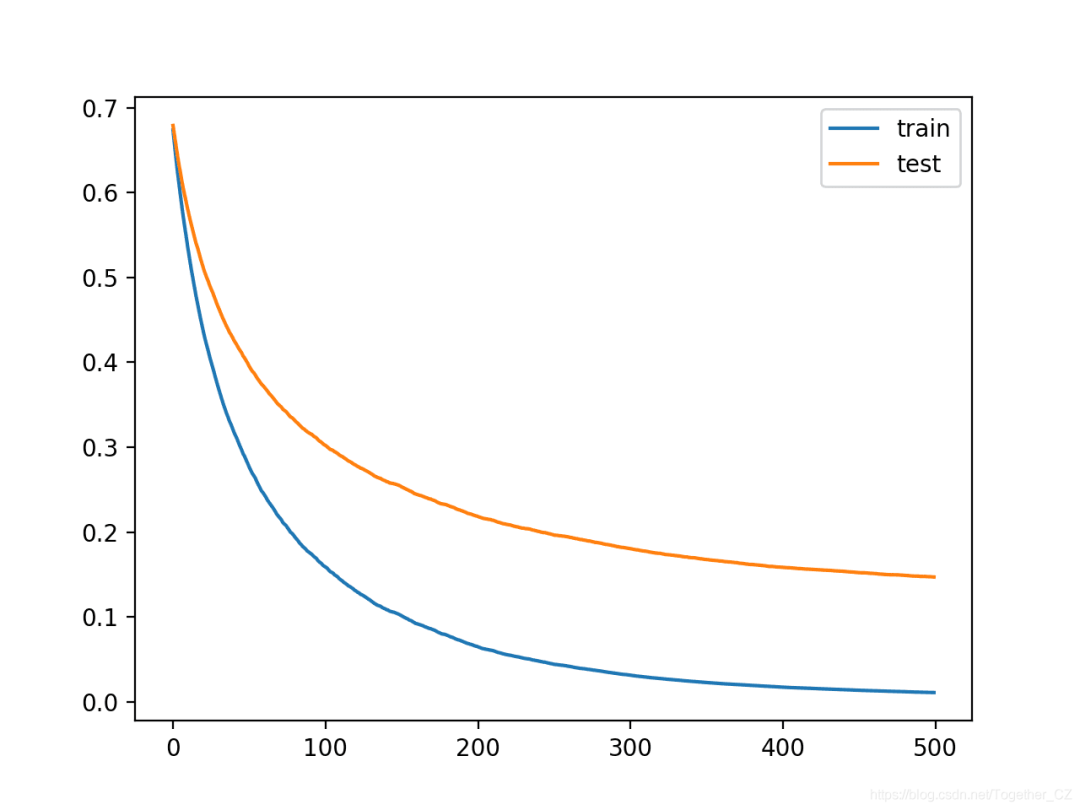
我们可以看到较小的学习率使准确度变差,从 大约95.8%下降到大约95.1%。
Accuracy: 0.951
从学习曲线我们可以看出,学习确实在放慢脚步。曲线表明我们可以继续添加更多的迭代,并且可能会获得更好的性能,因为曲线将有更多机会继续降低。
让我们尝试将迭代次数从500增加到2,000。
# define the model
model = XGBClassifier(n_estimators=2000, eta=0.05)
完整实例如下:
# plot learning curve of an xgboost model
from sklearn.datasets import make_classification
from sklearn.model_selection import train_test_split
from sklearn.metrics import accuracy_score
from xgboost import XGBClassifier
from matplotlib import pyplot
# define dataset
X, y = make_classification(n_samples=10000, n_features=50, n_informative=50, n_redundant=0, random_state=1)
# split data into train and test sets
X_train, X_test, y_train, y_test = train_test_split(X, y, test_size=0.50, random_state=1)
# define the model
model = XGBClassifier(n_estimators=2000, eta=0.05)
# define the datasets to evaluate each iteration
evalset = [(X_train, y_train), (X_test,y_test)]
# fit the model
model.fit(X_train, y_train, eval_metric='logloss', eval_set=evalset)
# evaluate performance
yhat = model.predict(X_test)
score = accuracy_score(y_test, yhat)
print('Accuracy: %.3f' % score)
# retrieve performance metrics
results = model.evals_result()
# plot learning curves
pyplot.plot(results['validation_0']['logloss'], label='train')
pyplot.plot(results['validation_1']['logloss'], label='test')
# show the legend
pyplot.legend()
# show the plot
pyplot.show()
运行示例可以拟合并评估模型,并绘制模型性能的学习曲线。
注意:由于算法或评估程序的随机性,或者数值精度的差异,您的结果可能会有所不同。考虑运行该示例几次并比较平均结果。
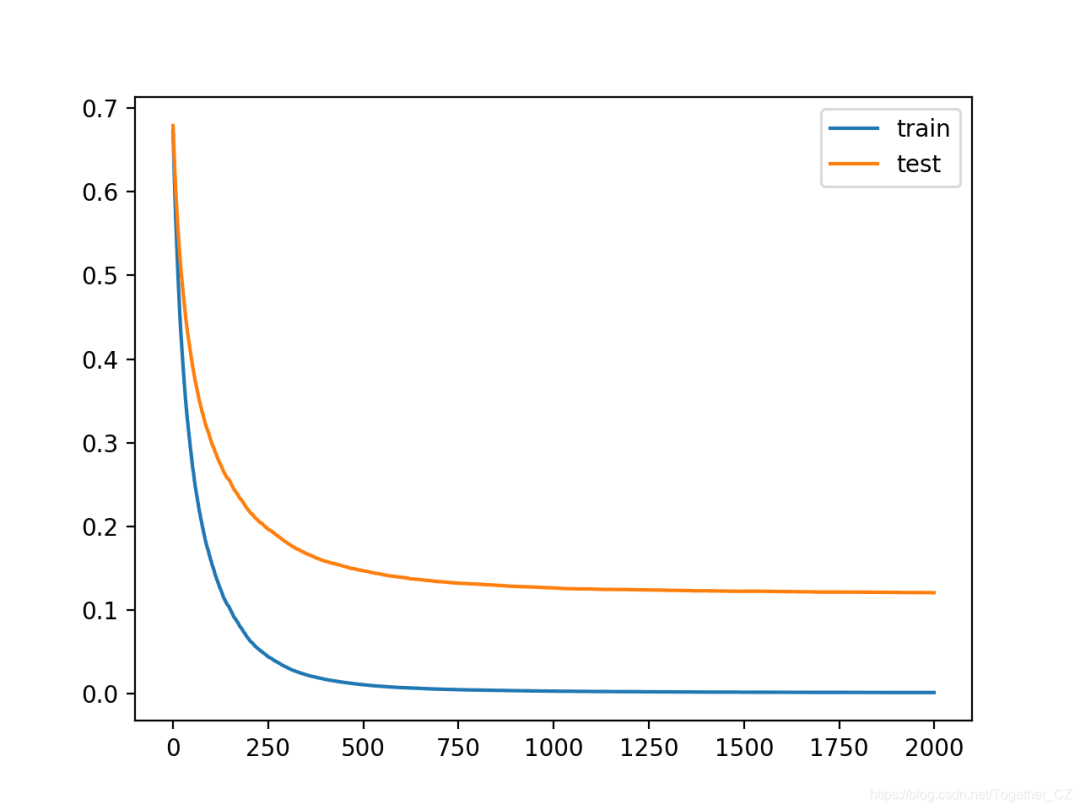
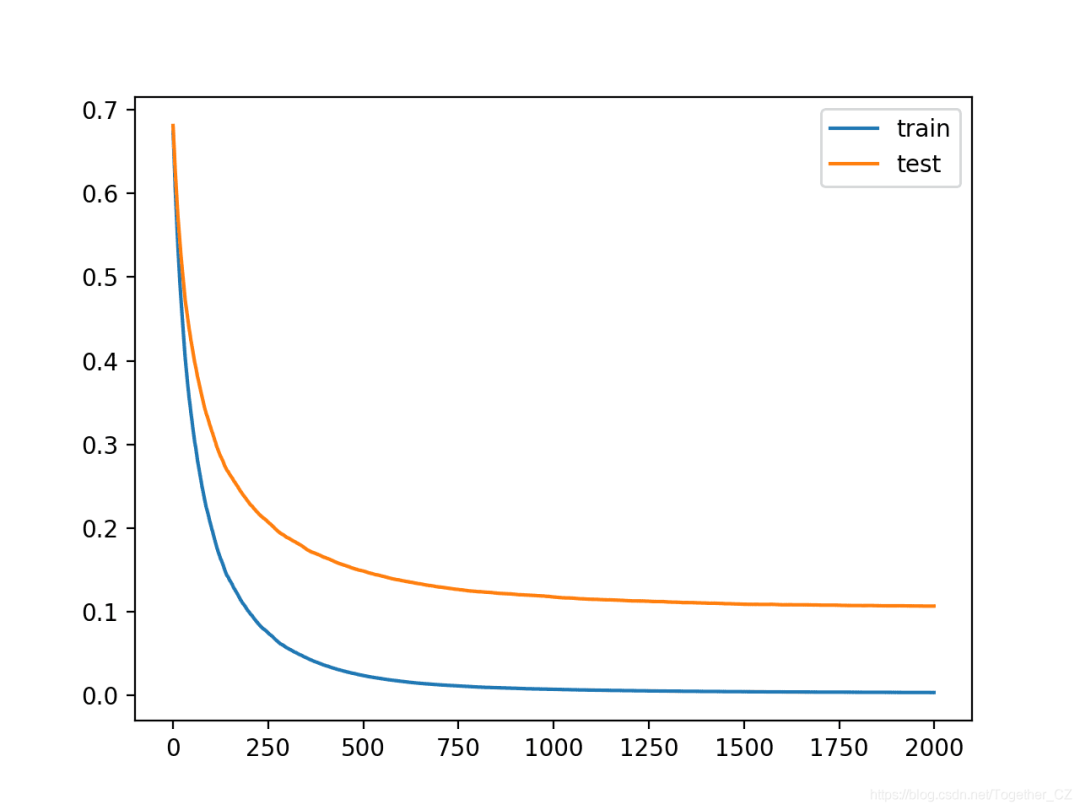
我们可以看到,更多的迭代使算法有更多的改进空间,达到了96.1%的准确性,是迄今为止最好的。
Accuracy: 0.961
学习曲线再次显示出算法的稳定收敛,且急剧下降且长时间展平。
我们可以重复降低学习率和增加迭代次数的过程,以查看是否有可能进一步改进。减慢学习速度的另一种方法是以减少样本数和特征(行和列)的数量的形式添加正则化,以用于构造整体中的每棵树。在这种情况下,我们将尝试通过“子样本”和“ colsample_bytree”超参数分别将样本和特征的数量减半。
# define the model
model = XGBClassifier(n_estimators=2000, eta=0.05, subsample=0.5, colsample_bytree=0.5)
完整实例如下:
# plot learning curve of an xgboost model
from sklearn.datasets import make_classification
from sklearn.model_selection import train_test_split
from sklearn.metrics import accuracy_score
from xgboost import XGBClassifier
from matplotlib import pyplot
# define dataset
X, y = make_classification(n_samples=10000, n_features=50, n_informative=50, n_redundant=0, random_state=1)
# split data into train and test sets
X_train, X_test, y_train, y_test = train_test_split(X, y, test_size=0.50, random_state=1)
# define the model
model = XGBClassifier(n_estimators=2000, eta=0.05, subsample=0.5, colsample_bytree=0.5)
# define the datasets to evaluate each iteration
evalset = [(X_train, y_train), (X_test,y_test)]
# fit the model
model.fit(X_train, y_train, eval_metric='logloss', eval_set=evalset)
# evaluate performance
yhat = model.predict(X_test)
score = accuracy_score(y_test, yhat)
print('Accuracy: %.3f' % score)
# retrieve performance metrics
results = model.evals_result()
# plot learning curves
pyplot.plot(results['validation_0']['logloss'], label='train')
pyplot.plot(results['validation_1']['logloss'], label='test')
# show the legend
pyplot.legend()
# show the plot
pyplot.show()
运行示例可以拟合并评估模型,并绘制模型性能的学习曲线。
注意:由于算法或评估程序的随机性,或者数值精度的差异,您的结果可能会有所不同。考虑运行该示例几次并比较平均结果。
我们可以看到,添加正则化带来了进一步的改进,将准确性从大约96.1%提高到了大约96.6%。
Accuracy: 0.966
曲线表明正则化减慢了学习速度,也许增加迭代次数可能会导致进一步的改进。
教程
A Gentle Introduction to the Gradient Boosting Algorithm for Machine Learning
Extreme Gradient Boosting (XGBoost) Ensemble in Python
How to use Learning Curves to Diagnose Machine Learning Model Performance
Avoid Overfitting By Early Stopping With XGBoost In Python
APIs
xgboost.XGBClassifier API.
xgboost.XGBRegressor API.
XGBoost: Learning Task Parameters
作者:沂水寒城,CSDN博客专家,个人研究方向:机器学习、深度学习、NLP、CV
Blog: http://yishuihancheng.blog.csdn.net
赞 赏 作 者



点击下方阅读原文加入社区会员
