(附代码)使用OpenCV实现摄像头测距
点击左上方蓝字关注我们

作者 |视学算法
假设物体的宽度为 W,将其放到离相机距离为 D 的位置,然后对物体进行拍照。在照片上量出物体的像素宽度 P,于是可以得出计算相机焦距 F 的公式:

比如我在相机前 24 英寸距离(D=24 inches)的位置横着放了一张 8.5 x 11 英寸(W=11 inches)的纸,拍照后通过图像处理得出照片上纸的像素宽度 P=248 pixels。所以焦距 F 等于:

此时移动相机离物体更近或者更远,我们可以应用相似三角形得到计算物体到相机的距离的公式:
原理大概就是这样,接下来使用 OpenCV 来实现。
# import the necessary packagesfrom imutils import pathsimport numpy as npimport imutilsimport cv2def find_marker(image):# convert the image to grayscale, blur it, and detect edgesgray = cv2.cvtColor(image, cv2.COLOR_BGR2GRAY)gray = cv2.GaussianBlur(gray, (5, 5), 0)edged = cv2.Canny(gray, 35, 125)# find the contours in the edged image and keep the largest one;# we'll assume that this is our piece of paper in the imagecnts = cv2.findContours(edged.copy(), cv2.RETR_LIST, cv2.CHAIN_APPROX_SIMPLE)cnts = imutils.grab_contours(cnts)c = max(cnts, key = cv2.contourArea)# compute the bounding box of the of the paper region and return itreturn cv2.minAreaRect(c)
定义一个 find_marker 函数,接收一个参数 iamge,用来找到要计算距离的物体。这里我们用一张 8.5 x 11 英寸的纸作为目标物体。第一个任务是在图片中找到目标物体。
下面这三行是先将图片转换为灰度图,并进行轻微模糊处理以去除高频噪声,然后进行边缘检测。
gray = cv2.cvtColor(image, cv2.COLOR_BGR2GRAY)gray = cv2.GaussianBlur(gray, (5, 5), 0)edged = cv2.Canny(gray, 35, 125)
做了这几步后图片看起来是这样的:
现在已经可以清晰地看到这张纸的边缘,接下来需要做的是找出这张纸的轮廓。
cnts = cv2.findContours(edged.copy(), cv2.RETR_LIST, cv2.CHAIN_APPROX_SIMPLE)cnts = imutils.grab_contours(cnts)c = max(cnts, key = cv2.contourArea)
用 cv2.findContours 函数找到图片中的众多轮廓,然后获取其中面积最大的轮廓,并假设这是目标物体的轮廓。
这种假设只适用于我们这个场景,在实际使用时,在图片中找出目标物体的方法与应用场景有很大关系。
我们这个场景用简单的边缘检测并找出最大的轮廓就可以了。当然为了使程序更具有鲁棒性,也可以用轮廓近似,并剔除不是四个点的轮廓(纸张是一个有四个点的矩形),然后再找出面积最大,具有四个点的轮廓。
注意: 关于这个方法,详情可以查看这篇文章,用于构建一个移动文本扫描工具。
我们也可以根据颜色特征在图片中找到目标物体,因为目标物体和背景的颜色有着很明显的不同。还可以应用关键点检测(keypoint detection),局部不变性描述子(local invariant descriptors)和关键点匹配(keypoint matching)来寻找目标。但是这些方法不在本文的讨论范围内,而且高度依赖具体场景。
我们现在得到目标物体的轮廓了,find_marker 函数最后返回的是包含轮廓 (x, y) 坐标、像素长度和像素宽度的边框,
接下来该使用相似三角形计算目标到相机的距离。
def distance_to_camera(knownWidth, focalLength, perWidth):# compute and return the distance from the maker to the camerareturn (knownWidth * focalLength) / perWidth
distance_to_camera 函数传入目标的实际宽度,计算得到的焦距和图片上目标的像素宽度,就可以通过相似三角形公式计算目标到相机的距离了。
下面是调用 distance_to_camera 函数之前的准备:
# initialize the known distance from the camera to the object, which# in this case is 24 inchesKNOWN_DISTANCE = 24.0# initialize the known object width, which in this case, the piece of# paper is 12 inches wideKNOWN_WIDTH = 11.0# load the furst image that contains an object that is KNOWN TO BE 2 feet# from our camera, then find the paper marker in the image, and initialize# the focal lengthimage = cv2.imread("images/2ft.jpg")marker = find_marker(image)focalLength = (marker[1][0] * KNOWN_DISTANCE) / KNOWN_WIDTH
首先是测量目标物体的宽度,和目标物体到相机的距离,并根据上面介绍的方法计算相机的焦距。其实这些并不是真正的摄像机标定。真正的摄像机标定包括摄像机的内参,相关知识可以可以查看这里。
使用 cv2.imread 函数从磁盘加载图片,然后通过 find_marker 函数得到图片中目标物体的坐标和长宽信息,最后根据相似三角形计算出相机的焦距。
现在有了相机的焦距,就可以计算目标物体到相机的距离了。
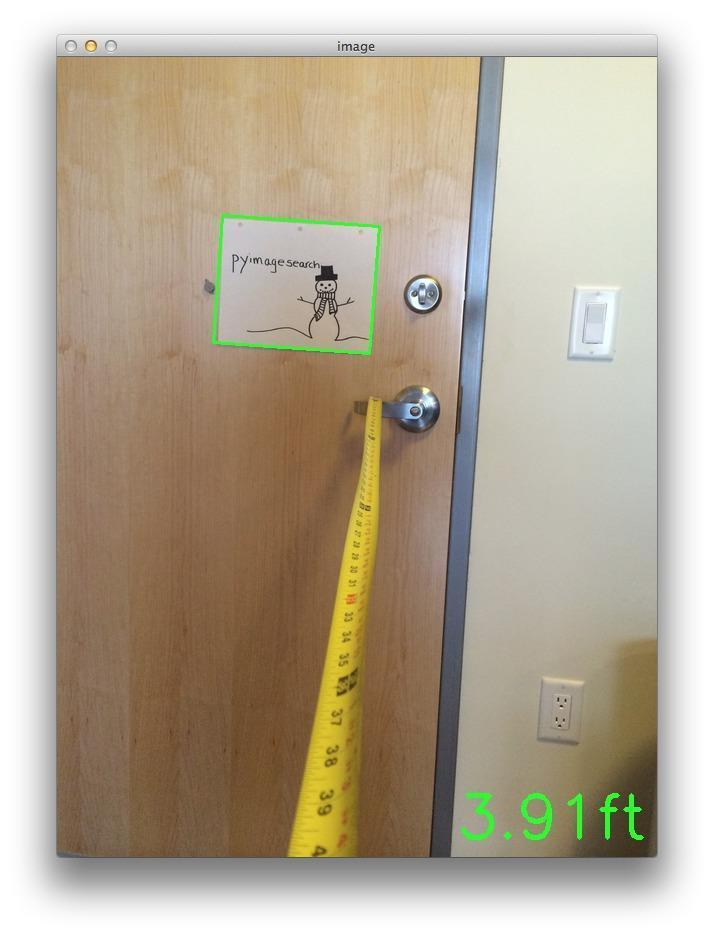
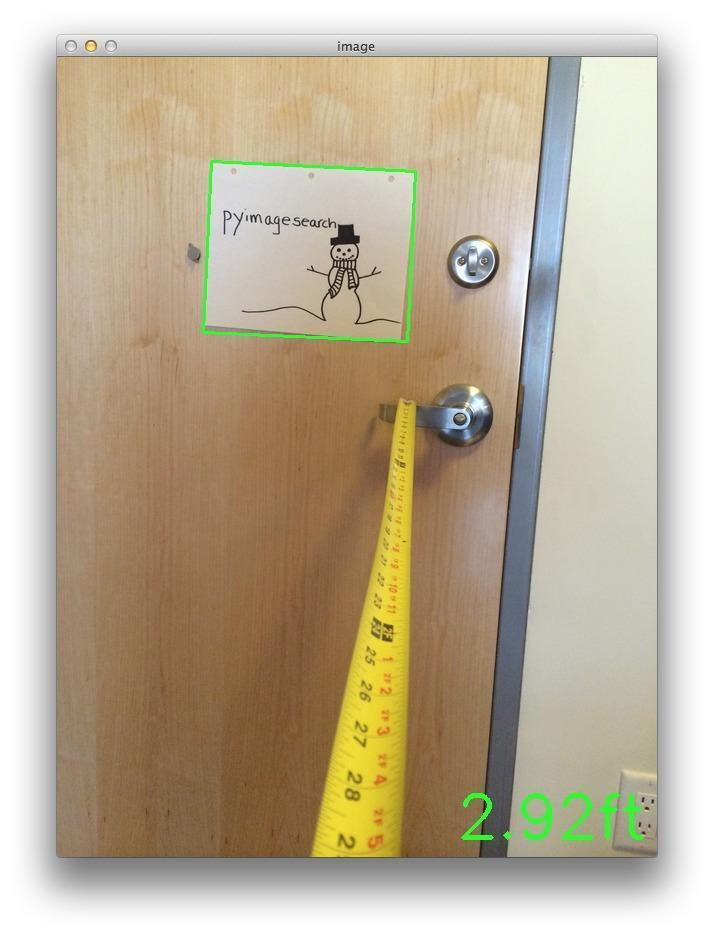
# loop over the imagesfor imagePath in sorted(paths.list_images("images")):# load the image, find the marker in the image, then compute the# distance to the marker from the cameraimage = cv2.imread(imagePath)marker = find_marker(image)inches = distance_to_camera(KNOWN_WIDTH, focalLength, marker[1][0])# draw a bounding box around the image and display itbox = cv2.cv.BoxPoints(marker) if imutils.is_cv2() else cv2.boxPoints(marker)box = np.int0(box)cv2.drawContours(image, [box], -1, (0, 255, 0), 2)cv2.putText(image, "%.2fft" % (inches / 12),(image.shape[1] - 200, image.shape[0] - 20), cv2.FONT_HERSHEY_SIMPLEX,2.0, (0, 255, 0), 3)cv2.imshow("image", image)cv2.waitKey(0)
使用 for 循环遍历每个图片,计算每张图片中目标对象到相机的距离。在结果中,我们根据得到的轮廓信息将方框画了出来,并显示出了距离。下面是得到的几个结果图:


通过这篇文章,我们学会了使用相似三角形计算图片中一个已知物体到相机的距离。
需要先测量出目标物体的实际宽度和目标物体到相机的距离,然后使用图像处理的方法自动计算图片中目标物体的像素宽度,并使用相似三角形计算出相机的焦距。
根据相机的焦距就可以计算图片中的目标物体到相机的距离。
END
整理不易,点赞三连↓
