从零开始深度学习Pytorch笔记(5)——张量的索引与变换

 前文传送门:从零开始深度学习Pytorch笔记(1)——安装Pytorch从零开始深度学习Pytorch笔记(2)——张量的创建(上)从零开始深度学习Pytorch笔记(3)——张量的创建(下)从零开始深度学习Pytorch笔记(4)——张量的拼接与切分
在该系列的上一篇,我们介绍了更多Pytorch中的张量的拼接与切分,本文研究张量的索引与变换。张量的索引
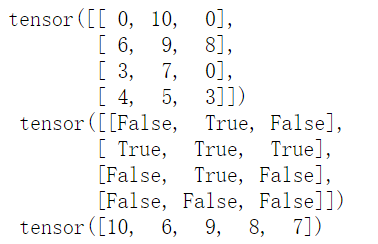
import torch使用torch.masked_select()索引
torch.masked_select(input, mask, out=None)其中:
input: 要索引的张量mask: 与input同形状的布尔类型张量
t = torch.randint(0,12,size=(4,3))
mask = t.ge(6) #ge是greater than or equal ,gt是greater than , le   lt
t_select = torch.masked_select(t,mask)
print(t,'\n',mask,'\n',t_select)#将大于等于6的数据挑出来,返回一维张量
 张量变换
张量变换使用torch.reshape()变换变换张量的形状torch.reshape(input, shape)参数:input: 要变换的张量shape: 新张量的形状
t = torch.randperm(10)
t1 = torch.reshape(t,(2,5))
print(t,'\n',t1)

t1 = torch.reshape(t,(-1,5))# -1代表根据其他维度计算得到
print(t,'\n',t1)
 当张量在内存中是连续时,新张量和input共享数据内存
t = torch.randperm(10)
t[0] = 1024
print(t,'\n',t1)
print(id(t.data),id(t1.data))
#共享内存,id相同
 使用torch.transpose()变换交换张量的两个维度
torch.transpose(input, dim0, dim1)参数:
input:要变换的张量dim0:要交换的维度dim1:要交换的维度
t = torch.rand((4,3,2))
t1 = torch.transpose(t,dim0=0,dim1=1)#交换他们的第0,1维度
print(t.shape,t1.shape)
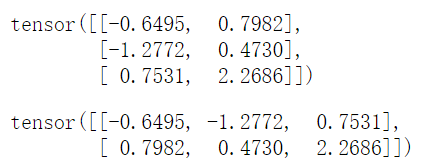
 使用torch.t()变换2 维张量转置,对于矩阵而言,等价于torch.transpose(input,0,1)
torch.t(input)参数:input:要变换的张量
x = torch.randn(3,2)
print(x)
torch.t(x)
 使用torch.squeeze()变换压缩长度为1的维度(轴)
torch.squeeze(input, dim=None, out=None)参数:dim: 若为None,移除所有长度为1的轴;若指定维度,当且仅当该轴长度为1时,可以被移除。
t = torch.rand((1,2,1,1))
t1 = torch.squeeze(t)
t2 = torch.squeeze(t,dim=0)
t3 = torch.squeeze(t,dim=1)#指定的轴长度不为1,不能移除
print(t.shape,'\n',t1.shape,t2.shape,t3.shape)
 使用torch.unsqueeze()变换依据dim扩展维度
torch.unsqueeze(input, dim, out=None)参数:dim:扩展的维度
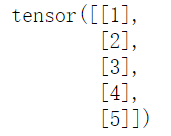
x = torch.tensor([1, 2, 3, 4, 5])
torch.unsqueeze(x, 0)
 从中括号数量可以看出已经从1维变成2维的了。
torch.unsqueeze(x, 1)
 欢迎关注公众号学习之后的深度学习连载部分~
 喜欢记得点再看哦,证明你来看过~
评论
