对抗图像和攻击在Keras和TensorFlow上的实现
点击上方“小白学视觉”,选择加"星标"或“置顶”
重磅干货,第一时间送达
本文转自:计算机视觉联盟
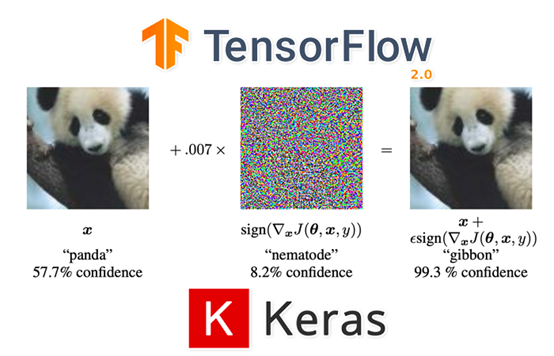
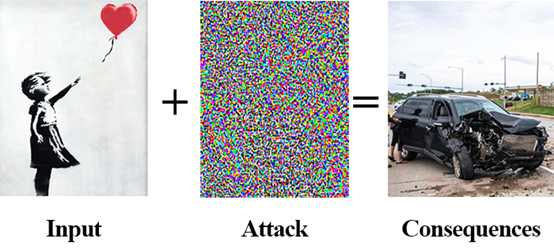
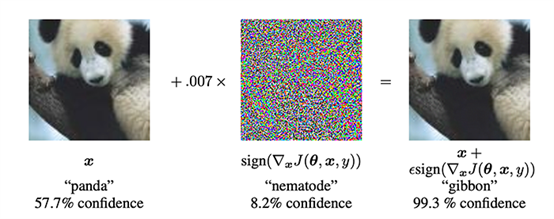
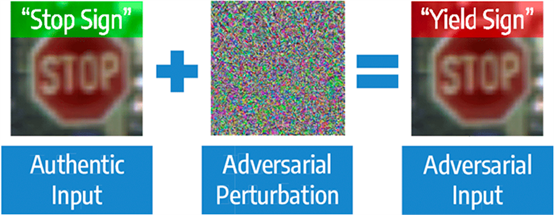
第一段Python脚本是加载ImageNet数据集并解析类别标签的使用助手。 第二段Python脚本是利用在ImageNet数据集上预训练好的ResNet模型来实现基本的图像分类(由此来演示“标准”的图像分类)。 最后一段Python脚本用于执行一次对抗攻击,并且组成一张故意混淆我们的ResNet模型的对抗图像,而这两张图像对于肉眼来说看上去是一样的。
如何在Ubuntu系统下配置TensorFlow2.0 ?(How to installTensorFlow 2.0 on Ubuntu) 如何在macOS系统下配置TensorFlow2.0 ?How to install TensorFlow 2.0 on macOS
tree --dirsfirst.├── pyimagesearch│ ├── __init__.py│ ├── imagenet_class_index.json│ └── utils.py├── adversarial.png├── generate_basic_adversary.py├── pig.jpg└── predict_normal.py1 directory, 7 files
imagenet_class_index.json: 一个JSON文件,将ImageNet类别标签标记为可读的字符串。我们将会利用这个JSON文件来决定这样一组特殊标签的整数值索引,在构建对抗图像攻击时,这个索引将会给予我们帮助。 utils.py: 包含简单的Python辅助函数,用于载入和解析imagenet_class_index.json
predict_normal.py: 接收一张输入图像(pig.jpg),载入ResNet50模型,对输入图像进行分类。这个脚本的输出会是预测类别标签在ImageNet的类别标签索引。 generate_basic_adversary.py:利用predict_normal.py脚本中的输出,我们将构建一次对抗攻击来欺骗ResNet,这个脚本的输出(adversarial.png)将会存储在硬盘中。
{"0": ["n01440764","tench"],"1": ["n01443537","goldfish"],"2": ["n01484850","great_white_shark"],"3": ["n01491361","tiger_shark"],..."106": ["n01883070","wombat"],...
ImageNet标签的唯一标识符; 有可读性的类别标签。
接收一个输入标签; 转化成其对应标签的类别标签整数值索引。
# importnecessary packagesimport jsonimport osdefget_class_idx(label):# build the path to theImageNet class label mappings filelabelPath = os.path.join(os.path.dirname(__file__),"imagenet_class_index.json")
# open theImageNet class mappings file and load the mappings as# a dictionary with the human-readable class label as the keyand# the integerindex as the valuewithopen(labelPath)as f:imageNetClasses = {labels[1]: int(idx)for(idx, labels)injson.load(f).items()}# check to see if the inputclass label has a corresponding# integer index value, and if so return it; otherwise return# a None-type valuereturn imageNetClasses.get(label, None)
如果在字典中存在改标签的话,则返回该标签的整数值索引; 否则返回None。
# import necessarypackagesfrom pyimagesearch.utils import get_class_idxfrom tensorflow.keras.applications import ResNet50from tensorflow.keras.applications.resnet50 import decode_predictionsfrom tensorflow.keras.applications.resnet50 import preprocess_inputimport numpy as npimport argparseimport imutilsimport cv2
defpreprocess_image(image):# swap color channels,preprocess the image, and add in a batch# dimensionimage = cv2.cvtColor(image,cv2.COLOR_BGR2RGB)image = preprocess_input(image)image = cv2.resize(image, (224, 224))image = np.expand_dims(image, axis=0)# return the preprocessed imagereturn image
将图片的BGR通道组合转化为RGB; 执行preprocess_input函数,用于完成ResNet50中特别的预处理和比例缩放过程; 将图片大小调整为224×224; 增加一个批次维度。
# construct the argument parser and parsethe argumentsap = argparse.ArgumentParser()ap.add_argument("-i", "--image",required=True,help="pathto input image")args = vars(ap.parse_args())
# load image fromdisk and make a clone for annotationprint("[INFO] loadingimage...")image = cv2.imread(args["image"])output = image.copy()# preprocess the input imageoutput = imutils.resize(output, width=400)preprocessedImage = preprocess_image(image)
# load thepre-trained ResNet50 modelprint("[INFO] loadingpre-trained ResNet50 model...")model = ResNet50(weights="imagenet")# makepredictions on the input image and parse the top-3 predictionsprint("[INFO] makingpredictions...")predictions =model.predict(preprocessedImage)predictions = decode_predictions(predictions, top=3)[0]
# loop over thetop three predictionsfor(i, (imagenetID, label,prob))inenumerate(predictions):# print the ImageNet class label ID of the top prediction to our# terminal (we'll need thislabel for our next script which will# perform the actual adversarial attack)if i == 0:print("[INFO] {} => {}".format(label, get_class_idx(label)))# display the prediction to our screenprint("[INFO] {}.{}: {:.2f}%".format(i + 1, label, prob * 100))
# draw thetop-most predicted label on the image along with the# confidence scoretext = "{}:{:.2f}%".format(predictions[0][1],predictions[0][2] * 100)cv2.putText(output, text, (3, 20),cv2.FONT_HERSHEY_SIMPLEX, 0.8,(0, 255, 0), 2)# show the output imagecv2.imshow("Output", output)cv2.waitKey(0)
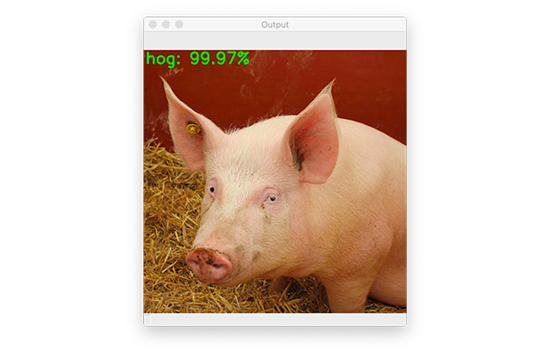
$ pythonpredict_normal.py --image pig.jpg[] loading image...[] loadingpre-trained ResNet50 model...[] making predictions...[] hog => 341[] 1. hog: 99.97%[] 2.wild_boar: 0.03%[] 3. piggy_bank: 0.00%
# import necessary packagesfrom tensorflow.keras.optimizers import Adamfrom tensorflow.keras.applications import ResNet50from tensorflow.keras.losses importSparseCategoricalCrossentropyfrom tensorflow.keras.applications.resnet50 import decode_predictionsfrom tensorflow.keras.applications.resnet50 import preprocess_inputimport tensorflow as tfimport numpy as npimport argparseimport cv2
defpreprocess_image(image):# swap color channels, resizethe input image, and add a batch# dimensionimage = cv2.cvtColor(image,cv2.COLOR_BGR2RGB)image = cv2.resize(image, (224, 224))image = np.expand_dims(image, axis=0)# return the preprocessedimagereturn image
defclip_eps(tensor, eps):# clip the values of thetensor to a given range and return itreturn tf.clip_by_value(tensor,clip_value_min=-eps,clip_value_max=eps)
defgenerate_adversaries(model, baseImage,delta, classIdx, steps=50):# iterate over the number ofstepsfor step inrange(0, steps):# record our gradientswith tf.GradientTape()as tape:# explicitly indicate thatour perturbation vector should# be tracked for gradient updatestape.watch(delta)
model:ResNet50模型(如果你愿意,你可以换成其他预训练好的模型,例如VGG16,MobileNet等等); baseImage:原本没有被干扰的输入图像,我们有意针对这张图像创建对抗攻击,导致model参数对它进行错误的分类。 delta:噪声向量,将会被加入到baseImage中,最终导致错误分类。我们将会用梯度下降均值来更新这个delta 向量。 classIdx:通过predict_normal.py脚本所获得的类别标签整数值索引。 steps:梯度下降执行的步数(默认为50步)。
# add our perturbation vector to the base image and# preprocess the resulting imageadversary = preprocess_input(baseImage + delta)# run this newly constructed image tensor through our# model and calculate theloss with respect to the# *original* class indexpredictions = model(adversary,training=False)loss = -sccLoss(tf.convert_to_tensor([classIdx]),predictions)# check to see if we arelogging the loss value, and if# so, display it to our terminalif step % 5 == 0:print("step: {},loss: {}...".format(step,loss.numpy()))# calculate the gradients ofloss with respect to the# perturbation vectorgradients = tape.gradient(loss, delta)# update the weights, clipthe perturbation vector, and# update its valueoptimizer.apply_gradients([(gradients, delta)])delta.assign_add(clip_eps(delta, eps=EPS))# return the perturbationvectorreturn delta
第7行用model参数导入的模型对新创建的对抗图像进行预测。 第8和9行针对原有的classIdx(通过运行predict_normal.py得到的top-1 ImageNet类别标签整数值索引)计算损失。 第12-14行表示每5步就显示一次损失值。
# construct the argumentparser and parse the argumentsap = argparse.ArgumentParser()ap.add_argument("-i", "--input", required=True,help="path tooriginal input image")ap.add_argument("-o", "--output", required=True,help="path tooutput adversarial image")ap.add_argument("-c", "--class-idx", type=int,required=True,help="ImageNetclass ID of the predicted label")args = vars(ap.parse_args())
--input: 输入图像的磁盘路径(例如pig.jpg); --output: 在构建进攻后的对抗图像输出(例如adversarial.png); --class-idex:ImageNet数据集中的类别标签整数值索引。我们可以通过执行在“非对抗图像的分类结果”章节中提到的predict_normal.py来获得这一索引。
# define theepsilon and learning rate constantsEPS = 2 / 255.0LR = 0.1# load the inputimage from disk and preprocess itprint("[INFO] loadingimage...")image = cv2.imread(args["input"])image = preprocess_image(image)
# load thepre-trained ResNet50 model for running inferenceprint("[INFO] loadingpre-trained ResNet50 model...")model = ResNet50(weights="imagenet")# initializeoptimizer and loss functionoptimizer = Adam(learning_rate=LR)sccLoss = SparseCategoricalCrossentropy()
# create a tensorbased off the input image and initialize the# perturbation vector (we will update this vector via training)baseImage = tf.constant(image,dtype=tf.float32)delta = tf.Variable(tf.zeros_like(baseImage), trainable=True)# generate the perturbation vector to create an adversarialexampleprint("[INFO]generating perturbation...")deltaUpdated = generate_adversaries(model, baseImage,delta,args["class_idx"])# create theadversarial example, swap color channels, and save the# output image to diskprint("[INFO]creating adversarial example...")adverImage = (baseImage +deltaUpdated).numpy().squeeze()adverImage = np.clip(adverImage, 0, 255).astype("uint8")adverImage = cv2.cvtColor(adverImage,cv2.COLOR_RGB2BGR)cv2.imwrite(args["output"], adverImage)
将超出[0,255] 范围的值裁剪掉; 将图片转化成一个无符号8-bit(unsigned 8-bit)整数(这样OpenCV才能对图片进行处理); 将通道顺序从RGB转换成BGR。
# run inferencewith this adversarial example, parse the results,# and display the top-1 predicted resultprint("[INFO]running inference on the adversarial example...")preprocessedImage = preprocess_input(baseImage +deltaUpdated)predictions =model.predict(preprocessedImage)predictions = decode_predictions(predictions, top=3)[0]label = predictions[0][1]confidence = predictions[0][2] * 100print("[INFO] label:{} confidence: {:.2f}%".format(label,confidence))# draw the top-most predicted label on the adversarial imagealong# with theconfidence scoretext = "{}: {:.2f}%".format(label, confidence)cv2.putText(adverImage, text, (3, 20),cv2.FONT_HERSHEY_SIMPLEX, 0.5,(0, 255, 0), 2)# show the output imagecv2.imshow("Output", adverImage)cv2.waitKey(0)
$ python generate_basic_adversary.py --inputpig.jpg --output adversarial.png --class-idx 341[INFO] loading image...[INFO] loading pre-trained ResNet50 model...[INFO] generatingperturbation...step: 0, loss:-0.0004124982515349984...step: 5, loss:-0.0010656398953869939...step: 10, loss:-0.005332294851541519...step: 15, loss: -0.06327803432941437...step: 20, loss: -0.7707189321517944...step: 25, loss: -3.4659299850463867...step: 30, loss: -7.515471935272217...step: 35, loss: -13.503922462463379...step: 40, loss: -16.118188858032227...step: 45, loss: -16.118192672729492...[INFO] creating adversarial example...[INFO] running inference on theadversarial example...[INFO] label: wombat confidence: 100.00%
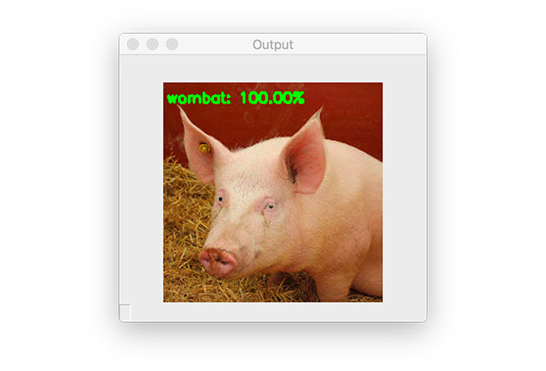
图六:之前,这张输入图片被正确地分在了“猪(hog)”类别中,但现在因为对抗攻击而被分在了“袋熊(wombat)”类别里!
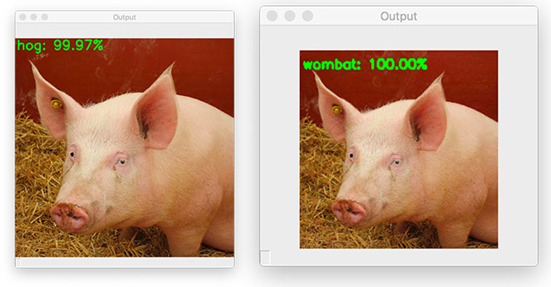
这张输入图片会被错误分类。 然而,肉眼看上去被扰乱的图片还是和之前一样。
交流群
欢迎加入公众号读者群一起和同行交流,目前有SLAM、三维视觉、传感器、自动驾驶、计算摄影、检测、分割、识别、医学影像、GAN、算法竞赛等微信群(以后会逐渐细分),请扫描下面微信号加群,备注:”昵称+学校/公司+研究方向“,例如:”张三 + 上海交大 + 视觉SLAM“。请按照格式备注,否则不予通过。添加成功后会根据研究方向邀请进入相关微信群。请勿在群内发送广告,否则会请出群,谢谢理解~
评论

