Android 打造炫酷的桌面小部件!
大家好,我是皇叔,最近开了一个安卓进阶涨薪训练营,可以帮助大家突破技术&职场瓶颈,从而度过难关,进入心仪的公司。
详情见文章:没错!皇叔开了个训练营
作者:路很长OoO
https://juejin.cn/post/7048623673892143140
本文带大家看看自定义炫酷桌面小部件的各种技法。
一、AppWidgetProvider
Widget是一种微型的应用程序视图。可以嵌入到像桌面这样的应用程序中,作为我们应用程序小功能的载体,由于Widget本身就是
BroadcastReceiver,且应用微件布局基于 RemoteViews,并不是每种布局或视图微件都受其支持,目前只支持下面视图类,如果需要其他支持View或者自定义View那么需要framwork层添加容器:
FrameLayoutLinearLayoutRelativeLayoutGridLayout
以及以下微件类:
AnalogClockButtonChronometerImageButtonImageViewProgressBarTextViewViewFlipperListViewGridViewStackViewAdapterViewFlipper
二、Widget目前常见的视觉
根据官网和文档以及别人的博客可能我们仅仅能做的就是简单的布局,列表,顶多来个🉑️拖拽的卡片或者能动起来的时钟当然了我们应用自己的小部件很漂亮的。
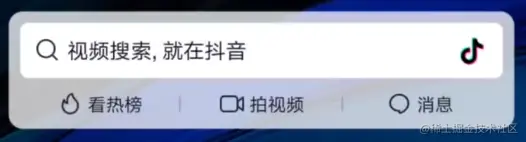
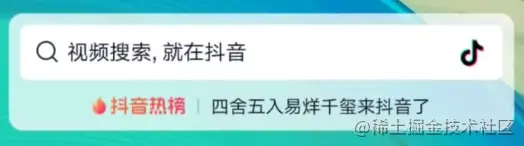
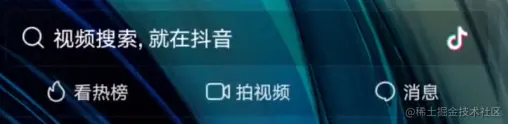
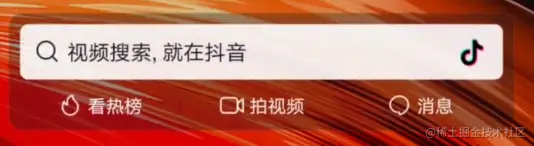
抖音:没错安装之后发现同样的搜索框有6种样式可选。
OneNote:设计简约。
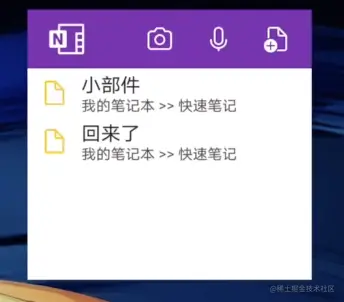
我们的日历:挺好看的
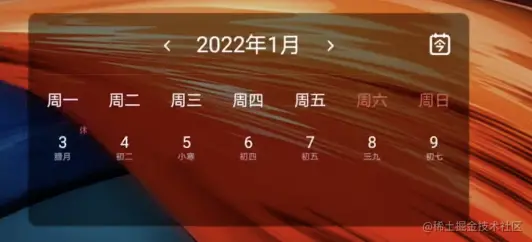
这些市面上很多小部件都是基于应用常用的模块提供快捷入口。并没有进行很大的操作挖掘。当然了,Google这样适配可能是为了避免对于cpu造成内存抖动,或者造成桌面性能等问题吧。但是作为开发者我们在乎的是我们产品的美观和提高用户的满意度。所以动画和自定义绘制还是很有必要的。
三、Widget动画
那我们还能不能搞那些Android 自定义View那些华丽呼哨的动画呢?我的回答是必须可以,接下来我们逐步的进入正题,开始摸索。
1、创建Widget四步骤
第一步 AndroidManifest.xml注册
前文我们说了Widget本身就是一个广播接收者,当然也可以动态注册。但是这里我们需要清楚我们的小部件是依赖于桌面应用程序而不是我们的App,所以动态和静态注册需要我们考虑不同的产品需求,如果我们小部件不依赖于App宿主应用程序什么周期,这种常驻类型的应用小部件静态是首选吧。不明白的可以看看广播静态和动态注册的区别。接下来我们在AndroidManifest静态注册:
<?xml version="1.0" encoding="utf-8"?>
<manifest xmlns:android="http://schemas.android.com/apk/res/android"
    xmlns:tools="http://schemas.android.com/tools"
    package="com.zui.recorder">

 <application
    android:name=".RecorderApplication"
    android:icon="@mipmap/ic_launcher_soundrecorder"
    android:label="@string/app_name"
    android:requestLegacyExternalStorage="true"
    android:resizeableActivity="true"
    android:supportsRtl="true"
    android:testOnly="false"
    android:theme="@style/AppBaseTheme">
       <!--name:是我们一会儿创建Widget的具体类-->
        <receiver
            android:name=".ui.translation.widget.RecorderAppWidget"
            android:exported="true">
            <intent-filter><!--action:是用来更新我们小部件的行为动作标记-->
                <action android:name="android.appwidget.action.APPWIDGET_UPDATE" />
            </intent-filter>
            <meta-data
                android:name="android.appwidget.provider"
                android:resource="@xml/recorder_widget" />
        </receiver>
 </application>
</manifest>
第二步 定义应用微件的基本特性
具体的参数看官网对应用微件的基本特性,字面意思应该差不多能读懂,设置widget在桌面所占的空间大小限制,初始化视图布局,以及更新Widget的时间,缩放方向模式等,如果设置最大限制这些参数没有的可以将sdk升级到android 12也就是compileSdkVersion = 31即可。
<?xml version="1.0" encoding="utf-8"?>
<appwidget-provider xmlns:android="http://schemas.android.com/apk/res/android"
    android:description="@string/app_name"
    android:initialKeyguardLayout="@layout/widget_recorder_remote_view"
    android:initialLayout="@layout/widget_recorder_remote_view"
    android:minWidth="255dp"
    android:minHeight="100dp"
    android:minResizeWidth="255dp"
    android:minResizeHeight="100dp"
    android:previewImage="@drawable/blur_bg"
    android:resizeMode="horizontal|vertical"
    android:updatePeriodMillis="20000"
    android:widgetCategory="home_screen" />
第三步 定义应用微件的初始布局
在 XML 中定义应用微件的初始布局,并将其保存在项目的 res/layout/ 目录中。我们上文也提到了Widget布局基于 RemoteViews,并不是每种布局或视图微件都受其支持。能支持的可以看上文或者官网。如下是我们今天完成的第一个视图效果:
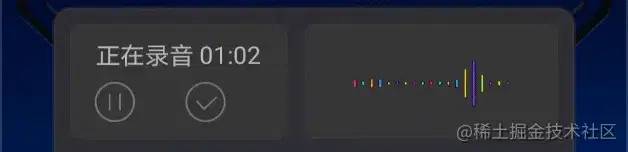
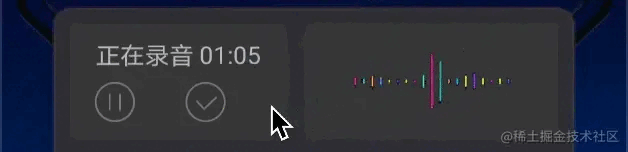
左边是一个可以控制播放停止以及完成录制的按钮加一个录音记时文字。右边是一个跟随录音状态可以跟随这录音进行波动动画。到这里是不是感觉到很醋,Widget也可以搞动画么?先看看我们的部件样式。
<!--对于dimen这些以及命名自行规范,追求速度所以随意命名和布局里面写死dp等-->
<?xml version="1.0" encoding="utf-8"?>
<LinearLayout xmlns:android="http://schemas.android.com/apk/res/android"
    android:layout_width="match_parent"
    android:layout_height="match_parent"
    android:layout_margin="10dp"
    android:background="@drawable/widget_recorder_shape"
    android:elevation="10dp"
    android:orientation="vertical">

    <LinearLayout
        android:layout_width="match_parent"
        android:layout_height="wrap_content">

        <LinearLayout
            android:layout_width="wrap_content"
            android:layout_height="wrap_content"
            android:layout_marginStart="10dp"
            android:layout_marginTop="10dp"
            android:layout_marginEnd="10dp"
            android:background="@drawable/widget_recorder_inner_shape"
            android:elevation="10dp"
            android:orientation="vertical"
            android:padding="5dp">

            <TextView
                android:id="@+id/widget_title_text"
                android:layout_width="match_parent"
                android:layout_height="wrap_content"
                android:layout_marginStart="10dp"
                android:layout_marginTop="3dp"
                android:layout_marginEnd="10dp"
                android:layout_marginBottom="2dp"
                android:gravity="start"
                android:text="@string/app_name"
                android:textColor="@color/recorder_widget_title"
                android:textSize="14sp" />

            <LinearLayout
                android:layout_width="match_parent"
                android:layout_height="wrap_content"
                android:layout_marginStart="5dp"
                android:layout_marginEnd="20dp"
                android:orientation="horizontal">
                <!--左边播放录音和暂停录音按钮-->
                <ImageView
                    android:id="@+id/widget_stop_bn"
                    android:layout_width="wrap_content"
                    android:layout_height="wrap_content"
                    android:background="@drawable/notification_btn_pause" />
                <!--左边结束录音按钮-->
                <ImageView
                    android:id="@+id/widget_finish_bn"
                    android:layout_width="wrap_content"
                    android:layout_height="wrap_content"
                    android:layout_marginStart="20dp"
                    android:background="@drawable/notification_finish" />
            </LinearLayout>
        </LinearLayout>

        <RelativeLayout
            android:layout_width="0dp"
            android:layout_height="66dp"
            android:layout_marginTop="10dp"
            android:layout_marginEnd="10dp"
            android:layout_weight="1"
            android:background="@drawable/widget_recorder_inner_shape"
            android:padding="5dp">
            <!--右边震动动画-->
            <ImageView
                android:id="@+id/widget_wave"
                android:layout_width="wrap_content"
                android:layout_height="35dp"
                android:layout_centerInParent="true"
                android:layout_marginStart="20dp"
                android:scaleType="fitXY" />
        </RelativeLayout>
    </LinearLayout>
</LinearLayout>
第四步 继承AppWidgetProvider
AppWidgetProvider 类扩展了 BroadcastReceiver 作为一个辅助类来处理应用微件广播。AppWidgetProvider 仅接收与应用微件有关的事件广播,例如当更新、删除、启用和停用应用微件时发出的广播。当发生这些广播事件时,AppWidgetProvider 会接收并调用对应的 onUpdate()、onReceive()、onAppWidgetOptionsChanged、onDeleted、onRestored、onDisabled 等方法,具体方法可以看源码或者官网详解。接下来我们通过继承 AppWidgetProvider 来实现我们的录音机小部件类。
/**I
 * Created by wangfei44 on 2021/12/28.
 */
class RecorderAppWidget : AppWidgetProvider() {

    override fun onUpdate(
        context: Context?,
        appWidgetManager: AppWidgetManager?,
        appWidgetIds: IntArray?,
    ) {
        Log.i(TAG, "onUpdate")
        super.onUpdate(context, appWidgetManager, appWidgetIds)
    }


    override fun onEnabled(context: Context) {
        super.onEnabled(context)
    }


    override fun onDisabled(context: Context) {
        super.onDisabled(context)
    }

    override fun onReceive(context: Context?, intent: Intent?) {
        super.onReceive(context, intent)
    }
}
接下来我们将RecorderAppWidget注册到清单文件<receiver android:name=".ui.translation.widget.RecorderAppWidget".../>
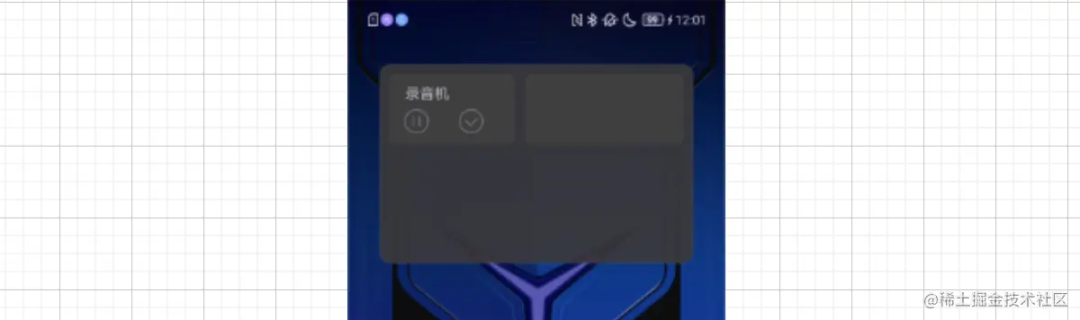
运行。长按桌面选择我们小部件,效果如下:
2、Widget和app之间的通信、刷新
对于应用层和小部件之间的交互刷新,我们可以通过广播进行相互的刷新,数据的传输通过intent进行携带即可,例如当我录制音频时候,可以在服务里面进行发送广播,来传递数据并刷新小部件显示录制的时间或者其他的数据。相反点击Widget的暂停和完成录制按钮也可以通过广播通知录音机服务进行更新应用的当前状态。可以通过 AppwidgetManager 实时更新widget。
private BroadcastReceiver widgetBroadcastReceiver;
private void registerWidgetReceiver() {
    if (null == widgetBroadcastReceiver) {
        widgetBroadcastReceiver = new BroadcastReceiver() {
            @Override
            public String toString() {
                return "$classname{}";
            }

            @Override
            public void onReceive(Context context, Intent intent) {
                switch (intent.getAction()) {
                    case ACTION_CANCEL_TIMER: {
                        if (isRecording()) {
                            //小部件通知过来了进行暂停录音机进入pause状态
                            pauseRecording(true);
                            //去刷新小部件图标内容:
                            sendBroadCastToRecorderWidget();
                        } else if (getState() == State.RECORD_PAUSED) {
                            resumeRecording(true);
                        }
                        break;
                    }
                    case ACTION_RESUME_TIMER: {
                        //小部件通知过来了进行完成录音进入IDLE
                        stopRecording();
                        break;
                    }
                }

            }
        };
    }
    IntentFilter filter = new IntentFilter();
    filter.addAction(ACTION_CANCEL_TIMER);
    filter.addAction(ACTION_RESUME_TIMER);
    try {
        registerReceiver(widgetBroadcastReceiver, filter);
    } catch (Exception e) {
        Logger.i("registerWidgetReceiver error ::: $e");
    }
}

private void unregisterWidgetReceiver() {
    if (widgetBroadcastReceiver == null) {
        return;
    }
    try {
        unregisterReceiver(widgetBroadcastReceiver);
    } catch (java.lang.Exception e) {
        Logger.e("unregisterWidgetReceiver error ::: $e");
    }
    widgetBroadcastReceiver = null;
}


//在RecorderService内部通过广播高频率的刷新小部件
private void sendBroadCastToRecorderWidget() {

    Intent updateWidgetIntent = new Intent();
    //指定广播行为动作的名字
    updateWidgetIntent.setAction(RecorderAppWidget.UPDATE_ACTION);
    //传输当前录音机录制的状态
    updateWidgetIntent.putExtra(WIDGET_STATE_EXTRA_NAME,getState().ordinal());
    //传输当前录音机录制的时间
    updateWidgetIntent.putExtra(WIDGET_TIME_EXTRA_NAME, Utils.formatTime(getRecordingTime()));
    //发送广播
    sendBroadcast(updateWidgetIntent);
}


//RecorderAppWidget
companion object {
    const val TAG = "RecorderAppWidget"
    const val UPDATE_ACTION = "android.appwidget.action.APPWIDGET_UPDATE"

    //录音机当前状态和录制时间
    const val WIDGET_STATE_EXTRA_NAME = "state"
    const val WIDGET_TIME_EXTRA_NAME = "time"
    //对应录音机的录制状态

    const val STATE_IDLE = 0
    const val STATE_PLAYING = 1
    const val STATE_PLAY_PAUSED = 2
    const val STATE_RECORDING = 3
    const val STATE_RECORDING_FROM_PAUSED = 4
    const val STATE_RECORD_PAUSED = 5
}

//在RecorderAppWidget内部接收更具不同的状态进行更新Widget视图
override fun onReceive(context: Context, intent: Intent) {
    this.context = context
    super.onReceive(context, intent)
    Log.i(TAG, "onReceive")
    val remoteViews = RemoteViews(context.packageName, R.layout.widget_recorder_remote_view)
    val appWidgetIds = AppWidgetManager.getInstance(context)
        .getAppWidgetIds(
            ComponentName(
                context,
                RecorderAppWidget::class.java
            )
        )
    if (null == intent.action || UPDATE_ACTION != intent.action) {
        return
    }
    val titleStart = getTitleStart(context, getState(intent))
    when (getState(intent)) {
        STATE_RECORDING, STATE_RECORDING_FROM_PAUSED -> {
            remoteViews.setTextViewText(
                R.id.widget_title_text,
                getTimeString(titleStart, context, intent))
            remoteViews.setImageViewResource(
                R.id.widget_stop_bn,
                R.drawable.notification_btn_pause)
            remoteViews.setWidgetOnClickPendingIntent(context,
                R.id.widget_stop_bn,
                ACTION_CANCEL_TIMER)
            remoteViews.setWidgetOnClickPendingIntent(context,
                R.id.widget_finish_bn,
                ACTION_RESUME_TIMER)
            remoteViews.setTextViewText(R.id.widget_time,
                getTimeString("", context, intent))
            remoteViews.setTextViewText(R.id.widget_time_center,
                getTimeString("", context, intent))
        }
        STATE_IDLE, STATE_RECORD_PAUSED -> {
            updateAnimate(getState(intent))
            remoteViews.setTextViewText(
                R.id.widget_title_text,
                getTimeString(titleStart, context, intent))
            remoteViews.setImageViewResource(
                R.id.widget_stop_bn,
                R.drawable.notification_btn_resume)
        }

    }

    //由AppwidgetManager 处理更新widget
    val awm = AppWidgetManager.getInstance(context.applicationContext)
    awm.updateAppWidget(appWidgetIds, remoteViews)

}
//获取小部件对应的录音机录制状态
private fun getState(intent: Intent): Int {
    return intent.getIntExtra(WIDGET_STATE_EXTRA_NAME, STATE_IDLE)
}

//获取录音机录制时间
private fun getTimeString(titleStart: String, context: Context, intent: Intent): String {
    var time = intent.getStringExtra(WIDGET_TIME_EXTRA_NAME)
    if (null == time) {
        time = ""
    }
    if (time.isNotEmpty()) {
        time = "$titleStart $time"
    }
    return time
}

private fun RemoteViews.setWidgetOnClickPendingIntent(
    context: Context,
    id: Int,
    action: String,
) = this.apply {
    setOnClickPendingIntent(id, PendingIntent
        .getBroadcast(
            context, 0, Intent().setAction(action),
            PendingIntent.FLAG_IMMUTABLE
        ))
}
到这里我们基本的通知互刷搞定
3、Widget动画实现
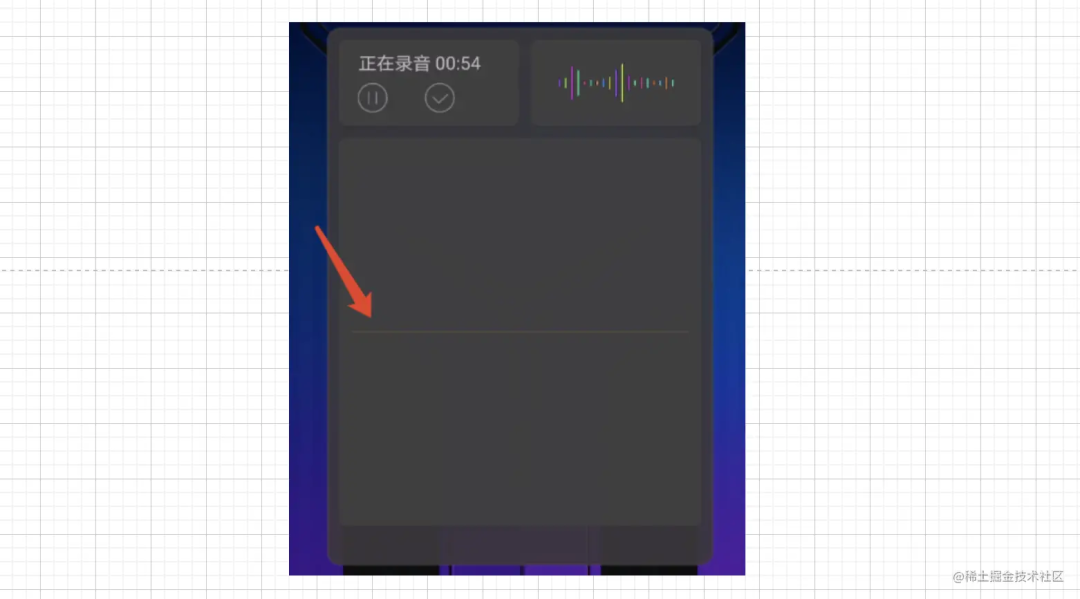
大家想一想动画的相关内容。什么是动画?接下来我们进入动画的实现部分。动画通俗点:顺序播放一组图片,大多数开发者应该都玩过帧动画和补间动画。对于动画都流畅[FPS]当然就是我们单位秒数内出现的图片[帧]数的多少来决定,来看看我们需要实现的这个动画。看看右边效果
Widget我们都是基于RemoteViews来刷新的,没发通过View方式进行帧动画来刷新。如何刷新RemoteViews呢?明白刷新原理我们也就有了实现的突破口,我们可以通过顺序来刷新ImageView的资源也不就是动画了么?对于帧动画的刷新一秒内刷新30帧左右应该看起来听流畅的。接下来我们找UI要素材也就是每一帧的图片。当然如果和我一样写demo你自己也可以制作帧素材。让我们百度一个素材:
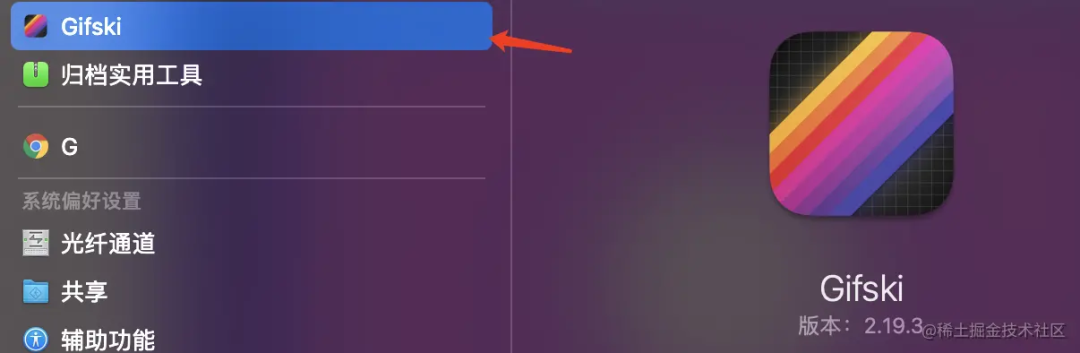
第一步
GIF或者MP4素材、通过Gifski,MP4可以转化为GIF;或者用Kap直接可以截取局部部分生成MP4或者GIF.
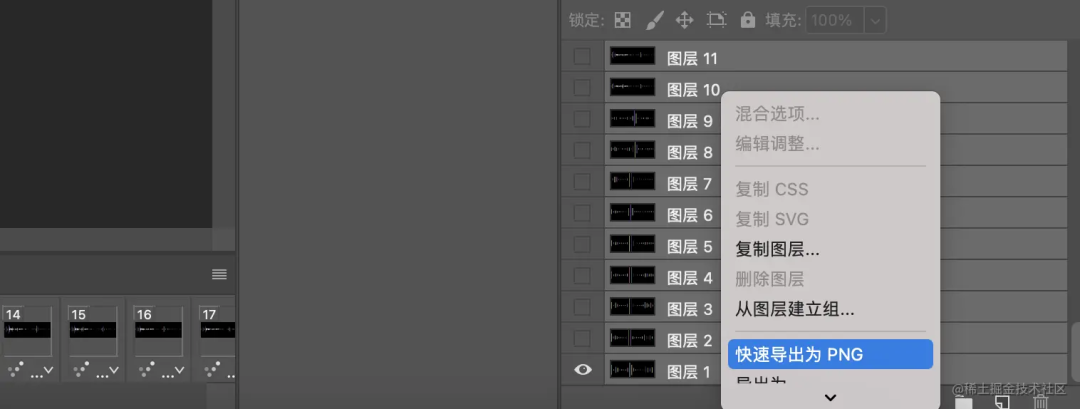
第二步
通过PhotoShop进行制作并导出帧图片集合。打开GIF图片之后,右边通过shift来选择所有的图层
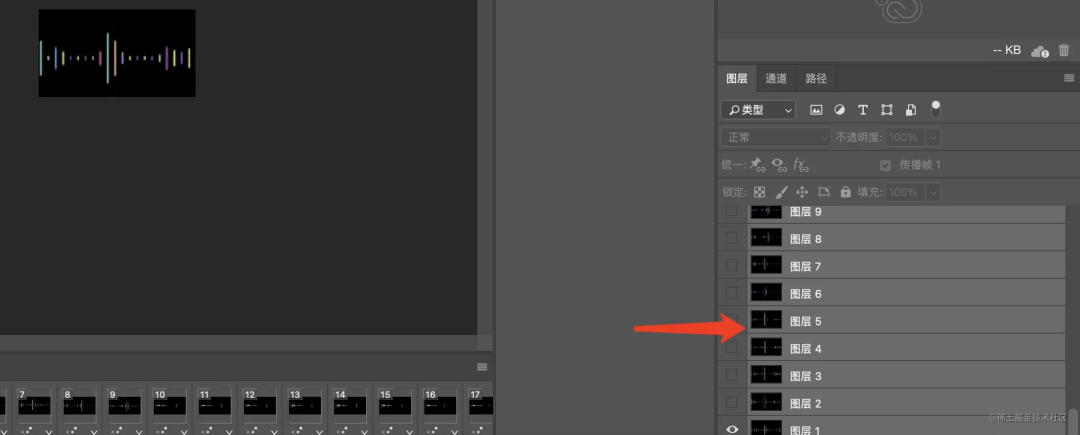
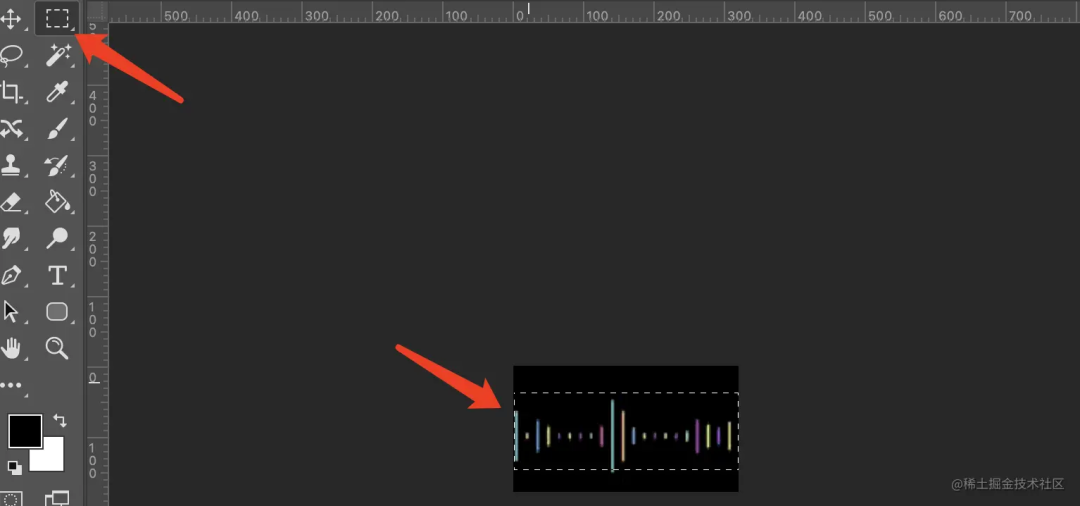
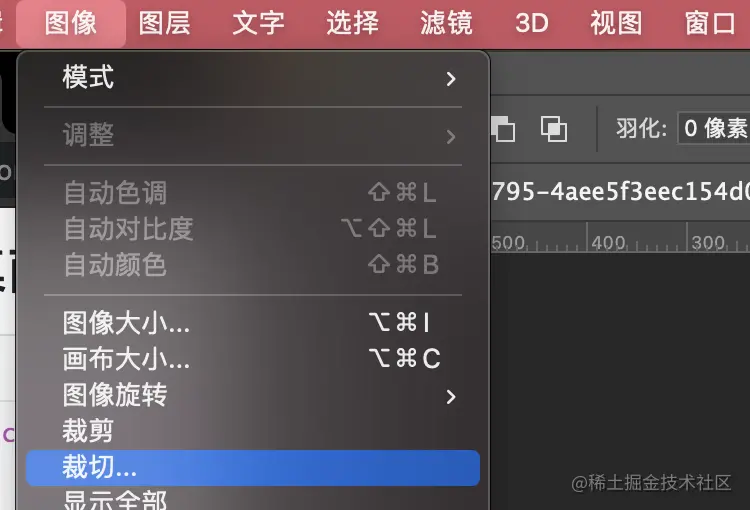
选中图层所有图片、快速导出为PNG。即可制作完成。
然后我们扔到drawble目录。对于如何进行刷新图片,当然是控制一定的时间段可以刷新视图便可以完成。那我们可以通过那些方式进行刷新图片呢?当然大家都会想到Handle和Runnable或者CountDownTimer[内部也是通过Handle实现的比较方便],当然了我们这里使用来ValueAnimal进行更新,相对强于其他的,ValueAnimal刷新机制大家可以百度看看。
val IMAGES = arrayListOf( R.drawable.wave_animal_01, ...R.drawable.wave_animal_55)
//这里我们设置动画Value顺序变化范围数值为0到size-1也就是对应的图片数组里面图片底0个到最后一张图片。
val valueAnimator: ValueAnimator = ValueAnimator.ofInt(0, IMAGES.size - 1)<br/>
var duration = IMAGES.size * 55L
class RecorderAppWidget : AppWidgetProvider() {
    companion object {
        const val TAG = "RecorderAppWidget"
        const val UPDATE_ACTION = "android.appwidget.action.APPWIDGET_UPDATE"

        //录音机当前状态和录制时间
        const val WIDGET_STATE_EXTRA_NAME = "state"
        const val WIDGET_TIME_EXTRA_NAME = "time"
        //对应录音机的录制状态

        const val STATE_IDLE = 0
        const val STATE_PLAYING = 1
        const val STATE_PLAY_PAUSED = 2
        const val STATE_RECORDING = 3
        const val STATE_RECORDING_FROM_PAUSED = 4
        const val STATE_RECORD_PAUSED = 5

        var isFirst = true
        var lastIndex = 0

        val IMAGES = arrayListOf(
            R.drawable.wave_animal_01,
            R.drawable.wave_animal_02,
            R.drawable.wave_animal_03,
            R.drawable.wave_animal_04,
            R.drawable.wave_animal_05,
            R.drawable.wave_animal_06,
            R.drawable.wave_animal_07,
            R.drawable.wave_animal_08,
            R.drawable.wave_animal_09,
            R.drawable.wave_animal_10,
            R.drawable.wave_animal_11,
            R.drawable.wave_animal_12,
            R.drawable.wave_animal_13,
            R.drawable.wave_animal_14,
            R.drawable.wave_animal_15,
            R.drawable.wave_animal_16,
            R.drawable.wave_animal_17,
            R.drawable.wave_animal_18,
            R.drawable.wave_animal_19,
            R.drawable.wave_animal_20,
            R.drawable.wave_animal_21,
            R.drawable.wave_animal_22,
            R.drawable.wave_animal_23,
            R.drawable.wave_animal_24,
            R.drawable.wave_animal_25,
            R.drawable.wave_animal_26,
            R.drawable.wave_animal_27,
            R.drawable.wave_animal_28,
            R.drawable.wave_animal_30,
            R.drawable.wave_animal_31,
            R.drawable.wave_animal_32,
            R.drawable.wave_animal_33,
            R.drawable.wave_animal_34,
            R.drawable.wave_animal_35,
            R.drawable.wave_animal_36,
            R.drawable.wave_animal_37,
            R.drawable.wave_animal_38,
            R.drawable.wave_animal_39,
            R.drawable.wave_animal_40,
            R.drawable.wave_animal_41,
            R.drawable.wave_animal_42,
            R.drawable.wave_animal_43,
            R.drawable.wave_animal_44,
            R.drawable.wave_animal_45,
            R.drawable.wave_animal_46,
            R.drawable.wave_animal_47,
            R.drawable.wave_animal_48,
            R.drawable.wave_animal_49,
            R.drawable.wave_animal_50,
            R.drawable.wave_animal_51,
            R.drawable.wave_animal_52,
            R.drawable.wave_animal_54,
            R.drawable.wave_animal_55,
            R.drawable.wave_animal_56,
            R.drawable.wave_animal_57,
        )
        val valueAnimator: ValueAnimator = ValueAnimator.ofInt(0, IMAGES.size - 1)
        var duration = IMAGES.size * 55L
    }

    private lateinit var context: Context
    lateinit var viewModel: SmartTranslationViewModel

    override fun onUpdate(
        context: Context?,
        appWidgetManager: AppWidgetManager?,
        appWidgetIds: IntArray?,
    ) {
        Log.i(TAG, "onUpdate")
        super.onUpdate(context, appWidgetManager, appWidgetIds)
    }

    //当Widget第一次创建的时候,该方法调用,然后启动后台的服务
    override fun onEnabled(context: Context) {
        super.onEnabled(context)
    }

    //当把桌面上的Widget全部都删掉的时候,调用该方法
    override fun onDisabled(context: Context) {
        super.onDisabled(context)
    }
    //我们在RecorderServierce里面每秒钟都会发送广播,Widget的onReceive接收到之后进行刷新时间即可。
    override fun onReceive(context: Context, intent: Intent) {
        this.context = context
        super.onReceive(context, intent)
        Log.i(TAG, "onReceive")
        val remoteViews = RemoteViews(context.packageName, R.layout.widget_recorder_remote_view)
        val appWidgetIds = AppWidgetManager.getInstance(context)
            .getAppWidgetIds(
                ComponentName(
                    context,
                    RecorderAppWidget::class.java
                )
            )
        if (null == intent.action || UPDATE_ACTION != intent.action) {
            return
        }
        val titleStart = getTitleStart(context, getState(intent))
        when (getState(intent)) {
            STATE_RECORDING, STATE_RECORDING_FROM_PAUSED -> {
                remoteViews.setTextViewText(
                    R.id.widget_title_text,
                    getTimeString(titleStart, context, intent))
                remoteViews.setImageViewResource(
                    R.id.widget_stop_bn,
                    R.drawable.notification_btn_pause)
                remoteViews.setWidgetOnClickPendingIntent(context,
                    R.id.widget_stop_bn,
                    ACTION_CANCEL_TIMER)
                remoteViews.setWidgetOnClickPendingIntent(context,
                    R.id.widget_finish_bn,
                    ACTION_RESUME_TIMER)
                remoteViews.setTextViewText(R.id.widget_time,
                    getTimeString("", context, intent))
                remoteViews.setTextViewText(R.id.widget_time_center,
                    getTimeString("", context, intent))
                if (isFirst) {
                    updateAnimate(getState(intent))
                    isFirst = false
                }
            }
            STATE_IDLE, STATE_RECORD_PAUSED -> {
                updateAnimate(getState(intent))
                remoteViews.setTextViewText(
                    R.id.widget_title_text,
                    getTimeString(titleStart, context, intent))
                remoteViews.setImageViewResource(
                    R.id.widget_stop_bn,
                    R.drawable.notification_btn_resume)
            }

        }

        //由AppwidgetManager 处理更新widget
        val awm = AppWidgetManager.getInstance(context.applicationContext)
        awm.updateAppWidget(appWidgetIds, remoteViews)

    }

    @Synchronized
    private fun updateWave(context: Context, index: Int) {
        val remoteViews = RemoteViews(context.packageName, R.layout.widget_recorder_remote_view)
        val appWidgetIds = AppWidgetManager.getInstance(context)
            .getAppWidgetIds(
                ComponentName(
                    context,
                    RecorderAppWidget::class.java
                )
            )
        if (index != lastIndex) {
            lastIndex = index
            remoteViews.setImageViewResource(
                R.id.widget_wave,
                IMAGES[index])
            remoteViews.setImageViewResource(
                R.id.item_content,
                IMAGES_CIRCLE[index])
            remoteViews.setImageViewResource(
                R.id.item_content_center,
                IMAGES_CIRCLE[index])
        }

        //由AppwidgetManager 处理更新widget
        val awm = AppWidgetManager.getInstance(context.applicationContext)
        awm.updateAppWidget(appWidgetIds, remoteViews)
    }


    //根据状态来更新文字前缀
    private fun getTitleStart(context: Context, state: Int): String {
        return if (state == STATE_RECORD_PAUSED) {
            context.resources.getString(R.string.title_record_pause)
        } else if (state == STATE_RECORDING || state == STATE_RECORDING_FROM_PAUSED) {
            context.resources.getString(R.string.title_recording)
        } else {
            ""
        }
    }

    //获取小部件对应的录音机录制状态
    private fun getState(intent: Intent): Int {
        return intent.getIntExtra(WIDGET_STATE_EXTRA_NAME, STATE_IDLE)
    }

    //获取录音机录制时间
    private fun getTimeString(titleStart: String, context: Context, intent: Intent): String {
        var time = intent.getStringExtra(WIDGET_TIME_EXTRA_NAME)
        if (null == time) {
            time = ""
        }
        if (time.isNotEmpty()) {
            time = "$titleStart $time"
        }
        return time
    }

    private fun RemoteViews.setWidgetOnClickPendingIntent(
        context: Context,
        id: Int,
        action: String,
    ) = this.apply {
        setOnClickPendingIntent(id, PendingIntent
            .getBroadcast(
                context, 0, Intent().setAction(action),
                PendingIntent.FLAG_IMMUTABLE
            ))
    }

    private fun updateAnimate(state: Int) {
        Log.i("valueAnimator:value=", valueAnimator.toString())
        valueAnimator.repeatCount = INFINITE
        valueAnimator.duration = duration
        valueAnimator.repeatMode = RESTART
        valueAnimator.interpolator = LinearInterpolator()
        valueAnimator.addUpdateListener {
            updateWave(context, it.animatedValue as Int)
        }
        Log.i("state::==", state.toString())
        when (state) {
            STATE_RECORDING, STATE_RECORDING_FROM_PAUSED -> {
                if (valueAnimator.isPaused) {
                    valueAnimator.resume()
                } else if (!valueAnimator.isRunning) {
                    valueAnimator.start()
                }
            }
            STATE_IDLE, STATE_RECORD_PAUSED -> {
                valueAnimator.removeAllUpdateListeners()
                valueAnimator.pause()
                isFirst = true
            }
        }
    }
}
接下来运行结果:
同样的我们实现水波图不就缺少一个图片数组么?简单同上面操作步骤找素材图片。
到了这里大家是不是觉得这种实现好像也不是很吊,通过帧图片来实现这种效果。有本事你通过代码写一波小部件水波纹或者声音波纹。当然了我们在这种比较高端的操作之前先来研究如何实现Widget的Canvas自定义吧。当我们能突破Widget的自定义之后,这种动画实现起来也是没啥问题的。接下来我们探索一下如何将Canvas引入到桌面小部件。
四、Widget自定义
RemoteViews.setImageViewBitmap(id, bitmap)出现自然而然了解Canvas API并多用的开发者应该可以联想到Canvas(@NonNull Bitmap bitmap) bitmap才是像素真正的载体,Canvas只是一个光栅画布,我们花里胡哨的操作都最终会储存在bitmap上并设置到视图部件上。于是我们先绘制一条线?感受一波是否可行。
private fun drawCanvas(remoteViews: RemoteViews, index: Int) {
    val width = context.resources.getDimensionPixelSize(R.dimen.widget_canvas_width)
    val height = context.resources.getDimensionPixelSize(R.dimen.widget_canvas_height)
    val bitmap = Bitmap.createBitmap(width, height, Bitmap.Config.ARGB_8888)
    val canvas = Canvas(bitmap)
    val paint = Paint().apply {
        this.color = Color.argb(115, 194, 108, 57)
        this.strokeWidth = 2f
        this.style = Paint.Style.STROKE
    }
 canvas.drawLine(0f, height/2f, width.toFloat(), height/2f, paint)
 remoteViews.setImageViewBitmap(
        R.id.widget_canvas, bitmap)
}
运行效果如下:
到这里我们是不是找到了突破口,只要能加载bitmap那么canvas自定义就是不是问题。
1.绘制之前的分析
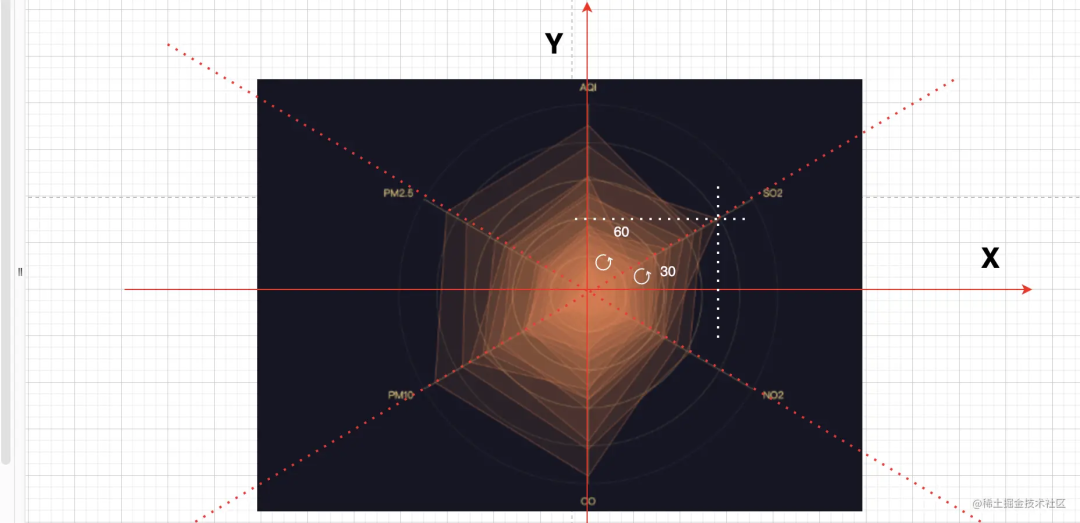
坐标变换到屏幕中心带来的方便 绘制多条骨架线段 如何实际数据映射到屏幕中 连线填充完成
2.坐标变换到屏幕中
我们看到总共有三条骨架直线将屏幕分为六等分,我们可以简单的求出三条线段的方程式吧?初中的数学我相信你能明白。
Yx=-tan30*x
Yx= tan30*x
//右边的有个
val pathRight = Path()
val tan30 = kotlin.math.tan(Math.PI / 180 * 30)
val y1 = tan30 * (-width / 2)
val y2 = tan30 * width / 2
pathRight.moveTo(-width.toFloat() / 2, y1.toFloat())
pathRight.lineTo(width.toFloat() / 2, y2.toFloat())
canvas.drawPath(pathRight, paint)
//绘制中间一个
canvas.drawLine(0f, y1.toFloat() * 1.7f, 0f, -y1.toFloat() * 1.7f, paint)
//左边的一个
val pathLeft = Path()
pathLeft.moveTo(-width.toFloat() / 2, -y1.toFloat())
pathLeft.lineTo(width.toFloat() / 2, -y2.toFloat())
canvas.drawPath(pathLeft, paint)

paint.color = Color.argb(255, 66, 39, 39)
for (index in 0..10) {
    canvas.drawCircle(0f, 0f, 50f * index, paint)
}
4.如何实际数据映射到屏幕中
同样我们圆的半径可以看做是各个骨架坐标轴的长度,而我们实际数据是长度数据而已如何将长度数字映射到各个不规则的骨架坐标轴上呢?当然还是离不开简单的数学。
例如我们一个数字250如下图两个白色虚线相交地方。我们实际的250代表的是圆点到焦点部分的长度。但是我们需要在坐标系中定位那就需要求出(x,y)在坐标系中的虚拟坐标。同样的简单的初中数学,不难得出(x,y)=(lengthcson30,lenghtsin30),如果你细心分析每个骨架坐标轴上的所有坐标都满足(x,y)=(lengthcson30,lenghtsin30)。接下来我们上代码看效果
paint.style = Paint.Style.FILL
paint.color = Color.argb(60, 154, 108, 57)
val arrData = arrayListOf(
    arrayOf(300f, 200f, 300f, 300f, 266f, 133f),
    arrayOf(200f, 245f, 300f, 201f, 220f, 200f),
    arrayOf(130f, 295f, 180f, 151f, 220f, 120f),
    arrayOf(220f, 235f, 200f, 199f, 200f, 130f),
    arrayOf(110f, 135f, 300f, 199f, 150f, 220f),
    arrayOf(150f, 235f, 100f, 300f, 50f, 110f),
    arrayOf(100f, 40f, 80f, 70f, 36f, 23f)
)
for (index in 0 until arrData.size) {
    val result = Path().apply {
        moveTo(0f, arrData[index][0])
        val random2 = arrData[index][1]
        lineTo(random2, (random2 * tan30).toFloat())
        val random4 = arrData[index][2]
        lineTo(random4, -(random4 * tan30).toFloat())
        val random5 = arrData[index][3]
        lineTo(0f, -random5)
        val random6 = arrData[index][4]
        lineTo(-random6, -(random6 * tan30).toFloat())
        val random7 = arrData[index][5]
        lineTo(-random7, (random7 * tan30).toFloat())
        close()
    }
    canvas.drawPath(result, paint)

}
paint.strokeWidth = 2f
paint.style = Paint.Style.STROKE
paint.color = Color.argb(35, 254, 108, 57)
5.连线钩边
paint.strokeWidth = 2f
paint.style = Paint.Style.STROKE
paint.color = Color.argb(35, 254, 108, 57)
for (index in 0 until arrData.size) {
    val result = Path().apply {
        moveTo(0f, arrData[index][0])
        val random2 = arrData[index][1]
        lineTo(random2, (random2 * tan30).toFloat())
        val random4 = arrData[index][2]
        lineTo(random4, -(random4 * tan30).toFloat())
        val random5 = arrData[index][3]
        lineTo(0f, -random5)
        val random6 = arrData[index][4]
        lineTo(-random6, -(random6 * tan30).toFloat())
        val random7 = arrData[index][5]
        lineTo(-random7, (random7 * tan30).toFloat())
        close()
    }
    canvas.drawPath(result, paint)
}
运行效果如下:
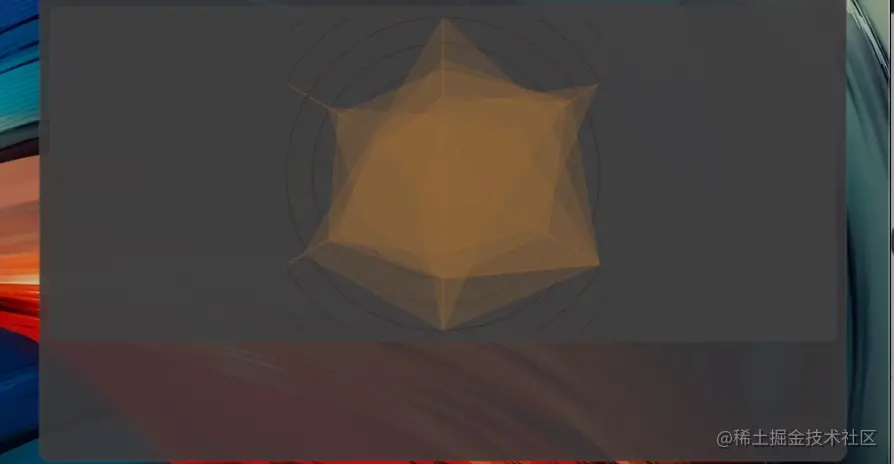
最终效果
到了这里,我们可以任意自定义Widget,那么水波纹和音频抖动还用帧动画来凑齐么?当然了为了还原更加真实的水波纹和抖动动画帧动画只能是粗略的动而已,后面咋们来实现如何自定义水波纹和声波动画。
为了防止失联,欢迎关注我防备的小号

                 微信改了推送机制,真爱请星标本公号👇