Spring Security 中使用Keycloak作为认证授权服务器

Keycloak对流行的Java应用提供了适配器。在系列文章的上一篇我们演示了针对Spring Boot的安全保护,用的就是适配器的一种。Keycloak同样提供Spring Security的适配器,后续的几篇文章我们就来共同学习Spring Security适配器的使用。
❝
Keycloak的安装可参考前面的系列教程。
适配器集成
在Spring 应用中我们集成keycloak-spring-security-adapter:
<dependency>
    <groupId>org.keycloak</groupId>
    <artifactId>keycloak-spring-security-adapter</artifactId>
    <version>15.0.0</version>
</dependency>
在Spring Boot中可以这样集成:
<dependency>
    <groupId>org.springframework.boot</groupId>
    <artifactId>spring-boot-starter-security</artifactId>
</dependency>
<dependency>
    <groupId>org.keycloak</groupId>
    <artifactId>keycloak-spring-boot-starter</artifactId>
    <version>15.0.0</version>
</dependency>
然后就能利用Spring Security的特性来集成Keycloak。Keycloak 提供了一个 KeycloakWebSecurityConfigurerAdapter 作为创建WebSecurityConfigurer 实例的方便基类。我们可以编写了一个配置类来定制我们的安全策略,就像这样:
@KeycloakConfiguration
public class SecurityConfig extends KeycloakWebSecurityConfigurerAdapter
{
    /**
     *  注册了一个Keycloak的AuthenticationProvider
     */
    @Autowired
    public void configureGlobal(AuthenticationManagerBuilder auth) throws Exception {
        auth.authenticationProvider(keycloakAuthenticationProvider());
    }

    /**
     * 定义会话策略
     */
    @Bean
    @Override
    protected SessionAuthenticationStrategy sessionAuthenticationStrategy() {
        return new RegisterSessionAuthenticationStrategy(new SessionRegistryImpl());
    }

    /**
     * 常见的Spring Security安全策略
     */
    @Override
    protected void configure(HttpSecurity http) throws Exception
    {
        super.configure(http);
        http
                .authorizeRequests()
                .antMatchers("/customers*").hasRole("USER")
                .antMatchers("/admin/**").hasRole("base_user")
                .anyRequest().permitAll();
    }
}
❝
注意:上面的配置并不能成功。
java.io.FileNotFoundException: Unable to locate Keycloak configuration file: keycloak.json
抛出找不到 keycloak.json文件的异常。Keycloak支持的每个Java适配器都可以通过一个简单的JSON文件进行配置,我们缺失的就是这个文件。
{
  "realm" : "demo",
  "resource" : "customer-portal",
  "realm-public-key" : "MIGfMA0GCSqGSIb3D...31LwIDAQAB",
  "auth-server-url" : "https://localhost:8443/auth",
  "ssl-required" : "external",
  "use-resource-role-mappings" : false,
  "enable-cors" : true,
  "cors-max-age" : 1000,
  "cors-allowed-methods" : "POST, PUT, DELETE, GET",
  "cors-exposed-headers" : "WWW-Authenticate, My-custom-exposed-Header",
  "bearer-only" : false,
  "enable-basic-auth" : false,
  "expose-token" : true,
  "verify-token-audience" : true,
   "credentials" : {
      "secret" : "234234-234234-234234"
   },

   "connection-pool-size" : 20,
   "socket-timeout-millis": 5000,
   "connection-timeout-millis": 6000,
   "connection-ttl-millis": 500,
   "disable-trust-manager": false,
   "allow-any-hostname" : false,
   "truststore" : "path/to/truststore.jks",
   "truststore-password" : "geheim",
   "client-keystore" : "path/to/client-keystore.jks",
   "client-keystore-password" : "geheim",
   "client-key-password" : "geheim",
   "token-minimum-time-to-live" : 10,
   "min-time-between-jwks-requests" : 10,
   "public-key-cache-ttl": 86400,
   "redirect-rewrite-rules" : {
   "^/wsmaster/api/(.*)$" : "/api/$1"
   }
}
上面包含的客户端配置属性都可以在Keycloak控制台进行配置,见下图:
 配置Keycloak客户端属性
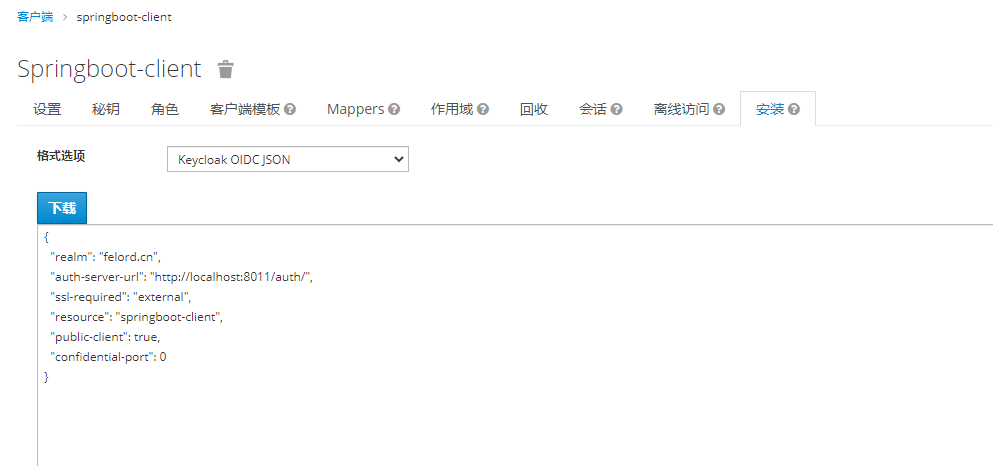
也就是说我们需要的json文件和图中的配置项是对应的。比较人性化的是我们不需要自行编写这个json文件,Keycloak提供了下载客户端配置的方法,这里我只使用了必要的配置项:
 你可以下载客户端json配置
引入客户端配置
虽然顺利拿到json文件,但是加载这个json配置却不太顺利,经过我的摸索需要实现一个KeycloakConfigResolver并注入Spring IoC,有下面两种实现方式。
直接复用Spring Boot的配置形式,先声明Spring Boot的KeycloakConfigResolver实现:
  /**
     * 复用spring boot 的方法
     *
     * @return the keycloak config resolver
     */
    @Bean
    public KeycloakConfigResolver keycloakConfigResolver() {
        return new KeycloakSpringBootConfigResolver();
    }
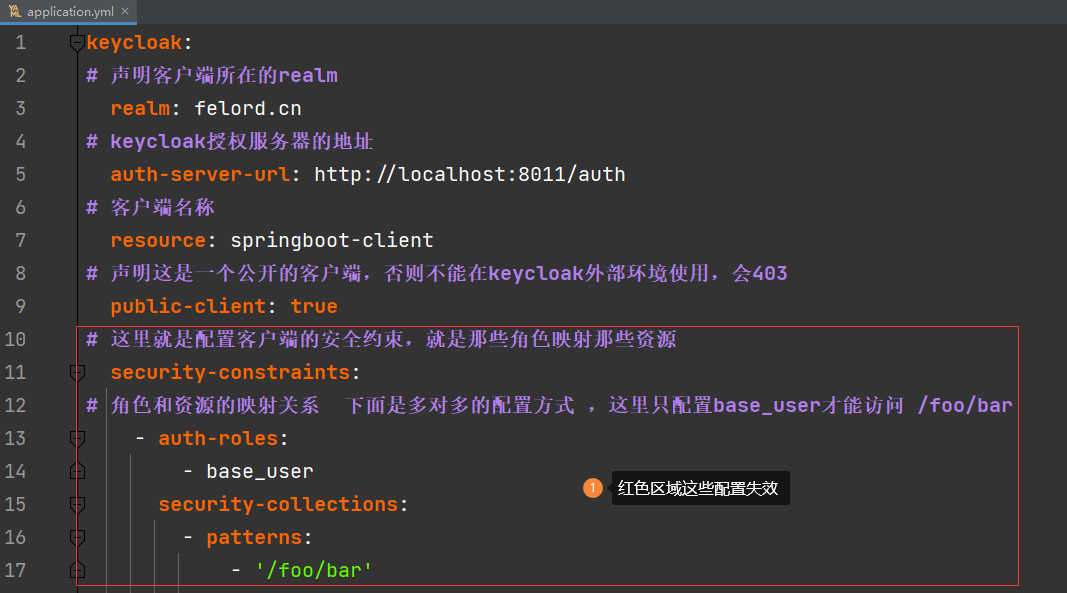
然后复用Spring Boot的application.yaml的配置项:
 复用Spring Boot配置项
❝
原来的角色资源映射约束失效。
自定义实现
你也可以自定义写解析,这个时候json形式已经不重要了,你可以将json文件的内容存储到任何你擅长的地方。
/**
 * 自己写解析
 *
 * @return the keycloak config resolver
 */
@Bean
public KeycloakConfigResolver fileKeycloakConfigResolver() {
    return  new KeycloakConfigResolver() {
        @SneakyThrows
        @Override
        public KeycloakDeployment resolve(HttpFacade.Request request) {
            // json 文件放到resources 文件夹下
            ClassPathResource classPathResource = new ClassPathResource("./keycloak.json");
            AdapterConfig adapterConfig = new ObjectMapper().readValue(classPathResource.getFile(), AdapterConfig.class);

            return KeycloakDeploymentBuilder.build(adapterConfig);
        }
    };
}
角色命名策略
Spring Security会为每个角色添加ROLE_前缀,这需要我们声明GrantedAuthoritiesMapper的实现SimpleAuthorityMapper来完成这一功能。Keycloak在KeycloakAuthenticationProvider中配置该功能:
        KeycloakAuthenticationProvider authenticationProvider = keycloakAuthenticationProvider();
        authenticationProvider.setGrantedAuthoritiesMapper(new SimpleAuthorityMapper());
完整的配置
applicaiton.yaml:
keycloak:
# 声明客户端所在的realm
  realm: felord.cn
# keycloak授权服务器的地址
  auth-server-url: http://localhost:8011/auth
# 客户端名称
  resource: springboot-client
# 声明这是一个公开的客户端,否则不能在keycloak外部环境使用,会403
  public-client: true
❝
这里要结合Keycloak导出的json文件配置。
Spring Security配置:
@KeycloakConfiguration
public class SecurityConfig extends KeycloakWebSecurityConfigurerAdapter {

    /**
     * 复用spring boot 的方法
     *
     * @return the keycloak config resolver
     */
    @Bean
    public KeycloakConfigResolver keycloakConfigResolver() {
        return new KeycloakSpringBootConfigResolver();
    }
    /**
     * 自己写解析
     *
     * @return the keycloak config resolver
     */
//    @Bean
    public KeycloakConfigResolver fileKeycloakConfigResolver() {
        return request -> {
            // json 文件放到resources 文件夹下
            ClassPathResource classPathResource = new ClassPathResource("./keycloak.json");
            AdapterConfig adapterConfig = null;
            try {
                adapterConfig = new ObjectMapper().readValue(classPathResource.getFile(),
                        AdapterConfig.class);
            } catch (IOException e) {
                e.printStackTrace();
            }

            return KeycloakDeploymentBuilder.build(adapterConfig);
        };
    }
    /**
     *  配置{@link AuthenticationManager}
     *  这里会引入Keycloak的{@link AuthenticationProvider}实现
     *
     * @param auth the auth
     */
    @Autowired
    public void configureGlobal(AuthenticationManagerBuilder auth) {
        KeycloakAuthenticationProvider authenticationProvider = keycloakAuthenticationProvider();
        authenticationProvider.setGrantedAuthoritiesMapper(new SimpleAuthorityMapper());
        auth.authenticationProvider(authenticationProvider);
    }
    /**
     * 会话身份验证策略
     */
    @Bean
    @Override
    protected SessionAuthenticationStrategy sessionAuthenticationStrategy() {
        return new RegisterSessionAuthenticationStrategy(new SessionRegistryImpl());
    }
    /**
     * 配置 session 监听器 保证单点退出生效
     *
     * @return the servlet listener registration bean
     */
    @Bean
    public ServletListenerRegistrationBean<HttpSessionEventPublisher> httpSessionEventPublisher() {
        return new ServletListenerRegistrationBean<>(new HttpSessionEventPublisher());
    }
    @Override
    protected void configure(HttpSecurity http) throws Exception {
        super.configure(http);
        http
                .authorizeRequests()
                .antMatchers("/customers*").hasRole("USER")
                .antMatchers("/admin/**").hasRole("base_user")
                .anyRequest().permitAll();
    }
}
调用流程
资源客户端springboot-client有一个接口/admin/foo,当未登录调用该接口时会转发到:
http://localhost:8011/auth/realms/felord.cn/protocol/openid-connect/auth?response_type=code&client_id=springboot-client&redirect_uri=http%3A%2F%2Flocalhost%3A8080%2Fsso%2Flogin&state=ec00d608-5ce7-47a0-acc8-8a20a2bfadfd&login=true&scope=openid
输入正确的用户密码后才能得到期望的结果。
❝
典型的
authorazation code flow。
总结
Keycloak整合Spring Security的要点这里需要再梳理一下。在原生情况下,客户端的配置、用户的信息、角色信息都由Keycloak负责;客户端只负责角色和资源的映射关系。后续会深入并定制Keycloak和Spring Security以满足实际场景需要。
往期推荐
