SSD的torchvision版本实现详解
 点蓝色字关注“机器学习算法工程师”
设为星标,干货直达!
之前的文章目标检测算法之SSD已经详细介绍了SSD检测算法的原理以及实现,不过里面只给出了inference的代码,这个更新版基于SSD的torchvision版本从代码实现的角度对SSD的各个部分给出深入的解读(包括数据增强,训练)。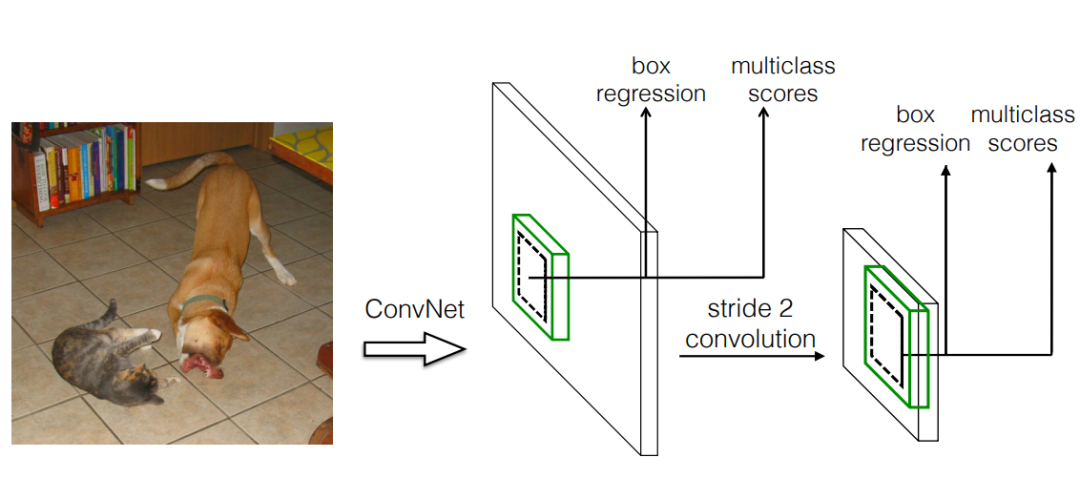
特征提取器(Backbone Feature Extractor)
SSD的backbone采用的是VGG16模型,SSD300的主体网络结构如下所示: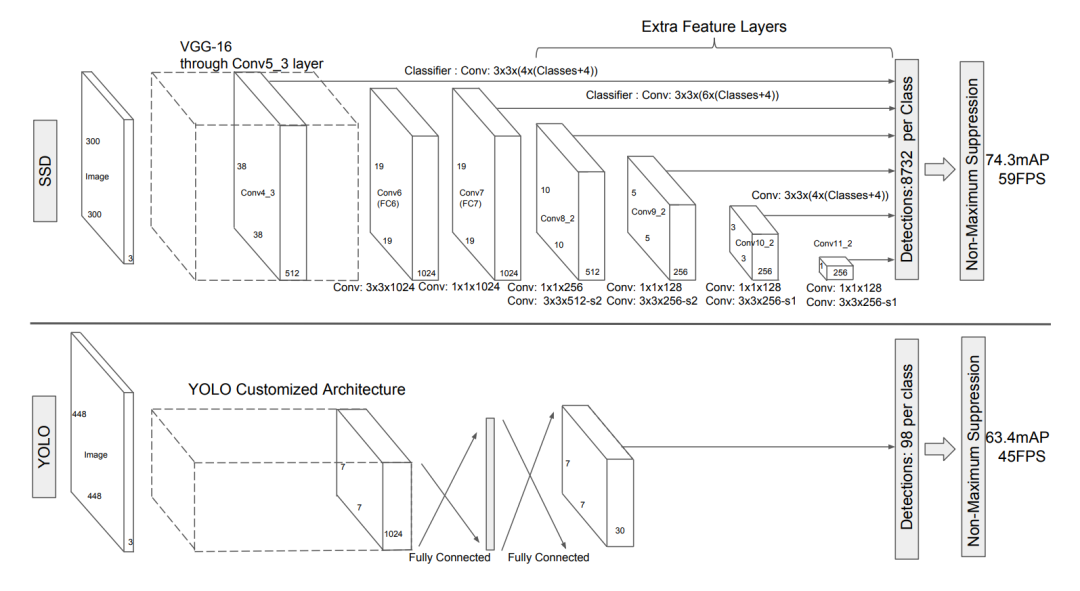 SSD提取多尺度特征来进行检测,所以需要在VGG16模型基础上修改和增加一些额外的模块。VGG16模型主体包括5个maxpool层,每个maxpool层后特征图尺度降低1/2,可以看成5个stage,每个stage都是3x3的卷积层,比如最后一个stage包含3个3x3卷积层,分别记为Conv5_1,Conv5_2,Conv5_3(5是stage编号,而后面数字表示卷积层编号)。图上所示的Conv4_3对应的就是第4个stage的第3个卷积层的输出(第4个maxpool层前面一层),对应的特征图大小为38x38(300/2^3),这是提取的第一个特征,这个特征比较靠前,其norm一般较大,所以后面来额外增加了一个L2 Normalization层。相比原来的VGG16,这里将第5个maxpool层由原来的2x2-s2变成了3x3-s1,此时maxpool后特征图大小是19x19(没有降采样),然后将将VGG16的全连接层fc6和fc7转换成两个卷积层:3x3的Conv6和1x1的Conv7,其中Conv6采用dilation=6的空洞卷积,Conv7是提取的第2个用来检测的特征图,其大小为19x19。除此之外,SSD还在后面新增了4个模块来提取更多的特征,每个模块都包含两个卷积层:1x1 conv+3x3 conv,3x3卷积层后输出的特征将用于检测,分别记为Conv8_2,Conv9_2,Conv10_2和Conv11_2,它们对应的特征图大小分别是10x10,5x5,3x3和1x1。对于SSD512,其输入图像大小更大,所以还额外增加了一个模块来提取特征,即Conv12_2。特征提取器的代码实现如下所示:
class SSDFeatureExtractorVGG(nn.Module):
    def __init__(self, backbone: nn.Module, highres: bool):
        super().__init__()

        # 得到maxpool3和maxpool4的位置,这里backbone是vgg16模型
        _, _, maxpool3_pos, maxpool4_pos, _ = (i for i, layer in enumerate(backbone) if isinstance(layer, nn.MaxPool2d))

        # maxpool3开启ceil_mode,这样得到的特征图大小是38x38,而不是37x37
        backbone[maxpool3_pos].ceil_mode = True

        # Conv4_3的L2 regularization + rescaling
        self.scale_weight = nn.Parameter(torch.ones(512) * 20)

        # Conv4_3之前的模块,用来提取第一个特征图
        self.features = nn.Sequential(
            *backbone[:maxpool4_pos]
        )

        # 额外增加的4个模块
        extra = nn.ModuleList([
            nn.Sequential(
                nn.Conv2d(1024, 256, kernel_size=1),
                nn.ReLU(inplace=True),
                nn.Conv2d(256, 512, kernel_size=3, padding=1, stride=2),  # conv8_2
                nn.ReLU(inplace=True),
            ),
            nn.Sequential(
                nn.Conv2d(512, 128, kernel_size=1),
                nn.ReLU(inplace=True),
                nn.Conv2d(128, 256, kernel_size=3, padding=1, stride=2),  # conv9_2
                nn.ReLU(inplace=True),
            ),
            nn.Sequential(
                nn.Conv2d(256, 128, kernel_size=1),
                nn.ReLU(inplace=True),
                nn.Conv2d(128, 256, kernel_size=3),  # conv10_2
                nn.ReLU(inplace=True),
            ),
            nn.Sequential(
                nn.Conv2d(256, 128, kernel_size=1),
                nn.ReLU(inplace=True),
                nn.Conv2d(128, 256, kernel_size=3),  # conv11_2
                nn.ReLU(inplace=True),
            )
        ])
        if highres:
            # SSD512还多了一个额外的模块
            extra.append(nn.Sequential(
                nn.Conv2d(256, 128, kernel_size=1),
                nn.ReLU(inplace=True),
                nn.Conv2d(128, 256, kernel_size=4),  # conv12_2
                nn.ReLU(inplace=True),
            ))
        _xavier_init(extra)

        # maxpool5+Conv6(fc6)+Conv7(fc7),这里直接随机初始化,没有转换权重
        fc = nn.Sequential(
            nn.MaxPool2d(kernel_size=3, stride=1, padding=1, ceil_mode=False),  # add modified maxpool5
            nn.Conv2d(in_channels=512, out_channels=1024, kernel_size=3, padding=6, dilation=6),  # FC6 with atrous
            nn.ReLU(inplace=True),
            nn.Conv2d(in_channels=1024, out_channels=1024, kernel_size=1),  # FC7
            nn.ReLU(inplace=True)
        )
        _xavier_init(fc)
        # 添加Conv5_3,即第2个特征图
        extra.insert(0, nn.Sequential(
            *backbone[maxpool4_pos:-1],  # until conv5_3, skip maxpool5
            fc,
        ))
        self.extra = extra

    def forward(self, x: Tensor) -> Dict[str, Tensor]:
        # Conv4_3
        x = self.features(x)
        rescaled = self.scale_weight.view(1, -1, 1, 1) * F.normalize(x)
        output = [rescaled]

        # 计算Conv5_3, Conv8_2,Conv9_2,Conv10_2,Conv11_2,(Conv12_2)
        for block in self.extra:
            x = block(x)
            output.append(x)

        return OrderedDict([(str(i), v) for i, v in enumerate(output)])
采用多尺度来检测是SSD的一个重要特性,多尺度特征能够适应不同尺度物体,不过自从FPN提出后,后面大部分的检测都采用FPN这样的结构来提取多尺度特征,相比SSD,FPN考虑了不同尺度特征的融合。
检测头(Detection Head)
SSD的检测头比较简单:直接在每个特征图后接一个3x3卷积。这个卷积层的输出channels=A * (C+4),这里的A是每个位置预测的先验框数量,而C是检测类别数量(注意包括背景类,C=num_classes+1),除了类别外,还要预测box的位置,这里预测的是box相对先验框的4个偏移量。代码实现如下所示(注意这里将类别和回归预测分开了,但和论文是等价的):
# 基类:实现tensor的转换,主要将4D tensor转换成最后预测格式(N, H*W*A, K)
class SSDScoringHead(nn.Module):
    def __init__(self, module_list: nn.ModuleList, num_columns: int):
        super().__init__()
        self.module_list = module_list
        self.num_columns = num_columns

    def _get_result_from_module_list(self, x: Tensor, idx: int) -> Tensor:
        """
        This is equivalent to self.module_list[idx](x),
        but torchscript doesn't support this yet
        """
        num_blocks = len(self.module_list)
        if idx < 0:
            idx += num_blocks
        out = x
        for i, module in enumerate(self.module_list):
            if i == idx:
                out = module(x)
        return out

    def forward(self, x: List[Tensor]) -> Tensor:
        all_results = []

        for i, features in enumerate(x):
            results = self._get_result_from_module_list(features, i)

            # Permute output from (N, A * K, H, W) to (N, HWA, K).
            N, _, H, W = results.shape
            results = results.view(N, -1, self.num_columns, H, W)
            results = results.permute(0, 3, 4, 1, 2)
            results = results.reshape(N, -1, self.num_columns)  # Size=(N, HWA, K)

            all_results.append(results)

        return torch.cat(all_results, dim=1)

# 类别预测head
class SSDClassificationHead(SSDScoringHead):
    def __init__(self, in_channels: List[int], num_anchors: List[int], num_classes: int):
        cls_logits = nn.ModuleList()
        for channels, anchors in zip(in_channels, num_anchors):
            cls_logits.append(nn.Conv2d(channels, num_classes * anchors, kernel_size=3, padding=1))
        _xavier_init(cls_logits)
        super().__init__(cls_logits, num_classes)

# 位置回归head
class SSDRegressionHead(SSDScoringHead):
    def __init__(self, in_channels: List[int], num_anchors: List[int]):
        bbox_reg = nn.ModuleList()
        for channels, anchors in zip(in_channels, num_anchors):
            bbox_reg.append(nn.Conv2d(channels, 4 * anchors, kernel_size=3, padding=1))
        _xavier_init(bbox_reg)
        super().__init__(bbox_reg, 4)

class SSDHead(nn.Module):
    def __init__(self, in_channels: List[int], num_anchors: List[int], num_classes: int):
        super().__init__()
        self.classification_head = SSDClassificationHead(in_channels, num_anchors, num_classes)
        self.regression_head = SSDRegressionHead(in_channels, num_anchors)

    def forward(self, x: List[Tensor]) -> Dict[str, Tensor]:
        return {
            "bbox_regression": self.regression_head(x),
            "cls_logits": self.classification_head(x),
        }
注意,每个特征图的head是不共享的,毕竟存在尺度上的差异。相比之下,RetinaNet的head是采用4个中间卷积层+1个预测卷积层,head是在各个特征图上是共享的,而分类和回归采用不同的head。采用更heavy的head无疑有助于提高检测效果,不过也带来计算量的增加。
先验框(Default Box)
SSD是基于anchor的单阶段检测模型,论文里的anchor称为default box。前面说过SSD300共提取了6个不同的尺度特征,大小分别是38x38,19x19,10x10,5x5,3x3和1x1,每个特征图的不同位置采用相同的anchor,即同一个特征图上不同位置的anchor是一样的;但不同特征图上设置的anchor是不同的,特征图越小,放置的anchor的尺度越小(论文里用一个线性公式来计算不同特征图的anchor大小)。在SSD中,anchor的中心点是特征图上单元的中心点,anchor的形状由两个参数控制:scale和aspect_ratio(大小和宽高比),每个特征图设置scale一样但aspect_ratio不同的anchor,这里记为第k个特征图上anchor的scale,并记为anchor的aspect_ratio,那么就可以计算出anchor的宽和高:。具体地,6个特征图采用的scale分别是0.07, 0.15, 0.33, 0.51, 0.69, 0.87, 1.05,这里的scale是相对图片尺寸的值,而不是绝对大小。每个特征图上都包含两个特殊的anchor,第一个是aspect_ratio=1而scale=的anchor,第2个是aspect_ratio=1而scale=的anchor。除了这两个特殊的anchor,每个特征图还包含其它aspect_ratio的anchor:[2, 1/2], [2, 1/2, 3, 1/3], [2, 1/2, 3, 1/3], [2, 1/2, 3, 1/3], [2, 1/2], [2, 1/2],它们的scale都是。具体的代码实现如下所示:
class DefaultBoxGenerator(nn.Module):
    """
    This module generates the default boxes of SSD for a set of feature maps and image sizes.
    Args:
        aspect_ratios (List[List[int]]): A list with all the aspect ratios used in each feature map.
        min_ratio (float): The minimum scale :math:`\text{s}_{\text{min}}` of the default boxes used in the estimation
            of the scales of each feature map. It is used only if the ``scales`` parameter is not provided.
        max_ratio (float): The maximum scale :math:`\text{s}_{\text{max}}`  of the default boxes used in the estimation
            of the scales of each feature map. It is used only if the ``scales`` parameter is not provided.
        scales (List[float]], optional): The scales of the default boxes. If not provided it will be estimated using
            the ``min_ratio`` and ``max_ratio`` parameters.
        steps (List[int]], optional): It's a hyper-parameter that affects the tiling of defalt boxes. If not provided
            it will be estimated from the data.
        clip (bool): Whether the standardized values of default boxes should be clipped between 0 and 1. The clipping
            is applied while the boxes are encoded in format ``(cx, cy, w, h)``.
    """

    def __init__(self, aspect_ratios: List[List[int]], min_ratio: float = 0.15, max_ratio: float = 0.9,
                 scales: Optional[List[float]] = None, steps: Optional[List[int]] = None, clip: bool = True):
        super().__init__()
        if steps is not None:
            assert len(aspect_ratios) == len(steps)
        self.aspect_ratios = aspect_ratios
        self.steps = steps
        self.clip = clip
        num_outputs = len(aspect_ratios)

        # 如果没有提供scale,那就根据线性规则估算各个特征图上的anchor scale
        if scales is None:
            if num_outputs > 1:
                range_ratio = max_ratio - min_ratio
                self.scales = [min_ratio + range_ratio * k / (num_outputs - 1.0) for k in range(num_outputs)]
                self.scales.append(1.0)
            else:
                self.scales = [min_ratio, max_ratio]
        else:
            self.scales = scales

        self._wh_pairs = self._generate_wh_pairs(num_outputs)

    def _generate_wh_pairs(self, num_outputs: int, dtype: torch.dtype = torch.float32,
                           device: torch.device = torch.device("cpu")) -> List[Tensor]:
        _wh_pairs: List[Tensor] = []
        for k in range(num_outputs):
            # 添加2个默认的anchor
            s_k = self.scales[k]
            s_prime_k = math.sqrt(self.scales[k] * self.scales[k + 1])
            wh_pairs = [[s_k, s_k], [s_prime_k, s_prime_k]]

            # 每个aspect ratio产生两个成对的anchor
            for ar in self.aspect_ratios[k]:
                sq_ar = math.sqrt(ar)
                w = self.scales[k] * sq_ar
                h = self.scales[k] / sq_ar
                wh_pairs.extend([[w, h], [h, w]])

            _wh_pairs.append(torch.as_tensor(wh_pairs, dtype=dtype, device=device))
        return _wh_pairs

    def num_anchors_per_location(self):
        # 每个位置的anchor数量: 2 + 2 * len(aspect_ratios).
        return [2 + 2 * len(r) for r in self.aspect_ratios]

    # Default Boxes calculation based on page 6 of SSD paper
    def _grid_default_boxes(self, grid_sizes: List[List[int]], image_size: List[int],
                            dtype: torch.dtype = torch.float32) -> Tensor:
        default_boxes = []
        for k, f_k in enumerate(grid_sizes):
            # Now add the default boxes for each width-height pair
            if self.steps is not None: # step设置为特征图每个单元对应图像的像素点数
                x_f_k, y_f_k = [img_shape / self.steps[k] for img_shape in image_size]
            else:
                y_f_k, x_f_k = f_k

            # 计算anchor中心点
            shifts_x = ((torch.arange(0, f_k[1]) + 0.5) / x_f_k).to(dtype=dtype)
            shifts_y = ((torch.arange(0, f_k[0]) + 0.5) / y_f_k).to(dtype=dtype)
            shift_y, shift_x = torch.meshgrid(shifts_y, shifts_x)
            shift_x = shift_x.reshape(-1)
            shift_y = shift_y.reshape(-1)

            shifts = torch.stack((shift_x, shift_y) * len(self._wh_pairs[k]), dim=-1).reshape(-1, 2)
            # Clipping the default boxes while the boxes are encoded in format (cx, cy, w, h)
            _wh_pair = self._wh_pairs[k].clamp(min=0, max=1) if self.clip else self._wh_pairs[k]
            wh_pairs = _wh_pair.repeat((f_k[0] * f_k[1]), 1)

            default_box = torch.cat((shifts, wh_pairs), dim=1)

            default_boxes.append(default_box)

        return torch.cat(default_boxes, dim=0)

    def forward(self, image_list: ImageList, feature_maps: List[Tensor]) -> List[Tensor]:
        # 同一个batch的图像的大小一样,所以anchor是一样的,先计算anchor
        grid_sizes = [feature_map.shape[-2:] for feature_map in feature_maps]
        image_size = image_list.tensors.shape[-2:]
        dtype, device = feature_maps[0].dtype, feature_maps[0].device
        default_boxes = self._grid_default_boxes(grid_sizes, image_size, dtype=dtype)
        default_boxes = default_boxes.to(device)

        dboxes = []
        for _ in image_list.image_sizes:
            dboxes_in_image = default_boxes
            # (x,y,w,h) -> (x1,y1,x2,y2)
            dboxes_in_image = torch.cat([dboxes_in_image[:, :2] - 0.5 * dboxes_in_image[:, 2:],
                                         dboxes_in_image[:, :2] + 0.5 * dboxes_in_image[:, 2:]], -1)
            dboxes_in_image[:, 0::2] *= image_size[1] # 乘以图像大小以得到绝对大小
            dboxes_in_image[:, 1::2] *= image_size[0]
            dboxes.append(dboxes_in_image)
        return dboxes

# SSD300的anchor设置
anchor_generator = DefaultBoxGenerator(
        [[2], [2, 3], [2, 3], [2, 3], [2], [2]],
        scales=[0.07, 0.15, 0.33, 0.51, 0.69, 0.87, 1.05],
        steps=[8, 16, 32, 64, 100, 300],
    )
前面说过,SSD每个anchor共回归4个值,这4个值是box相对于anchor的偏移量(offset),这其实涉及到box和anchor之间的变换,一般称为box的编码方式。SSD采用和Faster RCNN一样的编码方式。具体地,anchor的中心点和宽高为,而要预测的box的中心点和宽高为,我们可以通过下述公式来计算4个偏移量:这4个值就是模型要回归的target,在预测阶段,你可以通过反向变换得到要预测的边界框,一般情况下会称box到offset的过程为编码,而offset到box的过程为解码。具体的实现代码如下所示:
def encode_boxes(reference_boxes: Tensor, proposals: Tensor, weights: Tensor) -> Tensor:
    """
    Encode a set of proposals with respect to some
    reference boxes
    Args:
        reference_boxes (Tensor): reference boxes
        proposals (Tensor): boxes to be encoded
        weights (Tensor[4]): the weights for ``(x, y, w, h)``
    """

    # perform some unpacking to make it JIT-fusion friendly
    wx = weights[0]
    wy = weights[1]
    ww = weights[2]
    wh = weights[3]

    proposals_x1 = proposals[:, 0].unsqueeze(1)
    proposals_y1 = proposals[:, 1].unsqueeze(1)
    proposals_x2 = proposals[:, 2].unsqueeze(1)
    proposals_y2 = proposals[:, 3].unsqueeze(1)

    reference_boxes_x1 = reference_boxes[:, 0].unsqueeze(1)
    reference_boxes_y1 = reference_boxes[:, 1].unsqueeze(1)
    reference_boxes_x2 = reference_boxes[:, 2].unsqueeze(1)
    reference_boxes_y2 = reference_boxes[:, 3].unsqueeze(1)

    # implementation starts here
    ex_widths = proposals_x2 - proposals_x1
    ex_heights = proposals_y2 - proposals_y1
    ex_ctr_x = proposals_x1 + 0.5 * ex_widths
    ex_ctr_y = proposals_y1 + 0.5 * ex_heights

    gt_widths = reference_boxes_x2 - reference_boxes_x1
    gt_heights = reference_boxes_y2 - reference_boxes_y1
    gt_ctr_x = reference_boxes_x1 + 0.5 * gt_widths
    gt_ctr_y = reference_boxes_y1 + 0.5 * gt_heights

    targets_dx = wx * (gt_ctr_x - ex_ctr_x) / ex_widths
    targets_dy = wy * (gt_ctr_y - ex_ctr_y) / ex_heights
    targets_dw = ww * torch.log(gt_widths / ex_widths)
    targets_dh = wh * torch.log(gt_heights / ex_heights)

    targets = torch.cat((targets_dx, targets_dy, targets_dw, targets_dh), dim=1)
    return targets

class BoxCoder:
    """
    This class encodes and decodes a set of bounding boxes into
    the representation used for training the regressors.
    """

    def __init__(
        self, weights: Tuple[float, float, float, float], bbox_xform_clip: float = math.log(1000.0 / 16)
    ) -> None:
        """
        Args:
            weights (4-element tuple)
            bbox_xform_clip (float)
        """
        # 实现时会设置4个weights,回归的target变为offset*weights
        self.weights = weights
        self.bbox_xform_clip = bbox_xform_clip

    # 编码过程:offset=box-anchor
    def encode_single(self, reference_boxes: Tensor, proposals: Tensor) -> Tensor:
        """
        Encode a set of proposals with respect to some
        reference boxes
        Args:
            reference_boxes (Tensor): reference boxes
            proposals (Tensor): boxes to be encoded
        """
        dtype = reference_boxes.dtype
        device = reference_boxes.device
        weights = torch.as_tensor(self.weights, dtype=dtype, device=device)
        targets = encode_boxes(reference_boxes, proposals, weights)

        return targets

    # 解码过程:anchor+offset=box
    def decode_single(self, rel_codes: Tensor, boxes: Tensor) -> Tensor:
        """
        From a set of original boxes and encoded relative box offsets,
        get the decoded boxes.
        Args:
            rel_codes (Tensor): encoded boxes
            boxes (Tensor): reference boxes.
        """

        boxes = boxes.to(rel_codes.dtype)

        widths = boxes[:, 2] - boxes[:, 0]
        heights = boxes[:, 3] - boxes[:, 1]
        ctr_x = boxes[:, 0] + 0.5 * widths
        ctr_y = boxes[:, 1] + 0.5 * heights

        wx, wy, ww, wh = self.weights
        dx = rel_codes[:, 0::4] / wx
        dy = rel_codes[:, 1::4] / wy
        dw = rel_codes[:, 2::4] / ww
        dh = rel_codes[:, 3::4] / wh

        # Prevent sending too large values into torch.exp()
        dw = torch.clamp(dw, max=self.bbox_xform_clip)
        dh = torch.clamp(dh, max=self.bbox_xform_clip)

        pred_ctr_x = dx * widths[:, None] + ctr_x[:, None]
        pred_ctr_y = dy * heights[:, None] + ctr_y[:, None]
        pred_w = torch.exp(dw) * widths[:, None]
        pred_h = torch.exp(dh) * heights[:, None]

        # Distance from center to box's corner.
        c_to_c_h = torch.tensor(0.5, dtype=pred_ctr_y.dtype, device=pred_h.device) * pred_h
        c_to_c_w = torch.tensor(0.5, dtype=pred_ctr_x.dtype, device=pred_w.device) * pred_w

        pred_boxes1 = pred_ctr_x - c_to_c_w
        pred_boxes2 = pred_ctr_y - c_to_c_h
        pred_boxes3 = pred_ctr_x + c_to_c_w
        pred_boxes4 = pred_ctr_y + c_to_c_h
        pred_boxes = torch.stack((pred_boxes1, pred_boxes2, pred_boxes3, pred_boxes4), dim=2).flatten(1)
        return pred_boxes

box_coder = BoxCoder(weights=(10., 10., 5., 5.))
匹配策略(Match Strategy)
在训练阶段,首先要确定每个ground truth由哪些anchor来预测才能计算损失,这就是anchor的匹配的策略,有些论文也称为label assignment策略。SSD的匹配策略是基于IoU的,首先计算所有ground truth和所有anchor的IoU值,然后每个anchor取IoU最大对应的ground truth(保证每个anchor最多预测一个ground truth),如果这个最大IoU值大于某个阈值(SSD设定为0.5),那么anchor就匹配到这个ground truth,即在训练阶段负责预测它。匹配到ground truth的anchor一般称为正样本,而没有匹配到任何ground truth的anchor称为负样本,训练时应该预测为背景类。对于一个ground truth,与其匹配的anchor数量可能不止一个,但是也可能一个也没有,此时所有anchor与ground truth的IoU均小于阈值,为了防止这种情况,对每个ground truth,与其IoU最大的anchor一定匹配到它(忽略阈值),这样就保证每个ground truth至少有一个anchor匹配到。SSD的匹配策略和Faster RCNN有些区别,Faster RCNN采用双阈值(0.7,0.3),处于中间阈值的anchor既不是正样本也不是负样本,训练过程不计算损失。但在实现上,SSD的匹配策略可以继承复用Faster RCNN的逻辑,具体实现如下所示:
# Faster RCNN和RetinaNet的匹配策略:
# 1. 计算所有gt和anchor的IoU
# 2. 对每个anchor,选择IoU值最大对应的gt
# 3. 若该IoU值大于高阈值,则匹配到对应的gt,若低于低阈值,则为负样本,处于两个阈值之间则忽略
# 4. 如果设定allow_low_quality_matches,那么对每个gt,与其IoU最大的anchor一定是正样本,但
# 这里将这个anchor分配给与其IoU最大的gt(而不一定是原始的那个gt)这里看起来有些奇怪,不过也合理。
class Matcher:
    """
    This class assigns to each predicted "element" (e.g., a box) a ground-truth
    element. Each predicted element will have exactly zero or one matches; each
    ground-truth element may be assigned to zero or more predicted elements.
    Matching is based on the MxN match_quality_matrix, that characterizes how well
    each (ground-truth, predicted)-pair match. For example, if the elements are
    boxes, the matrix may contain box IoU overlap values.
    The matcher returns a tensor of size N containing the index of the ground-truth
    element m that matches to prediction n. If there is no match, a negative value
    is returned.
    """

    BELOW_LOW_THRESHOLD = -1
    BETWEEN_THRESHOLDS = -2

    __annotations__ = {
        "BELOW_LOW_THRESHOLD": int,
        "BETWEEN_THRESHOLDS": int,
    }

    def __init__(self, high_threshold: float, low_threshold: float, allow_low_quality_matches: bool = False) -> None:
        """
        Args:
            high_threshold (float): quality values greater than or equal to
                this value are candidate matches.
            low_threshold (float): a lower quality threshold used to stratify
                matches into three levels:
                1) matches >= high_threshold
                2) BETWEEN_THRESHOLDS matches in [low_threshold, high_threshold)
                3) BELOW_LOW_THRESHOLD matches in [0, low_threshold)
            allow_low_quality_matches (bool): if True, produce additional matches
                for predictions that have only low-quality match candidates. See
                set_low_quality_matches_ for more details.
        """
        self.BELOW_LOW_THRESHOLD = -1
        self.BETWEEN_THRESHOLDS = -2
        assert low_threshold <= high_threshold
        self.high_threshold = high_threshold
        self.low_threshold = low_threshold
        self.allow_low_quality_matches = allow_low_quality_matches

    def __call__(self, match_quality_matrix: Tensor) -> Tensor:
        """
        Args:
            match_quality_matrix (Tensor[float]): an MxN tensor, containing the
            pairwise quality between M ground-truth elements and N predicted elements.
        Returns:
            matches (Tensor[int64]): an N tensor where N[i] is a matched gt in
            [0, M - 1] or a negative value indicating that prediction i could not
            be matched.
        """
        if match_quality_matrix.numel() == 0:
            # empty targets or proposals not supported during training
            if match_quality_matrix.shape[0] == 0:
                raise ValueError("No ground-truth boxes available for one of the images during training")
            else:
                raise ValueError("No proposal boxes available for one of the images during training")

        # 这里的match_quality_matrix为gt和anchor的IoU
        # match_quality_matrix is M (gt) x N (predicted)
        # Max over gt elements (dim 0) to find best gt candidate for each prediction
        # 对每个anchor,找到IoU最大对应的gt
        matched_vals, matches = match_quality_matrix.max(dim=0)
        if self.allow_low_quality_matches:
            all_matches = matches.clone()
        else:
            all_matches = None  # type: ignore[assignment]

        # 根据IoU判定它是正样本还是负样本,或者是忽略
        # Assign candidate matches with low quality to negative (unassigned) values
        below_low_threshold = matched_vals < self.low_threshold
        between_thresholds = (matched_vals >= self.low_threshold) & (matched_vals < self.high_threshold)
        matches[below_low_threshold] = self.BELOW_LOW_THRESHOLD
        matches[between_thresholds] = self.BETWEEN_THRESHOLDS

        if self.allow_low_quality_matches:
            assert all_matches is not None
            self.set_low_quality_matches_(matches, all_matches, match_quality_matrix)

        return matches

    def set_low_quality_matches_(self, matches: Tensor, all_matches: Tensor, match_quality_matrix: Tensor) -> None:
        """
        Produce additional matches for predictions that have only low-quality matches.
        Specifically, for each ground-truth find the set of predictions that have
        maximum overlap with it (including ties); for each prediction in that set, if
        it is unmatched, then match it to the ground-truth with which it has the highest
        quality value.
        """
        # For each gt, find the prediction with which it has highest quality
        highest_quality_foreach_gt, _ = match_quality_matrix.max(dim=1)
        # Find highest quality match available, even if it is low, including ties
        gt_pred_pairs_of_highest_quality = torch.where(match_quality_matrix == highest_quality_foreach_gt[:, None])
        # Example gt_pred_pairs_of_highest_quality:
        #   tensor([[    0, 39796],
        #           [    1, 32055],
        #           [    1, 32070],
        #           [    2, 39190],
        #           [    2, 40255],
        #           [    3, 40390],
        #           [    3, 41455],
        #           [    4, 45470],
        #           [    5, 45325],
        #           [    5, 46390]])
        # Each row is a (gt index, prediction index)
        # Note how gt items 1, 2, 3, and 5 each have two ties

        pred_inds_to_update = gt_pred_pairs_of_highest_quality[1]
        matches[pred_inds_to_update] = all_matches[pred_inds_to_update]


class SSDMatcher(Matcher):
    def __init__(self, threshold: float) -> None:
        # 这里高阈值和低阈值设定一样的值,此时就只有正样本和负样本
        super().__init__(threshold, threshold, allow_low_quality_matches=False)

    def __call__(self, match_quality_matrix: Tensor) -> Tensor:
        # 找到每个anchor对应IoU最大的gt
        matches = super().__call__(match_quality_matrix)

        # For each gt, find the prediction with which it has the highest quality
        # 找到每个gt对应IoU最大的anchor
        _, highest_quality_pred_foreach_gt = match_quality_matrix.max(dim=1)
        # 将这些anchor要匹配的gt改成对应的gt,而无论其IoU是多大
        matches[highest_quality_pred_foreach_gt] = torch.arange(
            highest_quality_pred_foreach_gt.size(0), dtype=torch.int64, device=highest_quality_pred_foreach_gt.device
        )

        return matches
基于IoU的匹配策略属于设定好的规则,它的好处是可以控制正样本的质量,但坏处是失去了灵活性。目前也有一些研究提出了动态的匹配策略,即基于模型预测的结果来进行匹配,而不是基于固定的规则,如DETR和YOLOX。
损失函数(Loss Function)
根据匹配策略可以确定每个anchor是正样本还是负样本,对于为正样本的anchor也确定其要预测的ground truth,那么就比较容易计算训练损失。SSD损失函数包括两个部分:分类损失和回归损失。SSD的分类采用的是softmax多分类,类别数量为要检测的类别加上一个背景类,对于正样本其分类的target就是匹配的ground truth的类别,而负样本其target为背景类。对于正样本,同时还要计算回归损失,这里采用的Smooth L1 loss。对于one-stage检测模型,一个比较头疼的问题是训练过程正样本严重不均衡,SSD采用hard negative mining来平衡正负样本(RetinaNet采用focal loss)。具体地,基于分类损失对负样本抽样,选择较大的top-k作为训练的负样本,以保证正负样本比例接近1:3。具体的代码实现如下所示:
    def compute_loss(
        self,
        targets: List[Dict[str, Tensor]],
        head_outputs: Dict[str, Tensor],
        anchors: List[Tensor],
        matched_idxs: List[Tensor],
    ) -> Dict[str, Tensor]:
        bbox_regression = head_outputs["bbox_regression"]
        cls_logits = head_outputs["cls_logits"]

        # Match original targets with default boxes
        num_foreground = 0
        bbox_loss = []
        cls_targets = []
        for (
            targets_per_image,
            bbox_regression_per_image,
            cls_logits_per_image,
            anchors_per_image,
            matched_idxs_per_image,
        ) in zip(targets, bbox_regression, cls_logits, anchors, matched_idxs):
            # 确定正样本
            foreground_idxs_per_image = torch.where(matched_idxs_per_image >= 0)[0]
            foreground_matched_idxs_per_image = matched_idxs_per_image[foreground_idxs_per_image]
            num_foreground += foreground_matched_idxs_per_image.numel()

            # 计算回归损失
            matched_gt_boxes_per_image = targets_per_image["boxes"][foreground_matched_idxs_per_image]
            bbox_regression_per_image = bbox_regression_per_image[foreground_idxs_per_image, :]
            anchors_per_image = anchors_per_image[foreground_idxs_per_image, :]
            target_regression = self.box_coder.encode_single(matched_gt_boxes_per_image, anchors_per_image)
            bbox_loss.append(
                torch.nn.functional.smooth_l1_loss(bbox_regression_per_image, target_regression, reduction="sum")
            )

            # Estimate ground truth for class targets
            gt_classes_target = torch.zeros(
                (cls_logits_per_image.size(0),),
                dtype=targets_per_image["labels"].dtype,
                device=targets_per_image["labels"].device,
            )
            gt_classes_target[foreground_idxs_per_image] = targets_per_image["labels"][
                foreground_matched_idxs_per_image
            ]
            cls_targets.append(gt_classes_target)

        bbox_loss = torch.stack(bbox_loss)
        cls_targets = torch.stack(cls_targets)

        # 计算分类损失
        num_classes = cls_logits.size(-1)
        cls_loss = F.cross_entropy(cls_logits.view(-1, num_classes), cls_targets.view(-1), reduction="none").view(
            cls_targets.size()
        )

        # Hard Negative Sampling,这里针对每个样本,而不是整个batch
        foreground_idxs = cls_targets > 0
        num_negative = self.neg_to_pos_ratio * foreground_idxs.sum(1, keepdim=True) # 确定负样本抽样数
        negative_loss = cls_loss.clone()
        negative_loss[foreground_idxs] = -float("inf")  # use -inf to detect positive values that creeped in the sample
        # 对负样本按照损失降序排列
        values, idx = negative_loss.sort(1, descending=True)
        # 选择topk
        background_idxs = idx.sort(1)[1] < num_negative

        N = max(1, num_foreground) # 正样本数量
        return {
            "bbox_regression": bbox_loss.sum() / N,
            "classification": (cls_loss[foreground_idxs].sum() + cls_loss[background_idxs].sum()) / N,
        }
数据增强(Data Augmentation)
SSD采用了比较strong的数据增强,其中包括:水平翻转(horizontal flip),颜色扭曲(color distortion),随机裁剪(rand crop)和缩小物体(zoom out)。
transforms = T.Compose(
                [
                    T.RandomPhotometricDistort(), # 颜色扭曲
                    T.RandomZoomOut(fill=list(mean)), # 随机缩小
                    T.RandomIoUCrop(), # 随机裁剪
                    T.RandomHorizontalFlip(p=hflip_prob), # 水平翻转
                    T.PILToTensor(),
                    T.ConvertImageDtype(torch.float),
                ]
            )
前面两个数据增强比较理解和实现,这里主要来讲述一下后面两种操作。首先是rand crop,SSD的rand crop是随机从图像中crop一块区域,这里会限定区域的scale(相对于原图)和aspect ratio范围,对于标注框,只有当box的中心点落在crop的区域中才保留这个box;同时也设定了一个IoU阈值,只有存在与crop区域的IoU大于阈值的box时,crop出的区域才是有效的。这个增强比较复杂,从代码实现更容易理解:
class RandomIoUCrop(nn.Module):
    def __init__(
        self,
        min_scale: float = 0.3,
        max_scale: float = 1.0,
        min_aspect_ratio: float = 0.5,
        max_aspect_ratio: float = 2.0,
        sampler_options: Optional[List[float]] = None,
        trials: int = 40,
    ):
        super().__init__()
        # Configuration similar to https://github.com/weiliu89/caffe/blob/ssd/examples/ssd/ssd_coco.py#L89-L174
        self.min_scale = min_scale
        self.max_scale = max_scale
        self.min_aspect_ratio = min_aspect_ratio
        self.max_aspect_ratio = max_aspect_ratio
        if sampler_options is None:
            sampler_options = [0.0, 0.1, 0.3, 0.5, 0.7, 0.9, 1.0]
        self.options = sampler_options
        self.trials = trials

    def forward(
        self, image: Tensor, target: Optional[Dict[str, Tensor]] = None
    ) -> Tuple[Tensor, Optional[Dict[str, Tensor]]]:
        if target is None:
            raise ValueError("The targets can't be None for this transform.")

        if isinstance(image, torch.Tensor):
            if image.ndimension() not in {2, 3}:
                raise ValueError(f"image should be 2/3 dimensional. Got {image.ndimension()} dimensions.")
            elif image.ndimension() == 2:
                image = image.unsqueeze(0)

        orig_w, orig_h = F.get_image_size(image)

        while True:
            # sample an option 随机选择一个IoU阈值
            idx = int(torch.randint(low=0, high=len(self.options), size=(1,)))
            min_jaccard_overlap = self.options[idx]
            if min_jaccard_overlap >= 1.0:  # a value larger than 1 encodes the leave as-is option
                return image, target

            # 由于crop存在限制,所以进行多次尝试
            for _ in range(self.trials):
                # check the aspect ratio limitations
                # 随机选择w和h的scale
                r = self.min_scale + (self.max_scale - self.min_scale) * torch.rand(2)
                new_w = int(orig_w * r[0])
                new_h = int(orig_h * r[1])
                aspect_ratio = new_w / new_h
                # check此时的aspect ratio是否在限制范围内,否则无效
                if not (self.min_aspect_ratio <= aspect_ratio <= self.max_aspect_ratio):
                    continue

                # check for 0 area crops
                # 随机产生crop区域的左上起点,并check区域大小是否为0
                r = torch.rand(2)
                left = int((orig_w - new_w) * r[0])
                top = int((orig_h - new_h) * r[1])
                right = left + new_w
                bottom = top + new_h
                if left == right or top == bottom:
                    continue

                # check for any valid boxes with centers within the crop area
                # 确定有效的标注box:中心点落在区域内
                cx = 0.5 * (target["boxes"][:, 0] + target["boxes"][:, 2])
                cy = 0.5 * (target["boxes"][:, 1] + target["boxes"][:, 3])
                is_within_crop_area = (left < cx) & (cx < right) & (top < cy) & (cy < bottom)
                if not is_within_crop_area.any():
                    continue

                # check at least 1 box with jaccard limitations
                # 检查是否存在box和区域的IoU大于阈值
                boxes = target["boxes"][is_within_crop_area]
                ious = torchvision.ops.boxes.box_iou(
                    boxes, torch.tensor([[left, top, right, bottom]], dtype=boxes.dtype, device=boxes.device)
                )
                if ious.max() < min_jaccard_overlap:
                    continue

                # keep only valid boxes and perform cropping
                # 保留有效的boxes,并进行clip
                target["boxes"] = boxes
                target["labels"] = target["labels"][is_within_crop_area]
                target["boxes"][:, 0::2] -= left
                target["boxes"][:, 1::2] -= top
                target["boxes"][:, 0::2].clamp_(min=0, max=new_w)
                target["boxes"][:, 1::2].clamp_(min=0, max=new_h)
                image = F.crop(image, top, left, new_h, new_w)

                return image, target
这个操作在TensorFlow中也有类似的实现,具体见tf.image.sample_distorted_bounding_box。随机裁剪也相当于对物体进行了放大(zoom in):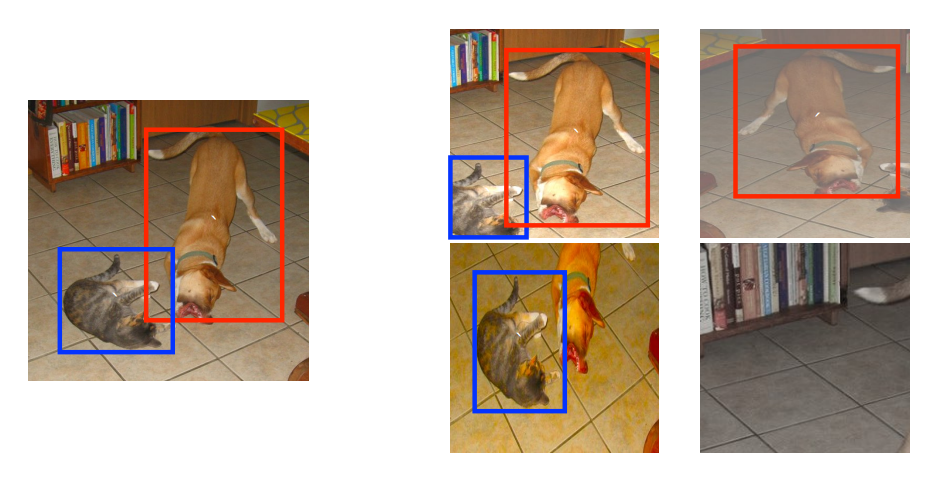 zoom out就是缩小物体,这样就相当于增加了很多包含小物体的训练样本,我们可以通过产生一个较大的画布,然后将图像随机放置在里面,具体的实现如下:
class RandomZoomOut(nn.Module):
    def __init__(
        self, fill: Optional[List[float]] = None, side_range: Tuple[float, float] = (1.0, 4.0), p: float = 0.5
    ):
        super().__init__()
        if fill is None:
            fill = [0.0, 0.0, 0.0]
        self.fill = fill
        self.side_range = side_range
        if side_range[0] < 1.0 or side_range[0] > side_range[1]:
            raise ValueError(f"Invalid canvas side range provided {side_range}.")
        self.p = p

    @torch.jit.unused
    def _get_fill_value(self, is_pil):
        # type: (bool) -> int
        # We fake the type to make it work on JIT
        return tuple(int(x) for x in self.fill) if is_pil else 0

    def forward(
        self, image: Tensor, target: Optional[Dict[str, Tensor]] = None
    ) -> Tuple[Tensor, Optional[Dict[str, Tensor]]]:
        if isinstance(image, torch.Tensor):
            if image.ndimension() not in {2, 3}:
                raise ValueError(f"image should be 2/3 dimensional. Got {image.ndimension()} dimensions.")
            elif image.ndimension() == 2:
                image = image.unsqueeze(0)

        if torch.rand(1) < self.p:
            return image, target

        orig_w, orig_h = F.get_image_size(image)

        # 随机确定画布的大小
        r = self.side_range[0] + torch.rand(1) * (self.side_range[1] - self.side_range[0])
        canvas_width = int(orig_w * r)
        canvas_height = int(orig_h * r)

        # 随机选择图像在画布中的左上点
        r = torch.rand(2)
        left = int((canvas_width - orig_w) * r[0])
        top = int((canvas_height - orig_h) * r[1])
        right = canvas_width - (left + orig_w)
        bottom = canvas_height - (top + orig_h)

        if torch.jit.is_scripting():
            fill = 0
        else:
            fill = self._get_fill_value(F._is_pil_image(image))

        # 对图像padding至画布大小
        image = F.pad(image, [left, top, right, bottom], fill=fill)

        # 转换boxes
        if target is not None:
            target["boxes"][:, 0::2] += left
            target["boxes"][:, 1::2] += top

        return image, target
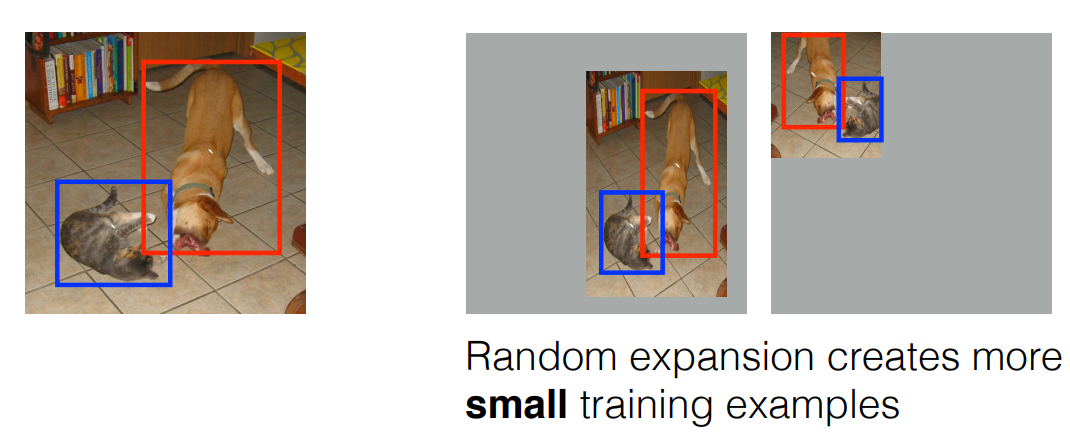 这些数据增强可以大大扩增训练样本,产生了不同尺度的物体,这对于SSD提升检测性能是比较关键的。
训练(Train)
torchvision官方也给出了复现SSD的训练超参,具体设置如下所示:
python -m torch.distributed.launch --nproc_per_node=8 --use_env train.py\
    --dataset coco --model ssd300_vgg16 --epochs 120\
    --lr-steps 80 110 --aspect-ratio-group-factor 3 --lr 0.002 --batch-size 4\
    --weight-decay 0.0005 --data-augmentation ssd
由于采用较strong的数据增强,SSD需要较长的训练时长:120 epochs(相比之下,其它检测器如Faster RCNN和RetinaNet往往只用12 epoch和36 epoch)。对于训练参数,感兴趣的也可以对比一下mmdet的训练设置训练设置。此外,torchvision官方也给出了他们在复现SSD时不同优化对性能的提升对比(具体见Everything You Need To Know About Torchvision's SSD Implementation),如下图所示,这里的weight init和input scaling指的是采用caffe版本VGG16的weights和归一化方式。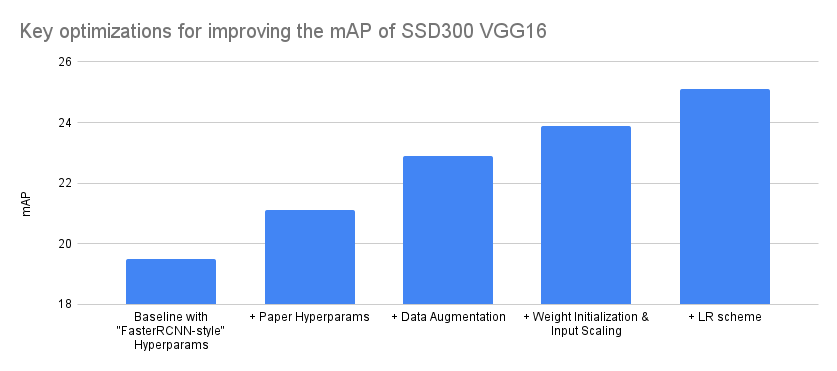
推理过程(Inference)
SSD的推理过程比较简单:首先根据分类预测概率和阈值过滤掉低置信度预测框;然后每个类别选择top K个预测框;最后通过NMS去除重复框。整个实现代码如下所示:
    def postprocess_detections(
        self, head_outputs: Dict[str, Tensor], image_anchors: List[Tensor], image_shapes: List[Tuple[int, int]]
    ) -> List[Dict[str, Tensor]]:
        bbox_regression = head_outputs["bbox_regression"]
        pred_scores = F.softmax(head_outputs["cls_logits"], dim=-1)

        num_classes = pred_scores.size(-1)
        device = pred_scores.device

        detections: List[Dict[str, Tensor]] = []

        for boxes, scores, anchors, image_shape in zip(bbox_regression, pred_scores, image_anchors, image_shapes):
            boxes = self.box_coder.decode_single(boxes, anchors) # 解码得到预测框
            boxes = box_ops.clip_boxes_to_image(boxes, image_shape) # clip box

            image_boxes = []
            image_scores = []
            image_labels = []
            # 针对每个类别:过滤低置信度预测框,并选择topK
            for label in range(1, num_classes):
                score = scores[:, label]

                keep_idxs = score > self.score_thresh
                score = score[keep_idxs]
                box = boxes[keep_idxs]

                # keep only topk scoring predictions
                num_topk = min(self.topk_candidates, score.size(0))
                score, idxs = score.topk(num_topk)
                box = box[idxs]

                image_boxes.append(box)
                image_scores.append(score)
                image_labels.append(torch.full_like(score, fill_value=label, dtype=torch.int64, device=device))

            image_boxes = torch.cat(image_boxes, dim=0)
            image_scores = torch.cat(image_scores, dim=0)
            image_labels = torch.cat(image_labels, dim=0)

            # non-maximum suppression:去除重复框
            keep = box_ops.batched_nms(image_boxes, image_scores, image_labels, self.nms_thresh)
            keep = keep[: self.detections_per_img]

            detections.append(
                {
                    "boxes": image_boxes[keep],
                    "scores": image_scores[keep],
                    "labels": image_labels[keep],
                }
            )
        return detections
SSDLite
SSDLite是谷歌在MobileNetv2中设计的一种轻量级SSD,与原来的SSD相比,SSDLite的特征提取器从VGG16换成了MobileNetv2(或者新的MobileNetV3),另外额外增加的预测分支和检测头都采用了深度可分类卷积(depthwise 3x3 conv+1x1 conv),这样网络的参数量和计算量大大降低。目前torchvision中也已经实现了SSDLite,并且复现了基于MobileNetV3-Large的SSDLite(mAP为21.3,和论文的22.0基本一致)。这里讲述一下具体的实现细节。对于MobileNet特征提取器,和VGG16类似,也是从MobileNet的主体先提取两个尺度的特征:1/16特征和1/32特征。对于1/32特征就是global avg pooling前的特征(即pooling前的最后一个卷积层输出);而1/16特征则应该从最后一个stride=2的block前提取特征,这里的block指的是MobileNetV2中提出的inverted residual block,它包括1x1 conv+depthwise 3x3 conv+1x1 conv,第一个1x1卷积一般称为expansion layer ,而最后一个1x1卷积一般称为projection layer,对于stride=2的block其stride是放在中间的depthwise 3x3 conv上的,所以最深的1/16特征就应该是最后一个stride=2的block中的expansion layer的输出。然后额外增加4个预测分支,最后和SSD一样提取6种不同scale的特征来进行检测,这里额外增加的分支也采用深度可分离卷积(实际是1x1 conv+depthwise 3x3 conv + 1x1 conv)。具体的代码实现如下所示:
# 额外增加的预测分支采用1x1 conv+depthwise 3x3 s2 conv + 1x1 conv
def _extra_block(in_channels: int, out_channels: int, norm_layer: Callable[..., nn.Module]) -> nn.Sequential:
    activation = nn.ReLU6
    intermediate_channels = out_channels // 2
    return nn.Sequential(
        # 1x1 projection to half output channels
        ConvNormActivation(
            in_channels, intermediate_channels, kernel_size=1, norm_layer=norm_layer, activation_layer=activation
        ),
        # 3x3 depthwise with stride 2 and padding 1
        ConvNormActivation(
            intermediate_channels,
            intermediate_channels,
            kernel_size=3,
            stride=2,
            groups=intermediate_channels,
            norm_layer=norm_layer,
            activation_layer=activation,
        ),
        # 1x1 projetion to output channels
        ConvNormActivation(
            intermediate_channels, out_channels, kernel_size=1, norm_layer=norm_layer, activation_layer=activation
        ),
    )

class SSDLiteFeatureExtractorMobileNet(nn.Module):
    def __init__(
        self,
        backbone: nn.Module,
        c4_pos: int,
        norm_layer: Callable[..., nn.Module],
        width_mult: float = 1.0,
        min_depth: int = 16,
    ):
        super().__init__()
        _log_api_usage_once(self)

        assert not backbone[c4_pos].use_res_connect
        self.features = nn.Sequential(
            # As described in section 6.3 of MobileNetV3 paper
            nn.Sequential(*backbone[:c4_pos], backbone[c4_pos].block[0]),  # 最后一个s=2的block前的模块+它的expansion layer
            nn.Sequential(backbone[c4_pos].block[1:], *backbone[c4_pos + 1 :]),  # 剩余的模块直至pooling前的卷积
        )

        # 额外增加的4个预测分支
        get_depth = lambda d: max(min_depth, int(d * width_mult))  # noqa: E731
        extra = nn.ModuleList(
            [
                _extra_block(backbone[-1].out_channels, get_depth(512), norm_layer),
                _extra_block(get_depth(512), get_depth(256), norm_layer),
                _extra_block(get_depth(256), get_depth(256), norm_layer),
                _extra_block(get_depth(256), get_depth(128), norm_layer),
            ]
        )
        _normal_init(extra)

        self.extra = extra

    def forward(self, x: Tensor) -> Dict[str, Tensor]:
        # Get feature maps from backbone and extra. Can't be refactored due to JIT limitations.
        output = []
        for block in self.features:
            x = block(x)
            output.append(x)

        for block in self.extra:
            x = block(x)
            output.append(x)

        return OrderedDict([(str(i), v) for i, v in enumerate(output)])
对于检测头,同样也采用深度可分离卷积,具体的实现如下所示:
# Building blocks of SSDlite as described in section 6.2 of MobileNetV2 paper
def _prediction_block(
    in_channels: int, out_channels: int, kernel_size: int, norm_layer: Callable[..., nn.Module]
) -> nn.Sequential:
    return nn.Sequential(
        # 3x3 depthwise with stride 1 and padding 1
        ConvNormActivation(
            in_channels,
            in_channels,
            kernel_size=kernel_size,
            groups=in_channels,
            norm_layer=norm_layer,
            activation_layer=nn.ReLU6,
        ),
        # 1x1 projetion to output channels
        nn.Conv2d(in_channels, out_channels, 1),
    )

class SSDLiteClassificationHead(SSDScoringHead):
    def __init__(
        self, in_channels: List[int], num_anchors: List[int], num_classes: int, norm_layer: Callable[..., nn.Module]
    ):
        cls_logits = nn.ModuleList()
        for channels, anchors in zip(in_channels, num_anchors):
            cls_logits.append(_prediction_block(channels, num_classes * anchors, 3, norm_layer))
        _normal_init(cls_logits)
        super().__init__(cls_logits, num_classes)


class SSDLiteRegressionHead(SSDScoringHead):
    def __init__(self, in_channels: List[int], num_anchors: List[int], norm_layer: Callable[..., nn.Module]):
        bbox_reg = nn.ModuleList()
        for channels, anchors in zip(in_channels, num_anchors):
            bbox_reg.append(_prediction_block(channels, 4 * anchors, 3, norm_layer))
        _normal_init(bbox_reg)
        super().__init__(bbox_reg, 4)
对于特征提取器,一个额外的细节是谷歌在MobileNetV3中提出进一步对MobileNetV3的C4-C5之间模块的channel进行降维(减少为原来的一半),这里的C4-C5模块指的是最后一个stride=2的block之后的模块,torchvision的实现中有一个bool类型的reduce_tail参数来控制这种行为。对于SSDLite,其输入图像尺寸为320x320,它采用的先验框也和SSD有略微的区别,6个尺度的特征均采用6个先验框(scale用线性规则产生),具体的设置如下所示:
# 2个默认先验框+4个aspect ratio=[2, 1/2, 3, 1/3]的先验框
anchor_generator = DefaultBoxGenerator([[2, 3] for _ in range(6)], min_ratio=0.2, max_ratio=0.95)
由于SSDLite相比SSD,参数量更小,为了防止训练过程出现欠拟合,所以数据增强策略也更简化一些(去掉了颜色抖动和zoom out,对于参数量较小的模型,往往建议采用轻量级的数据增强,YOLOX也是这样处理的):
transforms = T.Compose(
                [
                    T.RandomIoUCrop(),
                    T.RandomHorizontalFlip(p=hflip_prob),
                    T.PILToTensor(),
                    T.ConvertImageDtype(torch.float),
                ]
            )
torchvision官方也在博客Everything You Need To Know About Torchvision's SSDlite Implementation中给出了他们在复现SSDLite的细节,这里也给出不同的优化对模型性能提升的影响: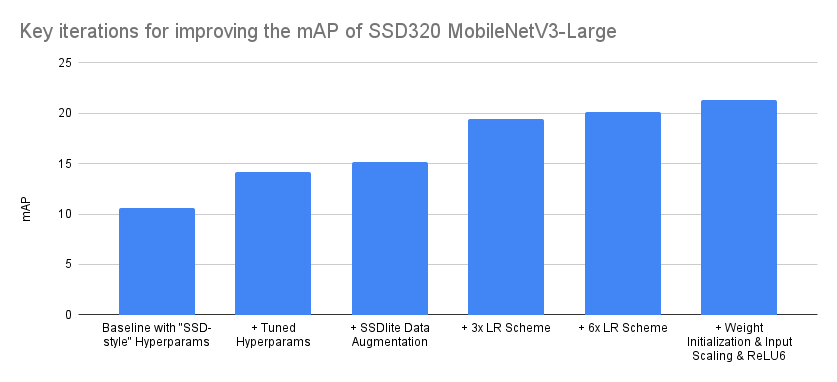 SSDLite的训练参数也和SSD有略微的区别,这里训练时长更长(长达660 epoch):
torchrun --nproc_per_node=8 train.py\
    --dataset coco --model ssdlite320_mobilenet_v3_large --epochs 660\
    --aspect-ratio-group-factor 3 --lr-scheduler cosineannealinglr --lr 0.15 --batch-size 24\
    --weight-decay 0.00004 --data-augmentation ssdlite
这里要说明的一点是,谷歌在TensorFlow Object Detection开源的SSDLite实现中,其分类分支采用的是RetinaNet的focal loss,而不是原来SSD的negative hard mining + softmax loss,如果你认真看model zoo,也会发现这里SSD ResNet50 FPN和RetinaNet50是一样的叫法和实现。
最后,这里也整理了一个比较clean且完整的SSD实现:https://github.com/xiaohu2015/ssd_pytorch。
参考
SSD: Single Shot MultiBox Detector SSD Slide Everything You Need To Know About Torchvision's SSD Implementation Everything You Need To Know About Torchvision's SSDlite Implementation MobileNetV2: Inverted Residuals and Linear Bottlenecks Searching for MobileNetV3
推荐阅读
PyTorch1.10发布:ZeroRedundancyOptimizer和Join
谷歌AI用30亿数据训练了一个20亿参数Vision Transformer模型,在ImageNet上达到新的SOTA!
"未来"的经典之作ViT:transformer is all you need!
PVT:可用于密集任务backbone的金字塔视觉transformer!
涨点神器FixRes:两次超越ImageNet数据集上的SOTA
不妨试试MoCo,来替换ImageNet上pretrain模型!
机器学习算法工程师
一个用心的公众号

