SwaggerUI看烦了,这个工具帮你换个新皮肤
背景
好像是上周四,看到微信群有人说java有轮子swagger-bootstrap-ui,而c#,就是找不到。
于是我一看,就说大话:“这个只是一套UI,他这个有开源地址么”
被@at说:你试试...
当天晚上就把swagger-ui, Knife4j,Swashbuckle.AspNetCore项目的源码都下载下来研究下,看看能不能集成到AspNETCore下,这样我们就能给Swagger UI换套新皮肤。
knife4j
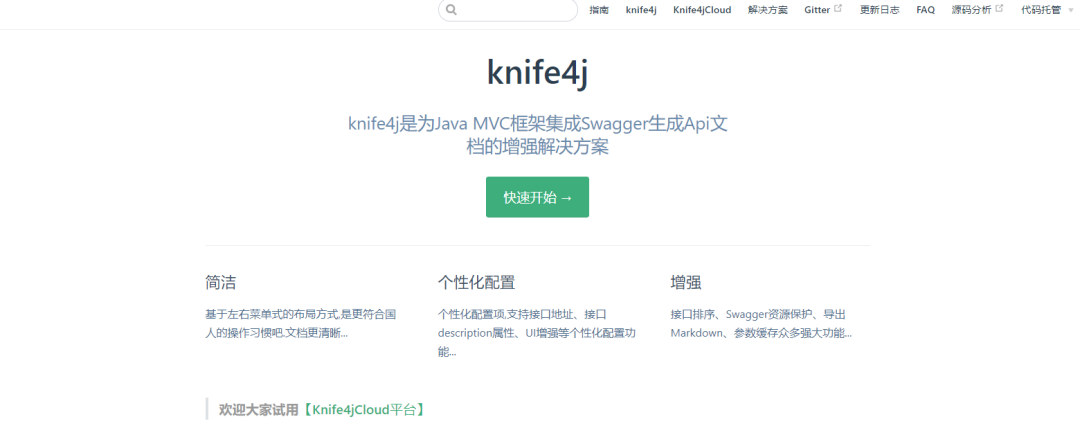
knife4j 是swagger-bootstrap-ui库的升级版,作者已全面升级,全部以knife4j命名。
Gitee上也有2.8K

效果图 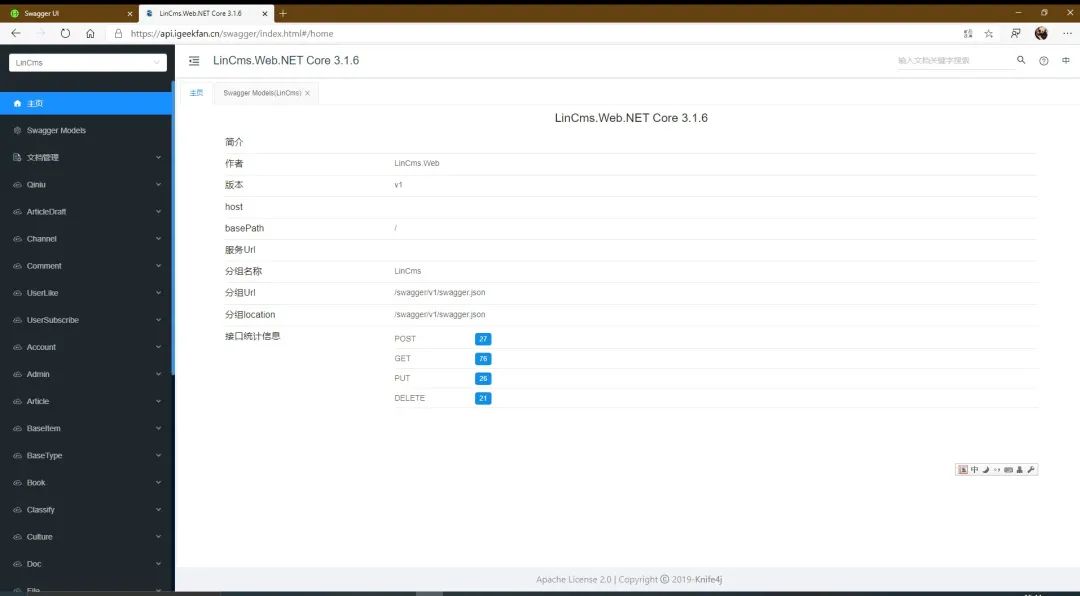
IGeekFan.AspNetCore.Knife4jUI
他是swagger ui 库:knife4j UI 的.NET Core封装,支持 .NET Core3.0+或.NET Standard2.0。
https://github.com/luoyunchong/IGeekFan.AspNetCore.Knife4jUI
概念对应关系如下
| 功能 | c# | java |
|---|---|---|
| 实现swagger规范 | Swashbuckle.AspNetCore | spring-fox |
| 封装成nuget包/maven包的UI库 | Swashbuckle.AspNetCore.SwaggerUI | knife4j-v3-spring-ui |
| UI库 | swagger-ui-dist | knife4j-vue-v3(swagger v3版本) |
注意
swagger v2和v3版本不一样,我只实现了swagger v3版本的封装。
源码下载
https://gitee.com/xiaoym/knife4j https://github.com/domaindrivendev/Swashbuckle.AspNetCore
Swashbuckle.AspNetCore.SwaggerUI源码分析。
通过中间件SwaggerUI中间件Middleware,Invoke方法中,替换了Index.html中的%(DocumentTitle) %(HeadContent),%(ConfigObject)等等 。
private readonly SwaggerUIOptions _options;
//xxx

public async Task Invoke(HttpContext httpContext)
{
//xxx
    if (httpMethod == "GET" && Regex.IsMatch(path, $"^/{Regex.Escape(_options.RoutePrefix)}/?index.html$"))
    {
        await RespondWithIndexHtml(httpContext.Response);
        return;
    }
//xxx
  }

private async Task RespondWithIndexHtml(HttpResponse response)
{
    response.StatusCode = 200;
    response.ContentType = "text/html;charset=utf-8";

    using (var stream = _options.IndexStream())
    {
        // Inject arguments before writing to response
        var htmlBuilder = new StringBuilder(new StreamReader(stream).ReadToEnd());
        foreach (var entry in GetIndexArguments())
        {
            htmlBuilder.Replace(entry.Key, entry.Value);
        }

        await response.WriteAsync(htmlBuilder.ToString(), Encoding.UTF8);
    }
}

private IDictionary GetIndexArguments()
{
    return new Dictionary()
    {
        { "%(DocumentTitle)", _options.DocumentTitle },
        { "%(HeadContent)", _options.HeadContent },
        { "%(ConfigObject)", JsonSerializer.Serialize(_options.ConfigObject, _jsonSerializerOptions) },
        { "%(OAuthConfigObject)", JsonSerializer.Serialize(_options.OAuthConfigObject, _jsonSerializerOptions) }
    };
}
在index.html中。
%(DocumentTitle)
var configObject = JSON.parse('%(ConfigObject)');
var oauthConfigObject = JSON.parse('%(OAuthConfigObject)');
当我们写的aspnetcore项目集成swagger组件后,只会有一个ajax的异步请求
knife4j-v3-spring-ui
效果(2.X版):http://knife4j.xiaominfo.com/doc.html
由于官方也没有v3的demo,我们可以暂时通过v2分析,发现他有3个异步请求,有一个请求返回相似的。另一个则是swagger的配置项,可以发现,返回值与SwaggerUIOptions一致。
| 功能 | c# (swagger v3) | java(swagger v2) |
|---|---|---|
| 获取分组配置 | 无 | /swagger-resources |
| swagger配置项 | 无 | /swagger-resources/configuration/ui |
| api文档 | https://api.igeekfan.cn/swagger/v1/swagger.json | /v2/api-docs?group=2.X版本 |
结构如下。
版本分组配置 http://knife4j.xiaominfo.com/swagger-resources
[
    {
        "name":"2.X版本",
        "url":"/v2/api-docs?group=2.X版本",
        "swaggerVersion":"2.0",
        "location":"/v2/api-docs?group=2.X版本"
    },
    {
        "name":"分组接口",
        "url":"/v2/api-docs?group=分组接口",
        "swaggerVersion":"2.0",
        "location":"/v2/api-docs?group=分组接口"
    },
    {
        "name":"默认接口",
        "url":"/v2/api-docs?group=默认接口",
        "swaggerVersion":"2.0",
        "location":"/v2/api-docs?group=默认接口"
    }
]
swagger 配置项 http://knife4j.xiaominfo.com/swagger-resources/configuration/ui 请求方法: GET
{
    "deepLinking":true,
    "displayOperationId":false,
    "defaultModelsExpandDepth":1,
    "defaultModelExpandDepth":1,
    "defaultModelRendering":"example",
    "displayRequestDuration":false,
    "docExpansion":"none",
    "filter":false,
    "operationsSorter":"alpha",
    "showExtensions":false,
    "tagsSorter":"alpha",
    "validatorUrl":"",
    "apisSorter":"alpha",
    "jsonEditor":false,
    "showRequestHeaders":false,
    "supportedSubmitMethods":[
        "get",
        "put",
        "post",
        "delete",
        "options",
        "head",
        "patch",
        "trace"
    ]
}
api 文档 http://knife4j.xiaominfo.com/v2/api-docs?group=2.X%E7%89%88%E6%9C%AC
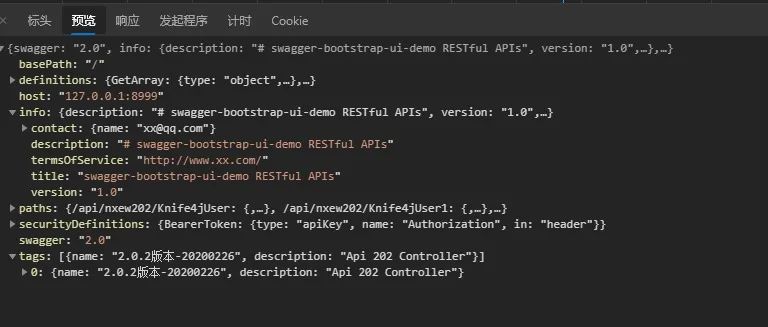
接下来我们看下knife4j,可以看到,他有knife4j-vue-v3项目,这个是swagger v3版本的vue实现。
我们打开knife4j-vue-v3项目,修改配置项vue.config.js,devServer 反向代理的地址(后台地址)
proxy: {
  "/": {
    target: 'http://localhost:5000/',
    ws: true,
    changeOrigin: true
  }
}
安装依赖,并运行他
yarn install
yarn serve
我们会看到一个请求错误。Knife4j文档请求异常,因为后台并没有:'/v3/api-docs/swagger-config'。
也就是上文中的/swagger-resources/configuration/ui,我们可以在SwaggerUIMiddleware中间件获取这些参数,原本是通过替换字符串,现在,我们可以写一个api。怎么写呢。
下载Swashbuckle.AspNetCore的源码,打开Swashbuckle.AspNetCore.sln。
我们尝试修改Swashbuckle.AspNetCore.SwaggerUI项目中,SwaggerUIMiddleware中的源码。
Invoke方法增加如下处理,将配置项直接返回json串。
if (httpMethod == "GET" && Regex.IsMatch(path, $"^/v3/api-docs/swagger-config$"))
{
     await httpContext.Response.WriteAsync(JsonSerializer.Serialize(_options.ConfigObject, _jsonSerializerOptions));
    return;
}
在swagger v3 版本中,/v3/api-docs/swagger-config,返回了分组信息,urls字段。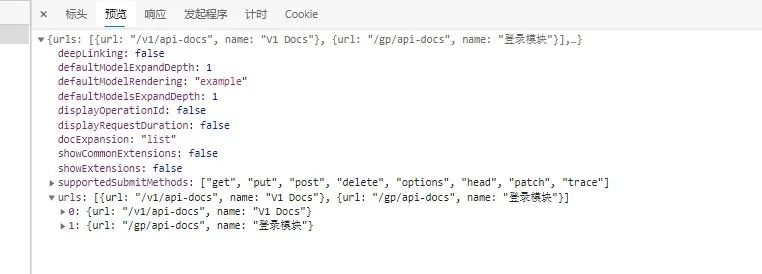
效果如下
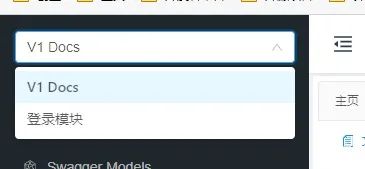
设置test/WebSites/Basic项目为启动项目,运行后,打开了http://localhost:5000/index.html,这个还是原本的swagger ui,我们打开http://localhost:8080/#/home,前台依旧提示有问题。
AddSwaggerGen 需要增加Server,前台判断有BUG,非空。

servers.length得到的是0,问号表达式就会执行后面的servers[0].url,

临时方案
services.AddSwaggerGen(c =>
{

    c.AddServer(new OpenApiServer()
    {
        Url = "",
        Description = "v1"
    });
});
但还有一个问题,前台根据operationId生成的路由, [HttpPost(Name = "CreateProduct")]比如CreateProduct。有些没有设置 Name的,点击后就会出现空白界面。
增加CustomOperationIds的配置,通过反射获取方法名。
services.AddSwaggerGen(c =>
{
    //xx
     c.CustomOperationIds(apiDesc =>
    {
        return apiDesc.TryGetMethodInfo(out MethodInfo methodInfo) ? methodInfo.Name : null;
    });
});
解决了这些问题。
我们创建一个新类库,起名IGeekFan.AspNetCore.Knife4jUI
将前端打包。修改打包文件配置,vue.config.js
assetsDir: "knife4j",
indexPath: "index.html"
打包
yarn run build
复制到根目录,设置为嵌入文件,删除不需要的images和txt文本。
 "knife4j/**/*" />
 "favicon.ico" />
 "index.html" />
将后台Swashbuckle.AspNetCore.SwaggerUI的代码复制过来,全部重命名。比如中间件名字为
SwaggerUIMiddleware -> Knife4jUIMiddleware。即SwaggerUI都改成Knife4jUI。
Knife4jUIMiddleware修改位置
private const string EmbeddedFileNamespace = "IGeekFan.AspNetCore.Knife4jUI";
删除无用的替换变量,增加
Knife4UIOptions 修改
public Func IndexStream { get; set; } = () => typeof(Knife4UIOptions).GetTypeInfo().Assembly
            .GetManifestResourceStream("IGeekFan.AspNetCore.Knife4jUI.index.html");
Startup 中的Configure中间件
将UseSwaggerUI()改成UseKnife4UI()
app.UseKnife4UI(c =>
{
    c.RoutePrefix = ""; // serve the UI at root
    c.SwaggerEndpoint("/v1/api-docs", "V1 Docs");
    c.SwaggerEndpoint("/gp/api-docs", "登录模块");
});
不用IGeekFan.AspNetCore.Knife4jUI也能实现?
当然,可以。
我们也能通过其他方式,在SwaggerUI的基础上,替换比如替换Index.html页面,自己打包前端UI,复制到项目中等。
将knife4j-vue-v3项目打包,放到wwwwroot目录中。
需要配置静态文件。
app.UseStaticFiles();
app.UseSwaggerUI(c =>
{
        c.RoutePrefix = ""; // serve the UI at root
        c.SwaggerEndpoint("/v1/api-docs", "V1 Docs");//这个配置无效。
        c.IndexStream = () => new PhysicalFileProvider(Path.Combine(Directory.GetCurrentDirectory(), "wwwroot")).GetFileInfo("index.html").CreateReadStream();
});
重写/v3/api-docs/swagger-config路由
app.UseEndpoints(endpoints =>
{
    endpoints.MapControllers();
    endpoints.MapSwagger("{documentName}/api-docs");
    endpoints.MapGet("/v3/api-docs/swagger-config", async (httpContext) =>
    {

        JsonSerializerOptions _jsonSerializerOptions = new JsonSerializerOptions();
        _jsonSerializerOptions.PropertyNamingPolicy = JsonNamingPolicy.CamelCase;
        _jsonSerializerOptions.IgnoreNullValues = true;
        _jsonSerializerOptions.Converters.Add(new JsonStringEnumConverter(JsonNamingPolicy.CamelCase, false));

        SwaggerUIOptions _options = new SwaggerUIOptions()
        {
            ConfigObject = new ConfigObject()
            {
                Urls = new List
                {
                    new UrlDescriptor()
                    {
                        Url="/v1/api-docs",
                        Name="V1 Docs"
                    }
                }
            }
        };

        await httpContext.Response.WriteAsync(JsonSerializer.Serialize(_options.ConfigObject, _jsonSerializerOptions));
    });
});
IGeekFan.AspNetCore.Knife4jUI指南
相关依赖项
knife4j
knife4j-vue-v3(不是vue3,而是swagger-ui-v3版本)
Swashbuckle.AspNetCore
Swashbuckle.AspNetCore.Swagger Swashbuckle.AspNetCore.SwaggerGen
Demo
Basic Knife4jUIDemo
? 快速开始
?安装包
1.Install the standard Nuget package into your ASP.NET Core application.
Package Manager : Install-Package IGeekFan.AspNetCore.Knife4jUI
CLI : dotnet add package IGeekFan.AspNetCore.Knife4jUI
2.In the ConfigureServices method of Startup.cs, register the Swagger generator, defining one or more Swagger documents.
using System.Reflection;
using Microsoft.OpenApi.Models;
using Swashbuckle.AspNetCore.SwaggerGen;
using IGeekFan.AspNetCore.Knife4jUI;
? ConfigureServices
3.服务配置,CustomOperationIds和AddServer是必须的。
   services.AddSwaggerGen(c =>
    {
        c.SwaggerDoc("v1",new OpenApiInfo{Title = "API V1",Version = "v1"});
        c.AddServer(new OpenApiServer()
        {
            Url = "",
            Description = "vvv"
        });
        c.CustomOperationIds(apiDesc =>
        {
            return apiDesc.TryGetMethodInfo(out MethodInfo methodInfo) ? methodInfo.Name : null;
        });
    });
? Configure
中间件配置
app.UseSwagger();

app.UseKnife4UI(c =>
{
    c.RoutePrefix = ""; // serve the UI at root
    c.SwaggerEndpoint("/v1/api-docs", "V1 Docs");
});

app.UseEndpoints(endpoints =>
{
    endpoints.MapControllers();
    endpoints.MapSwagger("{documentName}/api-docs");
});
? 效果图
运行项目,打开 https://localhost:5001/index.html#/home
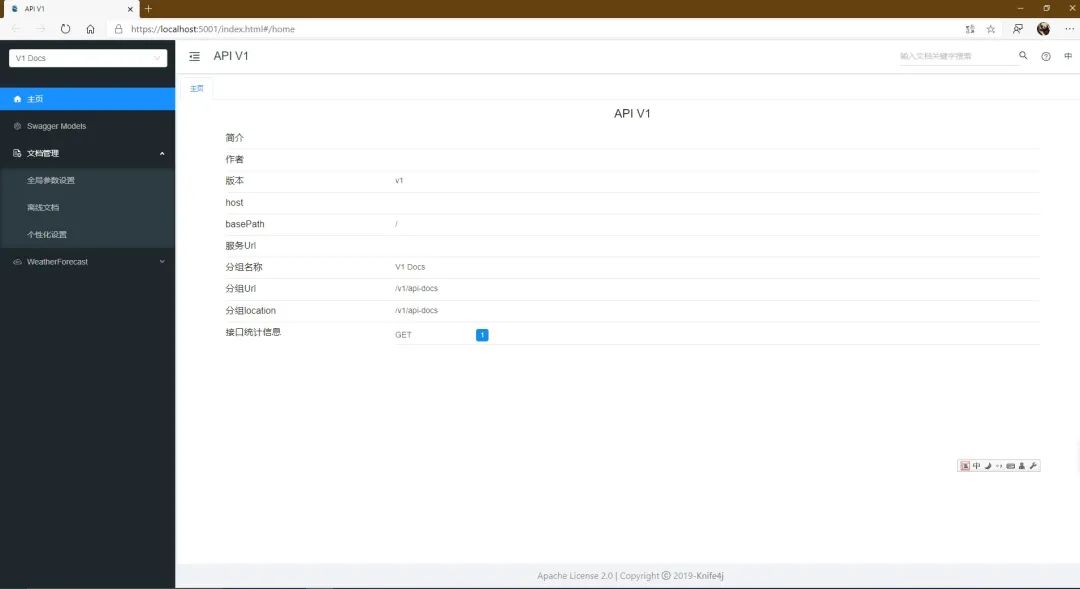
更多配置请参考
https://github.com/domaindrivendev/Swashbuckle.AspNetCore
更多项目


为什么不能在代码中使用「User」这个单词?
刷知乎摸鱼?推荐这个VSCode神器

推荐:3款爬虫神器插件

最全C#自学资源汇总
