
Kubevela VelaUX 的 Plugin 机制及实现原理
作者:李艳芳,中国移动云能力中心软件研发工程师,专注于云原生、微服务、算力网络等
Kube Vela 是 一 个现代化应用交付与管理平台。 VelaUX 以KubeVela addon的形式存在为 KubeVela 提供了可 视化的 UI 控制台操作能力,大大降低了KubeVela的使用门槛,使得用户只需通过页面上操作就可完成应用交付与管理。 为了满足用户的各种不同需求,VelaUX同样提供了一种扩展机制,使得用户可以定制化自己的UI控制台,就是Plugin机制。 本文介绍Plugin的开发和实现原理。
一、什么是Plugin机制
简单来说,Plugin机制提供了一种框架用户通过开发自己的Plugin可以为VelaUX新增自定义页面。如下图,VelaUx本身是没有节点管理这个页面的,现在我们可以开发一个Plugin,为VelaUX新增这样一个页面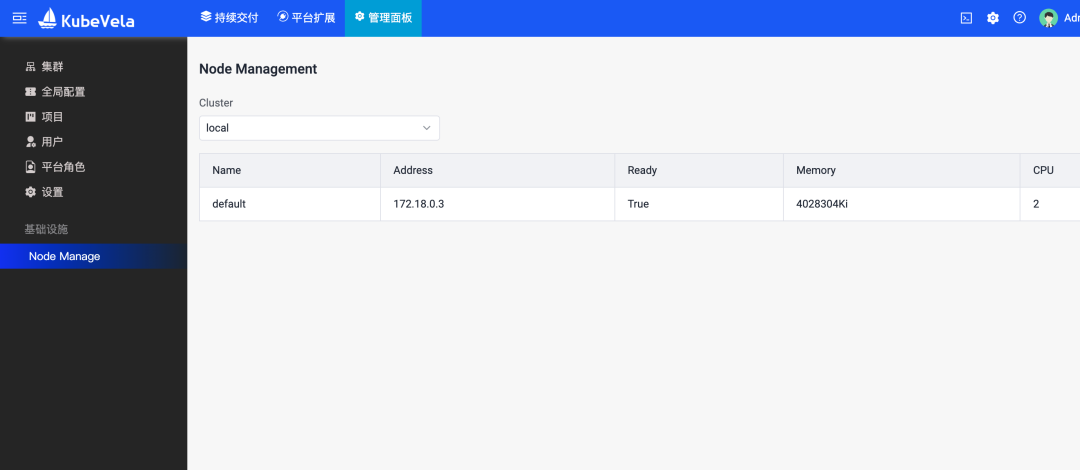
二、怎么开发一个Plugin
社区提供了Plugin的模版,我们可以从克隆一个Plugin模版开始开发。从地址 https://github.com/kubevela-contrib/velaux-plugin-template 克隆一个Plugin下来,我们看到一个Plugin的目录结构如下:
      src
  asset
  components
  App
    index.less
    index.tsx
  PluginConfing
   index.ts
  module.ts
  plugin.json
package.json
其中:
- plugin.json是Plugin的元数据如:Plugin的名字、id、描述信息以及其他相关信息。
- module.ts中的内容一般无需修改。开发完成的Plugin作为js的一个模块存在,通过模块加载机制将Plugin页面加载到VelaUX主控制台中,module.ts就是该js模块的入口,主要是定义了一个AppPagePlugin对象,VelaUX渲染Plugin的时候就是通过该对象获取具体需要渲染页面内容。
- components文件夹下App目录和PluginConfig目录分别用来编写新扩展的页面和其配置页面,跟开发普通的页面没有什么区别。继续看App/index.tsx文件可以看到定义了一个App组件,该组件就是要新扩展的页面组件。
在开发页面组件或页面配置组件时,如果需要调用Vela Apiserver本身的接口只需要通过getBackendSrv().get('/api/v1/clusters')方式调用即可:
      import { getBackendSrv } from '@velaux/ui';

getBackendSrv().get('/api/v1/clusters').then(res=>{console.log(res)})
想使用VelaUX中已经写好的React组件也是像如下直接引用即可:
import { Table, Form } from '@velaux/ui'
完成Plugin开发和build后只需要在启动VelaUX的命令后通过--plugin-path参数制定插件等位置,新扩展的页面就显示到VelaUX控制台中了。
三、VelaUX Apiserver中本身提供的接口不够用怎么办
有时候我们会发现需要使用的接口VelaUX并没有提供,比如实现一个对集群的监控页面需要调用K8S本身的API接口,VelaUX本身的API是没有提供的,这时就需要借助VelaUX的Plugin机制。Plugin机制内部通过反向代理可以将接口转发至需要的K8S Apiserver或者自定义的服务上。
如果需要新的API支持,开发Plugin的时候需要修改Plugin元数据,即在plugin.json文件中添加"backend"、"backendType"字段。backend设置为true代表需要后端接口支持。backendType用来指定API的类型,有两个取值:"kube-api"和"kube-service",分别代表将请求转发至K8S Apiserver上和自定义的服务上。接口调用时也需要在路径前加上"/proxy/plugins/${pluginID}",如下所示:
getBackendSrv().get(`/proxy/plugins/${pluginID}/${realPath}`).then(res=>{console.log(res)})
通过查看VelaUX的启动过程可以发现,如果请求接口的路径前缀是"/proxy/plugins/",VelaUX为其进行了特殊处理-通过proxyPluginBackend方法进行处理
      func (s *restServer) ServeHTTP(res http.ResponseWriter, req *http.Request) {
    ....
    switch {
    case strings.HasPrefix(req.URL.Path, "/proxy/plugins/"):
        utils.NewFilterChain(s.proxyPluginBackend, api.AuthTokenCheck, api.AuthUserCheck(s.UserService)).ProcessFilter(req, res)
        return
proxyPluginBackend方法通过调用router.GetPluginHandler注册了Plugin的plugin.json中配置的路由规则,并交由pluginBackendProxyHandler处理
      func (s *restServer) proxyPluginBackend(req *http.Request, res http.ResponseWriter) {
    plugin, err := s.PluginService.GetPlugin(req.Context(), pluginID)
    // Register the plugin route
    router.GetPluginHandler(plugin, s.pluginBackendProxyHandler).ServeHTTP(res, req)
}
pluginBackendProxyHandler中新建了一个PluginProxy对象pro, 并由该代理对象处理请求
      func (s *restServer) pluginBackendProxyHandler(w http.ResponseWriter, r *http.Request, p httprouter.Params, plugin *plugintypes.Plugin, route *plugintypes.Route) {
    ...
    pro, err := proxy.NewBackendPluginProxy(plugin, s.KubeClient, s.KubeConfig)
    ...

    r.URL.Path = strings.Replace(r.URL.Path, "/proxy/plugins/"+plugin.PluginID(), "", 1)
    r = r.WithContext(context.WithValue(r.Context(), &proxy.RouteCtxKey, route))
    pro.Handler(r, w)
}
至此能看到所有路径以"/proxy/plugins/"开头的请求,VelaUX都为其新建了代理,通过代理转发到相应的RESTFull服务上。
从NewBackendPluginProxy方法中可以看到VelaUX根据plugin的BackendType字段创建对应类型的代理。Plugin机制目前实现了两种类型的代理:KubeAPI类型和KubeService类型。KubeAPI类型的代理可以将请求转发至K8S Apiserver上,KubeService类型代理可以将请求转发至自定义服务上。
      func NewBackendPluginProxy(plugin *types.Plugin, kubeClient client.Client, kubeConfig *rest.Config) (BackendProxy, error) {
    p, ok := proxyCache[plugin]
    switch plugin.BackendType {
        case types.KubeAPI:
            p, err = NewKubeAPIProxy(kubeConfig, plugin)
            if err != nil {
                return nil, err
            }
        case types.KubeService:
            p = NewKubeServiceProxy(kubeClient, plugin)
        default:
            return nil, ErrAvailablePlugin
    }
    proxyCache[plugin] = p
    return p, nil
}
继续查看KubeServiceProxy的Handler方法发现,VelaUX通过kubeClient去集群上查找指定NameSpace下端口为指定端口的Service服务。该Service服务的服务地址http://ClusterIP:Port就是请求将要被转发到的目的地址,保存在变量k.availableEndpoint中。
              var service corev1.Service
        namespace := k.plugin.BackendService.Namespace
        name := k.plugin.BackendService.Name
        if namespace == "" {
            namespace = kubevelatypes.DefaultKubeVelaNS
        }
        err := k.kubeClient.Get(req.Context(), apitypes.NamespacedName{Namespace: namespace, Name: name}, &service); err != nil {

        matchPort := service.Spec.Ports[0].Port
        if k.plugin.BackendService.Port != 0 {
            havePort := false
            for _, port := range service.Spec.Ports {
                if k.plugin.BackendService.Port == port.Port {
                    havePort = true
                    matchPort = k.plugin.BackendService.Port
                    break
                }
            }
        }

        availableEndpoint, err := url.Parse(fmt.Sprintf("http://%s:%d", service.Spec.ClusterIP, matchPort))
        if err != nil {
            bcode.ReturnHTTPError(req, res, bcode.ErrNotFound)
        }
        k.availableEndpoint = availableEndpoint
接下来就是以k.availableEndpoint为目标地址新建一个反向代理,这样该Plugin相应的接口就都转发到了所指定的NameSpace下的端口为指定端口的Service上。
          director := func(req *http.Request) {
        var base = *k.availableEndpoint
        base.Path = req.URL.Path
        req.URL = &base
        if route != nil {
            // Setting the custom proxy headers
            for _, h := range route.ProxyHeaders {
                req.Header.Set(h.Name, h.Value)
            }
        }
        // Setting the authentication
        if types.Basic == k.plugin.AuthType && k.plugin.AuthSecret != nil {
            if err := k.setBasicAuth(req); err != nil {
                klog.Errorf("can't set the basic auth, err:%s", err.Error())
                return
            }
        }
        for k, v := range req.URL.Query() {
            for _, v1 := range v {
                base.Query().Add(k, v1)
            }
        }
    }
    rp := &httputil.ReverseProxy{Director: director, ErrorLog: log.Default()}
    rp.ServeHTTP(res, req)
}
KubeAPIProxy实现类似,这里不再赘述。
四、Plugin的加载过程
总的来说Plugin的加载过程就是:
1、就是从先从指定目录下遍历查找并读取plugin.json文件内容,并创建对应的plugin对象
2、判断是否是需要KubeAPI类型的后端支持,如果是就为其创建对应的ClusterRole/ClusterRoleBinding资源
下面就是加载plugin的代码,p.loader.Load一行完成了plugin的加载和plugin对象的创建,range循环部分通过判断plugin类型,按需初始化plugin角色,其实就是创建对应的ClusterRole/ClusterRoleBinding资源对象。
      func (p *pluginImpl) LoadNewPlugin(ctx context.Context, s types.PluginSource) error {
    plugins, err := p.loader.Load(s.Class, s.Paths, nil)

    for _, plugin := range plugins {
        if plugin.BackendType == types.KubeAPI && len(plugin.KubePermissions) > 0 {
            if err := p.InitPluginRole(ctx, plugin); err != nil {
               .....
            }
        }
        err := p.registry.Add(ctx, plugin);
    }
    return nil
}
从下面代码中可以看到,加载plugin的过程就是:先从指定目录下遍历查找dist目录下的plugin.json文件并读取plugin.json中的内容,保存在foundPlugins变量中, 然后为找到的所有plugin创建的对应的plugin对象
      pluginJSONPaths, err := l.pluginFinder.Find(paths)
for _, pluginJSONPath := range pluginJSONPaths {
        plugin, err := l.readPluginJSON(pluginJSONPath)
        pluginJSONAbsPath, err := filepath.Abs(pluginJSONPath)
        foundPlugins[filepath.Dir(pluginJSONAbsPath)] = plugin
    }

loadedPlugins := make(map[string]*types.Plugin)
    for pluginDir, pluginJSON := range foundPlugins {
        plugin := createPluginBase(pluginJSON, class, pluginDir)
        loadedPlugins[plugin.PluginDir] = plugin
    }
五、Plugin的渲染过程
VelaUX中Plugin机制定义了路由规则,所有的Plugin页面的路由地址都是"/plugins/:pluginId",pluginId是Plugin的id,而且都通过AppRootPage这个组件来渲染,如下代码:
       <Route
        path="/plugins/:pluginId"
        render={(props: any) => {
          return <AppRootPage pluginId={props.match.params.pluginId}></AppRootPage>;
        }}
      />
AppRootPage组件中会去加载相应的plugin并赋值给常量app, 而app.root就是Plugin中用户开发的需要在页面上渲染的内容,也就是我们在开发plugin时定在components目录下定义的页面App组件。
      function RootPage({ pluginId }: Props) {
  const [app, setApp] = React.useState<AppPagePlugin>();
  React.useEffect(() => {
    loadAppPlugin(pluginId, setApp);
  }, [pluginId]);

  const AppRootPage = app.root
  return (<AppRootPage meta={app.meta} />);
}
怎么可以确认app.root真的是我们新定义的App组件呢?我们可以查看我们定义插件时的mudule.ts文件,其中new了一个AppPagePlugin对象,并调用了setRootPage方法并将App作为参数,而此App就是我们在components中定义的App组件
      import { App } from './components/App';
export const plugin = new AppPagePlugin<{}>().setRootPage(App).addConfigPage({
 ...
});
查看AppPagePlugin类型的定可以看到其方法setRootPage就是将接收到到参数赋值给root属性。
      export class AppPagePlugin {
  setRootPage(root) {
    this.root = root;
    return this;
  }
}
至此我们的Plugin页面已经渲染出来的。这里还有一个疑问就是RootPage是如何将Plugin资源加载进来的?这里是使用了SystemJS模块加载器,通过SystemJS.import(path)加载进来的模块内容,就是Plugin定义中的module.ts中导出的内容,即:AppPagePlugin类型的对象。
      async function importPluginModule(path: string, version?: string): Promise<any> {
  return SystemJS.import(path);
}
function importAppPagePlugin(meta: PluginMeta): Promise<AppPagePlugin> {
  return importPluginModule(meta.module, meta.info?.version).then((pluginExports) => {
    const plugin = pluginExports.plugin as AppPagePlugin;
    plugin.init(meta);
    plugin.meta = meta;
    return plugin;
  });
}
至于Plugin中用到的其他依赖,则是通过SystemJS.registerDynamic提前将这些依赖注册进来的。
      export function exposeToPlugin(name: string, component: any) {
  SystemJS.registerDynamic(name, [], true, (require: any, exports: any, module: { exports: any }) => {
    module.exports = component;
  });
}
exposeToPlugin('lodash', _);
exposeToPlugin('moment', moment);
exposeToPlugin('@velaux/data', velauxData);
exposeToPlugin('@velaux/ui', velauxUI);
exposeToPlugin('react', react);
exposeToPlugin('react-dom', ReactDom);
exposeToPlugin('redux', Redux);
exposeToPlugin('dva/router', DvaRouter);
至此Plugin页面的渲染已经全部完成,至于菜单的渲染就容易了,只需要在渲染菜单之前获取一下Plugin列表,并根据相关菜单配置生成菜单项并渲染即可
      loadPluginMenus = () => {
    if (this.pluginLoaded) {
      return Promise.resolve(this.menus);
    }
    return getPluginSrv()
      .listAppPagePlugins()
      .then((plugins) => {
        plugins.map((plugin) => {
          plugin.includes?.map((include) => {
            if (!this.menus.find((m) => m.name == include.name)) {
              const pluginMenu: Menu = {
                workspace: include.workspace.name,
                type: include.type,
                name: include.name,
                label: include.label,
                to: include.to,
                relatedRoute: include.relatedRoute,
                permission: include.permission,
                catalog: include.catalog,
              };
              this.menus.push(pluginMenu);
            }
          });
        });
        this.pluginLoaded = true;
        return Promise.resolve(this.menus);
      });
  };
小结
Plugin机制是VelaUX提供的一种扩展机制,本文介绍了如何开发一个Plugin,并通过对接口代理转发、Plugin的加载、渲染等过程的代码分析介绍了Plugin的核心实现原理。